
Using a Regular Loaf Pan in a Zojirushi Bread Machine
Baking in A Regular Loaf Pan in a Zojirushi Bread Machine. Mine is a BB-PAC20 Virtuoso.
Okay, here's teaching an old dog new tricks. It was hot, I didn't want to bake in the regular oven, but I wanted to bake in a 9 x 5 loaf pan. My toaster oven always gets the top of the loaf too dark or burns it by the time the interior is done. I had used the Zojirushi Virtuoso bread machine's manual dough cycle to knead the dough. Then I put the sourdough in a regular loaf pan to rise in the regular off oven. I was making sourdough sandwich bread. Now it was ready to bake, but I didn't want to heat up the house with the conventional oven.
.
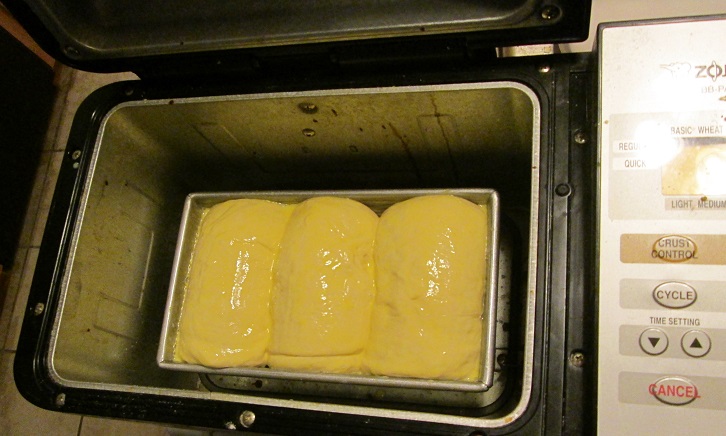
It looked like a 9 x 5 inch loaf pan would fit in the Zo bread machine with the Zo's mixing/bread basket removed.
I ran a manual bake cycle for 70 minutes. Placed the 9 x 5 loaf pan of sourdough in the bottom of the Zo. The loaf pan rested on the square raised fixture that surrounds the posts that spin the mixing paddles. Those posts are so short, they didn't touch the bottom of the loaf pan. It sat there perfectly as if it were made for a 9 x 5 loaf pan. The heating element surrounded the loaf pan perfectly. I put the loaf pan in the Zo and ran the manual bake cycle. It stated out cold, not preheated.
.
70 minutes later, I have a perfect loaf a bread, baked in a regular 9 x 5 loaf pan in the bottom of the Zo. The top is nicely browned. The loaf is a regular shape, not a bread machine shape. Best of all, my house didn't heat up.
.
So that's another use for the Zo bread machine. In addition to mixing the dough, it can bake a regular 9 x 5 inch loaf pan of bread. Next time, I will let it rise in the regular loaf pan in the Zo. Actually the top rim of the loaf pan is 9 1/2 x 5 1/2 inches. In the Zo BB-PAC20 Virtuoso there is about an inch of clearance on all the side walls from the loaf pan.
.
I've baked several loaves by this method and it's worked great each time. I now let the dough rise in the loaf pan, while it's sitting in the the closed, off, bread machine, in addition to baking in the bread machine.
Here's a picture of Japanese Milk Bread rising in a 9 x 5 inch loaf pan in my Zo Virtuoso. When it rose enough (1/2 inch over rim of loaf pan) I baked it for 70 minutes. This keeps the house cool and makes a more attractive loaf.


They are neat machines. I enjoy the heck out of mine.
I still like the "set it and forget it" part of the bread machine, but that's someting to think about.
Thanks for posting!
Glad to see others expanding the potential of the ZO bread machine. I've been playing around with removing the paddles, before the final stir down, to reduce the tear-out on the loaf bottom. Yet even with baking spray on the hubs, the dough still sticks. I'll try using a loaf pan, as suggested, along with warming the loaf pan (hot water bath) prior to use. Thanks for the idea.
BTW thanks for the Tanzhong formula, I;ll be trying that soon.
Jim
During the final rise, I've removed the paddles also. The bread always stuck to the bare posts, but a little water soak after baking and cool down cleans them off. But, now with the 9 x 5 inch loaf pan trick, I don't have that problem anymore.'
I wonder if you could program a manual warming cycle before manual baking? I will have to look into that.
Tried using my own 1 lb. loaf pan (Williams-Sonoma Goldtone nonstick) inside Of Zo Virtuoso.
Worked great! Used Zo pan for kneading. Used Homemade Setting to set up a cycle: 15 minute warmup, 20 min. knead, "shape loaf" turned on and removed dough and placed in my own pan, then placed pan in Zo (fit very easily resting on square bracket in bottom); Rise1-45 min., Rise2-20 min.,Rise3-15 min., added egg wash at beginning of bake, bake for 60 min. (Although I pulled it out at 50 minutes). Done perfectly, perfect shape, perfect bottom.
So I did this blindly, with little pre-thought... Just kind of copied (but not exactly) the Zo's own basic cycle... And it worked perfectly. No paddle holes, no misshapen loaf, fully, perfectly formed and baked! Yahoo! Now I can fine tune the rises and bake time a little bit.
This is a small loaf, but perfectly risen. I'm anxious to see how a big loaf (1.5 lb. ) will do.
hello! i'm so excited to search this through google. it's exactly what i was hoping to find. such a waste to use the zo just for dough and i love the sandwich bread shape :)
i did as everyone mentioned. custom program on the zo.
i realized during 2nd & 3rd rise, since we put the shaped dough into the pullman tin, the dough is skipping the "punch down" cycle since it is no longer in the zo baking pan with paddles. is that ok? will missing the "punch down" mess up the bread?
I'm dying to try my Pullman 9x4x4 pan in the Zo instead of the Zo bread pan but I can't wrap my mind around why three rise cycles are being used with a different pan and the paddles not installed. If it's not being stirred down, doesn't that mean there is just one VERY long rise cycle that is a combination of the three times?
Also, I see the same problem in the Zo manual that is explaining how to set up homemade cycles like the cinnamon roll bread where you are told to remove the paddles before the 3 rise cycles and yet why oh why if the paddles are missing?
Please help me figure this out.
I'd been wondering the same thing. Did you get an answer?
deleted
I found this interesting post through a Google search and it addressed one of my problems - namely, after removing the dough, then removing the paddles, reinserting the dough and finishing the last rise followed by baking in the Zojirushi bread pan, I still had significant holes torn in the loaf due to bread adhering to the remaining shafts. The original poster's regular pan solution was fine, but only for small 1.0 pound loafs. The larger loaves heavily mushroomed or flowed everywhere. I began a search for a taller pan that would fit the effective dimensions of the Zojirushi Virtuoso pan, but still had a small enough base so as not to contact the heating elements when resting on the machine's pan support structure. I even entertained the possibility of purchasing a Zojirushi replacement bread pan and modifying it to remove the paddle drive shafts and filling the holes! (Too expensive!)
Fortunately, I found that the commercial 6 inch deep 1/4 size steam table pan was just the size needed. I purchased a Vollrath (part number 30462) 6" deep, Super Pan V Stainless Fourth Size steam table pan for $27. It fits perfectly in the Virtuoso Breadmaker as can be seen in the two enclosed photos.
Above is a photo of the Vollrath pan inserted in the Zojirushi Virtuoso Breadmaker. For comparison, the following photo is that of the Zojirushi bread pan lying next to the Vollrath pan showing relative size and depth.
The top opening of the Vollrath pan is 9.375 x 5.375 inches and, of course, it's 6 inches deep. The sidewalls slope inwards at 3 degrees and the stainless finish currently (2 experiments) does not bond to the bread loaf, giving an easy removal.
The flat bottom of the steam table pan is 7.75 x 3.75 inches while the bottom before curvature is 8.75 x 4.75 inches. The radius of curvature at the bottom of the pan is 0.5 inches. As a result there is no interference or contact with the heating elements.
When the Vollrath pan is inserted in the bread maker, there is 3/8" clearance to the sidewalls of the oven area on the long dimension of the pan and 1/2 inches of clearance on the narrow dimension.
Thus far, the thermal characteristics of the stainless Vollrath pan and the non-ferrous Zojirushi bread pan seem quite similar as there is no observed difference in crust color or thickness when comparing loafs prepared in either pan.
Hope this is helpful to some amateur such as I!
That’s a great bread machine hack!
I just got a Williams Sonoma W0598. Dang, I should have gone 'Zo'!!!
Hi,
This is an old post but I heard about using the zoji for baking.
I had a bit of starter (enough for 300 gr of flour). When the dough was just about risen in a pan, I programmed the zoji for 10 min preheat followed by a 40 min bake. I was so surprised to see it rising during the preheat and then go into the bake. I just laid the pan on the metal base of the zoji and the pan was held above the coils.
However in the last 15 min of the bake, I saw the coils dim and I assumed the bake temps would go down. I took the temp of the bread and it was only 128F. I hurriedly turned on the toaster oven and finished the bake at 400F in about 15 min. The bread was great!!
I will set the zoji for a 70 min bake next time. What a convenience the machine was!!
Which model Zoji do you have? I just stumbled onto this idea. Sounds like a good reason for getting a Zoji.
This picture shows the browning on the top of a loaf baked in the Zojirushi. I think I would get a higher rise and nicer top color in the oven ... crumb tomorrow. The recipe says 100% whole wheat but there is 3.5% blue corn masaseca. Dough filled 3/8 pan before final rise. Zoji temps stay around 350-400F during periodic checks. Flas (4 days old) is a great dough conditioner and pretty carefree.
next day crumb
This show the same dough baked in the oven vs in the zojirushi. There is almost a 1 inch rise difference in height.
That looks great to me. The rise is what I prefer as well. In my 4 inch tall pan I consider a 5 inch tall loaf to be perfect.
Thanks for sending the photos.
Hi,
I have an older model BB CEC-20, white, like the one at
https://www.ebay.com/itm/334224635874?mkevt=1&mkcid=1&mkrid=711-53200-19255-0&campid=5338678874&toolid=20006%26customid%3Ds%253AGS%253Bgc%253A6ecebf86...
I would say though that the bake is fine but the top did not brown very nicely though the sides did.
I did take the temps during the bake. I set it for 70 min (the max) and a 9 x4x3 loaf took about 50 min. There is no way to change the temps for a 2 stage bake (as to lower temp). There was a fluctuation from 315-400 as it tried to maintain its preprogrammed target.
I think getting a bargain one at a goodwill store would be worth it but for 300 not so sure. Mine was a discard by a friend who had it for years but couldn't get a satisfactory end product. I love it for mixing clas and flas recipes (the suggested 10-10-10 min method worked really well for me) and the loaf bakes are fine for me too.
I'll be trying it for a flas bread this afternoon.
Oh, what a great tip. I recently purchased a Zojirushi Virtuoso; it should arrive tomorrow.