December 2, 2008 - 9:56pm

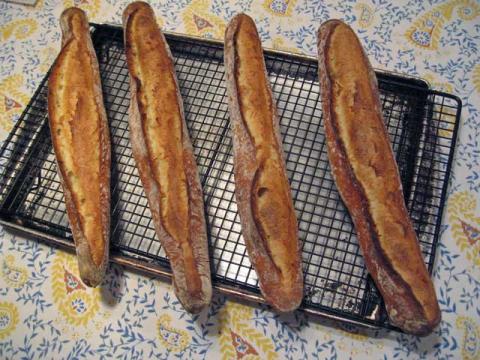
Ficelles made with Anis Bouabsa's baguette formula


- Flour500 gms Giusto's Baker's Choice
- Water375 gms
- Yeast1/4 tsp Instant
- Salt10 gms
- Mix flour and water and autolyse for 20 minutes.
- Add yeast and mix by folding dough in the bowl.
- Add salt and mix by folding dough in the bowl.
- Mix dough by folding and stretching in the bowl for 20 strokes. Repeat this 3 more times at 20 minute intervals.
- Refrigerate dough, covered tightly, for 21 hours.
- Divide into 4 equal parts and preshape gently for baguettes.
- Allow preshaped pieces to rest, covered with plastic, for 1 hour.
- Shape into ficelles (short, thin baguettes).
- Proof en couche or on parchment paper dusted with semolina for 45 minutes.
- Pre-heat oven to 500F with baking stone in middle rack and a cast iron skillet and a metal loaf pan on the lowest rack. Preheat 45 minutes or longer before baking.
- 3-5 minutes before baking, place a handful of ice cubes in the loaf pan. Shut the oven door. Bring water to a boil.
- Transfer the ficelles to a peel and load them onto the baking stone. Pour one cup of boiling water into the skillet. Close the oven door.
- Turn the oven down to 480F.
- After 10 minutes, remove the loaf pan and the skillet from the oven.
- Continue baking for another 10-15 minutes until the loaves are nicely colored, the crust is hard all around and the bottom gives a hollow sound when tapped. Internal temperature should be at least 205F.
- Cool on a rack completely before slicing.
Share


Comments
Here is the picture of the scored dough before it was sent in the oven:
http://www.flickr.com/photos/33569048@N05/sets/72157618981352446/
Makes a perfect illustration of your 'wrong' sample.
I bought the following three Giusto flours on my way home:
Ultimate - high protein whole wheat - $5.99 / 5 lbs
high protein fine whole wheat - $3.69 / 5 lbs
Baker's Choice (organic unbleached?) - loose - $1.29/lb
BTW, my Super Peel has arrived. Hopefully this will end my frustration of loading slack baguette dough onto the stone. Then I don't need the baguette pan anymore.
I'll keep you posted of my results. Thank you very much.
Yippee
David:
I've put your scoring skills to use for the first time. The results were encouraging. Please visit my blog entry 090602 Sourdough Rye Bread.
Your baguettes are on the way. Thank you very much.
Yippee
Hi, Yippee.
I saw your rye. It looks wonderful! I'm looking forward to seeing your baguettes.
David
David:
My baguettes were over proofed last night and did not have much oven spring. Therefore, the 'ears' did not show at all. I'll redo it and keep you posted. Thank you.
Yippee
David:
I may have failed the scoring test but the taste and texture of these baguettes were phenominal. My kids have told me that these were the best tasting baguettes I've made so far.
Hope my next batch would be picture perfect as well.
Yippee
It will all come together for you. I have complete confidence, having seen the other beautiful breads you have made.
Positive reviews from your "customers" is always energizing, of course.
David
David:
Please visit my blog to see my last attempt in making your baguettes. Thanks again for your help!
Yippee
You are definitely making the fast progress I expected of you!
David
Thanks for all the wonderful help here. After my 5th loaf I've made some progress using
Hamelman's “Stretch and Fold in the Bowl” no-knead technique
After 21 hours my dough had more air, bubbles, and activity that I had ever seen. I wasn't really sure where to go from there hoping to not mess it up so I went back to recipe written above (and cut and pasted steps7-16 below, now numbered 1-10).
I divided the dough into 4 pieces VERY CAREFULLY as instructed but felt like I lost some of the air and bubbles. After resting for an hour I VERY CAREFULLY "shaped into ficelles" and here I felt like I lost even more air and bubbles. i DON'T THINK i EVER RECOVERED FROM THERE AS (please excuse the caps) as during the resting times I never got any more rise. Could someone please go into more detail about how to exactly proceed following the 21 hours in the fridge. I felt like I was so close only to watch it go out the window after waiting the 21 hours. The taste was good, the crumb was fair but my bread didn't "Blow" like I want it to. Any help is Greatly Appreciated. Thanks.
Hi, MISSiShrimpi.
I'm not clear as to what didn't work. You got good taste and good crumb. What wasn't good? Photos would help.
What you describe is little expansion during proofing, as I understand it. This could be just that you needed to give the baguettes more time. It might also be that your weren't gentle enough in pre-shaping and shaping them. This takes practive.
When you say they didn't "blow," are you talking about oven spring?
David
curious David. Why both the skillet with boiling water and the ice cubes in the pan? Just for the quantity of steam?
I normally steam by adding some water to a pyrex pan while the oven comes to temp, then add 2 or 3 cups to the pan at bake time for the first 10 mins.
I assume that the cast iron isn't "injured" with this use?
As it happens, I'm not using that technique any more. However, the idea is to have the oven humid when you load it and to have a burst of steam right after loading. What you are doing probably accomplishes the same thing. However, you are not going to be getting the burst of steam with pyrex that you do with cast iron - especially with the lava rocks.
We have pretty hard water, so the cast iron skillet gets mineral deposits. I bought a new skillet to use just for oven steaming.
David
Hi David,
Just a few questions before I try this on the weekend:
Where do you get these plastic scrapers?
Any recommendations, from you or others on shaping these sticky boogers when you have limited space? Love the stretch/fold in the bowl method while living in my RV but still figuring out where the heck I'm going to work with my doughs.
I'm going to be trying this on my outdoor gas grill so any extra suggestions regarding this would be appreciated as well. My plan is to pick up some saltillo tiles to cover the grill grates and then place these ficelles on a cookie sheet with parchment paper.
Hoping I love this recipe, can use it as my everyday practice recipe to learn how to work with stretchy rye dough without the expense of wasting so much rye.
Do you have a comprable whole grain recipe you could point me towards with the no-knead method?
Tracy
Hi, Tracy.
You can get plastic scrapers through breadtopia.com, just for one place. But, if you already have a rubber or silicon spatula, that works fine.
I have no experience baking on a grill and no experience with the no-knead method with whole grains.
David
Hi, Marie.
The baguettes look very good. Lovely crumb!
The problem with your scoring is not that it's too shallow. For classic baguette scoring, the cuts need to be almost parallel to the long axis of the loaf and overlapping about 1/4 of their length. Like this:
I hope this helps.
David
I will keep this in mind. I definitely was not scoring right. I can't wait to try--I know there's only so much you can do in a home oven but every little bit helps, eh?
Hi David
I'm having a bash at your baguette and was interested re the amount of fast acting yeast as the one I use in the UK (Doves Farm) suggests 1tsp per 500g of flour. Is just 1/4 tsp enough per 500g? or does the long retard make up for this......
Cheers
Steve
Hi, Steve.
I don't know if your "fast acting yeast" is the same as the SAF instant yeast I use, but 1/4 tsp. is the correct amount, and it does the job. I'm sure the long fermentation contributes.
BTW, since writing up this method, I've added two stretch and folds on the board at 45 minute intervals after the S&F in the bowl and before retardation. This has been a substantial improvement.
David
Thanks David, will try that next time as it is now retarding in the fridge, I did use 'bout 1/4 tsp for half the recipe, and will let you know how that turns out, it is quite a wet dough to work with and I did give it little stretch n fold before popping it into to the fridge. I did also add a splodge of sourdough starter (rye) for more of a pain campagne taste and as ever a little of my friends greek olive oil!, i'm also baking the Pierre Nury rustic rye tomorrow as well so hopefully plenty of good bread for the weekend cheese board and breakfasts
Cheers, Steve
Nick
Hi, Nick.
I use anywhere between 360 and 375 gms of water to make these. How the dough turns out depends on the flour and the weather. It also depends on how well you develop the gluten. For wetter doughs, a couple additional stretch and folds on the board can make a big difference.
I'd recommend you try making these a few more times using different hydration levels in the above range and see what pleases you the most.
BTW, many like the more rustic look you got. How was the crumb and flavor?
David
Thanks David!
I did an additional 2 S&Fs at 45 minute intervals as per your comment a couple posts ago and I could see a very big improvement in the gluten development when I was S&Fing the dough the last 2 times.
I used KA French Style flour and I don't think I am liking it. I want to try with AP flour and see what the difference would be. The crumb and flavor were great, better than any Pain a l'ancienne I have made in the past with the same flour. I have no problem working with slack dough and I am really great at getting the rustic look but some day I would like to make some pretty baguettes, haha.
Is this the same formula you use for making regular French baguettes?
Nick
Hi, Nick.
KAF French-style flour is relatively low gluten and makes an exceedingly extensible dough. This is desirable for shaping baguettes, but it works best at about 65% hydration. It doesn't absorb as much water as KAF AP, not to mention Bread Flour. You might like the flour better at lower hydration.
I've made baguettes using 6 or 8 different formulas. The ones I like best are Bouabsa's, Gosselin's and proth5's. All are good. Each is different. I have descriptions and formula's for all of these on my TFL blog. If you really like making baguettes, and If you want the most traditional baguettes, try proth5's. They are made with levain (no added yeast) and are wonderful, if you have all the techniques. For me, they had the best flavor second to the Gosselin's which are quite slack and challenging to mix but have amazing flavor.
David
Nick
Can you recommend a recipe with 50g of ww flour?
Currently I have a bag of Pills BfB that's, I'd guess, a little lower in the protein level then is desired. Should I substitute some KAB?
metropical,
If you have BBA the Poolish Baguettes recipe is a WW French bread. I have not made it but I have heard good things about it. Or, you can make Reinhart's Pain de Campagne. It's 15.8% whole wheat flour, and is awesome. I make it all the time and you can shape it any way you want.
Also, I don't see why you can't use any of these baguette recipes and substitute 50g of WW in for some of the regular flour. I know a lot of people substitute some Rye or WW for some added flavor in their baguettes with great results.
I believe BFB is a bread flour and it is higher protein than AP flour.
Tell me how it goes and post some pictures.
Nick
David, Your bread is always so sweeet (in teenage vernacular that means fantastic, wonderful, beautiful,etc) I aim for that beautiful color but don't always achieve it. What is your best suggestion for consistent color ??
Thanks, Pam
How to get crust color like mine consistently? I dunno. Follow my formula and procedures?
I could give you a general overview of factors influencing crust color, but it might be more helpful if you tell me what problem you are having with your crust.
Meanwhile, think about this: Assuming you haven't done anything bizarre with your dough like radically over-proofing it, you can control crust coloration by manipulating time and temperature.
Let's say you are baking baguettes of 250 g for 25 minutes at 440ºF. You want a darker crust. You might raise the temperature to 460º and bake for 22 minutes.
Fiddle with it. You should be able to get your bread just as you like it.
David
David, Frankly, it new occurred to me to raise the temperature. Thanks for a great idea. Pam
My ficelles are fresh out of the oven. When I opened the oven to pull out the steam pan, I saw that the tips of the ears were already getting very dark (this happens to me too on very sunny days with no hat, but I decided that sunscreen would not help the bread in any way). So I turned the oven to 430 on convection for the rest of the bake and baked a few extra minutes. My only other problems were shaping, proofing, scoring and transferring the loaves to the oven. This is the slackest dough I've worked with, and four 13 inch ficelles did not go easily onto my improvised (parchment over towel) couche, not did they want to be slashed prettily, not did they fit well on my baking stone.
Other than that, it was a marvelous bake and they look great (if a bit dark in places). I'll report on taste (the thing that matters most) and post pix on my blog tomorrow.
Glenn
are you letting the dough come to room temp after 21 hours or are you going right into preliminary shaping?
thanks for the help.
Hi David,
Your bread has really been working out well, but I would like to make a larger loaf as my family really likes sandwiches. I'm assuming (usually a big mistake) that I will need to lower the temp and time a bit. I would appreciate your input on this.
I will be taking a few classes with Mr. Hamelman over the next few months and will share my experience when I return. Thanks for the help
Tad
Hi, Tad.
If you want to make a larger loaf using Boabsa's method, I suggest you look at this:
http://www.thefreshloaf.com/node/20036/san-joaquin-sourdough-updated
Baking at 460 degrees for 28-30 minutes results in the crust color I prefer. If you want a lighter crust, you could bake at 440-450 degrees for 30-32 minutes. (Assumes loaf weight of about 450-475 g.)
The San Joaquin Sourdough does not use added yeast. I assume you have an active starter. If not, you could use the Boabsa formula and just shape as boules or batards.
David
Thanks David1
Wow....it looks nice, thanks
Hi, mccvi.
I'm glad you are enjoying this bread.
The dough is sticky. If you added flour during the final shaping, it would be un-fermented. You would just end up with streaks of raw flour in the loaves. Not recommended.
Handling slack dough is an acquired skill. Frequently dusting your hands with flour or wetting them may help. In my opinion, the real key is to use a light, fast touch. The dough will stick to your hands less if they are in contact with it for an instant at a time. If the dough sticks to the board a little, just loosen it with your bench knife. If it sticks a lot, you can dust flour on the bench lightly.
Again, a light (but firm), fast touch is the key to handling this dough. You can lightly dust your hands and the bench as needed, but try to avoid incorporating raw flour in the dough during shaping.
Hope this helps.
David
Reading the recipe, that I needed unbleached flour at 11.5%; I only had unbleached whole grain flour, so I sifted out most the bran. There was still some bran in the flour. Knowing that I should have added another 6.4% extra water into the recipe. But I didn't. hence the firm result
to hold the shape during baking, I made a 'pan' from chicken wire. lined with baking paper so the bread is not touching the wire, my 'stone' is a ceremic floor tile. And that all worked really well
the dough sat pretty much still, it relaxed and was easy to roll after 21 hrs in the fridge, even after 1 hr on the bench and 45 minutes proof not much changed, only in the oven with all the steam it started to move
i used the tray to slide the wire onto the stone
This is a 3/4 oven, bit more hot than a full oven
need to cut deeper, and hold the razor blade a little more on an angle while cutting, as you can see, not enough leviation, but cooked after 12 + 10 minutes
But, I learned from the process and going to try again, this time with bleached bakers flour at 11% protein so I add 0.5gr of gluten flour per 100gr flour. I'll made the recipe with 1kg of flour, so that works out to 5gr of glutenflour xtra.
The dough was a lot softer and stickier, than my whole grain try. Which is good. Still not the results shown in the starter blog. I've taken the dough out of the fridge 2 hr before pre-shape. pre-shape 1 hr on the bench, finall shape 45 min before baking. Hot oven 260degree C. steam/ water bath for 2 minutes, spray the oven inside, stone bake a bit lower than the middle of the oven. turn the oven down to 225degree C bake 10 minutes, take out of the wire tray and place directly on the stone, bake another 12 minutes directly on the stone.
result, nice crust, nice colour, good flavour. But no where near the airy structure of the first photo. 1 I think you used more yeast than you have descibed in your recipe. 2 or you have a proofer where you under controlled temperature and humidity rise the bread before baking.
I'm going to try a sourdough next, with more leviation than in this recipe. and I will leave it on the bench for even longer.
I'll keep you posted
SD
Hi David!
I think it is here in this thread that you say something like you do two additional S&F 45 min apart on the bench? Or instead of the three S&F 20 mins apart in the bowl? And that was a big improvement for gluten development. If you have a moment would you clarify for me if I am doing
A) 3 S&F in the bowl plus 20 mins apart PLUS 2 S&F 45 mins apart on the bench or
B) only 2 S&F on the bench 45 mins apart or
C) ?
Do you find S&F on the bench to be stronger, i.e. more effective, for developing gluten?
I think it is also here that it is commented to add maybe a little, in the range of 5% rye or whole wheat flour or a combination, to approximate the flavor or texture of French flours? I dont mean trying to have a pain de champagne effect. Is this correct?
I have been reading so many threads so fast I am becoming confused where a piece of information came from...
Going to try this bread now!
Thank you!
These days, I handle the dough according to my assessment of what it needs. I think 4 episodes of S&F in the bowl at 30 minute intervals is fairly equivalent to two episodes of S&F on the bench at 50 minute intervals. But, that's for the way I do them.
With experience, you will get a feeling for dough strength as it develops during bulk fermentation and adjust your dough manipulations accordingly.
I have found that, when I make a "white" bread with American AP flour, adding 5 to 10% rye, whole wheat or a mix enhances the flavor. I have never personally baked with French flour. Very few of the breads I have eaten in France during many trips have been as good as the breads I can bake at home. The exceptions have mostly been because of the ovens they use, not the flours or fermentation, at least that's my impression.
David
Very few of the breads I have eaten in France during many trips have been as good as the breads I can bake at home. :):)!
I will bet my bottom dollar on that!
Thank you for the above guidance, its means a lot to me and it is ver helpful.
I made this recipe with but autolysing flour with 325 gms water at warm RT for 4 hours. Wanted to get the sweetening effect right away. maybe I will try a controlled experiment another time. Then added yeast and salt and remaining water and proceeded as written.
hands down, this recipe was preferred over the Gosselin one.
My baguette rustique look more like ciabatta. I have to work on that. I followed your tips on steaming ( about 10 -12mins) and got a less shiny and crisper crust (which is what I wanted). The crumb is more moist, tender yet chewy, and still very sweet. The crumb is just as open, but in a different way. For me this is a bread worth getting to know and experimenting with. I will try your SD version.
I'm sure they taste as good as they look, too.
David
Hi David,
Having returned from a trip to France a few weeks ago where I seemed to be on a mission to eat every scrap of bread in the country (which of course I failed miserably at but I did manage to stretch the belt out a notch or two) I returned to Ireland hell bent on re-creating the seemingly simplistic idea of making one of the baguettes that their boulangerie's throw out in their thousands every day. I figured it would be quite simple to find a recipe that would give me a passable home baked version but having scoured the internet for hours on end and trying multitudes of different recipes which claimed to be the real deal I was starting to think that it was just something that wasn't possible to do at home, that is until I found this recipe. I mixed up the ingredients yesterday morning using bakers % of your recipe with me reducing the flour down to 360 grams of strong white flour >12% protein (we have very different types of flour available here compared to what you seem to have in the states) and the rest of the recipe matched up at these %'s.
So the 75% hydration gave me surprisingly little trouble to stretch and fold into a very pliable dough having left it to hydrate for 5 minutes before touching it and after the 3 sets of stretch and folds I was really starting to believe that it might just work out. So following the rest of your directions to the letter I put one baguette in first this morning after about 24 hours and within a few minutes it had puffed up to twice the size of the dough I'd put in which I was very surprised to see as it hadn't changed in size at all really since I'd originally mixed it and I was really starting to doubt that the amount of yeast could have been correct.
But anyway long story short the first baguette came out and looked and smelt exactly like I had set out to try and create, the taste is incredible, really crispy crust and deliciously soft centre. I think mine are a bit thicker than the recipe may have intended so I'll probably lower the temperature after the steam pan comes out and increase the cooking time up a small bit. I really liked your idea of scoring the dough in one continuous line and as always it was the part that I've struggled with most in trying to get the lahm to actually score the dough instead of just getting stuck in it and dragging it with it.
Anyway thank you so much for sharing this recipe, it's changed how I will make baguettes forever, I'm used to making sourdough bread so not phased at all by a really long bulk fermentation time but this recipe is honestly very little actual effort. I've only found this site for the first time but I think I'm going to end up spending a lot of time on it now that I have.
Pages