
Vermont Sourdough with Increased Whole Grain
On my last two bakes I’ve used the 3-stage Detmolder process from Hamelman’s Bread. I decided I would try to use it with a white sourdough.
3-stage build Stage 1—Freshening5 hours at ~78ºF. Room temperature in SW Florida.
| Ingredients | Weight | Percentage1 |
|---|---|---|
| KA ap flour | .3 oz | 100% |
| water | .4 oz | 150% |
| mature starter | .1 oz | 50% |
15 hours at ~78ºF.
| Ingredients | Weight | Percentage |
|---|---|---|
| KA ap flour | 3.2 oz | 100% |
| Water | 2.4 oz | 76% |
| stage 1 starter | .8 oz | 24% |
3 hours at ~85ºF. This was achieved using 2 large plastic bins in a stack, with the bottom stack containing 5 inches of water and a submersible aquarium heater.
| Ingredients | Weight | Percentage |
|---|---|---|
| KA ap flour | 7.7 oz | 100.0% |
| water | 7.7 oz | 100.0% |
| stage 2 starter | 6.4 oz | 82.6% |
I mixed the Basic Sour at 10:30 P.M. on Friday and by 9:30 A.M. on Saturday it had already fallen. I stirred the starter and watched it closely until I found that it was rising again. It continued rising for the full 15 hours.
The directions call for an autolyse with all ingredients but the salt. In the past I’ve had problems integrating the salt into the dough by hand, so I held back an amount of flour and water from the autolyse. I disolved the salt in the retained water, then made a second dough with just the water, flour, and salt. After the autolyse, the two doughs were incorporated.
AutolyseAutolyse dough62.5% hydration (figuring on the levain being 100% for 5.5 oz each flour and water)
| Ingredients | Weight |
|---|---|
| KA ap flour | 19.0 oz |
| whole rye | 4.8 oz |
| water | 12.8 oz |
| levain | 11.1 oz |
64% hydration
| Ingredients | Weight |
|---|---|
| KA ap flour | 5.0 oz |
| water | 3.2 oz |
| salt | .6 oz |
2.5 hours at 78ºF with a single fold at 1:15.
ShapingI made use of my new bench board from New York Bakers. What an improvement over my hideous counter top! I think far less extra flour was incorporated into my dough, and it was far easier to work with.
I made a concerted effort to not over-work the dough during the pre-shaping and shaping stages. I have a bad tendency to work the dough too much and I think the end result may be a crumb that’s more dense than it should be.
With the loaves shaped into boules, they went into bannetons floured with a mixture of rice flour and ap, into a large plastic bag, and into the refrigerator.
Final FermentationThe entire final fermentation was conducted in the refrigerator. At 14 hours the loaf closer to the front of the fridge seemed fully proofed, or close to it. The loaf toward the back of the fridge still felt somewhat dense, but I decided to go ahead and start the bake as I’ve never gone straight from fridge to oven before. My concern was that perhaps the proofed loaf was overproofed. I knew one of the two loaves would not be ideal, but hoped that one of them would be good and that I would learn something from the difference between them.
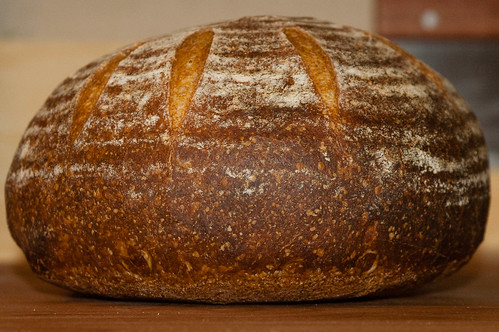
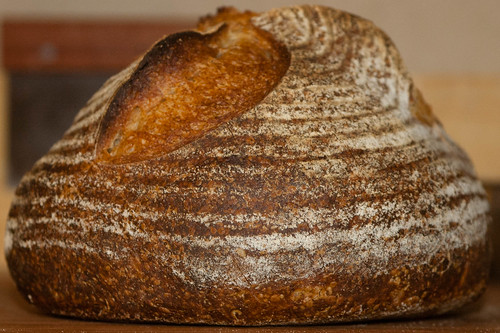
I scored the lesser proofed loaf with straight slashes radiating from aproximately 2–3 inches from center. The more fully proofed loaf was scored with arcing slashes radiating from the center. I’ve used this cut before on boules, but it proved to be an unfortunate choice.
BakeThe target bake temperature is 460ºF, so I headted the oven to 500ºF, with my new cordierite bake stone (also from New York Bakers), and my trusty rusty cast iron skillet on the bottom.
I steamed the oven with boiling water, misted the loaves, and loaded them. 30 seconds later I poured more boiling water into the cast iron skillet and found that the oven was already below 460ºF so I turned it up to 550ºF. The under-proofed bool shaped up nicely, but with insufficient rise. The fully proofed loaf’s poor slashing caused structural weakness in the top of the loaf, and it erupted into a volcano shape. I withdrew the cast iron skillet after 10 minutes and tended the oven until it caught back up to 460ºF.
In the past, I’ve cranked the temp up to 550ºF because my oven loses heat so quickly, but I’ve always ended up with a crust that’s too thick. Starting at a lower temp seemed to work better even though I was fighting with the oven to keep the temperature up.
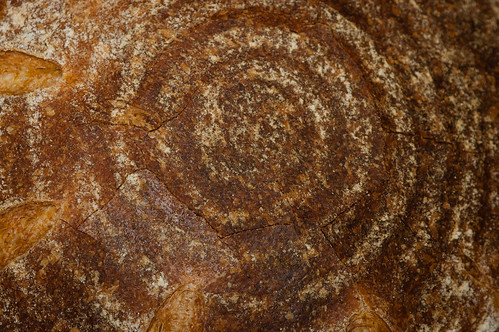
At 43 minutes the lesser proofed boule registered an internal temperature of 208ºF. I gave the bread 5 more minutes of bake time, then turned off the oven, opened the door, and left the bread for another 10 minutes in the cooling oven. When I removed the loaves, they were both at 214ºF. The crust was quite dark brown, with the edges of the arced cuts appearing black. The less proofed loaf was convex on the bottom, while the fully proofed loaf was more flat. Both crackled as they cooled.
I was concerned about the density of the lesser-proofed loaf, because it sounded solid when thumped. The proofed loaf had a nice hollow sound.
Introverted boule, crust:
Volcanic boule, crust:
Cracklin’ crust:
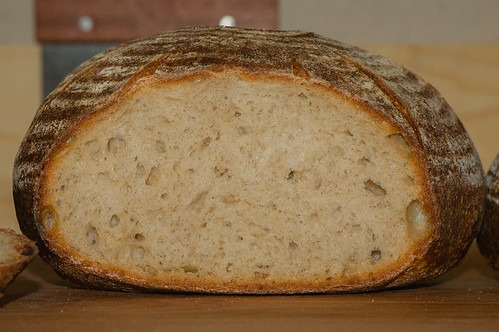
Cutting and Eating3 hours later, I found that the under-proofed loaf had a more hollow sound to it—this gave me hope. I cut into both loaves to compare. I was successful in getting a less-thick crust, though they could perhaps be even thinner. On cutting, both loaves sent crumbs everywhere.
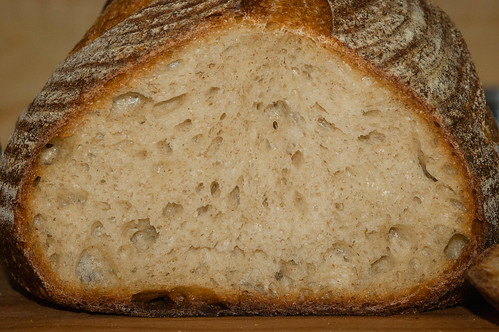
The crumb from the under-proofed loaf was too tight, but not as tight as I had feared it would be:
The volcanic loaf’s crumb showed the poorly channeled energy caused by the inappropriate scoring. You can see how the dough gasses were straining to make an escape:
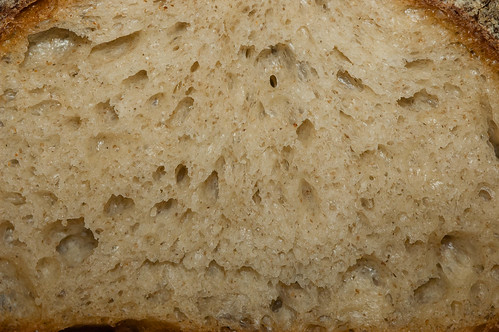
A closer view, showing the translucent, glossy holes from the long ferment:
Both loaves are delicious. On the first day, there was little sense of sour. A nutty, earthy scent and flavor is predominant, with just the slightest tang beneath it. The mouth feel, even on the denser loaf, isn’t bad, and rather enjoyably chewy. The crust is a tad thick, but dark and full of flavor and crunchy rather than tough—at least for the first day.
ConclusionI suspect that had I scored the proofed loaf with the straight radiating cuts I gave the under-proofed loaf, I would have had a nearly perfect loaf. I could be wrong, but will enjoy the one and only way of finding out.
I’m curious to see how the sour taste develops. On the first day I don’t notice much difference in the 3-stage build and the 1-stage build called for in the formula.
QuestionsThere are two things I’d like to learn more about—the autolyse and the bulk ferment. The purpose of the autolyse is to enhance extensibility. The instructions call for 20–60 minutes. How do I know how long to leave it? When is the autolyse done, and how will the dough feel at that time? And for the bulk ferment, I admit I slavishly follow the times given—how do I know when to shorten or prolong the bulk ferment time? How do I know when the dough has reached its maximum benefit from the bulk ferment?
[The Flickr photo gallery of this bake can be found here: http://www.flickr.com/photos/tuirgin/sets/72157631716753259/]
Percentages as printed in Bread, which do not quite work out for the amounts here. ↩


Comments
It looks like bubbles in a glass of beer. Beautiful breads!
Thank you!
both of your breads even if one was Volcanic. Noticed that you bake your breads much longer than our standard 205 F interior temperature too but, you get an unbelievably thick and rich colored crust too!
Nice baking
I wasn't sure what temperature to aim for. I think based on a few sources I'd determined to aim at 210°F. At any rate I wasn't intentionally aiming that high. By the end of day 2 the crumb was a bit too dry. I think next time I'll aim a bit lower.
Thanks so much for the feedback!
.
Baking is all about the hat.
Hi, Tuirgin.
The purpose of the autolyse is to evenly hydrate the flour and let gluten formation get a head start. Professor Calvel's purpose was to decrease the need for intensive mixing of baguette dough which results in a more dense, less open crumb and decreased flavor due to oxidation of carotinoids in the flour.
I don't know that there is an ideal length of time for autolyse. The usual recommendation is 20 to 60 minutes. I have autolysed up to 120 minutes when my schedule required, without any great difference.
I don't know that autolyse increases elasticity. In fact, if anything, it seems to increase extensibility.
Bulk fermentation serves to generate CO2 and develop flavor. The traditional criterion for judging its completion is dough doubling, but this is not valid when you are doing stretch and folds. The poke test, which works pretty well for judging proofing, is less reliable for bulk fermentation. It is still usefull in my opinion, but less so with high-hydration doughs. Some recommend using a "float test." Take a little ball of your dough and put it in a container of water. If it floats, it is adequately fermented. I've never used this.
A well-fermented dough should feel light and puffy. Each dough will feel a little different, so you have to learn through personal experience. I bulk ferment most doughs that weigh up to about 1.5 kg in a 2 liter glass batter pitcher. I can see how aerated the dough is and find that a valuable measure of adequate fermentation.
Hope this helps.
BTW, nice boules!
David
Oh, I did mean extensibility and not elasticity. Thank you, I've corrected my post.
It was in Hamelman’s discussion of autolyse that I found the explanation that the autolyse increases extensibility, though on looking back at it, in the very same sentence he makes your point about oxidation and the loss of carotenoids. I think I overlooked that aspect as I've only ever mixed by hand where oxidation is barely even a consideration.
The float test is something that I've used for bagels, though I find it a bit dubious—if the bagels float before retarding them, they'll likely be over-proofed by the time I get them in boil, as I've learned by experience. Your use of glass seems like a really good idea.
I started to get the idea that the poke test for proofing might really be more of a sort of palpation... Like a doctor. Rather than specifically a poke with a slow, partial spring back, maybe more a matter of getting a feel for the inner state, the consistency and gas level of the dough. I think this is also suggested by Hamelman. I had this thought when trying to determine the level of proofing of my cold dough. Might this also be useful for bulk, not the spring back, but the general consistency?
David, thanks for responding—it really does help, and it's quite encouraging to get feedback.
Also, for what it's worth, I've mostly been a lurker for the few years I've been here, but I am a constant fan of your breads.
Christopher