
Newbie's first loaves!
This is part me showing off, part asking for input. :)
A bit about me - I've always enjoyed cooking, but just recently (as of a week ago) dove into bread-making for the first time ever when I bought a few packets of active dry yeast on a whim. I've made two batches, and I've got my third one retarding in the fridge. I've already bought a proper jar of yeast (rather than packets,) and I've got an attempt at cherry yeast water brewing in the kitchen at the moment.
... yeah, I'm kind of addicted already. ;)
Unfortunately, I don't really have a great setup for making bread - you'll see from the pictures how I cook it, and probably cry a little bit. Still though, it's coming out tasty, and that's all that really matters. Note that all the measurements I use are volume measurements. I don't quite know the math involved in changing volume measurements to mass measurements, and I'm honestly not 100% sure on my proportions.
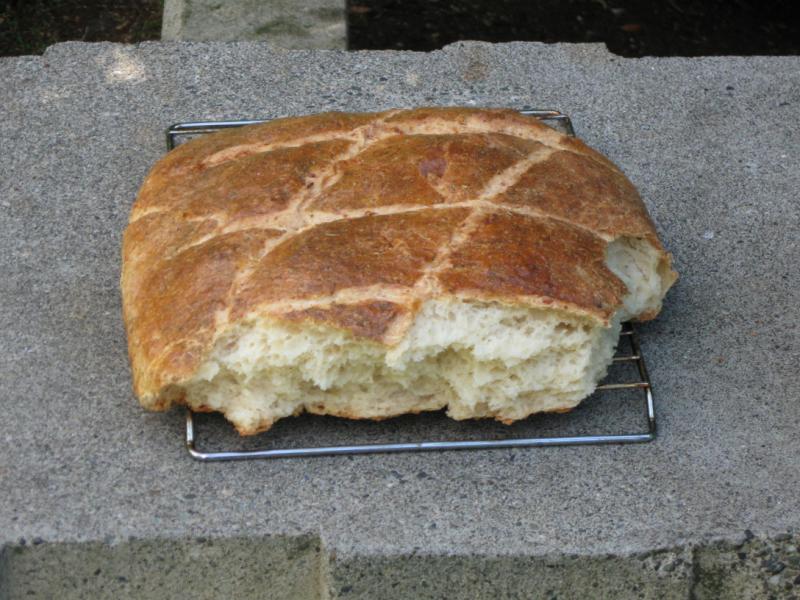
So, the first loaf, which I call a parmesan cream loaf:
Cooling:

Crumb Shot:

This loaf was really dense. It actually came out more like a biscuit than bread, but it was amazingly tasty - kinda like bread made from a biscuit, because it had sort of a cross between the two flavors. I just threw out about an inch wide portion of the second loaf since it's been sitting around for a couple of days, but I'm sure it could have easily been made edible again if I really wanted.
The crust itself came out extremely flaky and a little bit crunchy.
Rough recipe (since I tend to be really slap-dash when I'm cooking:)
4 cups AP flour (Safeway brand)
~2tsp salt
2 1/2 cups heavy whipping cream (!)
1 packet of Fleischmann's Active Dry Yeast
1 cup grated parmesan
I ended up kneading it until it felt "done" to me, letting it sit around when I got annoyed with it. I probably underproofed it, and I know I wasn't patient about letting it bulk ferment. It -did- rise to a decent degree, but it spread rather than rising up.
I let it cook at about 425F for... 40 minutes or so? I'm not used to writing down my recipes, unfortunately. I did steam the loaf, which is what I attribute the awesome crust to - it didn't get as hard as I'd have liked, but it was still good. No glaze was used on this one.
-----
Second loaf, which I call an "all-in-one garlic bread":
Bulk ferment:

Proofing:

Cooling:

Crumb shot after my friend and I had an hour with the loaf (he dropped it and I put a finger through the loaf catching it, so I figured it was cool enough to eat at that point...):
This one turned out beautifully, looks-wise. I loved the way the crust looked, even though it was still thinner than I'd have liked. Once again, I really should have cooked it longer. The dough was REALLY wet and I hadn't figured out folding yet, so I said "screw it" and tossed it in for a bulk ferment/retard/autolyze overnight after attempting to knead it (since I was making it the previous night for something I was doing the next day.)
Rough recipe:
4 cups AP flour (Safeway Brand)
~2tsp salt
2 1/4 cups water
1 packet Fleischmann's active dry yeast
1 stick butter (melted)
1 cup grated parmesan
1/4 cup minced garlic
1 whole egg, beaten (for glaze)
"Italian Herbs" (sprinkled on top before glazing)
I mixed the flour, salt, and parmesan in with 2 cups of the water; then I added the proofed yeast (which added the other 1/4 cup of water,) butter, and garlic. I attempted to knead it until I got annoyed with it (once again,) poured it on my pan, and let it chill in the fridge for about 8-10 hours. Once I pulled it out, I kneaded it a bit more (which went a WHOLE lot better after letting it sit in the fridge overnight...) shaped it into that rectangle shape, and let it rise a little bit (as usual though, not enough - at least I had the excuse of being on a time crunch this time!)
After letting it rise, I sprinkled on the finely-ground Italian herbs (what they are, I'm not sure - I just know that Market Spice in Seattle sells them, and they're great in anything Italian...) and then used a basting brush to coat it with the beaten egg.
I scored it, then cooked it at 400F for about 45 minutes. Steam was added, again, during the first 5-10 minutes of cooking. It came out looking beautiful. The crumb was very moist - more so than the previous loaf, which I attribute to the lower cooking temperature. The crust was soft, thin, and a little bit chewy - perfect for tearing off a chunk and nibbling at it. The crumb was extremely moist, and it had a touch of garlic butter flavor to it - just enough for a hint of the flavor. My two friends and I certainly enjoyed it - the loaf didn't last the day.
-----
I suspect I've been overhydrating my dough for a newbie - for both the previous recipes, I actually ended up mixing in 3 cups of flour, and sifting the fourth one over the dough to keep it dry enough to work with. This is a large part of why the recipes are inexact. <_<
Now for my questions:
Would adding some vital wheat gluten flour to the first recipe strengthen the gluten structure enough that I could get a better rise/more holes out of it?
Would it be worth trying the first recipe in a loaf pan so it rises up instead of out?
Would cooking either loaf for longer at a higher temperature dry out the crumb and give me a thicker crust?
When pulling a loaf out after retarding, should I pull it out, portion it, shape the loaves, bring to room temperature, reshape, and then let it rise? Or should I do things in a different order?
I'll take any other suggestions as well, of course. :)
Thanks in advance for any help that might be given, and I'm glad to have found this site! The lessons, the handbook, and all the assorted posts that describe process have been hugely helpful in getting me up to speed on this stuff.
-Eppy


Nice job, and welcome to the wonderful world of baking bread!
If you want more holes, you should use more water and less cream. The more fat in your dough, the more tender and less "holey" the crumb will be.
Definitely.
Using more water and less fat will dry out your crumb and give you a thicker crust. Again, that butter and fat tends to make things tender and soft.
Just to be clear, "retarding" can be done during bulk ferment, or after shaping. You should only be shaping once, with the exception of a short "rough shape" after portioning the dough (maybe 5-10 min) to allow the dough to relax. I'll take any other suggestions as well, of course. :)
Thanks for the welcome and the insight!
I know that fat and holes are kind of in opposition. I actually made a couple of smaller loaves tonight (one of which got nommed directly from the cooling rack <_<) that had better holes than my previous attempts. I was just wondering if the addition of vital wheat gluten would let me get more holes despite the fat - the taste of the bread was just amazing, and I'd love to replicate it in a slightly more fluffy/more open-crumbed loaf. That's my bad - I should have specified.
The interesting thing (which might not come out in that picture) is that it has holes in it - they're just really tiny. I'm assuming the loaf is so heavy that the yeast has to work that much harder to get a rise out of it, but I'm at a loss as to how (or if) I can get that extra action. I've read that yeast will eat gluten if it's out of starch, but I don't know how well it'd work.
This is me being silly again. I meant crust in this case, not crumb. I really like a soft crumb with a crunchy crust - perfect for buttering.
That said, tonight's loaves had an excellent result on that note. The outside is gum-cuttingly crunchy while the inside is store-bought white bread soft. I could probably have cooked it another 10-15 minutes and gotten the crumb dried out some more as well (though I think I'd have burnt the outsides excessively like that.) I also think I could have let it rise more than I did - I think I'm so paranoid about overproofing and collapsing a loaf that I underproof instead.
This is good insight on the process, but does retarding affect the flavor in the same way when done during bulk fermenting and after shaping? I assume not, but is one more preferable than the other?
And I'm definitely glad to hear anything about shaping - I've gotten good results with my attempts so far (thanks to... Mark's tutorials, I think?), but I'm somewhat lost as to the "why" of shaping (that is to say, what effects my shaping will have on the final loaf in ways other than shape, if any.)
Thanks again for the help. :)
-----
Tonight's bread:
Loaves (minus one, because I had to have one fresh out of the oven <_<):
Very pretty! I finally took a rack out of my oven and cleaned it up so I could use it as a cooling rack. Evident on the right-hand loaf is where I had to pull it off another one because I got way more oven spring than I've ever gotten with a loaf before. Note to self: Heated cookie sheet is good for oven spring.
Crumb shot:
I still probably could have let these rise more. Like I said above, I think I'm overly paranoid about overproofing. I really need to get a pizza peel though - I think I knocked some air out of one of the loaves. Not enough to totally kill it, but it was definitely flimsy in my hands. Of course, it'd be really nice to have a baking stone as well... OH. And in the background, you can see my cherry yeast water - which currently has a slightly alcoholic smell. Hopefully that means it's working. :D
Recipe:
4 cups flour
1/4 cup vital wheat gluten (Red Stone Mill)
2 cups water
2 1/2 Tbsp salted butter (roughly 1/3 of a stick)
1 egg, beaten
1 packet Fleischmann's active dry yeast (last packet!)
1 tsp salt
Mix water and 3 cups of flour. Add butter, beaten egg, salt, and proofed yeast. Mix until it's dough. Pour onto floured surface (this is what the last cup of flour is for.) Attempt to knead and/or fold. Curse profusely. Let sit for 15-20 minutes. Attempt to knead or fold again, adding some more flour. Curse more. Repeat process 3 or 4 times, or until annoyed enough to throw it somewhere to rise (realistically, I think I ended up working it for 15-20 minutes total or so, and added an entire cup of flour by sifting it over the dough.)
Retard in refrigerator for ~18 hours. Take out, portion into 4 pieces, make loaves, let warm and rise at ~75F for roughly 3 hours. Bake at 450F for 40 minutes, making sure to add steam. Let cool for 2 hours. Make sure to eat one loaf entirely before you post your results. ;)
-----
An interesting note about this bread - I kinda screwed up and overestimated the size of my cookie sheet, with the result that I ended up having to scramble for another pan to use for the final loaf. I forgot to score it, and the only place it split was a little portion along one side, underneath where the seam from shaping was. Does this imply that it was still under-risen, even though that one sat out a fair bit longer than the others?
Other notes:
I suspect I don't have the patience to work with high-hydration doughs, given how I've worded these instructions. I always end up adding excessive amounts of flour to it while kneading/working the dough. If the "oiled hands" method I read about doesn't work, I'm going to have to cut down. ;p
I plan on using these to make the breakfast sandwiches I make every morning. Usually, it's store-bought wheat bread that I use, but I suspect they'll be a lot tastier on these when they're heated sufficiently and toasted. :3
I also promise that the next time I make bread, I'll actually write down the recipe precisely so it might actually be replicable. ;)
You can try whole milk instead of cream; that will give you more liquid which can be used to hydrate the dough, while retaining the fat that provides the softness.
I think most recipes retard around the time of bulk ferment. Retarding after shaping definitely has an effect on the crust; you typically will get darker, more even colored crusts on shaped loaves that are cold fermented. Here are a couple of link that can shed more light:
http://www.thefreshloaf.com/node/16070/retarding-dough-bulk-or-after-shaping
http://www.sourdoughhome.com/retarding.html
Shaping makes a huge difference on oven spring and finished loaf texture. A properly gentle hand when shaping helps preserve the gas structure that you've worked to achieve. Getting a tight skin on the dough surface is key to keeping the dough shape during final rise and baking. If the skin is too loose, it won't rise as much.
Good links (although the sourdoughhome.com one didn't work properly - I found the info on there anyway, though!) And I didn't know proper shaping helped oven spring. :o I guess I'll need to make sure to use those techniques I learned, even if I'm not very good at it. That might explain why I had better oven spring with these loaves as well.
Thank you again!