
Baguette crumb - 65% hydration dough
Some time ago, Pat (proth5) posted her formula for baguettes. This was in the context of our "great baguette quest" of some months back. We were playing with higher hydration doughs and cold fermentation à la Gosselin and Bouabsa.
Pat's formula is levain-based and employs a 65% hydration dough. She has insisted repeatedly that, while higher hydration is one route to a more open, holey crumb, fermentation and technique in shaping the baguettes are at least as important and that good technique can achieve the desired open crumb even with a dryer dough.
Okay. It was past time I tested my own technique against Pat's claim.
Pat's formula is as follows:
This is for two loaves at a finished weight of 10.5 oz each
.75 oz starter
1.12 oz flour
1.12 oz water
Mix and let ripen (8-10 hours)
Bread
All of the levain build
10.95 oz all purpose flour
.25 oz salt
6.6 oz water
Dough temperature 76F
Mix to shaggy mass (Yes! Put the preferment in the autolyse!) – let rest 30 mins
Fold with plastic scraper (30 strokes) – repeat 3 more times at 30 min intervals
Bulk ferment at 76F for 1.5 hours – fold
Bulk ferment at 76F 2 hours
Preshape lightly but firmly, rest 15 mins
Shape. Proof 1 hour or so
Slash
Bake with steam at 500F for about 20 mins
I followed this except I baked at 480F. I used Whole Foods 365 Organic AP flour. The result was an excellent, classic baguette with a crunchy crust and cool, creamy crumb. It was slightly sweet with imperceptible sourness when eaten just ... well, almost ... cooled.
Here's the crumb:
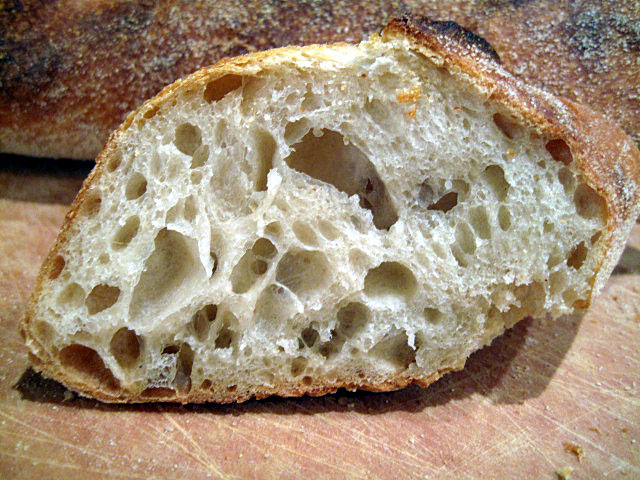
I'll let you draw your own conclusions.
Thanks, Pat!
David


Comments
One word: Wow.
I'm a believer, David :)
I've also thought that the most important key to an irregular, holey crumb is gentle handling and mixing the dough carefully so it remains extensible. The autolyse will definitely aid in achieving this as well. I haven't seen it demonstrated so clearly before, so thanks a lot for posting, David!
Wetter isn't always better.
That crumb looks perfect David.
Eric
I was crunching through a tartine this morning and saw your picture.
Yep. Very similar to what I eat every week...
Nice job!
One thing that I observe is that folks talk a lot about being careful not to deflate the dough during shaping. I will say that I regularly flatten any fermentation bubbles that seem to be interfering with good shaping. They will come back. There is a balance to be achieved in shaping of gentle handling, but a firm enough touch to get the thing in shape. "Iron hand in velevt glove" is the perfect expression. Thank you to "my teacher."
Now I have to produce that look with home milled flour. Don't wait up nights...
Pat
David, that's a great looking crumb achieved with lower hydration/technique dough...I can just taste it...lovely bread!
Sylvia
I wrote out that recipe last week when Pat was kind enough to send it to me. I am so looking forward to trying it. You have done it justice for sure. Caroline
Thanks, all, for your comments.
I just want to point out one other important variable: the flour.
I generally use higher protein flours for my SD breads. In this instance, Pat's formula called for AP flour, so that's what I used. AP flour absorbs less water than bread - or high gluten flour, so the dough texture was like a 70-75% hydration dough made with bread flour.
David
Beautiful job! I can't wait to try...
David,
As you are familiar with my current quest, this looks like a great formula to try. With the lower hydration, perhaps my scoring will improve.
Thanks to you as well Pat.
Darren
I am in the autolyse phase after mixing and I want to clarify a couple things if you don't mind.
As I read it, after the first 30 minute autolyse, there is a period over 2 hours where the dough gets folded in the bowl, as described, 4 times. Is that correct? Since we are changing the fermenting schedule I normally use I want to be sure of the times.
Second. Is the fold after the 1.5 hrs of bulk ferment another 30 strokes or a more gentle letter fold on the counter?
Lastly. After dividing and pre shaping, you are shaping the baguette fully at that time, unlike the Bouabsa technique which is more like shaping ciabatta. Yes? The proofing is done in a couch?
I'm anxious to finish this recipe and method. I do prefer to work with doughs that I can handle and shape without thinking about it sticking to everything. David's image is a remarkable looking bread. I didn't have any real AP today so I used my usual Gold Medal "Better for Bread" which I think is a little less strong than KA bread flour.
Eric
Hi, Eric.
Here are my answers:
You are correct regarding the folding in the bowl - 4 sets of 30 strokes at 30 min. intervals.
The final "fold" I did was a 4-way, "envelope" stretch and fold on the bench.
I pre-shaped and shaped using the usual technique for baguettes. This is a drier dough than Bouabsa's and it ended up more elastic/less extensible than what I get with the overnight fermentation. It was a very nice dough to work with, actually. I did proof en couche.
Looking forward to seeing your results.
David
I am observing that my dough is quite a bit dryer than the Bouabsa formula, as it should be. I think I'll stop by Whole Foods today and pick up a bag of the 365. I thought about adding a little water but yours were so nice I should try to get some good AP.
Eric
I've made some refinements on this technique since I did the post of the formula.
About the "folds in the bowl" - i have been doing 4 at 30 minute intervals, but I fold only as many "strokes" as it takes until I see the dough begin to tear. Depending on how feisty I am feeling this may be a few as 15 folds. I am very careful that they are folds and not just pushing the dough around the bowl.
At 1.5 hours I do a "stretch and fold." This is - oh the horror - different than the technique Mr. Hamelman describes. I don't know why I came up with that variant, I am usually so obedient. :>)
Use AP flour. This is the flour I used in developing the formula.
I do the final ferment on a couche - seams up.
I shape pretty much per the "Bread, etc" book. I find that the dough rolls out pretty easily, but I have been baking these things every week for a couple of years now (some day I'll get it right...). I use an absolute minimum of flour on the bench when shaping, dust off whatever does cling to the dough at each step and make sure there is absolutely no flour on the bench when I roll out the baguette.
Hope this helps.
Pat
Pat,
Is there a technical rationale for doing the proofing on a couche other than handling convenience? Just curious... Is the stretch and fold that you do the same as the Bertinet way?
Having the crumb that David got would entice me out of my self-imposed abstinence (from frustration, not religious reasons) from making baguettes.
The rationale behind the couche (other than it seems to me like a nice, efficient way to handle the dough) is that the linen of the couche draws a small amount of moisture away from the surface of the dough. This creates a thin skin which theoretically eases scoring and helps to create the conditions that create the "grigne" that we so fervently desire.
As for the "Bertinet way," I am ashamed to say that I don't know what that is. So, I don't know. I just put the dough on the bench - degass it and the pull the edges and fold them in thirds, do a 90 degree rotation and do it again. The part of the dough that is on the bench becomes the "good side" of the dough and will remain that way all the way through shaping.
"Every step must be perfect." - "My teacher"
Hope this helps.
Well, OK I get it about the AP flour. My bread was tasty enough and full of nice open holes but it was to strong, to dry, and to something else I can't quite figure out. I don't like what happened in the oven and I got a dry skin in the couche.
Today was one of those multi task stress me out days. Somehow I managed to make 2 round trips to downtown Milwaukee and slow roast/smoke a dozen Turkey Drums all the while trying to be attentive to the bread. It's a wonder I didn't burn the house down.
I had trouble with the dough temperature in our cool house. I'll be happy when it warms up to San Diego weather here in Wisconsin. I would guess I was 10 degrees cool for most of the ferment and I did compensate while I tried to warm the dough. Yes, it does matter, especially with sourdough.
I didn't get a huge spring but enough to show you the crumb wasn't bad. See how it is slightly carbonized on top. That's not normal for me and it wasn't intentional.??
I'll try this again when I get some good quality AP. Thanks Pat and David for all your suggestions.
Eric
Smoked Turkey Drums and Baguettes. Finger food for the masses!
Yeah, use the AP flour.
Don't know what to say about the bold baking on the top. Maybe your oven temperature needs moderating? Did you steam the oven?
I bake in Colorado and while we are enjoying a California winter this year, it is usually pretty cold. I use a heating pad in an insulated box to keep my fermenting dough warm...
I always caution that my formulas are particular to me. my altitude, my hands and my humidity.
Hope this helps.
Hi, Eric.
Your crumb looks pretty open, but, from your description of the dough, I think you probably did need to add more water to make it more like what I got with AP flour.
I'm going to make another batch this weekend with two changes: I will use a liquid starter (I used a firm starter on the last batch.), and I'm going to try a cold retardation of the formed loaves to boost the sour flavor.
David
Dave what is your overall opinion on this flour from whole foods - do you use it in any of your other recipes - if so do you add gluten?
Thanks - anna
Hi, Anna.
So far, this is the first time I have used it for bread. No firm opinion yet. I have never added gluten to any recipe.
David
Eric,
After following along and occasionally posting, I just today realized you are near Milwaukee. I am in Sheboygan- where exactly are you? It would be so helpful to me to benefit from your experience and your ingredient sources!
Well, spurred on by this posting and the 2/27 baking outputs (wow!), I gave the proth5 baguette recipe a whirl.
THanks for sharing this recipe. It looked quite similar to another six-fold French bread recipe I've tried, but the outcome was MUCH more baguette-like and with a really lovely crust.
My starter had been languishing a bit long in the fridge, so I pulled it out and 'refreshed' it for this purpose. It wasn't as strong as it usually is, but still did the trick (in my cool kitchen).
The result was, IMO, an awesome tasting loaf...creamy flavour with just a hint of sour, particularly in the crust. The crumb could have been a bit more open, but I'm sure a healthier starter would sort this out. I couldn't wait to bake it again!
Imagine my dismay when, at breakfast, DH proclaimed that this baguette was "too sour" for him to taste the smoked salmon on it. And my biggest fan, aka #1 son, followed in his father's mold by also proclaiming it "too sour".
Ah, well....guess I'll have to make it alongside another type of loaf so *I* can enjoy the awesome flavour.
:-)
MommaT
Hi, MommaT.
If your starter was sluggish, I assume that your bulk fermentation took longer than usual. That probably accounts for the increased sourness.
My baguettes were not noticeably sour. I'd be interested in Pat's input on this.
David
Hello David,
Regarding sour-ness...the other consideration, per the recent posts, could be that the starter has been nursed on the counter for 2 rounds of refreshing prior to the baking. Usually I refresh the starter, leave it out an hour or two, just to let it get going, then put it back in the fridge. Perhaps it was the warmer temps.
Go figure!
MommaT
David,
Thanks for pointing me to this baguette formula. I will give it a try this weekend and tell you how it goes. I have a wide range of flour choices at hand. Would you suggest I use an AP flour as you did in your initial post? Wish me luck...
Thanks again,
Nick
Pat's formula called for AP flour, and that's what I used. I recommend AP for your first try at this formula. If you then want to try it with KAF French-style, you might cut back on the water by 5-10 cc.
David
David,
Yes, "WOW!" was the first thing that came to mind after looking at my finished baguettes. Then "WOW!" was the second thing that came to mind after tasting these baguettes.
This recipe is a total winner. Very pretty, and my favorite tasting baguettes I have made yet. This was my first try at them and they came out fantastic, I love them.
I followed the recipe to a T, except for doubling it, and used KAAP Flour. It's hard to believe that you can get this flavor with only AP flour. Their only downfall, which is only a downfall because it keeps you from making them daily, is the length of time they take on the second day.
I don't know what else to say but thank you David and Pat for the help and recipe. I can't wait to make it again!
Please take a look at the pictures and give me a critique. I am always looking to improve.
Thanks again,
Nick
It's amazing what wonderful flavor one can coax out of plain old AP flour, if you know how. Looks like you know how. :-)
The baguettes are very nicely formed, and the crumb is lovely.
Since you invited nit-picking, the only critiques are that the sides are pale, presumably because you baked them all at once and too close together. The second nit is that, to get "classic" baguette scoring, you need to make your cuts a bit more parallel to the long axis of the loaf.
But, all told, your baguettes are close to perfection, I'd say.
David
Hi David,
I am a newbie. Here is a potential stupid question: What is a starter? Is it something to make or buy? Thank you.
I hope to have pictures of beautiful baguettes to share here some day :-)
Tom
David,
Thank you so much for the kind words! It means a lot coming from you. Without all your help, they wouldn't have come out like this. They would probably have looked more like hamburger buns, haha.
You are like a bread psychic. You are dead on with your assumption that I baked them all at once and too close together. I didn't realize the extent of their oven spring and they were virtually touching each other and that lead to the pale sides. I will remedy this the next time. I know what you mean about the baguette scoring and I will continue to tweak my technique. I need to think more parallel and maybe not do as many cuts.
I have a question about getting bigger ears on the baguettes. Do you know what the determining factors are? I feel that hitting it with high heat and steam when they first go in may have something to do with it. If the heat is too low, or too much heat is lost in the loading and steaming process, the baguette are earless. Is this a proper observation or does it have more to do with the actual scoring, scoring depth and whatnot?
Thanks again,
Nick
I found this thread very frustrating....I've been making two baguettes a week for the past two months and I get NOTHING like the hole structure these photographs show. Now, I'm using commercial yeast, KA AP flour, 67% hydration, and overnight cold fermantation rather than a preferment....could any of these things be affecting what I see? My dough is way too stiff to use the "strokes" mentioned in this thread, assuming we're referring to a technique like Hammelman uses in his six-fold french bread.
I've tried just about every mixing/folding/shaping combination and the hole structure is pretty much the same...the average hole size is about as big as a whole peppercorn. I just don't see how you can get what you show in the pictures with 65% dough.
From your message, I gather you have tried a number of formulas and methods and have gotten a closed crumb structure consistently.
There is a large number of possible causes. To help us problem solve with you, I suggest you post a separate topic, and provide the formula and the procedures you are using, along with photos of the results, if possible. Then we can start to narrow down the list of possible problems and how to solve them.
David
Hi David:
I greatly appreciate your offer to help. I don't think that I can post my procedures, though, because I've done it about 20 different ways, including following as closely as possible the procedure that Pat outlined.
Let me note that I can get a open crumb by using higher hydrations; my bread at 73% looks pretty good. It's the fact that you can get that at 65% that mystifies me.
I'm actually more interested from a theoretical point of view, rather than just trying to make a good loaf; if I was sure my loaves would be perfect every time, I probably would never bake again. ;-)
Can you identify the techniques in Pat's procedure that contributed to the open crumb? She said the preferment quantity was important. Why? And someone (you?) pointed out that AP at 65% was like bread flour at 75%, which doesn't match my experience. My two doughs using AP vs bread had almost identical handling characteristics at 65% hydration. Does more gluten development contribute to the hole structure or does less? Is extensibility the most important thing? Is a lower protein AP flour better than a higher one, such as KA? Does shaping with a high surface tension destroy big holes? Does the percent yeast play a role?
Basically, I'm wondering is how much you can change her procedure and still end up with such an open hole structure, at the same hydration.
Thanks for any insight.
(FWIW, I've only used one formula throughout: flour: 340g, water: 227, yeast:3g, salt: 7g.)
Whew!
As Pat has said repeatedly, "Everything matters." And "everything must be perfect."
First, ingredients: Note that Pat's formula calls for levain and no added yeast. Her long fermentation impacts both dough texture and flavor. From your last line, I take it your are not using a pre-ferment. Your yeast is at 0.8%. This is a very significant difference from Pat's formula. Moreover, the yeast percentage is very low, unless you are fermenting for a very long time. This could be a major source of your frustration.
I always use AP flour for baguettes. Lower protein flour gives a thinner, crisper crust. It also is less thirsty, so a 65% hydration dough made with AP is looser than one made with bread flour. That said, the AP flours I use are stronger than some - around 11.7% protein. KAF AP is an example.
Higher gluten flour will give a higher rise, but the gluten must be well-developed. You can get an open crumb with AP or Bread flour.
Procedures: I see two special things about Pat's procedures. The first is the multiple episodes of S&F in the bowl develop the gluten really well without over-organizing it, as you would get with intensive machine kneading. This is necessary for the open crumb structure you want. The second thing is optimal, long, slow fermentation. Under-fermenting the dough will adversely affect both flavor and crumb structure. Almost all the gas production occurs during bulk fermentation. It's the gas that makes the holes.
Once the dough is fermented well, you want to handle it gently so as not to de-gas it excessively. (Note the use of relative adverbs. Too little de-gassing will result in some holes that are too large.) Yet, you also want to get a fairly tight gluten sheath with your pre-shaping and shaping. This apparent paradox is described by "an iron hand in a velvet glove." Picture this: You are stretching the surface of the loaf over it without pressing on the inside, and you are sealing all the seams really well.
Judging how tightly to pre-shape and shape comes with lots of practice. These steps further develop the gluten, so a dough that already feels really "strong" needs less tight shaping than one that feels "weak."
There needs to be a balance between extensibility and elasticity. Many factors influence this balance but some are in the flour itself, and some result from your mixing, fermentation and dough handling procedures.
Please realize that words can only go so far in conveying techniques and judging the dough. I'm a "word person," but I learned a tremendous amount from the two courses I took at SFBI. There is no substitute for watching a professional handle the dough and having a professional look over your shoulder and correct your techniques.
Hope this helps.
David
David:
Thanks for your long, detailed reply.
True, I'm not using a preferment, but I am putting the dough into the refrigerator overnight during the bulk fermentation. That generally accommodates my schedule better than using a preferment.
Interesting regarding your comment about my yeast quantity; I was actually thinking of reducing it further. The baguette formula in Amy's Bread uses less yeast. My quantity is based on Reinhart's formula in "Artisan Breads Every Day", although I reduced it from 3.5 to 3 grams. I'm getting quite a snappy rise out of it. I see a bit of a conflict between using more yeast and increasing my fermentation time, which is why I started reducing the yeast.
Based on what you said, I may try a batch with a larger quantity of yeast and one with smaller and see in what direction the hole structure is going. And, as soon as I get a whole day to work on it, I will try a batch with a poolish and skip the cold fermentation and see what effect that has.
Thanks for your help
Very thorough, articulate explanation.I think my iron fist was too strong for the velvet glove.have you tried stretch and fold with90%hydration?
No. I haven't made any breads with this hydration except some with lots of whole grains and soakers, so the effective hydration is actually lower.
David
Unfortunately my stater is not quite ready to make me dekicious recipes like this one yet, so how can I convert the amout of sourdough starter to active dry or instant yeast? Thanks
Hi. lane87.
Add the water and flour in the starter to the amount of water and flour in the final dough. In this case, there is 1.5 oz of each. Then, use your commercial yeast at the percentage you desire. Of course, you are going to end up with a very different bread. Sourdough starter is a lot more that a source of yeast.
David
I figured I would be losing out on much more without using the starter, but I just wanted to give this recipe and method a try. I really appreciate the help. Thank you.
Hi everyone.
I know this is an older thread but I just saw it and have been making Batards with this method, added 10% whole wheat flour with fantastic results. Much better/open crumb than my high hydration doughs ever had.
My question is how did you arrive at the 65% hydration using the bakers formula? No matter how I figure it out it comes out to be closer to 62% hydration, not that I'm complaining.
I just don't know how to figure out hydration percentages when using sourdough levains whether they are 80% hydration ala Forkish or 100% hydration levains ala Tartine. Robertson.
Thanks for your help.
dtrap
Flour (oz.)
0.375 from seed starter
1.12 starter feeding
12.95 final dough
----------------------
12.440 Total
Water (oz)
0.375 from seed starter
1.12 starter feeding
6.6 final dough
-----------------
8.095 Total
8.095/12.440 = 0.65072347266881
Rounded to 2 decimal places and multiplied times 100 = 65% hydration.
I have written a couple tutorials which might help you get your arms around bakers math with sourdough starters. See these:
Baker's Math: A tutorial
Converting starter hydrations: A Tutorial. Or through thick and thin and vice versa
I hope this helps.
David