
Clayton's Buttermilk Whole Wheat Bread
Since the breads I made most recently were both sourdough ryes, I was looking for something different this time around that would work well for sandwiches. My first inclination was to haul out an old favorite, a honey whole wheat bread. While flipping through Bernard Clayton's New Complete Book of Breads, I happened across a buttermilk whole wheat recipe that I had not tried previously. Since I had all of the necessary materials on hand, I thought that I would give it a try. The recipe follows [with my notes]. I'll also include additional comments at the end
Buttermilk Whole Wheat Bread
from Bernard Clayton's New Complete Book of Breads
makes 1 9"x5" or 2 8.5"x4.5" loaves
Ingredients
2 packages dry yeast [I used 2 teaspoons instant yeast]
3/4 cup warm water (105-115F)
1-1/4 cups buttermilk, room temperature (or 1-1/4 cups water and 4 tablespoons buttermilk powder)
1-1/2 cups bread flour, approximately
3 cups whole wheat flour, stone-ground preferred
1/4 cup shortening, room temperature
2 tablespoons brown sugar or molasses [I used molasses]
2 teaspoons baking powder
2 teaspoons salt
Step 1 - In a large mixing bowl sprinkle the yeast over the warm water and stir briefly to dissolve. Set aside while allowing the buttermilk to reach room temperature, about 15 minutes.
Step 2 - When at room temperature, pour the buttermilk, bread flour, 1 cup whole wheat flour, shortening, brown sugar or molasses, baking powder, and salt into the yeast mixture. Blend with 50 strong strokes of a wooden spoon, or at low speed in a mixer until the flour and the dry ingredients are absorbed. With a wooden spoon or mixer flat beater stir in the remaining whole wheat flour, 1/2 cup at a time, and, when it becomes thick, work with the fingers. Allow 4 to 5 minutes for the whole wheat flour to fully absorb the liquid before adding more flour. The dough will be slightly sticky and soft. You may wish to add more bread flour to help control the stickiness.
Step 3 - Sprinkle flour on the work surface and turn out the soft dough. In the early stages of kneading, a metal spatula or dough blade will help turn and fold the dough. It will also scrape up the film of dough from the work surface. Knead with a strong push-turn-fold action, occasionally lifting the dough above the counter and banging it down hard. Knead for 8 minutes, buy hand or with a dough hook.
Step 4 - There is no "first" rising--the dough is put in the pans and set aside to rise. Divide the 2 pieces, if desired, and allow to rest for 5 minutes. Shape into balls; press the balls into ovals the length of the pans. Fold in half lengthwise, pinch the seam, and place in the pans with the seam under. Push the dough into the corners of the pans. Cover the pans with with wax paper and leave at room temperature until the dough has risen 1" to 2" above the level of the pan, about 50 minutes. (Rising times will be reduced if using instant yeast.)
Step 5 - Preheat oven to 425F 20 minutes before baking.
Step 6 - Bake the loaf or loaves in the oven until they are golden brown and loose in the pans, about 30-35 minutes. Cover with foil if the crusts are browning to rapidly. The loaves are baked if the sound is hard and hollow when thumped on the bottom crust.
Step 7 - Remove loaves from the oven and place on wire racks to cool.
My variation went like this:
Step 1 - Mix the warm water, the buttermilk, the whole wheat flour, the brown sugar or molasses, and the baking powder. Autolyse 60 minutes. (I actually had to run some errands and it was closer to 90 minutes before I got back to the autolysed dough.)
Step 2 - Stir in the instant yeast.
Step 3 - Stir in the salt.
Step 4 - Stir in the shortening.
Step 5 - Stir in bread flour, 1/2 cup at a time. (I wound up stirring in 1 cup, total. The balance was used for flouring the counter during kneading.)
Step 6 - Since the gluten was so thoroughly developed during the autolyse, I stopped kneading after 5 minutes, which was enough to ensure that everything was completely blended and distributed.
Step 7 - Clean and grease the mixing bowl. Place kneaded dough in bowl, cover with plastic wrap, and allow to ferment at room temperature until doubled in volume.
Step 8 - Degas the dough slightly, shape into loaf or loaves, place in pan(s). Cover the pans loosely with with plastic wrap and leave at room temperature until the dough has risen 1" to 2" above the level of the pan, about 50 minutes.
Step 9 - Preheat oven to 425F 20 minutes before baking.
Step 10 - Bake the loaf or loaves in the oven until they are golden brown and loose in the pans, about 30-35 minutes. Cover with foil if the crusts are browning to rapidly. The loaves are baked if the sound is hard and hollow when thumped on the bottom crust.
Step 11 - Remove loaves from the oven and place on wire racks to cool.
The effects of the autolyse were phenomenal. The dough texture looked as though it had been worked for 8-10 minutes, even though it had been stirred just enough to moisten the dry ingredients. After stirring in the bread flour, it was almost the the silky smooth texture that I usually associate with a well-kneaded white bread. The other thing that I should mention was that I was using Wheat Montana's Bronze Chief flour, a finely milled high-protein whole wheat containing 4 grams of protein in a 30-gram sample. For all practical purposes, it's bread flour that still has the bran in it. One of these days I'll have to try a 100% whole wheat bread with this flour.
Overall, I'm very happy with the results of this bread, using this approach and this flour. The loaves were some of the prettiest that I've ever pulled out of the oven, equalling the loftiness of a typical white bread. Here's a picture of the finished loaves:
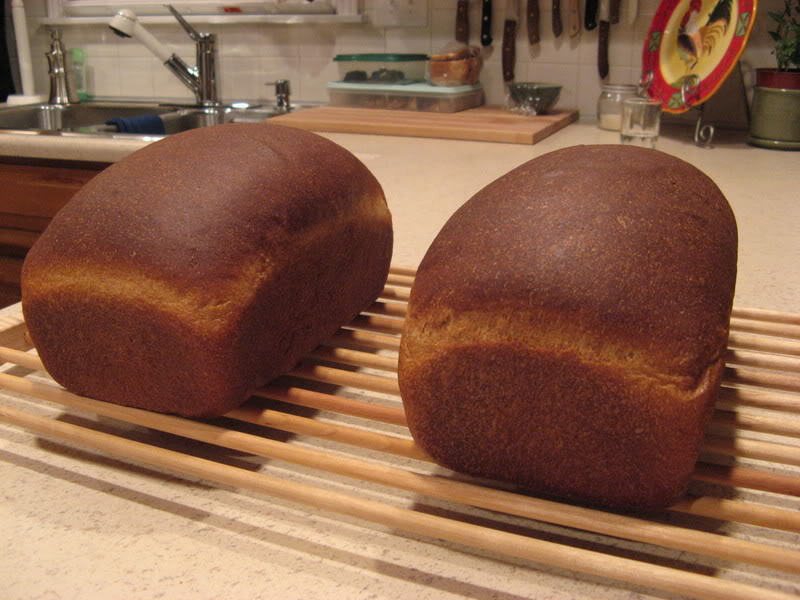
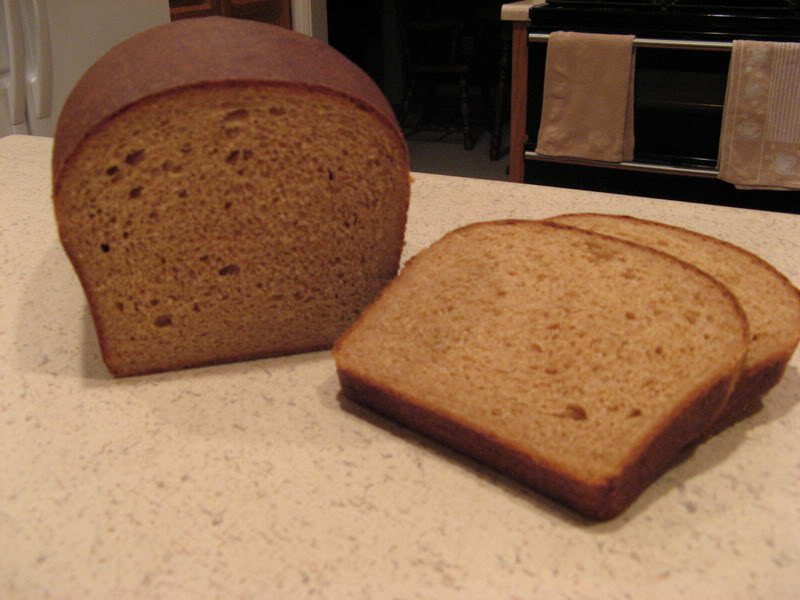
The crumb was close-textured and even; not at all crumbly or dry. No bricks this time:
Oh, and it tastes really good, too!
And, while I was baking bread, my wife was attending a book signing by Giada De Laurentiis, as evidenced by the photo below:


Comments
Thank you, Paul for this recipe! Gorgeous loaf! I almost missed this..nice write-up..it's late and I'll read all the blog in the morning. Nice photo of Giada..I love her tv show.
Sylvia
I'm so sorry to hear that the bread did not turn out the way you wanted, Curdmor. All the more so since you tried it two different ways!
Some thoughts: the variety of yeast ought not matter, especially since you proofed yours and know that it is viable. I'm not sure I understand your reference to salt. The recipe does include salt and, no, it does not inhibit the yeast from leavening the dough. Feel free to experiment with the quantity of baking powder (not soda). If you did use baking soda instead of baking powder, it is possible that your bread did not expand as much as it should have because of the change in ingredients.
A question for you: what are the dimensions of your bread pans? If, perchance, they are larger than the ones recommended by Mr. Clayton, the bread will still fill the same volume but the loaves will be wider or longer, and not as high.
And another: what is the texture and the protein content of the whole wheat flour you used? A coarser grind and/or a lower protein content would also contribute to a squattier loaf. I referenced that I had used a flour that was very finely milled and had a high protein content, which no doubt contributed to the outcome I had.
Best wishes for your future bakes.
Paul
WW bread Paul. I see that this recipe hasn't changed from his 1973 edition. The crust and crumb of your bread is great. I have made it converted to SD but never with yeast. The yeast version looks near perfect. Nice bake Paul. I really like his Sour Cream Rye Bread too.
That bake did turn out particularly well.
I haven't tried the Sour Cream Rye but it sounds really good. It's hard to say that I have a favorite when there are so many great breads in the book but one I keep coming back to is the Honey Lemon Whole Wheat. Good stuff!
Paul
50% WW with lemon peel. Sounds great and a perfect candidate for SD conversion. Will give it a whirl soon - maybe with some WW sprouts and some sunflower seeds.
What does the baking powder do in this recipe?
I am a new baker :). This recipe sounds great, but I am using home milled wheat montana hard spring wheat. Would it be a 1:1 amount of flour that you used? Thank you!
Since yours is home milled, the texture may not be quite as fine as the Wheat Montana flour's texture. You may have to decrease or increase the amount of liquid, as would be the case with any change in flour, since each flour has different capacity for absorption. Since you are using Wheat Montana wheat, the protein content should be in the same range as that of the Wheat Montana flour I used.
Your bread will probably taste even better than mine did, since you are using freshly milled flour.
Paul
Thank you! I made my first loaves today, and they came out good. I did not autolyse and that will be my next thing to try with your recipe! Could you please say what you use for shortening? Would butter work? Thank you again! Ellen
i used vegetable shortening. Butter would certainly work and add a richer flavor. I'm sure that lard or vegetable oil could also be used successfully.
That's one of the fun things about baking bread: the ability to experiment and adjust until we have something that suits us.
Paul