February 12, 2012 - 5:42pm

English muffin photos
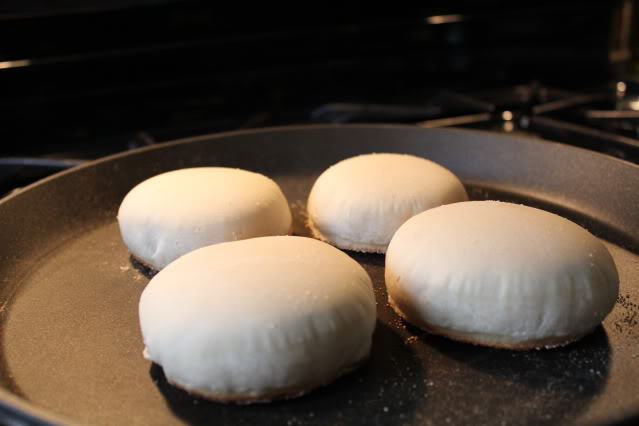
Every so often, I like to make a batch of sourdough English muffins. My go-to recipe is one from the King Arthur 200th Anniversary Cookbook, which I have blogged about previously. Today's post is just a series of photos showing the muffins as they cook for your viewing pleasure; something only a bread-head would love.
Up first, the muffins waiting their turn on the griddle:

After feeling the heat for a little bit:

Still growing:

Ready to turn:
And just after being turned:

And yes, they smell good too!
Paul
Share


Comments
Wow!
They look great!!!
Cheers
Phil
I always thought you needed rings. Great. You don't. Thanks for the pictures. -Varda
I, also, thought you needed rings.
Karin
Are you guys thinking of crumpets?
Cheers,
Phil
This is why I write things down. Mind like a rusty steel trap. -Varda
You need rings to cut them (egg rings work well - or a tuna can for that matter) - but not to cook them. I've only made them once, using the Tartine formula. They were pretty good.
Yours look quite yummy, Paul. Thanks for the reminder that there's more to breakfast than bagels! ;-)
rings aren't required for cooking the English muffins. While I have a set of rings (used one as a cutter for these), I still haven't attempted crumpets.
Thanks for the kind comments.
Paul
Paul,
These are beauties. I have yet to bake an ENglish Muffin I am satisfied with.
Did you happen to post the recipe somewhere is the past that you can supply a link to so I can give yours a try?
Thanks,
Janet
Maybe I can get to that in the next few days in a way that doesn't violate copyright laws. I had thought that the lovely people at King Arthur Flour might have the recipe posted on their web site but no. The one posted there is significantly different than the one from the book that I used.
Paul
Paul,
Thanks for checking for me. I have one of theircookbooks but not the one you used and wasn't sure if the recipe on the site was the same or not so thank you for telling me it is different.
Take Care,
Janet
Janet, here is the recipe for English Muffins from the KAF 200th Anniversary cookbook.
Preface: the starter maintenance directions are to feed with equal amounts (by volume) of flour and water, so the KA folks are working with a fairly soupy starter. All quantities are given as volumes in the book. However, the stated intent is that a cup of flour weighs 4 ounces. If you want to convert to weights, that gives you a starting point.
Ingredients:
1 cup sourdough starter
1.5 cups milk
5.5 to 6 cups unbleached AP flour
1 tablespoon sugar
1 tablespoon salt
1 teaspoon baking soda
cornmeal (for sprinkling on pan)
Stir together the starter, the milk, and 3 cups of flour to make a sponge. Cover with plastic wrap and allow to ferment until bubbly. Depending on your starter activity and temperatures, this could take from 2 to 24 hours. I usually make up the sponge before going to bed and then finish the muffins the next day.
When the sponge has developed, stir in one cup of flour, the sugar, the salt, and the baking soda. Add enough of the remaining flour in half-cup increments, mixing after each addition, to make a soft dough. It should still be on the sticky side, so don't worry about incorporating every last bit of flour. You can always work in more while kneading, if necessary. Cover the bowl and let it sit for 30-60 minutes so that the flour can fully hydrate.
Turn the dough out onto a floured work surface and knead for 2-3 minutes; just enough so that the dough smooths out and is no longer lumpy. Use a floured rolling pin to roll it out to a uniform thickness of between 1/4 and 1/2 inches. (I like the thicker dimension, even though it yields fewer muffins.) Using a muffin ring, or biscuit cutter, or empty and clean tuna can, cut 3-4 inch diameter rounds from the dough. Gently combine the scraps, re-roll and cut additional muffins until all scraps are used. There are at least two other shaping options. One, use a knife or pizza cutter to cut square muffins; there are no scraps to mess with that way. Or, pinch off balls of dough, round, then flatten into a disc shape.
Place the shaped muffins on a baking sheet that has been sprinkled with corn meal. Cover them and let them rest long enough to show some inflation. My suggestion: let them grow upward about 25% from their starting height. That means bubbles are beginning to form inside. They will expand more on the griddle, as shown in my photos.
When the muffins are about ready to cook, preheat a griddle on a burner at low heat. When the griddle is heated, place 4 or 5 muffins on the griddle, cornmeal side down. Cook until well-browned on that side, maybe 5-7 minutes depending on how hot your griddle is. Gently flip the muffins over and cook until the second side is also well-browned. Since I see that the muffins tend to dome on top while the first side is cooking, I use the spatula to very gently press the muffins after flipping them so that the whole face of the muffin is in contact with the griddle. Otherwise, you're heating a surface that is only a couple of inches across and that isn't conducive to even cooking throughout.
Although the KAF recipe doesn't mention it, I have seen others that recommend a short bake at 350F for the muffins after they come off the griddle to ensure that the centers are fully cooked. If you make yours thick and find that the interiors are a bit doughy yet, you may want to experiment with this.
After cooling, the muffins can be split with a fork (and yes it is a better way to maximize those nooks and crannies than is slicing with a knife). Eat as is, or toast, as may be your preference. They also freeze well, assuming that they last long enough for that to happen.
Paul,
Thank you so much for printing up the recipe as well as the mixing and baking instructions. I have made a copy and will give these a try sometime this week if time and schedule permit :-)
I like the idea of using a pizza cutter for cutting....whenever I try to use scraps for rolls etc. they turn out dense due to the extra handling so using the cutter seems like a really easy way to solve that problem.
Thanks for the tip on baking them for a bit too.
Take Care,
Janet
Paul,
I was just converting this recipe into grams and am wondering if the salt content is correct. A tablespoon of salt is about 24g which makes the salt % 3.6 if all of the flour gets used...higher if it isn't all used.
I am use to only using about 2% salt in breads and don't know about the content in muffins so I figured I better check it out before mixing it all up.
Thanks,
Janet
Janet,
I just double-checked and yes, the quantity in the recipe is 1 tablespoon. The muffins don't taste salty (and I'm ordinarily rather sensitive to that). Since I hadn't converted the recipe to weights, that hadn't caught my eye. For table salt, I'd expect a tablespoon to weigh about 21g, rather than 24g. Still, that's a substantial quantity.
Oh, on another topic, I also looked up Leader's recommendation for baking the muffins after they come off the griddle; he recommends 6-8 minutes at 350F.
Paul
Paul,
Thanks for the double check. I also double checked my wt for a TB of salt and found I was too high on that count too....just like you stated above.....Different spoons measure differently and I had done the measuring and recording with an old set to spoons...
Thanks also for the tip on baking temp. and times.
Take Care,
Janet
I saw a blog where a baker just cut the rolled out dough with his pizza cutter and made square english muffins - cooked on the griddle the same way... just the shape was different... and I asked myself, WHY NOT?
cutting them into squares with my bench scraper. Paul's' look much, much better than mine for sure. They must be tasty as can be. but, don't let the lack if a cutter keep you from making them - square ones taste pretty good too! How about an inside sliced shot Paul? Mine only had holes on one side for some strange reason. It has to be either the side that hit hot pan first or was shielded from it till later. I'm still not opening a can of tuna for breakfast or buying a cutter unless I can find one at Goodwill :-)
of cutting the muffins in squares with a pizza cutter, too. In any event, the flavor will certainly not be harmed if the muffins aren't round, as you point out.
Sorry, no crumb pics from this batch. They went straight into the freezer after cooling thoroughly. Previous experience with these suggests that the crumb will be more smooth and even, rather than open-celled. I think it has to do with a couple of factors. As written, the hydration in this recipe is not particularly high. The dough also gets quite a workout with the rolling pin, which tends to destroy bubbles. I try to counterbalance that by reducing the flour to get a wetter dough and by allowing a longer final rise before baking to permit the bubbles to reinflate.
I'll hazard a guess about your one-sided bubbles. The first side to face the griddle generally has a greater contact area because the dough is still moist and flexible. This increases heat transfer, driving steam expansion of the bubbles on that side. When flipped, the muffins are usually somewhat domed, creating a smaller surface area in contact with the griddle. That, in turn, means less heat is being transferred to the interior of the muffin. Add to that the likelihood that the interior has begun to set while the first side was cooking and is less able to stretch and expand. That's all a guess but seems plausible. I usually press the muffins gently with the spatula after flipping them so that more of the second surface contacts the griddle which, I hope, helps them cook more evenly.
Paul
explanation of one sided holes in EM's is spot on Paul I didn't use a pin on mine but gently pressed it out instead. Those commercial Thomas EM's have holes on both sides - and I find this ....two faced fact ....disturbing if not infuriating :-)
Hi Paul,
The muffins look fantastic.
The griddle pan the muffins are cooking on looks like it heats really evenly - nice browning on those muffins!
Like the low sides on that pan too...makes for easier turning?
:^) from breadsong
It's a good, heavy griddle; Calphalon, I think. It heats very evenly. Frankly, I wish the sides were even lower because they do sometimes get in the way of turning pancakes. My ideal would be a low lip, maybe 0.25 inch high; just enough to keep batter from going over the edge.
Paul
Great looking muffins Paul! How I wish there were a crumb shot. I want to see all those nooks and crannies!:)
Best,
Syd
Where is the crumb shot. Nooks and Crannies please.