On my commute in to work, I drive by an auto parts store with a large sign out front. For the past two months, the sign has read "FLAX SEEDS AVAILABLE."
I spent many a groggy morning puzzling over what flax seeds had to do with auto parts before I realized that the answer is nothing: flax seeds are a nutritional fad, something to do with omega 3 fatty acids and lignans or something along those lines (notice the flax seed related ads that appear on this article). Someone who works at the store is apparently a flax seed pusher.
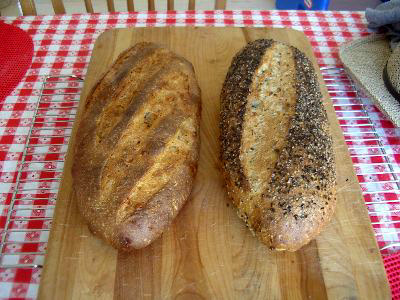
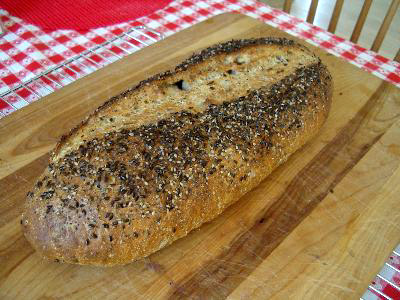
The sign hasn't caused me to start gorging on flax seeds, but it did remind me of a wonderful bread I ate once that contained flax seeds. And sesame seeds. And poppy seeds. And sunflower seeds. And pumpkin seeds, too. "Time to try baking a five seed french bread at home," I thought.
And the stinky cheese bread? Well, while I was preparing the seeded french bread I noticed that I had a large piece of blue cheese in the refrigerator and some walnuts. Blue cheese and walnuts taste wonderful together, and blue cheese loses some of its edge when it is baked. So I tried making a blue cheese-walnut bread too.
Recipes below.
The dough for this bread is a simplified version of the Rustic Bread from Jeffrey Hamelman's Bread: A Baker's Book of Techniques and Recipes. I changed the pre-ferment from a firm pate fermente to a soft poolish. Professional bakers, at least those that write cookbooks, tend to recommend firm pre-ferments and starters over soft ones because they are more concentrated and easier to measure on a scale. But, being that I still mix my dough with a wooden spoon, I find the soft pre-ferments to be easier to work with.
If you have a stand mixer, there is no reason these recipes wouldn't work well substituting the firm pate fermente back in. Or if you have a sourdough starter, you could easily make a sourdough version. And if you don't have rye flour or whole wheat flour, feel free to substitute whatever kind of flour you do have in the house. Seriously: you are the one who is going to have to eat this if you make, it so adjust the recipe to your own taste!
You'll notice I did this one all by weight, with the exception of the yeast and salt. I love how simple the proportions are: 1 lb. water + 1 lb. flour for the preferment, 1 lb. flour + 1/2 lb. water for the dough. But I've also listed approximations for making this using measuring cups. Use whichever system you are most comfortable with.
Five Seed French Bread and Blue Cheese-Walnut French Bread
Makes 1 large loaf of each
Pre-ferment:
1 lb. (3 1/2 cups) bread or all-purpose unbleached flour
1 lb. (2 cups) water
1/4 teaspoon instant yeastDough:
10 oz. (2 1/2 cups) bread or all-purpose unbleached flour
3 oz. (3/4 cup) whole wheat flour
3 oz. (3/4 cup) rye flour
4 oz. (1/2 cup) water
1/2 teaspoon instant yeast
1 tablespoon salt
all of the pre-fermentAdditions to the Seeded Loaf:
1 oz. (2 tablespoons) flax seeds
1 oz. (2 tablespoons) sesame seeds
1 oz. (2 tablespoons) poppy seeds
1 oz. (2 tablespoons) sunflower seeds
1 oz. (2 tablespoons) pumpkin seedsAdditions to the Blue Cheese-Walnut Loaf:
1/2 cup crumbled blue cheese
1/2 cup chopped walnuts
The evening before baking, in a bowl mix together the yeast and the flour for the pre-ferment. Add the water and stir with a wooden spoon until all of the ingredients are combined and a very soft dough is formed. Cover the bowl with plastic wrap and let it sit out at room temperature for approximately 12 hours. A couple of hours more or less with not hurt anything.
The next day, combine all of the dry ingredients for the dough in a large bowl and mix them together. Pour in the water and wet pre-ferment and mix with a wooden spoon until all of the ingredients are combined.
Split to dough into two roughly even pieces for the two loaves. If the dough is too wet to handle, sprinkle a little bit of flour on it and on the work surface (a cutting board or something). The moister you can keep it the better though, so add as little flour as you are comfortable with.
For the seeded loaf: flatten the dough out a little bit on the work surface and sprinkle a handful of the seeds on top. Press the seeds into the dough gently and then fold and knead the dough with the palm of your hand until the seeds have been worked into the dough. Repeat this with more handfuls of seeds until all of the seeds have been incorporated into the loaf and have been distributed fairly evenly throughout the loaf.

For the blue cheese-walnut loaf: flatten the dough out a little bit on the work surface and sprinkle the blue cheese on top. Press the cheese into the dough gently and then fold and knead the dough with the palm of your hand until the cheese has been worked into the dough. Flatten the dough again and sprinkle some of the walnuts on top and repeat the process until all of the walnut have been worked into the loaf.
Place each of these balls of dough in lightly oiled bowls, cover with plastic, and set aside for fermentation. At the very least they should rise once until doubled in size, approximately an hour to and hour and a half.
Both times I baked these breads I had other things to tend to during the day, so I placed the bowls in the refrigerator for a couple of hours. When I returned, I removed the bowls from the refrigerator, gently degassed the dough using the folding technique that Hamelman describes (and which I discuss briefly in my rustic bread posting), then returned the dough to the bowl and covered it again. Twice more I let it rise again for approximately an hour and then folded it before performing the final shaping.
If you can find the time to allow them these additional rises will improve the quality and flavor of your bread. But not everyone has the time to do all this, so if all you can afford to do is let the dough ferment once before shaping, that is fine: don't let the extra rises deter you from baking. You'll still love these breads.
If you have a technique you are already comfortable using to shape loaves, by all means, use it. If not, I recommend pressing the dough out on a work surface into something roughly shaped like a rectangle. Fold each of the corners in at an angle, like you do in the second fold while making a paper airplane, and press them gentle into the center of the dough to seal them down (so you'll have something like a doughy octagon). Then fold two of the sides in so that the dough is long and approximately 1/3rd as wide as it was originally. Seal the seams tightly on the bottom and place each of the loaves on parchment paper or the back of a baking sheet sprinkled with semolina flour or corn meal.
Cover the loaves loosely with plastic (I stuff each baking sheet into a clean garbage bag). Set aside and let the loaves rise until they have doubled or even tripled in size, approximately 90 minutes.
While they are rising, preheat the oven to 450 degrees. If you are using a baking stone, be sure to start preheating it at least 45 minutes before you intend to bake so you can maximize the oven spring.
Just before baking, if you'd like you can sprinkle the top of the seeded loaf with water and sprinkle a few more seeds on top (for that matter, you can do this before the loaf rises... you can even roll the entire loaf on a plate covered with seeds if you love seeds that much). The flax seeds are extremely oily, so they will turn black quite quickly, so I suggest using fewer of them and more sesame and poppy seeds on top.
Score each of the loaves with a sharp knife or a razor blade just before placing them in the oven.
Place each of the loaves into the hot oven and use whatever technique you prefer to fill the oven with steam quickly (squirt bottle, hot skillet, baking sheet, etc.) Currently my favorite method is to use a metal brownie pan with small holes punched in the bottom. I put it on the bottom shelf beneath the baking stone while preheating the oven. Right after placing the loaves into the oven I pour two cups of hot water into the pan. It immediately creates a steam cloud, and as the water drips out of the pan onto the bottom of the oven I get more steam. The entire pan empties in under 3 minutes, which is good because steam after the first 5 or 10 minutes of baking can ruin your crust.
Bake the loaves for 20 minutes then rotate them 180 degrees so they bake evenly. If you are concerned that they are going to get too dark, reduce the oven temperature to 350 degrees. Bake for another 15 to 20 minutes or until the interior of the loaves read 200 degrees when measured with an instant read thermometer.
Remove them from the oven and let cool before slicing.
Results
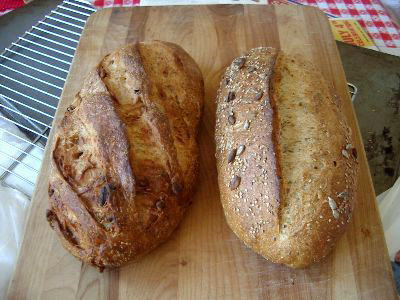
I scored the seeded loaf once:
The blue cheese-walnut bread multiple times:
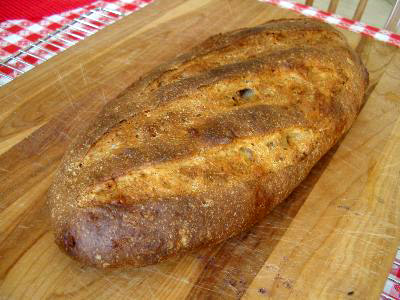
Scoring the loaf multiple times resulted in a different pattern on top, obviously, but it also resulted in a more relaxed loaf that expanded more horizontally than vertically.
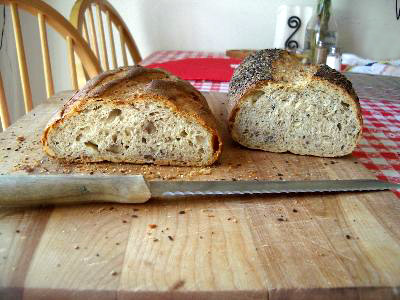
It is hard to tell in these photos, but the walnuts release oil that results in some interesting purple streaks in the loaf.
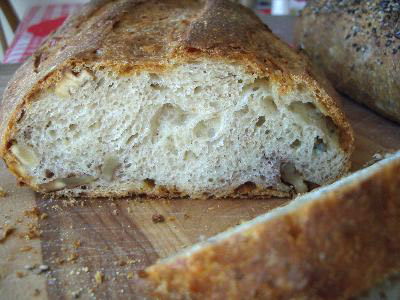
And a photo from a second batch I made yesterday. Yum!
Comments? Questions? Please post them!
Crunchy Seeds and the Stinky Cheese Bread


- Log in or register to post comments
- Printer-friendly version
Comments
WoW...They look too rustic and too professional. You have been doing a lot of baking, and as i can see you skills improved a lot.
8-)
Happy Baking.
Thanks.
I'm still getting shaping and scoring down, but the practice has helped a lot. The Hamelman book had some good tips too, though I don't think I would have found them that helpful if I hadn't been baking so often. There is no substitute for experience. :-)
Those look wonderful!! Thanks for sharing your recipe.
These recipes sound awesome..especially the Stinky Cheese!!
My question re shaping..you say to seal the seams tightly..
does this mean pinch them together or push it down into the
center?
Again, Thanks for you help!
I love the pictures, descriptions of all these great breads.......I am new to this sight so I can't wait to try yhem!
Thanks for sharing...will let you know how it all turns out!