
Apple Pie: Dream Pie Crust Realized

A modified version of Cafe Azul's Pastry Dough makes a terrific pie crust. This recipe will yield enough dough for two 9-inch double crusts or four single crusts. Yes, it is a lot of dough so make a few pies or freeze the extra. Use four sticks of butter as the original recipe states for an insanely rich - think puff pastry - pie crust. Or knock the butter down like I did to two and half or three sticks (this is my only change to the crust recipe). Divide the dough into four mounds and wrap them individually before putting them into the refrigerator. Let it rest for at least 1+1/2 hours. Be prepared to be amazed with how easy it is to roll out beautiful pie crust that is flaky, tender and buttery. Click below for the dough recipe:
http://www.epicurious.com/recipes/food/views/Cafe-Azuls-Pastry-Dough-107241
Now let's turn to the main part of the apple pie recipe (i.e. filling, baking times, etc.). I followed Rose Levy Beranbaum's recipe from the Joyofbaking.com except that I substituted her pate brisee (short crust pastry) for a modified version of Cafe Azul's Pastry Dough. Click below for the apple pie recipe:
http://www.joyofbaking.com/ApplePie.html
To briefly sum it up (click on above link for the entire recipe), Rose's way is to first, let the seasoned apple slices sit in their juices. Next, drain them and keep the juice, cooking it down with butter. Finally, mix it all in with the slices and pour the filling into the pie shell. After you top it with the other half of the crust, crimp the edges. *Here's a variation I made to the recipe: brush the top crust with a lightly beaten egg (egg wash) and give it a sprinkling of raw sugar (e.g. Washed Raw, Turbinado or Demerara). Place the pie in the refrigerator for about twenty minutes before baking it in the pre-heated oven (425°F) for 45-55 minutes - baking time will depend upon your oven's temperature and any hot spots. Good tip from Rose: bake the pie using a pizza or bread stone on the bottom rack of the oven. Place a baking pan/sheet between the pie and the stone to guard against filling overflow. The stone ensures that the bottom crust is baked through – crispy and golden! *If you are using a glass or ceramic pie pan, and you are worried about it cracking or breaking after placing it on the hot stone, make sure the baking pan/sheet is at room temperature before placing it underneath the pie pan, or you can just forego chilling the pie altogether. Keep a foil ring handy in case the pie edges brown too quickly.
As for apple varieties, I used a mixture of Fuji and Granny Smith apples. The filling was a tad runnier than I cared for (even after the pie rested) but made up for it with lots of nice concentrated apple and caramel flavors. Next time around I will use a greater assortment of apples in the pie. I will try cooking the apple slices and then cooling the mixture before adding it to the pie shell.
Here's to a bountiful autumn harvest and more apple pies on the table!
Next post: Pain de mie


Comments
I have never been good at pie crusts. The recipe kinda stops halfway. After cooling it in the fridge, then what ? Do you pre-bake with weights? punch holes ? use a thin layer of jam ?
Thank you for helping :)
anna
Anna,
I used Rose Levy Beranbaum's apple pie recipe except I substituted Cafe Azul's pastry dough for the crust because it is much easier to roll out.
Click on this link for Rose's apple filling recipe:
http://Joyofbaking.com/ApplePie.html
Instead of using Rose's pie crust recipe I modified Cafe Azul's Pastry Dough (reduced the butter so a total of 2 1/2 sticks were used) for my dream pie crust so click on this link for the recipe:
http://www.epicurious.com/recipes/food/views/Cafe-Azuls-Pastry-Dough-107241
This crust is very workable because of the egg and champagne vinegar (or apple cider vinegar). That extra protein aids in the strength and I believe that the vinegar helps out with keeping it tender. This recipe will make 2 9-inch double pie crusts or 4 singles.
Just remember to work quickly with the dough-I used my fingertips to break down the VERY COLD butter. As for the crust I didn't pre-bake (blind bake), dock (prick holes) nor use jam (Hey, that's a good idea. Will try that next time. Thanks.). I followed Rose's apple pie recipe to a tee except for the crust. Before lining the pan with the bottom crust you can lightly sprinkle flour in it first. After you line the pan with the bottom crust, fill it, top it with the other half of the pie crust, crimp the edges, brush it with an egg wash, sprinkle on sugar and stick it back in the fridge for 20 or so minutes before baking it in the hot oven.
Good luck. Feel free to ask away. This is my second blog post so I'll be tweaking it for improvements. Thank you!
new to me is to refrigerate the prebaked pie before going into the oven. Interesting.
Thank you !
I've struggled with fussy pie crusts a many. Not with this one. Let me know how your pie turns out. Hope it turns out beautifully. Comment below is a good one too.
and the tip for dusting with flour is a good one, I learned that you put the flour in the pan, and rotate it around the pan coating the entire crust to the rim, sweep out the excess flour, then put your pie crust in the pan in the fridge for about 20 or 30 minutes to chill and loose a bit of moisture, don't cover it! Then place the filling, the top crust and bake! The bottom crust comes out much less soggy, but will certainly try the stone on the bottom rack deal. My only problem is I need an extra oven rack, as when I bake, I do more than one pie! LOL
And two pies are sure better than one!
I know I find really high-fat pie crusts absolutely delicious, but a bear to work with, as they tend to be fairly brittle, particularly after cooling in the fridge. Fortunately, the guys at Cook's Illustrated found an ingenious solution: using vodka as part of the liquid.
http://www.seriouseats.com/recipes/2007/11/cooks-illustrated-foolproof-pie-dough-recipe.html
Because the alcohol evaporates off and doesn't contribute to gluten formation, you end up with a dough that's supple and easy to work with, but bakes up beautifully light and flaky. Since switching to this, I've never gone back to a traditional pie crust. It's pure genius!
we won't care if the pie is flaky or not ;)
Sorry, Anna, no hope for getting high on vodka fumes from this recipe!
Cooks Illustrated came up with the idea of adding vodka instead of more water to the crust in order to make it more pliable without leaving any flavor or making the dough tough in the way water does.
I made several pie crusts with this recipe and they turned out really wonderful, flaky and all. By the way, Cooks Illustrated tested all kinds of different pie plates, too, and Pyrex delivered the best crust.
Karin
:)
Hello, I wanted to compliment you on your beautifully shaped crust and decorative steam vents. I've made apple filling for pies using Rose's method for reducing the juices/concentrating flavors too - so tasty, and fantastic in apple turnovers also. Rose's recipes and techniques are wonderful (have you seen her other stuff in the Pie and Pastry Bible?!). Regards, breadsong
I love Rose's recipes. I only have her Bread Bible but I'm getting her Pie and Pastry Bible next. Thanks for the compliment, breadsong. My steam vents were supposed to be just a couple of slits but I got carried away and made scores of spokes. Call it the wishful bread baker in me!
your beautiful apple pie!
Sylvia
Thank you, Silvia!
ones said from freezer to oven, so they should have been ok, but more modern ones, I'm not that sure of.
BUT I think that you wouldn't put it on the stone, the stone is below the pie pan on another shelf from what I read. I wouldn't put my pie pan on the hot stone even if I were baking it in a wood fired oven, I would put a trivet under it to keep the surface heat a bit lower.
Since using pyrex or fire king is supposed to be used with about a 25 degree drop in the oven heat because it browns faster, I don't use them that often. I use my metal tins, partly because of sentimental reasons, many of them were my mother's, and partly because I never could afford the high prices of the glass ones when I went out into the world, the metal ones were cheaper. I had only two pie tins when we set up house, and both of those were less than $5 each, the pyrex ones at the time were going for close to $15 so you can see why I bought the metal ones, I've since picked up some glass ones in yard sales, but rarely use them. I do use them for crustless quiche though, as you can see how the quiche is progressing through the side.
Hello, evth
Your pie is absolutely great looking!
Happy baking,
Akiko
I always make sure everything stays very cold and put the dough in the refrigerator before I roll it out. Also once I make the pie, I put it in the freezer for about 10-15 minutes. I have never put it on a stone and always start it at 425ºF for 15 minutes and turn the oven down to 350ºF for the rest of the baking. It always comes out perfect. Also I always use 3 different varieties of apples, one that holds its shape, one that breaks down and one that is very sweet. I toss the apples with about 4 tablespoons of flour to help absorbs the juices, but I like a juicy pie so I don't like to put more then that.
Looks like you did a lot right because you pie looks great.
Regards,
Patricia
Evth, that's one beautiful pie!
Thanks for starting this timely topic!
I have been craving home made crust, but have so dreaded the challenge, that I avoided it until now.
I made my first crusts from scratch a little over a year ago, and I was amazed at how simple and delicious they were, compared to the ready made ones I used previously.
Simple, but NOT easy!
I found my mothers recipes from her now 50 plus year old Better Homes and Gardens Cookbook, which was her bible.
The biggest problem was working with the rolled out crust, it is so brittle and always ends up in pieces, which need mended.
I made some wonderful tasting, Frankenstein apple and rhubarb pies from scratch. lol Ugly but delicious!
The only way I know to get a terrific rhubarb pie, is to make it myself. Litereally.
I'm looking forward to trying this recipe, and especially since apples are now in season, and outside temps are dropping after a wonderfully hot summer.
As far as dusting the pie pan with flour, do you still grease the pan first?
(Off topic, can anyone tell me, how do you use spell check here?)
I am not sure what you mean by dusting the pan with flour, I spray the pan with Pam and dust the pie crust with flour. The flour absorbs some of the juice from the filling and thickens it, preventing a soggy bottom crust. I put about a tablespoon of flour in the pie crust once its in the pan, then I roll the flour around in the pan and crust, coating the pie crust all over the bottom and up the sides. Then I place the unfilled crust into the fridge without coverings (I make sure there is nothing there that gives off a strong smell so it doesn't absorb into the crust) and leave it for at least 20 minutes and 30 minutes to an hour is better. This allows some of the moisture from the crust to evaporate in the cool fridge, then fill and bake. Can't remember where this tip came from, but it sure works wonders for that soggy bottom crust, am going to try the stone on the rack under the pie rack next.
As to spell check, I have google toolbar on my browser header, and it has spell check, you simply click on it when you want to spell check something. Mine just did this and there is nothing wrong with my spelling, it has the ability to do different languages, and you can click on auto fix to fix any errors I guess. I rarely use it, but its there along with a translate feature which I have used.
Ronhol,
I use a pyrex pie plate and never dust or grease the plate. If you are having problems with your crust then you don't have enough fat. I don't know your recipe but try using more shortening and butter in the crust and add a little ice cold water. Don't over work the dough, just pull it together and refrigerate it. Also you can roll it out between two pieces of wax paper or plastic wrap and use it to help you place the dough in the plate. I really never have use this method, but showed my daughter as she also has a problem rolling out the dough. I just roll the dough over the rolling pin and release it over the plate and over the apples. It takes a little practice getting a pie crust right. In Switzerland I can't get solid vegetable shortening (Crisco) we only get coconut fat, and I hate it. So I use lard which makes a much flakier crust.
You will find so many opinions on how to make a crust that you will get a head full of ideas. But it is worth trying out some of them until you get the one method that works for you.
I slice up the apples, add the sugar, lemon juice, spices and 2 tbsp of flour and then chill in the refrigerator along with the pie crust. Then I quickly roll out the pie crust, rolling as few times as possible, fill the pie, dot it with about a tbsp of butter and then bake it. 450F for 10 minutes and then 350F until done. Never ever had a problem and it comes out tasty and juicy without being too runny and the crusts have never been soggy. Also like to put the crust trimmings, sometimes with cinnamon sugar on them, in the oven for the 10 minutes at 450F. They make a great snack.
Thanks Akiko. I am going to try baking your baguettes soon.
Patricia, thanks for the tips and I will try 3 different apple varieties in my next pie.
ronhol, good luck on finding your dream pie crust. If you ever feel like sharing your terrific rhubarb pie recipe please know that it would be much appreciated.
Good tips, EvaB.
And good tips on rolling, turosdolci. I've rolled pie dough on parchment paper dusted with flour and that works too. And sometimes nothing beats a leaf lard pie crust (aah...)
rhomp2002, yes, crust trimmings are a great snack! Sometimes we slather softened Nutella on the heftier fragments of crust.
Evth, This is a recipe from Mom's 1947 Better Homes and Gardens Cookbook.
I use this as my basic recipe. I simply cannot find a decent rhubarb pie anywhere, and most places insist on ruining them further by adding strawberries.
I'm a purist, and can consume one of these homemade pies in a day's time, they are so addicting.
You will want to bake one from the basic recipe first, then adjust to your own taste later.
If you chop the rhubarb in larger pieces, it will be more tart, smaller pieces will be less tart.
I like a mix of large (3/4" to 1" long) and smaller (1/2").
I find I like to make a few adjustments to my taste. I add another 1/2 cup sugar, more or less, and I also add another tablespoon or two of flour, (possibly more, I never wrote it down, and have not baked one for almost 2 years now) because I have found the pies to be pretty runny at times.
I noticed when I purchased my rhubarb from the grocer, it was much more watery when baked than the rhubarb I got from local growers.
I also like to add the bakers granulated sugar to the top of my pie crust, as you did with your apple pie.
More often than not, I don't have the orange peel, you can get along fine without it.
3 Cups Rhubarb
1 cup sugar
1/2 teaspoon grated orange peel
3 Tablespoons flour
1/8 Teaspoon salt
2 tablespoons butter
Combine Rhubarb, sugar, orange peel, flour, and salt.
Fill 9" pastry lined pie pan. Dot with butter and adjust top crust. Bake in hot oven (450) 10 minutes, then in moderate oven (350) about 30 minutes.
Hope you enjoy it as much as we do!
My husband & I will be enjoying this rhubarb pie to come.
rhubarb pie with vanilla pudding as part of the filling, it tasted heavenly.
Hi, AnnaInMD,
My one of favorite apple pie is as same as you describe. I love adding some custard filling in an apple pie !! It is great combination of apples and the filling, isn't ?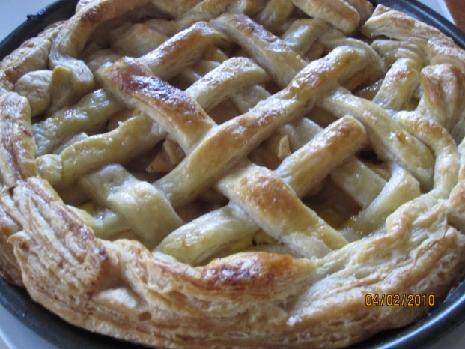
I shouldn't put the pie crust on the top though... but it tasted heavenly as you said!
Hello, evth... I am going to update my baguette's recipe, if it is going well. :)
Happy baking,
Akiko
But to get the custard taste, I add an egg, never added orange zest, but why not?
When I make mine, I take the sugar and add at least 1/8 cup of tapioca or arrowroot powder, this thickens without giving the flour taste, and makes it a sort of glossy filling. Then I add any spices, generally nutmeg in my family, and then stir the rhubarb into the sugar which has been mixed with the egg, pour it all into the prepared crust, and bake with a lattice top or open, which allows a bit more of the moisture to dissapate and the pie will be much less moist and soggy when cooled. Bake at 450 F for 10 minutes and turn it down to 350F and bake for 50 minutes, or until a tableknife inserted into the center of the pie comes out clean, just like baking any custard pie.
This was my brother's favourite pie, and like one comment here, we could eat one of these suckers each. I can remember when my husband and I were dating, we met my brother for coffee and pie at a local truck stop, and sat and ate rhubarb pie and coffee, at least 3 pieces each!
Except it calls for 2 eggs, and not the tapioca or arrowroot flour.
I never tried it, as the thought of a rhubarb cream did not appeal to me, but who knows, I may love it!
I'll have to give it a shot sometimes.
We started growing our own rhubarb, but it is very slow to expand and develop.
I remember experimenting with corn starch in place of so much flour, but can't remember how that worked, but I will try the tapioca or arrowroot, thanks for the tip.
mine actually came from a copy of the Five Roses Flour cookbook, and probably calls for two eggs, its a very old 1915 copy and my go to book for all sort of things, along with the joy of cooking book.
Rhubarb Custard Pie
2 1/2 cups rhubarb, 2 egg yolks (I use one whole egg and don't put on the meringue) 1 cup sugar, 2 Tbsp flour (this I substitue the tapioca or arrowroot powder) 1 tbsp melted butter.
Beat egg yolks to thick froth, add the sugar gradually, flour and butter. Add the cut rhubarb (1/2 inch pieces) pour into uncooked pastry shell, and bake 10 minutes in 450 F oven, turn down the oven to 350F and bake 50 minutes or until done in center(kinfe inserted comes out clean) When baked top with meringue made of the egg whites, if desired it may be baked between two crusts.
The reason I use the tapioca startch is the lady who baked for the truck stop used minute tapioca in her pies, to take up juice (the reason for the flour) and arrowroot will thicken as will the tapioca, and I'm not a big fan of corn startch.
I just found this cool pie pan which should produce the perfect pie crust before filling it with all kind of goodies.
http://www.cookware.com/asp/superbrowse.asp?clid=609&caid=&sku=FRU1079&refid=TP75-FRU1079
anna