The difference between mediocre bread and excellent bread usually has less to do with the ingredients being used than the process involved in creating it. Once you are comfortable with the basic process of mix, knead, rise, shape, and bake, your experimentation with the process can begin.
The two simplest variables in the process to modify are time and temperature. Below I will discuss how time and temperature change the character of your loaf of bread and then bake a loaf to show you how minor adjustments to the process can improve the quality of your bread significantly.
Time
Longer, slower fermentation extracts more flavor from your flour. If you are baking a simple white sandwich bread or in a hurry and you just want the darned thing to rise, you can put two or even three teaspoons of yeast into your dough and get the loaf to rise in under an hour. But if you want to create a rustic bread with a rich, nutty flavor, reducing the yeast and allow more and longer rises is appropriate.
Temperature's Impact on Rising
The warmer the temperature, the more active your yeast will be. The more active your yeast is, the quicker the dough rises. Simple enough, but you can use this in a multitude of ways. For example:
- if you want to speed up a rise, turn your oven on for 30 seconds, turn it off, and then place your dough into the slightly-above-room-temperature oven. It should rise noticeably quicker.
- If you need to leave halfway through preparing to bake a loaf, you can throw it into the fridge. It'll continue to rise in there at a much slower pace.
- You can make a large batch of pizza dough and freeze individual pieces of it in freezer bags. The yeast will survive at least a month or two in the freezer. The day before you want to make the pizza, just move it to the fridge to thaw it and then pull it out of the fridge when you want it begin its final rise.
Temperature's Impact on Baking
Temperature also has an impact on how your loaf bakes. The general rule is that crusty breads should be baked at as high a temperature as possible. Soft shelled breads should be baked at lower temperatures. When you increase the temperature of your oven your bread bakes quicker (duh).
Professional bakers of rustic breads use ovens that achieve higher temperatures than home ovens achieve. Turning the temperature of your oven up when baking rustic breads will help you get closer to professional quality loaves. Buying a pizza or baking stone is another inexpensive method of capturing more heat in your oven and improving the quality of your bread (I have shattered two of these, so I don't currently bake with one. I'll probably end up getting another one some day, but I can't say the quality of my bread has suffered that much without one).
If you get really serious about bread baking, there is even a movement of bread hobbyest who build large hearth ovens in their backyards to reproduce professional quality loaves. Pick up a copy of "The Bread Builders" if this interests you.
My wife is pleased that I have not gotten that crazy about baking good bread at home (yet).
Time and Temperature Together
As you can see, time and temperature work in opposition to one another during dough formation: increase the temperature, decrease the time that your loaf rises; decrease the temperature, increase the time it takes to get to full size.
In the rising stage, if you are striving to extract the maximum flavor from your flour, you want to slow the rise down. If you want a make a quick loaf in time for dinner, speed the rise up.
While baking, If you want a crusty bread, you'll want to increase the temperature of the oven and reduce the amount of time your loaf bakes. For soft, pillowy breads, do the opposite (more time at a lower temperature). There are times when either technique is appropriate, so don't be worried that you aren't doing things the "right" way!
One Other Tidbit: Steam and Crust
For the first five or ten minutes of baking, having steam in the oven will improve the quality of your crust. Steam does two things: first, it keeps the outside of the loaf from drying out until the dough has fully risen; second, steam coagulates the starches on the outside of the loaf, which improves the color and texture the crust.
Professional bakers have ovens that inject steam during the early baking phase. Home bakers can use a lot of different tricks to recreate this effect. The simplest method I have found has been to put an old metal brownie pan on the bottom shelf of the oven when preheating. Right after I put the loaf into the oven, I pour a cup of hot water into the pan. It immediately begins to bubble and boil, releasing a nice steam cloud that seems to improve my crust.
Don't do this with a glass pan. I did this once and it shattered as soon as I poured the water into it.
There are other ways of introducing moisture: spraying the walls of the oven with a squirt bottle, putting a pan full of water with a hole in the bottom onto the bottom shelf so that it drips onto the bottom of the oven, or rubbing the outside of the loaf with water are some of the common ways. Hot water in a pan works well enough for me.
Also be aware that some bakers have experienced malfunctions in their oven's electronics systems from the moisture caused while trying to create steam. Indeed, adding steam may void your oven's warranty. I've never had any problems doing this, but please consider these risks versus the reward of highly crusty bread before attempting to steam your oven. Let the "baker beware."
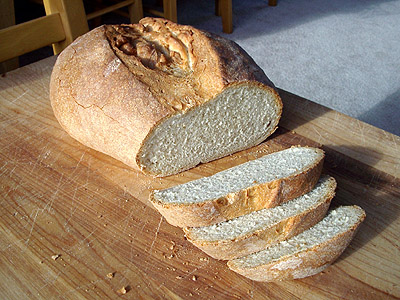
Today's Loaf
I started with the base recipe from Lesson One. I was shooting for a crusty, rustic style bread, so I decided to reduce the amount of yeast to try to slow the fermentation process down. In fact, to extend the fermentation process even longer I split the dough creation into two stages: one stage I started the night before and then refrigerated. The next day I added the dough (also known as the sponge) from stage one to more ingredients to create my final dough.
This method, typically known as the sponge or barm method, is a tried and true method for improving the flavor of your bread (and one I'll write more about in future lessons). I'm more-or-less using Peter Reinhart's approach from The Bread Baker's Apprentice: the stage one dough in this recipe is modeled on Peter's Pate Fermentee, and the final dough is something like his Pain de Campaign. But bakers have been using different variations of this technique for centuries.
Day 1
Before going to bed I mixed together:
1 cup of flour
1/4 teaspoon of salt
1/4 teaspoon of yeast
1/2 cup of water
Mix these ingredients together in a bowl. Pour it out onto a flat surface and kneaded the dough for about 5 minutes.
Place the dough back into a greased bowl, cover it with plastic wrap and let it rise for an hour or so. It won't rise a lot in that time, but the yeast will begin to wake up.
Punch the dough down, place it back in the bowl, cover it with with plastic wrap again and put it in the refrigerator overnight.
Day 2
When I got up, I pulled the bowl of dough out of the fridge and let it warm on the counter for about an hour.
In a larger bowl, I combined:
1 1/2 cups flour
1/2 cup whole wheat flour (this can be regular flour. I used whole wheat flour simply because I like it!)
1 teaspoon salt
1 teaspoon yeast
1 cup of water
day one's sponge
I mixed all of the dry ingredients together. Then I chopped the sponge up into a dozen or so little pieces with a knife and mixed them into the dry ingredients. Finally I added the water and mixed everything together, adjusting the flour or water until the dough formed a nice ball of dough that was soft and tacky but was not too sticky.
I poured the dough onto a floured surface and kneaded it for approximately 10 minutes. Then I put the dough back into a greased bowl and allowed it to rise for approximately 90 minutes. I then shaped the loaf and allowed it to rise for another 90 minutes.
(A note about these rise times: they are not exact. In reality, much was going on during the day, including a trip to the store and another trip to the playground, so no one was closely monitoring the clock. It seems to the uninitiated that making bread is a long and complicated process because the overall time it takes can be a day or more, but understand that it's really only about 20 minutes of work spread out over the entire day. It is easy enough to accommodate if you are going to be near the house all day.)
I put an empty metal pan on the bottom shelf of the oven and preheated the oven to 500 degrees.
When the oven was hot and the bread looked risen, I put the bread into the oven on the top shelf and quickly pour a cup of hot water into the pan on the bottom shelf and closed the door. After about 3-5 minutes, I reduced the temperature from 500 to 400 degrees, figuring that the loaf was done springing and would bake more evenly at a lower temperature. I baked it for 20 minutes, then rotated the loaf and bake until done.
This loaf took about 45 minutes, but time is dependent on the shape of the loaf. I used an instant-read thermometer. When the loaf hit 200 degrees inside, I pulled it out.
Aftermath
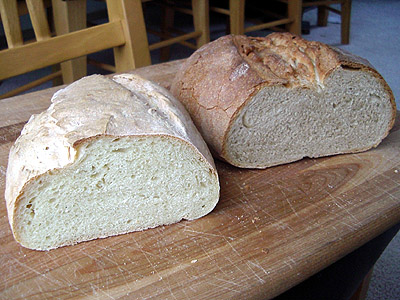
Comparing this loaf (on the right) to my bread from lesson one (on the left), I definitely noticed that this one had a nicer crust - it even crackled when I took it out of the oven and set it out to cool. It seems to me that it had a richer flavor, which was in part the whole wheat flour and partially the longer, slower rises and overnight fermentation.
A criticism of both of these loaves is that, although they are decently raised, neither one has the big irregular holes that you strive for in a rustic loaf. I think there are a couple of reasons for this. One likely reason is that I handle the loaves fairly roughly when shaping them: I suspect I am squeezing out too much of the air at that stage and rolling my loaves too tight. I also suspect I am underhydrating my dough. A moister, slacker dough should have an easier time forming large pockets. Underkneading or baking before my dough is fully risen could also have been contributing factors. As I have mentioned before, getting started baking is extremely easy, but mastering baking takes a lifetime. One shouldn't be intimidated by this: the majority of your experiments still end up quite edible.
The path to perfection is tasty, indeed!
Continue to Lesson 4: Glazing.
Lesson Three: Time & Temperature


- Log in or register to post comments
- Printer-friendly version
Comments
Hey Floyd,
You've inspired me- I'm making this lesson this weekend!
That crust looks beautiful and gives me hope that one day I can master the crust for German brotchen (one of my ultimate bread dreams).
-Erin
Good luck!
Hey nice website! I have a big honking rock oven I built inside my house for heating purposes, but found out it works GREAT for baking bread. I am still a novice at it.
Can we get the recipe for that German Brotchen?
This is the recipe I used. It didn't really turn out as I remembered them, partly because I was terrible at making crust until about 2 weeks ago and partly because there's a lot of regional variation in Brotchen..
But it's worth a shot!
-Erin
2 1/2 - 3 cups flour
1 teaspoon sugar
1 teaspoon salt
1 package active dry yeast
1 tablespoon oil
1 cup warm water
1 egg white
Pour 2 1/2 cups flour into a large bowl and make a well. Pour yeast, sugar, and two tablespoons of warm water (the water comes from the 1 cup listed above) in the well. Mix yeast, sugar and water carefully within the well. Do not mix with the flour at this time. Cover the bowl with a cloth and set it in a warm place for 15 minutes. Add the remaining water and oil and beat until mixed.
Turn out on counter top and knead until smooth. Add the remaining 1/2 cup flour as needed. Put dough in a bowl, cover, and let it rise until double in size.
Punch down and divide the dough into 12 parts. Shape into oval rolls and place 3 inches apart on a greased and floured cookie sheet. Cover and let rise until double in size.
Beat egg white and 1 teaspoon water with a fork until frothy and brush on the rolls. Bake in a preheated oven at 450 for 15 to 20 minutes until golden brown.
Source:
I just found this recipe that I intend to try this weekend.
It looks like the results should be closer to what I want:
http://bread.allrecipes.com/az/GermanBrotchenRolls.asp
Thanks for the Brotchen recipe. I'll have to try it by and by.
So far I've been baking variations of a simple French bread recipe in my rock oven. As this topic describes, it seems that technique (time and temp) is just as if not more critical than ingredients for mastering the art of baking. But as I learn the ropes I plan to try more complicated recipes. So far the simple French bread (with whole wheat and rye variations) have turned out so good that I have been quite satisfied. Reading this topic again, I think I'll add some kind of steam injection into my rock oven, altho the crust of my bread has been turning out nice and crunchy......
Just had to comment and tell you that your website is awesome! I'm definitely inspired to bake some more bread :D
Very nice, Floyd. Nice to have another lesson. I appreciate the literary value as well. It is so infrequent that I read articles that show the author has some training in writing the English language.
No offense to the rest of the posters, including me, for casual comment postings which are disctinctly different from formal writing.
Love this site.
Lee
As new as I am, I can answer your question, Lyne, from experience (very recent experience): your dough just over proofed while you were out shopping; and therefore the slash deflated it and there was no oven spring, and you had a yeasty smell. It just had nothing left to give. (The slash itself wasn't the problem; I find I can slash a good half inch when the dough is still in good shape). It seems the process always takes longer than I expect and I end up having to leave the house at critical times. Try refrigerating the dough when you need to slow down the rise. (It still rises though, so you don't want to be gone for too many hours). I keep my camping cooler handy and dump some ice cubes in the bottom, since I don't have room in my fridge. Tonight I did just that when I knew the kids' bedtime rituals would take me away from monitoring the progress. I was able to slash and bake at just the right time for a change and the loaves turned out great.
Great lesson Floyd!
Im working on that leson in sourdough and I'm having some nice results.
For the rest of you ... I really love you guys and gals. It's great that you can take your bread disappointments and write about your experience with such well writen flavor. We all have had things go wrong in our loaf and dough only to enhance the feeling of sucess when that great loaf springs in the oven. Keep up the great work and I will enjoy learning with you all.
Faith
I've been 'baking' since I was old enough to stand on a stool and help my mom make our bread when I was little. So, definitely not an inexperienced break maker, by any means. Anyway, I had/have been looking to improve, and happened to come across this forum a week or so. Wow, I am so glad I did! Awesome. Really. I've been having a blast reading and poking around. I decided to go through the lessons, using what I already know, and learning plenty more. The kids (7,4, and 2) just declared my version of Lesson 3 as the best bread ever. ;) Huzzah!!
tried to make 3 small loaves but they didn't like being apart...
I'm quite pleased with this one so far.. This is the 3rd attempt over the course of the week. The dough has since developed a very nice flavor--slightly sour with a light, chewy, moist texture.. The crust was also quite nice. The sesame was a last minute decision--turned out to be a good one. It wasn't too much and added a hint of sesame smell and flavor.. I used semolina flour to dust the peel. The first attempt I used corn flour but it imparted too much corn flavor. On my second attempt I used bread flour which was a little better. The semolina was very neutral and worked out perfectly.
The recipe I used was a basic master boulle dough recipe:
6 cups of all purpose flour
1 tbsp dry active yeast
1 tbsp sea salt
2 cups of water
I pulled the dough out of the fridge and hand formed the three loaves in about a minute from dough batch. I let rest for about 20 minutes on the pizza peel dusted with semonlina flour while the oven warmed up to 450 F with the pizza stone.
Baked for exactly 30 minutes, with 1 cup of water thrown into a bottom boiler tray at start. I let the dough cool completely before I cut into it. The crust became slightly softened as the moisture escaped however the 6 "corners" were still crispy.
Oh yes, I perfected the crust using the steam method, I was thrilled with the result, the texture taste and aroma...it was like nothing I have ever baked before.
However my landlord was unimpressed, I managed to short out the entire house, had to call an electrician and, well the oven had to be replaced. (admitedly there was a loose wire where the oven light was)..but the final steam just killed it. (I was warned!!)
I now have a new oven, a cross landlord but I am so scared to steam my loaves..... it does however have a "defrost" setting which has been handy for quickening rises for emergency loaves and for those who have tried the sourdough waffles, can get the pre mix perfect in an hour instead of overnight.
I'm in a rental now too, so I've stopped trying to steam the entire oven too. Now I either use a covered pot or a baking stone + an inverted turkey pan. Either approach keeps moisture near the loaf without putting the well-being of the entire oven at risk.
-Floyd
I tried the bread in this lesson last night... The result was sooo tasty
It was kept in the oven for around 55 minutes at 180-200C (i have a gas oven and the over thermometer takes ages to work..at some point it show 150-160 but the knob was at Gas 7 so...). In the end, the internal temperature was 95C. I'm not sure what is the best way to store it so today, after cutting it, I left it on the cutting board, cut side down. I figured that if I don't use it by tonight, I'll just freeze the rest. Next time I'll probably split the dough in 2 and freeze one loaf. This came out quite big. I have a 10" round pizza stone and it covered most of it
Any way, thank you Floyd. This really is a tasty bread !
Now I'm at day 4 with a new sourdough starter...Once it picks up (soon, hopefully, I will tried other breads)
Andrei
"Don't do this with a glass pan. I did this once and it shattered as soon as I poured the water into it."
I love that someone else made that mistake. As soon as I poured the water in, a split second before the cracks started sounding and showing, I realised I'd made a terrible terrible mistake. Didn't help the pan was a gift from my mother in-law.
Could this recipe be mixed and allowed to rise without putting it in the fridge overnight? I’m home for a snow day and would love to make it!