The Fresh Loaf

A Community of Amateur Bakers and Artisan Bread Enthusiasts.

Blogs

breadsong's picture
breadsong

Hello everyone,

At the end of June, The Bread Bakers Guild of America presented WheatStalk 2012, a *wonderful* three-day
educational event in Chicago.

On the Guild's website, the event is described as:
“… a joining together of member bakers, millers and growers to learn and improve techniques, share ideas and build community”, and,
“…will feature three educationally packed days with hands-on classes, demos, lectures and oven building taught by the industry leaders and old friends…”.

This event was exactly as promised! :^)

WheatStalk attracted some incredible (and extremely hard-working!) instructors, teaching assistants and volunteers!
The event was so much fun to attend, very well-organized, and held at Kendall College (a superbly-equipped and immaculate facility), located right on the Chicago River:
                                             

How fortunate was I to be able to attend this event, study at Kendall College, and have a bit of time to explore Chicago.
What a vibrant city! The architecture  was gorgeous (so many beautifully-designed buildings!), lots of green space in the downtown area, lots and lots of public art on display – a real feast for the eyes!

The view from 95 stories Up! --->  

Skylines:
 
Beautiful trees in among the skyscrapers, and one example of the incredibly-beautiful outdoor artwork,
                                                                                                                   a mural by Marc Chagall:


I found this event to have a joyous atmosphere with so many friends connecting again and so many
nice, kind people to meet.
Everyone was very welcoming to a home baker like myself, and my instructors were patient and generous,
each one a wealth of knowledge.
The teaching assistants and fellow students were invaluable to learn from, also – people were asking such good questions.
By the end of the conference I was feeling quite awestruck by the collective knowledge and expertise of the bakers in attendance!


The first evening, Jeffrey Yankellow presented a Baker’s Math class.
Jeffrey emphasized the importance of knowing the function of ingredients in dough, of understanding the bread-making process and baker’s math, and of practical experience. With all of all of these, he said you can ask yourself, “What do I want this bread to be?” and create any bread you want :^)


The next three days offered almost-impossible choices (by that I mean, so hard to choose among the incredible classes and demos offered!):  the range covering artisan breads and pastries, gluten-free baking, wood-fired oven baking, decorative breads, milling, bread baking science, building a wood-fired oven, food photography, equipment maintenance...

The social gatherings organized were lovely and it was really good see so many people enjoying one another’s company!

My first class was Decorative Breads, with Coupe du Monde de la Boulangerie / Team USA Silver medal winner
Harry Peemoeller :^)
I admired the way Harry ‘thinks outside of the box’ and uses all sorts of different things for molding pieces for his displays, the way he brings components together to create individual pieces and an overall artistic vision, and how he uses natural ingredients, powders, spices and glazes to make his pieces look so realistic.
Here is a picture displaying Harry’s craftsmanship using decorative dough, along with his artistic design and construction/engineering skill!:
 
(and, a link to a photo of Harry's Team USA Coupe du Monde de la Boulangerie work of art!)


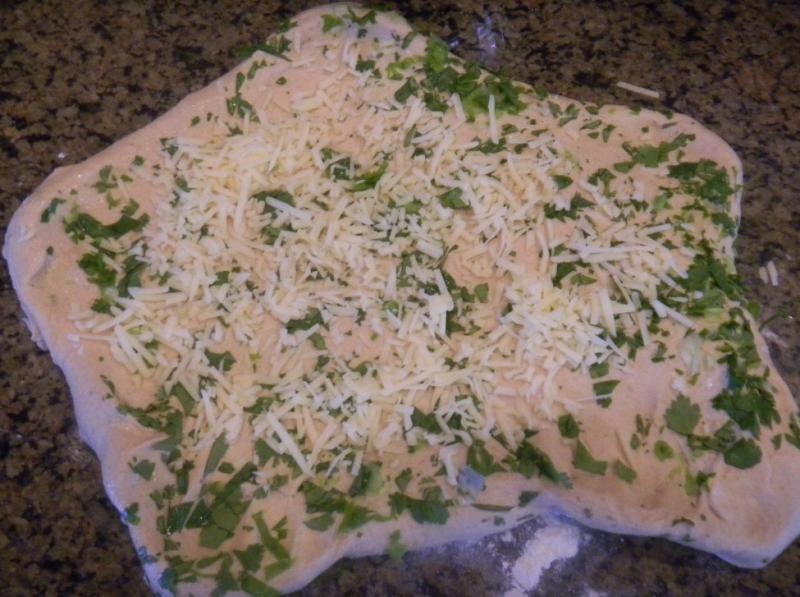
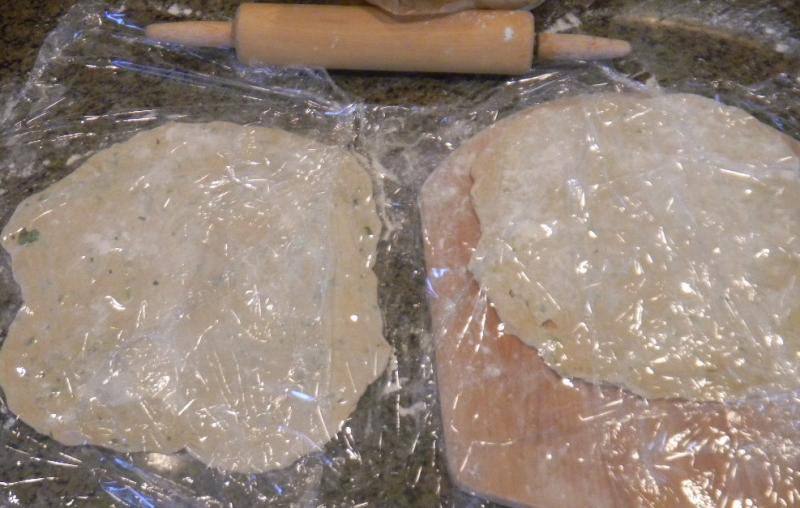
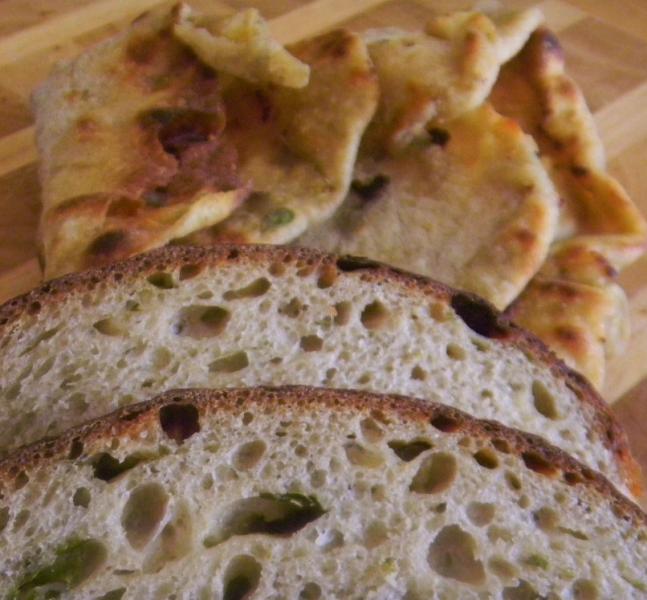
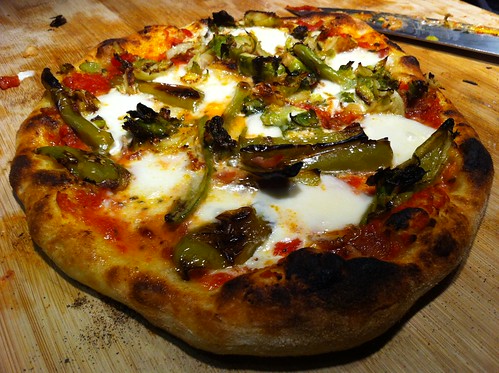
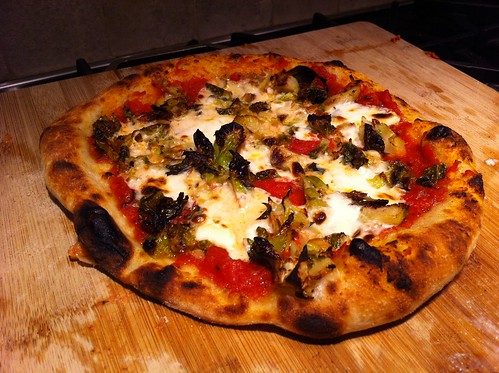
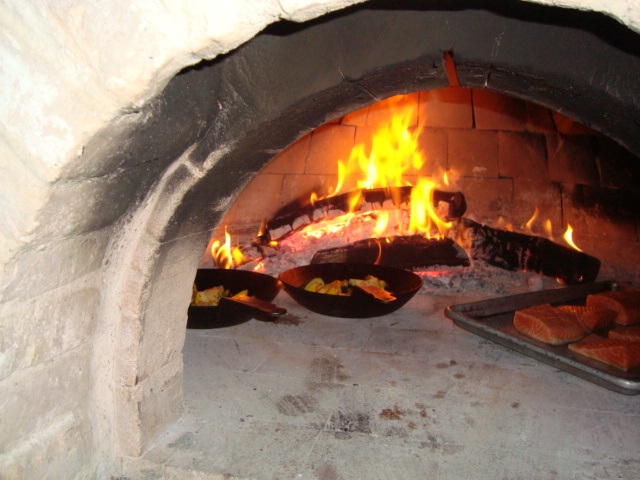
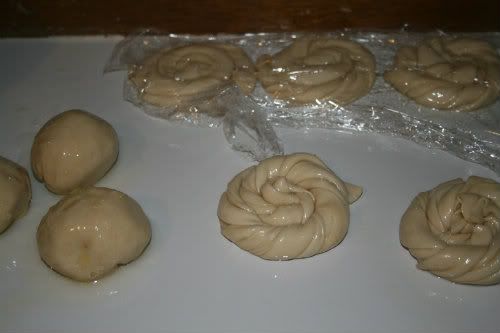
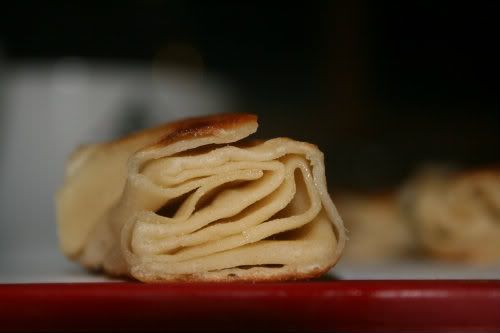
The next day's class was Baking with Sprouted Wheat Flour (and wood-fired oven baking), taught by
Richard Miscovich, a professor from Johnson and Wales University. Richard had such energy, enthusiasm and patience and was an excellent instructor! Richard taught us about sprouting wheat and how to use freshly sprouted berries a couple of different ways, mixed up two different types of lovely sprouted wheat dough, and also instructed us regarding wood-fired oven construction, insulation, proper burning/combustion, steaming and baking. Fascinating! I read in the latest Guild newsletter Richard is writing a book on wood-fired ovens (oh, I’ll be watching out for this book! ). Here are two photos showing what came out of that wonderful WFO :^)  
(a a 50% sprouted whole-wheat with sesame, and a 100% sprouted whole-wheat):
 

The last day I attended a Baking Science lecture presented by Lee Glass (a physician really good at explaining chemistry!) and Andrew Ross (a crop and food scientist and professor at Oregon State University). These gentlemen taught in an engaging way, bringing the subject matter to life with clear explanation and humor – it was very interesting, and enlightening.
Solveig Tofte (of Sun Street Breads in Minneapolis, MN) then presented an entertaining  demo on Scandinavian Baking. Solveig’s demo was touching as she discussed family recipes she’d worked on, and in the process, had been able to recapture flavor memories for her family. Her Vört Limpa Rye bread was one of the best ryes I’ve had the pleasure to taste; I was so preoccupied with its gorgeous flavor I didn’t even think to take a picture of it! Solveig described the flavor of this bread as “not sweet, and the spices don’t camouflage the flavor of the rye and fermented grain”. So true! – the bread’s flavor was beautifully balanced. Here is a picture of two beautiful Fyrstekake (“Royal” or “Prince’s Cake”, Norwegian almond-filled tarts) she demonstrated:
just loaded with almondy-goodness! :^)

Update: This blog post on Modern Baking's site is a lovely write-up about Solveig's presentation, and features her recipe for Harring Kake:
http://modern-baking.com/blog/glimpse-rich-family-history

To read more about WheatStalk, please see these lovely blogs, so well-written and filled with beautiful photos:
http://www.farine-mc.com/2012/07/wheatstalk-2012.html
http://thebakingblog.com/category/wheatstalk-2012
http://thebakingblog.com/2012/06/28/natural-ingredients-and-traditional-practices/
http://thebakingblog.com/2012/06/29/taking-inspiration-from-team-usa/
http://thebakingblog.com/2012/06/30/when-cardinal-rules-are-broken/


Update: Here are some more links to coverage regarding this event:
http://www.zingermansbakehouse.com/2012/07/wheatstalk-2012-i-was-there-man/
http://www.bakemag.com/Photo%20Gallery.aspx#id=album-339924&num=content-6344565

Lastly, here are a few pictures of some the lovely breads produced by some of the classes (wish I could have seen (and tasted!) them all!):

Easy Rye Breads, taught by Volker Baumann
 

The *most delicious!* kougelhopf,
kindly provided for breakfast by The French Pastry School 
(that was not my breakfast plate btw :^), limited myself to just one, willpower in action let me tell you!)

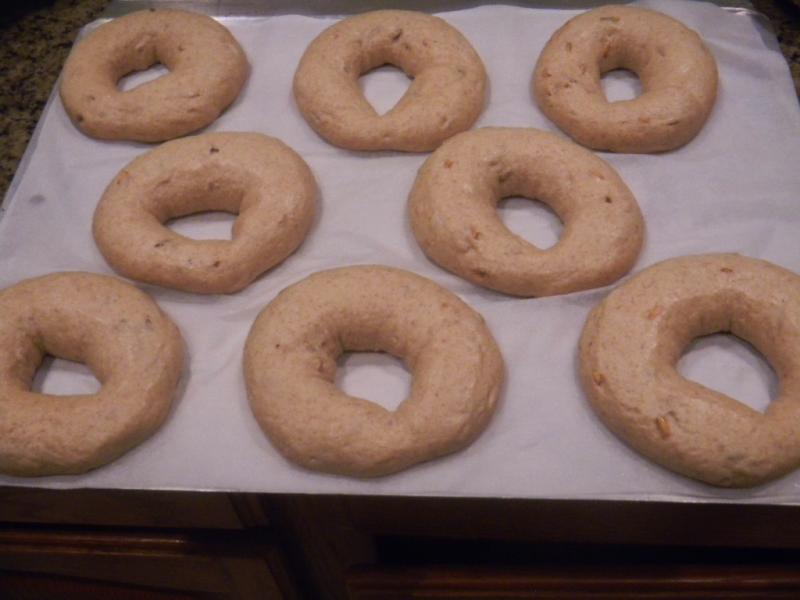
Bagels, Bialys and Pretzels, taught by Jeffrey Hamelman
 

An extremely-tempting-looking savory pastry, crafted by Ciril Hitz

Baking with Ancient Grains, taught by Frank Sally
   

Team USA Bread Demo, Jeffrey Yankellow and Mike Zakowski


Many, many thanks to the Guild and those who organized, taught, and volunteered at WheatStalk: a truly first-class event!
Thanks too, to Kendall College, Goose Island Brewery, and The French Pastry School for being such generous and gracious hosts.

I left this conference feeling so privileged to be able to attend, full of inspiration to learn more about baking delicious, nutritious, beautiful bread,
and *very grateful* to all of those organizers and teachers who put this event together for the benefit of the students.

Happy baking everyone!
:^) breadsong

dabrownman's picture
dabrownman

We were feeding the yeast water on the 3th of July and didn’t want to throw any YW away.  With the 4th of July the next day and knowing it would only be my apprentice and I for dinner that night, we decided to have some rib eye steak kabobs, veggie kabobs and garam masala rice and beans.

 What was missing was some Naan to put the dinner in to eat it properly.  We decided not to bake the Naan or cook it on the stove top but dry fry it in the cast iron skillet on the grill while grilling the kabobs.  After making pizza the other day on the grill we thought it would be fun.

 We were inspired by Sonia101’s unusual Roti here:

 http://www.thefreshloaf.com/node/29275/roti-bread

and by Delta_v’s stove top Naan here:

 http://www.thefreshloaf.com/node/27350/quick-stovetop-naan-recipe

You can see my Naan were larger than 12" and got squished at the edges to fit the pan - no worries !

 We built a 2 stage yeast water levain, 4 hours each using durum atta and AP flour.  After 8n hours it had doubled and was ready to go.  At the 6 hour mark we autolysed the bread flour with the liquids and the spices.  We held out the Greek yogurt, fresh herbs, green onion, baking soda and salt.

 The YW levain and the autolysed flours were mixed with the salt and Greek yogurt for 4 minutes on KA 2 and then 4 minutes on KA 3.  The baking soda was then added and mixed in for 1 minute on KA 3.

 The dough was then rested for 20 minutes.  Then it was turned out on a lightly floured surface and hand kneaded for 5 minutes and allowed to rest covered for 10 minutes.  The fresh herbs and green onions were then worked into the dough using S & F’s.

 The dough was allowed to develop and ferment for 1 hour.  (2)150 gpieces were separated out for the Naan and shaped into a ball and allowed to rest for 10 minutes.  The remainder of the dough was shaped into a loaf and placed into an oil sprayed Pyrex loaf pan and allowed to double over 4 hours.


Kabobs and..............................................................................Naan with Mexican Chipotle Pink Sauce

 The Naan balls were rolled and pressed out to 12”circles and covered with plastic for 30 minutes.  Then they were transferred to a floured peel like a pizza for chucking into the skillet on the grill – closing the lid. The gauge read 450 F.   After cooking for about 2-3 minutes the Naan was flipped and the cooked side, now facing up was brushed with Mojo de Ajo.  After another couple of minutes the bread was flipped again onto the Mojo de Ajo side allowed to fry for about a minute.  The bread was then folded to fit into a tortilla warmer while the 2nd Naan was fried. 

 The un-slashed loaf of bread, using the same dough, was baked in the mini oven at450 Fafter preheating with 'Sylvia’s Steam' at 500 F.  It was steamed for 12 minutes then the steam was removed, the loaf rotated 180 degrees and the mini oven was turned down to 425 F convection this time.  The loaf was rotated every 5 minutes until it was done and205 Fon the inside – about another 20 minutes – 32 minutes baking time total.  It was left in the oven with the door ajar and heat off for 10 minutes to further crisp the skin.

 The loaf and the Naan were both terrific.  The loaf was nicely browned, blistered and crunchy when it came out of the oven but it softened as it cooled.  The crumb was open, soft and moist.  It tasted like Japanese white bread met Indian curry.  When toasted with butter and corn jam it was just great.

Peach and mango Crisp for desert

 The Naan ended up with some soft and crunchy parts that made it unique.  It went well with the kabobs and tasted like a plate of Indian veggies and spices.  Yummy. 

Toasted with butter and carrot jam - delish!!

The formula follows;

Yeast Water Naan with Paneer, Garam Masala, Onion Garlic, Cumin and Cilantro     
      
StarterBuild 1Build 2Total% 
Durum Atta7007015.56% 
AP0707015.56% 
YW 70,Water 70707014031.11% 
Total Starter14014028062.22% 
      
Levain     
Hydration100.00%    
Levain % of Total28.00%    
      
Dough Flour %   
Durum Atta22550.00%   
AP22550.00%   
Dough Flour450100.00%   
      
Salt102.22%   
Water26057.78%   
Dough Hydration57.78%    
      
Total Flour590    
Total Liquid400    
T. Dough Hydration67.80%    
Whole Grain %50.00%    
      
Hydration w/ Adds67.80%    
Total Weight1,000    
      
Add - Ins     
1/4 tsp each ground coriandr and cumin    
1 T sugar     
1 tsp each garlic, onion and garam masala powders  
1 T fresh garlic chives     
2 T fresh cilantro     
1 minced green onion     
2 T Greek yogurt     
1/8 tsp baking soda.     
Mojo de Ajo for brushing on one side of the Naan   
1/2 C Shredded Paneer     
Andreea C's picture
Andreea C

Hey you all!

I've just baked the sourdough rye with raisins and walnuts from Mr. Hamelman's "Bread" book (pg. 208) and I am very happy with it. I really enjoy its texture given by the combination the nuts and fruits with the very spongy crumb. It is not sour at all and the crust is very "crusty". Also, the rye taste is evident, despite of this being a 50% rye bread and despite the other flavors. A very good, very tasty bread, in my opinion.

I halved the quantities and eliminated the yeast from the formula. I used 250 g rye flour No. 1370 (a medium to dark rye flour, 8.3 g proteins) and 250 g wheat flour No. 1050 (a dark flour with 11.6 g proteins, the nearest to high-extraction flour that you can find in Germany). For incorporating the raisins and nuts I used Andy's method illustrated here.

I also added more water during mixing, around 35 ml, raising the hydration from 68 to 75%. 

The schedule for this bread looked like this: 8 hours for the sourdough at around 25 degrees, 2 hours 15 minutes bulk fermentation, 10 minutes preshape/shape, 45 minutes final fermentation (in a banneton with cloth and dusted with a lot of flour). (I keep my rye sourdough culture at room temperature and feed it twice a day.)

With scoring things went a bit wrong. This is the fifth rye bread I make and the first one I score, so I kind of panicked. I planned to make five cuts like here, but I ended in two seconds with much more assymetrical cuts. I thought the bread would come out very ugly because of this, but this wasn't really the case in the end. :)

With this bread I also realised I have the worst bread knife ever and that I need a better one very soon. It couldn't deal with the thicker crust of this bread, so the slices were kind of wavy. It also shredded the the crumb here and there, as you can see in the third photo. 

I am submitting this post to YeastSpotting

I wish you all happy baking!

Andreea

breaducation's picture
breaducation

I've been tinkering with pizza dough for awhile now and recently I've had a break through both in my dough formula and with the bake.

Most formulas I've found online for serious quality pizza doughs are designed with high heat wood fired ovens in mind. These doughs are usally high-hydration doughs which work really well in an extremely hot oven. The problem with this for me is that my oven only taps out at 555 degrees, a good 350 degrees cooler than a traditional pizza oven. What results is a dough that doesn't stay crispy, takes too long to color and doesn't rise all that well.

What I've discovered with pizza dough is that there is not one dough that will work with all ovens. Rather, the best pizza dough is the one that works best in your oven. In my case that calls for backing off the hydration significantly. I've found that, in general, the hotter your oven the higher you can push the hydration.

For my oven at 555 degrees the best results I've gotten have come from using a 68% hydration dough. The resulting crust has just the right amount of crispiness with a soft open crumb.

This brings me to my dough formula. I have tried using a purely commercial yeast dough, either straight or with preferments and the results have been good but not quite as complex a flavor as I would like. I've also tried using pure sourdough leavening and have gotten good flavor but the texture is off. The crust is not light and airy enough.

I've finally settled on what, for me, is the perfect pizza dough. It's a hybrid of commercial yeast and sourdough. With this dough you get the best of all worlds. Light,  soft and flavorful with a thin, crispy crust.

What makes it even better is that the process is very easy and does not take much work. Simply combine all ingredients and let ferment 2 hours  at 76 degrees with 2 folds. After that you can let it sit in the fridge until you are ready to use it. The minimal mixing time results in the most flavor possible and an open crumb. You may want to autolyse this dough if you make it yourself as I did encounter a little bit of elasticity when I attempted to stretch out the doughs for pizza making. Poolish instead of sponge might also help with this.

Here is the formula:

IngredientsBaker's %
Flour100.00
Water68.53
Instant Yeast0.39
Salt3.30
Sponge100.00
Liquid Starter15


I also figured out a new way of baking the pizza that more closely simulates a pizza oven. With the oven at 555 degrees it takes way too long to get a nicely crisp crust. So what I do is bake the pizza on a stone as normal until the crust has fully risen and the cheese is melted, about 3 -4 minutes. At this point, I put the pizza directly under the broiler and char it for maybe 10-15 seconds. This is enough to get a perfectly charred crust. The best part was that the family loved it!

All the ingredients in the bowl ready to be mixed:

Results:

Anaheim pepper and mascarpone cheese:


Brussel Sprout:

dabrownman's picture
dabrownman

Thanks Franko for the 'Pate Push'

Carrot Jam

Portugese Stew

Peach and Mango Crisp.....with topping

Juergen Krauss's picture
Juergen Krauss

This is not for the fainthearted.

When I got ITJB (Inside  The Jewish Bakery) and flicked through, my rye addiction kicked in, and the unusual process (kind-of Auermann three stage) of the Black Bread intrigued me. This was the first recipe I tried from ITJB - and failed spectacularly.

The top half of the (freestanding) loaf was nice, but turning the temperature down as stated in the recipe let the loaf sink in, and the lower half was dense and badly undercooked.

Encouraged by a PM by Stan, whom I contacted, I gave it a second try - and failed again - this time I attributed it to family business interfering with the proving schedule.

After a long break from this recipe - and some recalculations, and lots of learning about rye and my oven I tried it again last weekend, using my proofing box. This time I baked in a tin, and extended the hot phase of the bake.

The bread came out very wet - looking undercooked, almost greyish in the middle (cut after 12 hours). I was disappointed and tended to attribute this to the superhyrated dough: 117% (if my calculations are correct).

BUT ...

I had made 2 loaves and kept one aside, in a plastic bag.

Today (4 days after the bake) I opened the bag - amazing smell. I cut the bread - still moist, but the crumb had changed completely. Beautiful chocolate brown, with a rich, tangy taste:

My advice if you want to make this bread:

1. Don't Panic

2. Follow the recipe (take oz amounts as a base - I calculated the bakers % from those)

3. Use loaf tins first

3. You might want to extend the hot phase of the bake by 10 minutes (and/or consult ananda's posts about Borodinsky bread for ideas about the baking regime)

3. Wait at least 3 days before cutting into it!

ITJB rocks!

Juergen


SylviaH's picture
SylviaH

Happy 4th to all you fresh loafer's.

Our family enjoyed and celebrated yesterday with food and the fireworks tonight. 

Just a couple of breads and treats baked to bring from my house : ) 

Good Ol' delicious Scali...but this time I've added 40% Durum flour.  The recipe is for both the Scali and dog treats are at http://www.kingarthurflours.com 

        A Scala to go


                                   I used a chopstick end to make the little indentations for a more bonie look

                the pet's love these..the bird, doggies, horses even fluff the hamster..also fit for human consumption..not bad :)

                and very easy to make.  

                                      What a Treat of Day!


                              There were all kinds of pizza combinations.


                       I enjoyed very much watching and picking up some pointers on pizza's and WFO baking :)                   


                              Salmon Dinner was the highlight of the meal.  Beautifully prepared by the chef.


Sylvia


dabrownman's picture
dabrownman

It has been almost 3 weeks since the last blog post of lunch sammys and other stuff - so here goes.

More later


dabrownman's picture
dabrownman

It has been several year's since bagels were on the bake list.  We always made them sourdough but after seeing that Stan published his bagels on TFL, we had to give them a go for the 4th of July. 


We used Stan's method but instead of using clear flour we used a host of multi-grain s and some sprouts.  The grains include dark rye, WW, Durum Atta, semolina, soft white wheat and Bread flour.  The starter was a sourdough and yeast water combo starter that had some Bulgar, AP and 6 grain cereal in it.


Since the whole grains were over 50%, much of it home ground, we upped Stan's hydration to 60% from 50% and hand kneaded it after mixing the levain with the dough and salt briefly in the KA .  We built the combo levain in 3 stages - first 2 stages were 4 hours each and the last stage 2 hours before being refrigerated overnight.   The YW was used to replace the commercial yeast in Stan's recipe.

When the levain came out of the fridge the next day, we autolysed the flour with the dough for 2 hours as the starter warmed up.  We hand kneaded the dough for 10 minutes after mixing in the KA for 3 minutes.  The 25 g of sprouts were added at the very end of kneeding.  The dough was then rested for 15 minutes to relax it before forming the bagels over the knuckles and rolling the seam.

We weighed out the dough in 102-103 g portions to end up with 12  nice sized bagels that ended up at 85 to 90 g (with seeds) when baked.  Stan's recipe doesn't call for any bulk ferment prior to or after forming the bagels or after retard either.  I guess they were supposed to only rise in the fridge.  The bagels are formed right after kneading and placed on parchment, covered in plastic and placed directly in the fridge for an overnight retard.

The bagels are then removed from the fridge the next morning and simmered in malted barley water for 1 minute, (30 seconds a side -mine floated right away) then dried slightly (we used a non terry cloth towel) before dipping them in the sesame, poppy, salt or combo toppings.  They go back on the parchment and directly into a 450 F oven preheated with steam in place for 8 minutes.  Then the steam is removed, the bagels turned over and baked for another 8 minutes.

I tested the baking with 4 bagels and found that, using 2 of Sylvia's steaming pans with towels and water, the bagels needed 10 minutes of steam then flipped without steam for 10 more minutes and then flipped again for 2 more minutes - 22 minutes in all instead of 16.  We made 4 sesame, 4 poppy and 4 combo black and white sesame with kosher salt.

The bagels didn't rise as much as we wanted even though they tasted very NY authentic and had fine chew just like they should.  These would be great bagels if allowed to proof in a trash can plastic liner at room temperature - possibly after simmering in the water.  Maybe someone would know the correct thing to do.  I read later that David Snyder lets his bulk ferment for an hour before forming and retarding. 

The formula follows immediately if not sooner.

SD & YW Multi-grain Bagels with Sprouts - Stan Ginsberg Method     
      
StarterBuild 1Build 2 Build 3Total%
SD Starter1500152.78%
Bulgar10100203.70%
6 Grain Cereal10100203.70%
WW15150305.56%
Semolina0020203.70%
Durum Atta20200407.41%
AP0020203.70%
Rye15150305.56%
YW 70,Water 707070014025.93%
Total Starter1551404033562.04%
      
Levain     
Hydration77.78%    
Levain % of Total27.64%    
      
Dough Flour %   
Dark Rye203.70%   
Whole Wheat203.70%   
Semolina509.26%   
Durum Atta509.26%   
Soft White Wheat15027.78%   
Bread Flour25046.30%   
Dough Flour540100.00%   
      
Salt101.85%   
Water29554.63%   
Dough Hydration54.63%    
      
Total Flour577.5    
Total Liquid442.5    
T. Dough Hydration76.62%    
Whole Grain %52.78%    
      
Hydration w/ Adds60.62%    
Total Weight1,230    
      
Add - Ins %   
Barley Malt152.78%   
VW Gluten101.85%   

Sprouts (Rye & WW)                          

Total

25

50

4.63%

9.26%


sonia101's picture
sonia101

I love this take on Roti Bread, love the crispy layer of this bread and it's so much fun to make! 

Ingredients
  • 500g plain flour
  • 1 egg, lightly whisked
  • 1 1/2 tsp salt
  • 1 tsp sugar
  • 1/2 cup water
  • 1/2 cup milk
  • 2 cups vegetable oil
  • 100g ghee
For instructions watch   Pho's video http://youtu.be/JMlGH6Fdwzs


Cheers Sonia

Pages

Subscribe to RSS - blogs