The Fresh Loaf

A Community of Amateur Bakers and Artisan Bread Enthusiasts.

Blogs

kshaunfield's picture
kshaunfield

Hello all,


Maybe the forum is a better place for this, but I wanted to introduce myself and ramble a bit.  I am a new sourdough baker (and currently have no interest in yeast breads) with about 10 loaves under my belt.  In addition to being a lover of sourdough, I am also a stay-at-home dad with a 4 month old daughter, an avid cook, home-brewer, urban gardener, beekeeper, and chicken-raiser and love cycling, hiking and backpacking.  Also, I love to learn and tend to throw myself into new hobbies.


I got into baking after reading Classic Sourdoughs by Ed Wood and aquiring a culture (his Finland culture).  After a few bakes, with few real successes (dense crumbs, the second half of the loaves mostly went to the chickens), I discovered The Fresh Loaf and my education really began.  Firstly, thank you to this community of passionate bakers with a willingness to share.  I think my initial lack of success was due to poor kneading technique, over-proofing and perhaps using mostly all-purpose flour.  My last few loaves have been quite successful and I think (based on a slightly educated guess) it's related to limiting my bulk fermentation to about 6 hrs, incorporating about 50% bread flour and improving gluten development in the dough via autolysing and doing several stretcch and folds during fermentation.  Needless-to-say, I'm eager to broaden my experience and continue developing my techniques.  As I'm still a beginning baker I realize I have MUCH to learn and am hoping for a few suggestions.


First of all, I'd love to know what experienced bakers would suggest regarding equipment.  So far, I have only the very, very basics: some measuring cups, large pyrex mixing bowls, some counter space or large wooden cutting boards, and a couple of baking sheets.  I'm the type that likes to keep things simple and have neither the space or funds for significant equipment (aka a mixer), but I wonder if a few basic things like a dough whisk, dough cutter/scraper and scale would be my best initial investments?  It definitely seems to me that a scale is necessary to truly get consistent results and be able to precisely control hydration (not to mention it seems experienced bakers here only list their recipes by weight).  What are your favorite or indispensible tools?


My second question regards techniques.  I started following Ed Wood's advice (all-purpose flour, not preheating oven, I even put together a proofing box to control temperature - I've barely used it).  I realize now that the suggestions he provides in Classic Sourdoughs: A Home Baker's Handbook, are neither typical nor particularly extensive.  He seems to imply that temperature is the primary driver of sourdough flavor, higher temperature favoring bacteria and sourness, potentially at the expense of leaving ability.  However, from some of my subsequent reading on TFL and elsewhere, it seems the picture is much more complicated and that the sourness of sourdough is multifaceted (lactic and acetic), and can be influenced by the hydration of the starter (cooler and drier favors the yeast?), temperature, length of different proofs, even how long after the baked bread cools that it is sliced (so the flavor continues to mature even after baking?).  Many questions, I know.  Regardless, as I embraced the broader world of sourdough baking suggestions I seem to have had more success, though I don't yet have enough experience to fully understand why.  So what technique or change in process first propelled your sourdough to the next level?  Also, there seem to be many valuable books that could enhance my understanding and baking, what would you recommend?


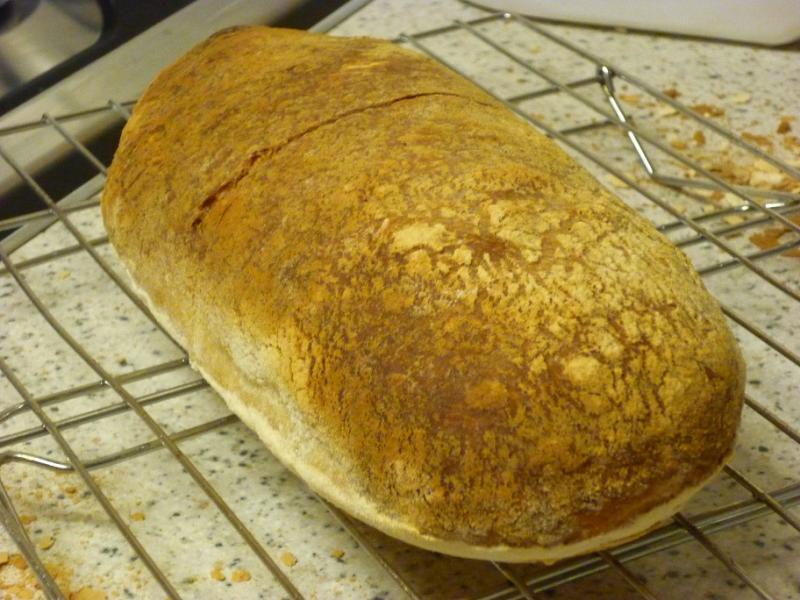
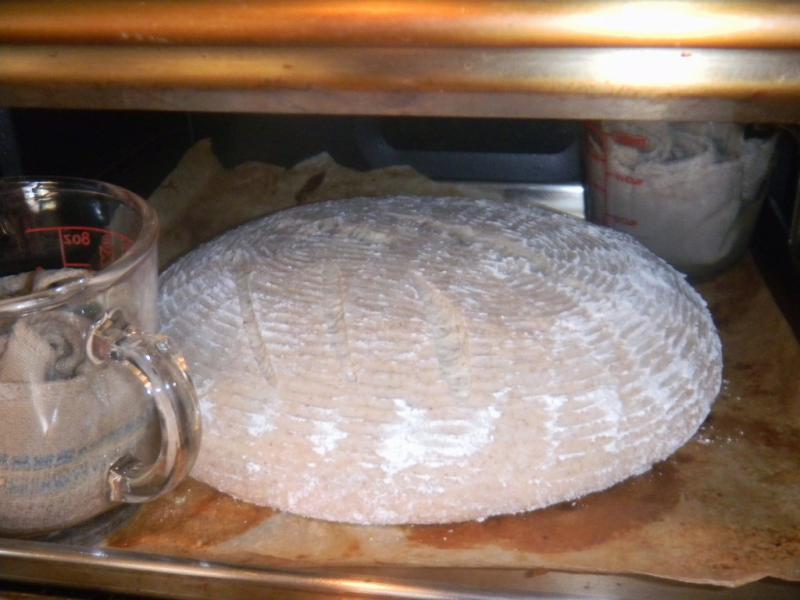
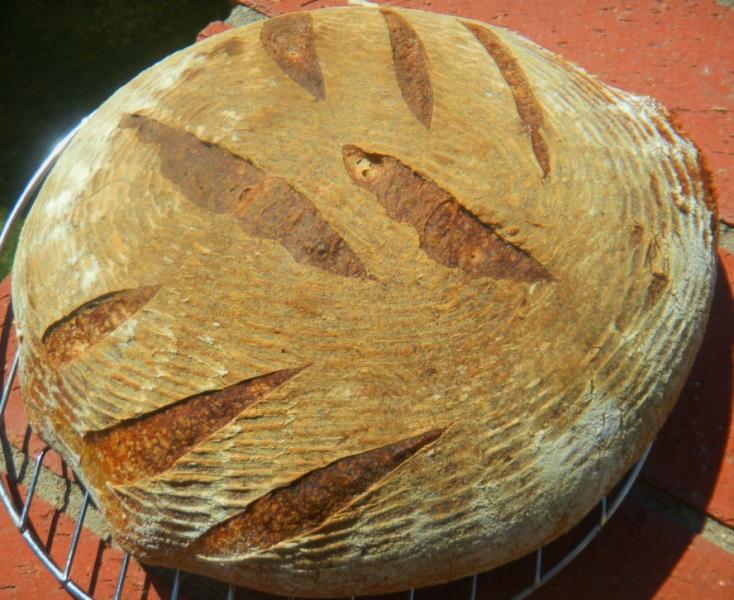
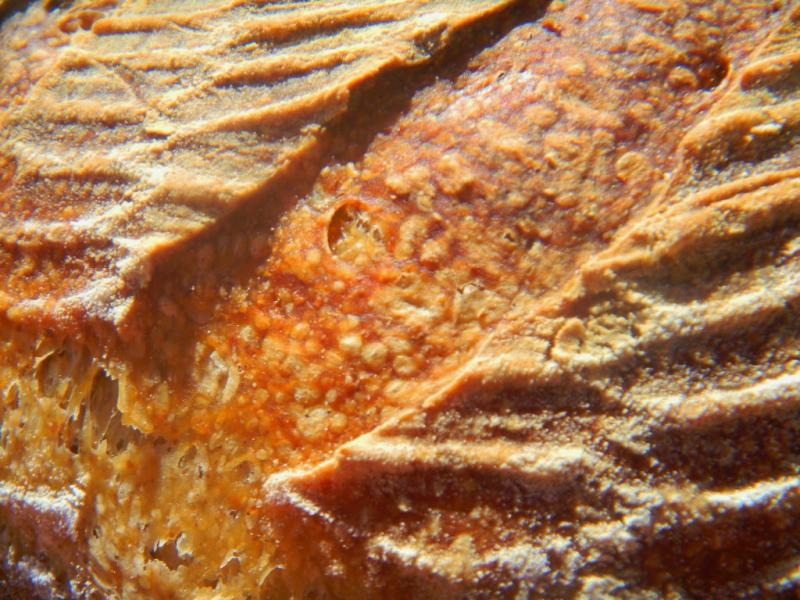
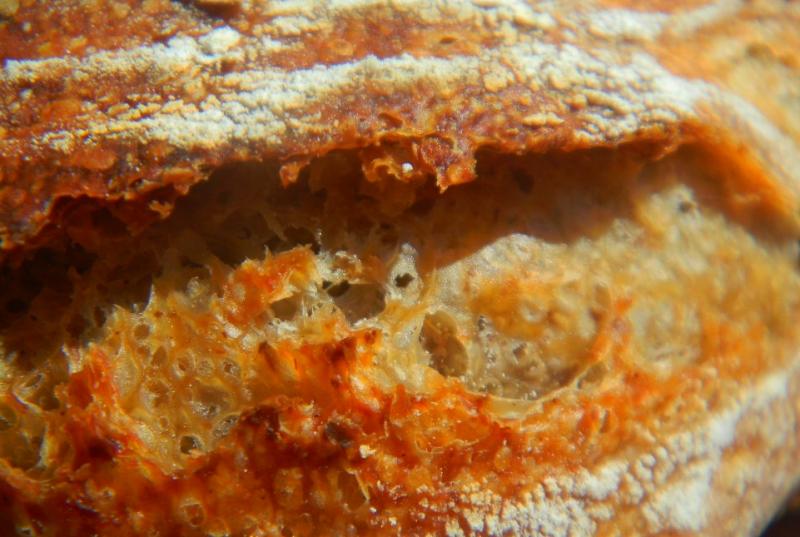
In regards to my loaves, I'm still perfecting my basic loaf: a 1.5-2lb white (or mostly white) sourdough batard.  Here's my basic process, I'm willing to tweak it and am open to criticism and suggestions.  My current process involves thoroughly mixing by hand, letting autolyse for 30 minutes to an hour, adding the salt and the last cup of flour, a short maybe 10 minute kneading (I'm still not very good), then rest in a covered bowl and do a stretch and fold about once an hour for 4 hrs allowing a total of 5-6 hrs bulk ferment, then removing from bowl, letting rest for 30 minutes, shaping (which I still need practice at), allowing to ferment (covered) an additional 3 hrs, brushing crust with melted butter, slashing, placing in a 450 - 475F preheated oven, spritzing oven with a spray bottle 3 times at 5 minute intervals in the first 10 minutes, turning loaf once, removing from the oven after about 40 minutes and allowing to cool overnight on a wire rack.  The result is a pretty decent loaf: crispy-chewy golden brown crust with some blistering, moderately open and moist crumb, not particularly complex or sour but delicious.  I'm pretty happy with the result (its as good as anything I can buy locally), but would ultimately like to be able to increase the sourness, get a more complex overall flavor, get a consistently attractive bubbled/blistered golden brown crust, reliably achieve a more open crumb, and hit the shape I'm going for (my last 3 "good" loaves were all rather wet doughs and despite my shaping attempts were slightly flattened, maybe 2-1/2" high).


Sorry for the lengthy post.  Thanks again to the entire TFL community for sharing your skills and wisdom, particularly the imformative posts of dmsnyder and txfarmer (and many others I have yet to discover).  I look forward to hearing from anyone willing to give me guidance on where to go from here!


Cheers,

Kirk


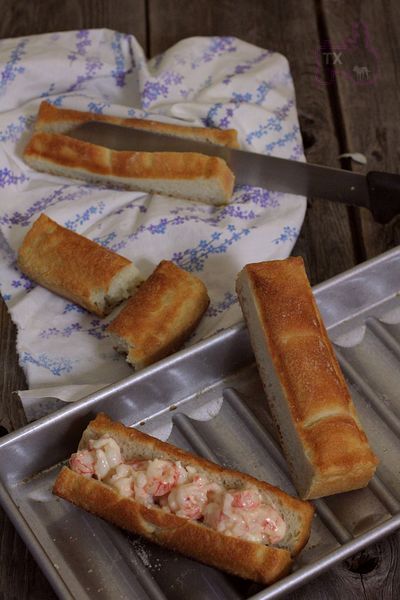
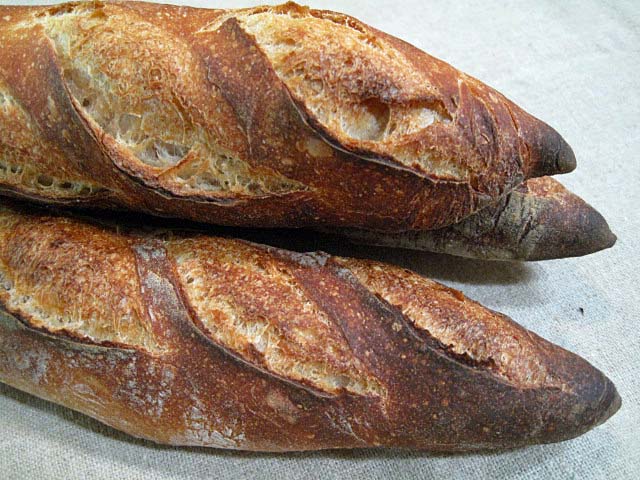
P.S. - Equipment-wise a scale is probably on top of the list, then I'll try my hand at some of the amazing recipes on TFL like dmsnyder's San Joaquin Sourdough or  txfarmer's 36+ hr Baguettes

mwilson's picture
mwilson

Biga acida

  • 20g lievito naturale
  • 200g '00' flour
  • 80g cold water

Lievito dissolved in water first then mixed with flour to create a very dry dough. Pin rolled until smooth. Rolled flat, ~4mm thick, wrapped in cling film and refrigerated for 2 days before removing and left overnight until mature.

Final dough

  • 175g biga acida
  • 35g '00' flour
  • 86g water
  • 3g salt

Cut biga into pieces and mixed with 35g of water. Added flour to combine. Added salt. Adjusted the mix with remaining water to achieve a total hydration of 85%. Very minimal kneading. A few s&f's performed.

Crumb

Observations

The biga was wonderfully strong after fermentation. Stronger than I ever felt a biga to be, really nice to feel. Fruity alcohol smell and characteristics reminiscent of a yeasted biga but accompanied with an acetic acid taste. 

The biga contributed vast strength, the final dough at 85% handled like it was 70%!

Final dough didn't rise as swiftly as I expected. The biga was probably not fully mature.

Baked loaf has wonderful flavour in the crust and some sourness in the crumb. Super light.

-Michael

txfarmer's picture
txfarmer

Sending this to Yeastspotting.

Click here for my blog index.

Got a new hot dog pan recently, and found the attached recipe here. Reading through the comments, many people noted that the buns were a bit too dense. Going back to the formula, I noticed that the flour amount was much more than I would expected (I measured the volume comparing to the usual sandwich tin), and the dough was not kneaded that much. As I have posted before, for soft light volumious breads, intensive kneading to achieve a thin but tough windowpane is the key. After adjusting kneading process and flour amount, the rolls turned out to be very soft and light, not dense at all.

Note: fit one new england hot dog roll pan
Note: total flour is 250g

-levain
starter (100%), 13g
water, 22g
bread flour 41g

1. Mix and let fermentation at room temp (75F) for 12 hours.

- Final Dough
bread flour, 153g
all purpose flour, 50g
butter, 20g (softened)
egg, 50g
sugar, 20g
salt, 5g
milk, 147g
levain, all

1. mix until stage 3 of windowpane (-30sec), see this post for details.
2. rise at room temp for 4-5 hours until double.
3. punch down, round, rest, roll out to the size of the pan, put into pan, rest for 20min, completely stretch out to fill all corners of the pan.

4. proof until 70-80% full, about 5 hours at 78F.

5 take an oiled cookie sheet, cover the pan with it, put something heavy on top, bake at 375F for 15min, take away the heavy thing and cookie sheet, bake uncovered until golden, about another 10-15min.

Flip over and we get the rolls

Light and soft, with even crumb, the flour used is 250g, comparing to the 400g in provided formula.

With lobster salad

Classic NE lobster roll, super yummy

Isand66's picture
Isand66

Last weekend I baked some of the best rolls I've made to date using instant yeast instead of my usual sourdough or yeast water.  I didn't have time to refresh my starter which is why I had used the instant yeast.  I wanted to try a similar formula using a combo of sourdough starter and yeast water levain.  I decided to leave out the cream and the eggs for this version since I didn't want the bread to be quite as soft as the rolls even though with the oil, potatoes and polenta the final bread ended up pretty soft anyway.

The final bread tasted great with a nice sour tang but not too overpowering with a slight hint of sweetness from the honey.  The crumb was nice and open and moist and the crust per above was soft.  The dough did spread out more than I would have liked but overall this ended up being a nice tasty loaf.  If I were to make it again, I might reduce the moisture content slightly but other than that this one is a keeper.

Procedure

I used a combination of my white sourdough starter which I keep at 66% hydration and did a 3 stage build with my fruit flavored yeast water starter.

Yeast Water Starter Build 1

50 grams Bread Flour (KAF)

50 grams Yeast Water Starter

Mix the flour and Yeast Water in a bowl until thoroughly combined.  Cover the bowl and let it sit at room temperature for around 4 hours.  The starter should almost double when ready to proceed to build 2.

Build 2

Add ingredients below to starter from above and mix until incorporated.  Cover with plastic wrap and let sit at room temperature for 4 hours.

100 grams Bread Flour

100 grams Yeast Water

Build 3

Add flour to starter from above and mix until incorporated.  Cover with plastic wrap and let sit at room temperature for 4 hours or until bubbly and either use immediately or put in the refrigerator for the next day.

75 grams Bread Flour

Main Dough Ingredients

170 grams Refreshed AP Starter (65% hydration)

255 grams  Yeast Water Starter (you may have some extra from above)

400 grams Bread Flour (KAF)

100 grams Spelt Flour

160 grams Mashed Potatoes (I like to mash them with the skins on and used red potatoes)

50 grams Olive Oil

180 grams Cooked Polenta (I used some butter and parmesan cheese in mine)

16 grams Salt (Sea Salt or Table Salt)

40 grams Honey

397 grams Water (80 to 90 degrees F.)

Procedure

Mix the starters with the water and stir to break it up and make sure to hold back about 50 grams of water.  Next mix in the flours into the starter mixture and mix for 2 minutes with your mixer or by hand.    Let the dough autolyse for 30 minutes to an hour in your bowl covered with a cloth or plastic wrap.  Next add in the salt, mashed potatoes, polenta and oil and mix on speed #1 for 3 minutes and #2 for 2 minutes or by hand.  This dough is very wet but it should start to come together after mixing but will still be very wet.

Next take the dough out of the bowl and place it on your work surface.  Do a stretch and fold and rest the dough uncovered for 10 minutes.  Place the dough in an oiled bowl after the rest and do another stretch and fold and cover the dough in the bowl and let it rest for 10 minutes.  Do one more stretch and fold and put the dough into a lightly oiled bowl and let it sit at room temperature covered for 2 hours.  (If the dough is still too lose, you can do several more stretch and folds until you are ready to put in the refrigerator). After 2 hours you can put the dough into the refrigerator for 24 hours or up to 2 days before baking.

The next day (or when ready to bake) let the dough sit out at room temperature for 2 hours.  After 2 hours form the dough into your desired shape and put them in floured bannetons, bowls or on a baking sheet and let them rise covered for 2 hours.

Score the loaves as desired and prepare your oven for baking with steam.

Set your oven for 500 degrees F. at least 30 minutes before ready to bake.  When ready to bake place the loaves into your on  your oven stone with steam and lower the temperature immediately to 450 degrees. (I made a large Miche so I ended up lowering the temperature half way through to 435 degrees).  It should take around 20 - 30 minutes to bake  until both loaves are golden brown and reached an internal temperature of 200 - 210 degrees F.

Let the loaves cool down for at least an hour or so before eating as desired.

Crumb Close-up
Boris the Guardian of the Sandman Residence. Natasha keeps watch in the back of our house.


bsimson's picture
bsimson

wondering if anyone can tell me how to convert nancy silverton starter to 100% starter?

dmsnyder's picture
dmsnyder

Watching the development of baking skills and the endless creativity of TFL members gives me enormous enjoyment. When I find members using formulas or techniques I have contributed and taking them to new and exciting places, I am especially thrilled. I can think of no better example than what txfarmer has done with the Anis Bouabsa and Phillip Gosselin formulas I first explored as part of my “baguette quest” in the Spring and Summer of 2008. Her “36 hours+ sourdough baguettes” (See 36 hours+ sourdough baguette - everything I know in one bread for her original, basic formula.) have been visually stunning as well as technically intriguing. It was with great anticipation that I followed her formula and procedures this weekend to make a batch myself.

My only modification of txfarmer's procedure was that I fermented the dough prior to dividing and shaping at 85 dF for 1 hour. I generally scale baguettes to 250 g to fit my baking stone. Her formula makes about 900 g of dough. I divided this into 3 pieces of 299 g each and shaped them to (barely) fit on my stone. I baked the baguettes for 12 minutes with steam at 460 dF conventional bake then for another 12 minutes at 435 dF in a dry oven using convection bake. In hindsight, I should have baked them for about 2 minutes less. They sang when taken out to cool and smelled delicious!


The crust was very crunchy and the crumb satisfyingly open, although not as open as some of the amazing baguettes txfarmer has shown us. The flavor of the bread was complex, nutty and sweet with moderate sourdough tang.

I do believe I have a new favorite sourdough baguette.

 David


dabrownman's picture
dabrownman

Typo after typo,  My left fnger doesn't know what my right finger is doing.  This is way worse than dyslexia, which I had but sold to Lebanese rug trader and a lot more painful too.

With plenty of rye, WW and semolina bread in the freezer we baked off another as close to white bread as we ever make for the bread winners daily lunches.   My wife prefers Oroweat whole wheat bread but we are slowly winning her over to SD bread in the 25%-35 % whole grain range.


This one was 25% home ground whole grain bread with spelt, rye and WW ground from berries.   The remainder of the flours used for the bread were grocery bought bread flour and AP milled by KAF.


The bread baked up nicely browned with small to medium blisters.  The crust came out crisp but went soft and chewy as it cooled.  The bloom and spring were OK but nothing special.   The crumb was moderately open, soft, chewy and slightly glossy.  This bread had a bolder SD tang right after being cooled and we assume it will get better tomorrow. 


If you like David Snyder’s Pugliesi Capriosso and San Joaquin or Pierre Nury’s Rustic Light Rye you will like this bread.  For a nearly white bread it sure is tasty.  Just delicious.


The formula follows the pictures.

Method

The levain starter was equal amounts of rye sour, desem and spelt (a new one that we will soon convert to Kamut) and built up over (2) 3 hour and (1) 2 hour build.

The levain was refrigerated overnight after nit had doubled along with the autolysed flours which included the entire formula less the levain.  There were no sprouts, scald, soaker or add ins with the exception of the red and white home made malts, some ground flax seed and a tiny bit of honey.

The next day the autolyse and the levain were removed from the fridge and sat on the counter for 1 hour to warm.  The two were combined in the KA mixing bowl and kneaded with the dough hook for 8 minutes on KA2.  The dough pulled away from the sides at the 7 minute mark.  It came together easily for the 75% hydration dough.

It was rested in an oiled plastic tub, sized for a 836 g loaf, for 20 minutes before (4) sets of S& F’s were performed all in the tub.  The first set was 25 stretches with a ¼ turn each time.  The next set was 5 stretches less all the way down to the last one of 10 for a total of 70 stretches.

After the last S&F the dough was rested for 60 minutes before being pre-shaped and then shaped into a boule and placed into a rice floured basket seam side up.  The basket was sized to allow the dough to double when it reached the top.

Sandwixh on the left made with last bakes Semolina Bread - good but not great like this bake.

The boule was them placed into a plastic trash can liner, the end closed with a rubber band.  The tented and basketed boule was placed in the refrigerator for a 12 hour retard.

Makes a great grilled hot dog bun! cantaloupe, cherries, black grapes, chips and pico de gillo. 1/2 ea plum and peach, 3 kinds of pickles and some Mexican beans - a typical but still a nice lunch to feature this  fine bread.

After 12 hours the mini oven was preheated to 500 F and (2) of Sylvia’s steaming cups with dish rage rolled up were micro waved until boiling.  The dough was covered with parchment and then the bottom of the mini’s supplied broiler pan.  The whole stack was overturned and the basket removed.

It was quickly slashed ¼” deep with a single sided razor blade, the steaming cups placed in the corner and the whole apparatus loaded into the mini oven’s bottom rack for 15 minutes of steam as the oven was turned down to 450 F.   When the steaming cups were removed at the 15 minute mark the oven was turned down to 400 F convection this time.

The boule was rotated every 5 minutes for the next 20 minutes when the boule was tested for temperature.   It was at 208 F and deemed done.   The mini oven was turned off and the bread allowed to sit in it with the door ajar for another 10 minutes to further crisp the skin.  It was then removed to a cooking rack.


Multi grain SD Starter - 25% Whole Grain Sourdough Boule     
      
Mixed StarterBuild 1Build 2 Build 3Total%
Multi-grain SD Starter **4500459.54%
AP025255014.12%
Dark Rye1500154.24%
WW1500154.24%
Spelt1500154.24%
Water452507019.77%
Total Starter135502521059.32%
** 15 g each Rye Sour, Desem & Spelt SD Starters   
      
Starter     
Hydration78.72%    
Levain % of Total25.12%    
      
Dough Flour      %   
Non - Diastatic Red  Malt20.56%   
Wheat Germ102.82%   
Dark Rye102.82%   
Spelt 102.82%   
Ground Flax Seed102.82%   
WW102.82%   
AP20056.50%   
Diastatic White Malt20.56%   
Bread Flour10028.25%   
Dough Flour354100.00%   
      
Salt71.98%   
Water 26073.45%   
Dough Hydration73.45%    
      
Total Flour471.5    
Water352.5    
T. Dough Hydration74.76%    
Whole Grain %25.77%    
      
Hydration w/ Adds75.29%    
Total Weight836    
      
Honey51.41%   


SylviaH's picture
SylviaH

I just love those crunchy, flaky, best for coating fried things Panko bread crumbs :)

Making homemade Panko Bread Crumbs.  Fun easy and fast.

Recipes are posted all over the web.  But I've never actually seen one here.  So here goes.

Pre-heat your oven to 300F

The secret weapon.......The Food Processor Shredder Disk : )  little did I know :/

Assemble your food processor with the largest sized shredder blade

Panko is usually made with a very shreddable, soft fluffy type plain white bread.  I like my sourdough stale leftover bread of coarse

Simply remove all the crust

Process the bread in your food processor with your largest shredder disk

Place the crumbs onto a cookie sheet.  

Bake in a pre-heated 300F oven for aproximately 6 minutes..till dry and crispy.   Do not brown

Done, just about..........unless of coarse you want some of those delicious seasoned bread crumbs.  My favorite are Italian.  Add whatever seasoning you like..toss.   

Place into storage bags and freeze for later if you like.


Store bought or homemade breading???  Answer at the bottom on the photo.

storebought Italian Panko...made this eggplant parmesan yesterday with the last of my Italian style panko.  Now I'm a day older and wiser...where have I been.  

Sylvia


mwilson's picture
mwilson

I couldn't resist making my favourite Panettone again!

As I wrote previously my regular Italian sourdough has been dried up and stored away in the fridge so that I could focus on making rustic sourdough breads. I created a new, wet 100% hydration starter but the temptation to convert it into a new Italian starter was too strong. And after bringing it to maturity I couldn't resist making Panettone again!

So here we have one of my favourites courtesy of master pastry chef Igino Massari. Entitled “The Best Panettone” this is one very soft, very sweet and very moist cake!

I made dough for a 500g mould but the smallest ones I have in stock are 750g capacity. Consequently the resulting shape isn't as proud as the Milanese style. I didn't glaze it and instead cut ears…


Paper removed.


Cross-section.


Finally, I now have a better understanding of how best to mix the second dough. I have achieved the best crumb so far. I like those open pockets!

First dough: (26C for 12hrs)

  • 30g Lievito Naturale
  • 120g '00' Flour
  • 45g Water
  • 38g Sugar
  • 30g Egg Yolks
  • 43g Butter

Second dough: (28C until tripled ~8hrs)

  • 30g '00' Flour
  • 39g Egg Yolks
  • 30g Sugar
  • 7.5g Honey
  • 46g Butter
  • 21g Water
  • 2.4g Salt
  • .3g Aroma Panettone
  • .3g Vanilla
  • 60g Sultanas
  • 45g Candied Orange
  • 15g Candied Citron

Total Ingredients:

Flour100
Water45
Sugar40
Honey4
Yolks41
Butter53
Fruit70
Salt1.4
Flavourings.6
 355%
 
Floydm's picture
Floydm

I've always admired immigrants, folks who, for love or opportunity, pull up their roots and start over.  This summer we've been going through what has to be the easiest immigration process possible -- same language, same geographic region, very similar culture, no questions of about citizenship or difficulty finding employment -- and still... it has been a tremendous amount of work.  I can't even imagine how much work it must be when the obstacles are larger or the circumstances less fortunate.  My respect and admiration for anyone who has gone through it has been redoubled.

Now we are here in Vancouver, largely settled in.  As of today my kids and I are on the Provincial health plan.  My wife's papers have been approved too, so she is legitimately residing with us and no longer "visiting."   All has gone as well as one could possible wish for and we are loving it here.

And I'm finally finding a little time to bake.  Well, only once, so far, but it is a start.

Baking in a new kitchen is always a challenge.  As is using a new oven that isn't mine with a glass door.  No more tossing ice cubes in willy nilly and not worrying about the damage I do.  But I brought my baking stone and picked up an aluminum roasting pan to invert over it to create a little steam, so we'll see how it goes.

I spotted this flour blend at the grocery store and decided to give it a try. 

I was extremely imprecise on this one, just trying to get back in the saddle rather take accurate measure.  My formula was roughly:

Poolish

1 cup AP flour

1 pinch instant yeast

1 cup water

I left that out covered on the counter overnight and then mixed it into

2 cups Robin Hood bread blend 

1 cup AP flour

1 cup water

2 teaspoons Kosher salt

1 teaspoon instant yeast

Mixed with my standmixer for 5 minutes, let rise on the counter top for an hour, folded and put in the refrigerator for 6 hours.

About an hour before baking, I removed it from the fridge, divided it, and shaped a couple of loaves.  I rolled them in sesame seeds before placing them on a pan since I forgot to pick up parchment paper and the last thing I wanted was to have them stick to the pan and ruin everything.

They rose for about an hour, then were baked at 465 for 10 minutes with the aluminum cover, then 425 for another 15 minutes after I removed the lid.

I can't say they were the best loaves I've ever made, but I certain consider them a success and a great starting point!

-Floyd

Pages

Subscribe to RSS - blogs