The Fresh Loaf

A Community of Amateur Bakers and Artisan Bread Enthusiasts.

Blogs

Mebake's picture
Mebake

Nothing new here, my old favorite: Hamelman’s Whole-wheat multigrain.  This time, though, and as I have come to appreciate sourdough preferments, as opposed to yeasted ones; I chose to skip the Instant yeast altogether. I have also chosen a new collection of grains for my hot soaker: Rolled oats, millet, Semolina,  and sunflower seeds.

The initial fermentation took 3 hours, while the final fermentation was  5 hours. I increased the hydration as the dough was stiff, and ended up with an over hydrated dough. To adjust, I added 50-50% whole wheat flour  to bread flour to arrive at a medium to loose hydration. It was wet, still.

The preferment % was reduced as a result of adding more flours to around 9% from 12%.

My Rye Sourdough is dead. I have rushed it once by adding more than comfortable warm water, and since then it seemed to go down the path of demise. Luckily, I can create one easily from my white levain.

For a change, i wanted to bake this bread in a pan.

Although i have not tasted the bread yet, i could describe it as follows:

Soft crust, with rich sourdough aroma. Crumb is open, cool and moist, with an appreciable sour aroma.

I have yet to decide whether or not the 100% sourdough version is better tasting than the sweeter yeasted version.

Update: The flavor of the bread was great. the extended final fermentation did mask the subtle sweetness and wheatiness of the bread, and the sour tang was clearly present. Lovely bread, nevertheless.

Khalid

wassisname's picture
wassisname

I gave up on this bread completely not so long ago. The dough always started out OK, but by the end of the bulk ferment it would be extremely slack and sticky, and by the time it went into the oven it was essentially a puddle. 

After several attempts it became clear that it was simply not going to work so I trashed the paper copy and deleted the spreadsheet and that was that.  Two days later I happen across this Farine blog post and learn that teff flour will do awful things to bread dough (of this fact I have become keenly aware) unless it is cooked a bit first.  So simple!  I would not have thought to try that in a million years.  (I had forgotten about theTFL thread on this subject I had read.  During this whole process my computer was having some kind of disagreement with the TFL site and wouldn't let me look for help here.  It's better now:) ) 

So I gave it another go and, hey, it's a loaf of bread this time!  Still not the strongest dough, it is manageable at least. 

Now that I have a starting point it's time to start tinkering and asking questions.  First off, I wonder if adding the flax meal to the scald is helping, hurting or having no effect?  I will likely leave it out next time.  I think I forgot to add the salt to the scald, so that's another change to try next time.

 The hydration felt pretty good, I don't think I  would go any higher.

The mixing... the dough was pretty slack by the time I shaped, so I can't decide if I want to try being gentler next time or try to develop more strength.

Fermentation time was, I think, at about it's maximum.  I imagine the overnight scald helped speed things up - another reason I'm thinking about leaving the flax out of the scald next time.

So many questions, can you tell I think this bread could be better?  Still, it's pretty good.  There's an extra sweetness and nuttiness in this bread that works for me.  Definitely one worth tinkering with.

Marcus


Franko's picture
Franko

Despite a late start we've had glorious summer weather this year here on Vancouver Island and the South Coast of British Columbia, with only a few cloudy days and no rain to speak of. Our garden has done extremely well as a result, producing Red Fife wheat, golden flax, quinoa, garlic, onions, potatoes, all kinds of herbs, raspberries and buckets of cherry tomatoes just to name a few. But by far our biggest crop is blueberries.

At the back of our yard we have two medium sized blueberry bushes that seem to produce more and more berries every year no matter how poor the growing season. That two average sized bushes can produce such a staggering amount of fruit so consistently just amazes my wife and I, challenging us to find ways to make use of them all before the cold weather sets in. I think we still have a bag or two of berries near the bottom of our freezer left over from last year's harvest. I'm not sure because now there are even more bags of berries from this year stacked on top of what's already in the freezer. If we don't use those up before next summer it may be a while before the ones below see the light of day.

Between the two of us we've made tarts,

 pies, jams, sauces, syrup and salsa, put them in salads, cereal, over ice cream, lemon sorbet and yogurt. I think Marie even blended some into her cassis that she makes every year from our black currant harvest, another one of our bumper crops. Naturally I've been planning to use them in a bread of some kind but have been holding off till the berries were at their peak of size and flavour. After checking them out this past weekend I decided it was time to get something going in that direction, deciding on a brioche loaf for this bake. The formula I used is from Advanced Bread & Pastry for “Brioche with Prefermented Dough”pg. 363 because of it's relatively lean butter content of 28%. Having made this dough before, I like that it's easy to handle and that it has enough butter in the formula to carry other flavours such as fruit or nuts without dominating the overall flavour of the finished product. The preferment helps to keep the doughs sweetness in balance, making this formula a good one to use for savoury applications as well. Blueberries being as delicate as they are, a very soft dough is my preference for incorporating them into the final dough with as little rupturing of the fruit as possible. Blue dough isn't particularly attractive or appetizing to me, so I try as best I can to be very gentle when mixing in the berries to keep smearing to a minimum. While it's no guarantee to avoiding the dreaded blue dough, if you're careful the crumb will have two distinct colours to it rather than a uniform and ghastly shade of blue.

An hour before I planned to mix, the blueberries went into the freezer to firm up, making them easier to incorporate into the dough once it was mixed without them breaking apart completely. This is a very easy brioche dough to make by hand because of the small amount of butter it calls for, but I use a mixer for brioche dough regardless simply because it's quicker to clean up afterwards. Once the dough was about 90% mixed it was finished off by hand and allowed to relax for a few minutes before gently stretching it out and laying the berries evenly over the surface, then gathering the dough and frozen berries up with a plastic scraper and slowly working them into the dough by hand until they were evenly distributed. With this mix I didn't follow the AB&P process exactly, deciding to bulk ferment at room temperature for 1 hour instead of putting it into the fridge directly after mixing. I also left it overnight for a retarded ferment of 12 hours rather than the recommended 30 minutes before shaping and final rise for scheduling reasons. The dough seemed quite healthy and I wasn't overly concerned about how it would preform after it's overnight stay in the fridge, in fact I feel that the flavour and crumb result is notably better than previous bakes I've done of this dough when I've followed the process. The 825 gram dough was divided in three, and very lightly rounded on a floured counter, placing the pieces in a 4.5x 9.5 inch Pullman tin for a final proof of 2.5 hours. The loaf came up the tin about 3/4 of the way before I decided it was ready, but could have/should have left it another 10-15 minutes longer due to a very minor break on one side. Brushed with egg wash and baked in a 385F oven for 25 minutes, then at 360F for 10 minutes and finally left to cool in a dead, open door oven for a further 15 minutes. The loaf jumped well and browned up nicely, just as a brioche should, filling the house with a wonderful aroma of eggs, butter, caramel, and cooked fruit.

 After 5 hours of cooling I took the first slice, finding the crumb to be soft and even, with a slightly open cell structure for a rich dough, and a pale yellow colour to set off the deep blue of the berries. The flavour was what I'd hoped for, just rich and sweet enough to compliment the delicate flavour of the blueberries but still with all the flavour qualities of a typical brioche.

 The bread goes well with roast chicken or turkey, the photo above showing it toasted on a plate with smoked turkey breast, Port Salut cheese, sliced pear and a green salad. Before it's all gone though I'll have to try it as French Toast with some recently made sage and ginger breakfast sausage and a drizzle of blueberry syrup. 

I thought I might as well include a few photos of some San Fransisco Sourdoughs made back in August that used fresh milled Red Fife flour from Cliff Leir's Fol Epi Bakery in Victoria. The loaves didn't quite achieve the profile I'd hoped for but the exceptional flavour of the Fol Epi flour more than made up for that. I found the flour to be quite a bit softer than other Red Fife flours I've used in the past, requiring less hydration than the formula from “Advanced Bread & Pastry” called for. Perhaps a fourth set of stretch and folds would have helped for a higher profile but for a first time using this high quality flour I was quite happy with the loaves it produced. A stop at Cliff's bakery for more of his lovely flour will be at the top of my shopping list next time we're down in Victoria.

Cheers,

Franko

txfarmer's picture
txfarmer

Sending this to Yeastspotting.

Click here for my blog index.

About 2 years ago, I made a mochi cake recipe for the first time (formula here), the rest, as they say, is history. The unique chewy texture from glutinous rice flour is what makes this cake stands out. As an extra bonus, it's very quick to put together.

My husband fell in love with this cake immediately, so much so that he asks for it all the time. No other desserts can compare in his eyes. The problem is that I HATE to repeat recipes. Usually I keep making something until I am satisfied with the result, then I move on -- which makes no sense because that means most of time we are eating my "failures". To compromise between his taste and my baking interest, I kept making different variations of this mochi cake, differ furthur and futhur from the original formula, making use of ingredients I have on hand.

-- Cocoa Mochi Cake
glutinous rice flour, 200g
cocoa powder, 25g
baking powder, 1tsp
sguar, 130g
evaporated milk,187g
butter, 85g, meltd
egg, 2, beaten
chocolate chips, some

-- Matcha Mochi Cake
glutinous rice flour, 220g
matcha powder, 5g
baking powder, 1tsp
sguar, 130g
evaporated milk,187g
butter, 85g, meltd
egg, 2, beaten
Chinese red bean, cooked, some

-- Pumpkin Mochi Cake
glutinous rice flour, 226g
pumpkin puree, 400g
baking powder, 1tsp
sguar, 100g
condensed milk,198g
butter, 113g, meltd
egg, 2, beaten
vanilla extract 1tsp

-- Sesame Mochi Cake
glutinous rice flour, 220g
black sesame powder, 40g
baking powder, 1tsp
sguar, 155g
milk,140g
heavy whipping cream, 47g
butter, 85g, meltd
egg, 2, beaten
black sesame, 2tsp

-- Banana  Mochi Cake
glutinous rice flour, 220g
baking powder, 1tsp
banana puree, 150g
sguar, 155g
milk,75g
heavy whipping cream, 47g
butter, 85g, meltd
egg, 2, beaten

-- Lemon  Mochi Cake
glutinous rice flour, 220g
baking powder, 1tsp
sguar, 165g
lemon juice,75g
heavy whipping cream, 50g
lemon zest, 10g
butter, 85g, meltd
egg, 2, beaten

For all the formulas above, the process is the same: mix together the dry ingredients (flour, powder, and baking powder), the wet ingredients (everything else), mix together wet and dry, pour into molds and bake at 350F until done. I like to bake them in cupcake molds. As you can see in the photos, sometimes I get inventive, and bake them in broiche molds, or something similar.

Glutinous rice flours are not created equal. If you use Koda Sweet Rice Flour (link here, which can be found in most grocery stores), the liquid amount should be about right, however if you use another brand (there are many brands of such flour in Asian market), liquid amount may have to be adjusted.

Now these days I use whatever diary/liquid I have on hand and add enough until the batter looks "right". Mochi cakes are supposed to be a bit sticky, but the crumb shouldn't be too wet. If cakes sink during cooking, they are most likely undercooked. For normal muffin tins, I usually bake them for 25-30min at 350F.

dabrownman's picture
dabrownman

Another fine lunch for a lazy Sunday.  This time  Cotto Salami with veg and Colby, banana, red and green diced Hatch Chili on top of feta, carrot, celery sticks with sliced red pepper on the salad, cantaloupe, left over grilled onions and peppers, Dill, B&B and jalapeno pickles with brie on the watermelon, black grapes, raspberries and the best half of a nectarine sliced we have ever tasted.  Eaten by the pool with a nice limoncello made with diet squirt. 

Ever since we first saw Andy’s commercial fresh yeast version of this bread here:

http://www.thefreshloaf.com/node/29164/june-baking-restricted

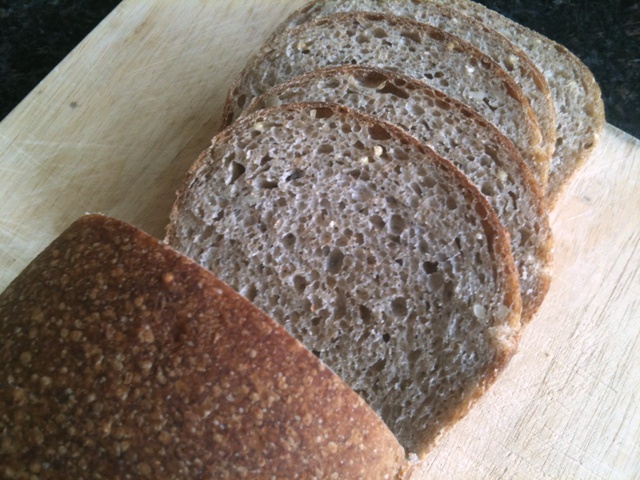
Andy's Brazil Nut and Prune Bread made for a delicious toasted breakfast with kjknits English Muffins and butter, a yellow plum and cantaloupe. 

We have been wanting to give it a go with natural yeast like he does at home.  Andy mentioned when he bakes at home it is invariably a sourdough.   I have seen him note that he uses a white levain for this bread at home but have not seen a recipe using it.  We only use natural non commercial YW and SD levains and finally decided to try to this bread using SD levin.


Since this bread has 35% whole wheat in it we decided to go with a WW Desem starter too instead of the white – which we don’t keep refrigerated anyway.  We wanted to try to keep to Andy’s overall formula, 25% whole wheat grain and the rest breads flour, 20% levain, 12.5% each toasted Brazil nuts and prunes and 68% hydration but ended up straying pretty far away in the end because of error in our formula spreadsheet that made the dough flour add up to 100g of more flour than what was really there so… 


                                                                                                               Not a huge rise when proofed, probabkly could have been longer?

We inadvertently upped the whole grains to 35% all whole wheat and upped the hydration to 85% ciabatta range which might open the crumb some.  We hoped it would not flop when it came out of basket or stick to it.  We upped the prunes and nuts to 20% each too.  Andy’s salt for this bread is less than 2% at 1.67% but our salt spiked to 2.33% and our Brazil nuts are roasted and salted so this might inhibit yeast growth and make one want to have beer or two with this bread.


 Going in the oven                                                                        This shot is in the oven after the DO bottom cloche was remved.

Andy’s recipe came in at 3,003 g and ours was less than a third of that including the scald that wasn’t in Andy’s formula.  The scald was 40 g of WW berries because we like scalds or sprouts or both in our breads but didn’t have time for the 2 days it takes for sprouts to do their thing.

If you want to bake a loaf of Andy’s bread nearly exactly like I wanted to do all you have to do is add 100g of bread flour to the recipe below and you will have it close enough.  Wish I would have done so.

We also used our 3 stage levain build of (2) 4 hour and (1) 2 hour build.  The levain had nicely doubled in 10 hours and was ready for use. We did not retard the finished levain in the fridge for 12 hours as we would normally. We held back 35 g of water and used the rest of the dough water to hydrate the flours and salt for a 10 hour autolyse while the levain was being built.  We are starting to like long hydrations for dough flour.


The 35 g of water that was held back from the autolyse was added to the levain to loosen it up and make it easier to mix into the autolyse.  The mixing was done in the KA on speed 2 using the paddle for 4 minutes.  We then switched to the dough hook and mixed for another 4 minutes on KA speed 2.  We then moved it up to speed 3 for 4 minutes.


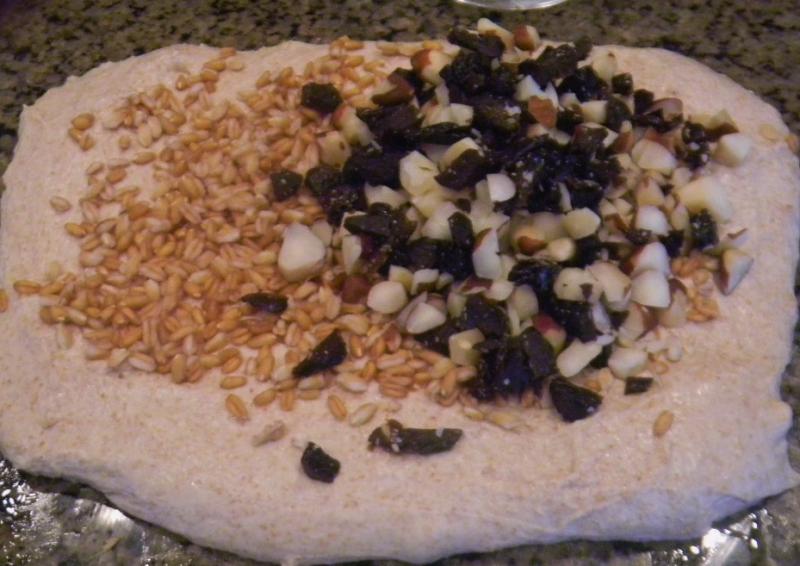
The dough was moved to a plastic covered oiled bowl for 10 minutes of rest.   5 sets of S&F’s (starting with 25 stretches with quarter turns going down 5 each time) were done on 10 minute intervals.  The wheat berries, chopped medium toasted Brazil nuts and chopped prunes were added at the beginning of the 4th set and nicely incorporated by the 5th set.

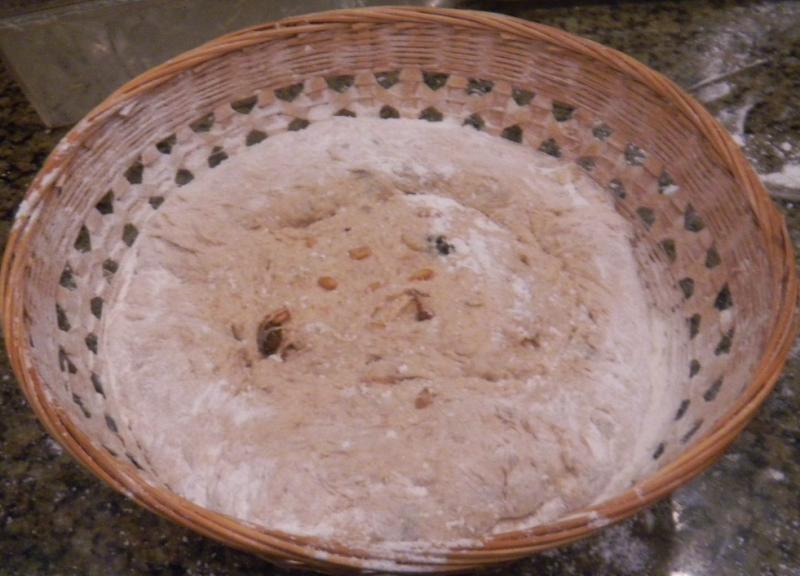
When the S& F’s were done the still slack and wet dough was fermented for 1 hour.  When fermentation was complete, we took a portion of the dough to make a knotted roll which was placed in the center of the rice floured basket to make the center of the Chacon.  The remainder of the dough was formed into a boule that was hand formed into a huge bialy shape (wish I had a picture of it) and placed pocket side down over the knotted roll to complete the Chacon.

The Chacon and basket were placed into a trash can liner and retarded overnight for 12 hours without any proofing at room temperature.  We hoped the 4-6 hour short retard times we have had lately were due to the YW and since we didn’t have any YW this time, we thought we would make it 12 hours OK.  But, the bread hardly rose in the fridge after 14 hours of retardation.   We should have let it proof at room temperature for an hour before refrigerating.  No worries.

We took it out to warm up and see what it would do if it was not so chilly.  In 2 hours we saw some activity with large bubbles on the top so then we put it back in the fridge.  The biblical monsoon  rain came and the back yard looked like a lake so some trenching with a hoe was required to get the water to drain away from coming in the back door.

A nice brie and Colby grilled cheese using this great bread with; raspberries, watermelon, cantaloupe, nectarine, pickles, banana, black grapes, salad with feta, pickles jalapeno and leftover veggies from last night's shimp kabobs.


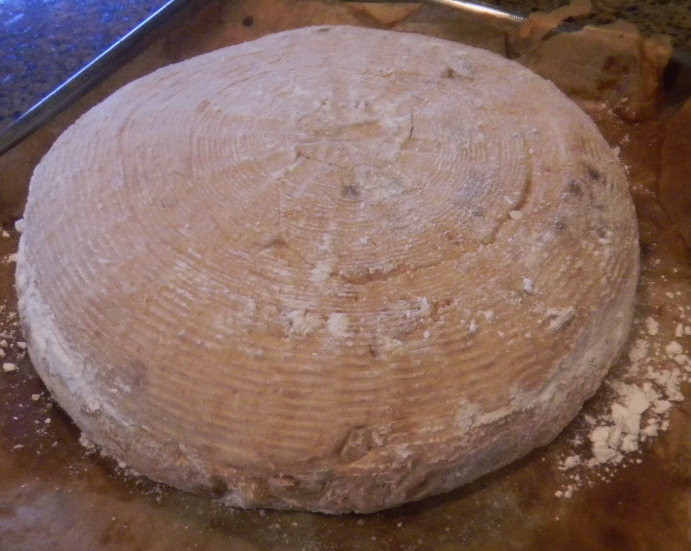
Retard complete and the dough nearly fully risen as it would be allowed to get, we fired up the mini oven to 500 F.  The basket was upended onto parchment using the bottom of the mini’s broiler pan.  No slashing is required for the Chacon.  The bottom of the aluminum DO was placed over the Chacon and the whole shebang was put in the mini oven.  The temperature was turned down to 450 F immediately and the bread baked covered for 20 minutes. 

The cover was removed and the oven was turned down to 425 F baking with convection this time.  It was baked until the internal temperature reached 208 F– about 15 minutes more while rotating the Chacon 90 degrees every 5 minutes to ensure even baking.

The oven was turned off the bread was left inside with the door open for 10 more minutes to crisp the skin before removing the bread to a cooling rack.

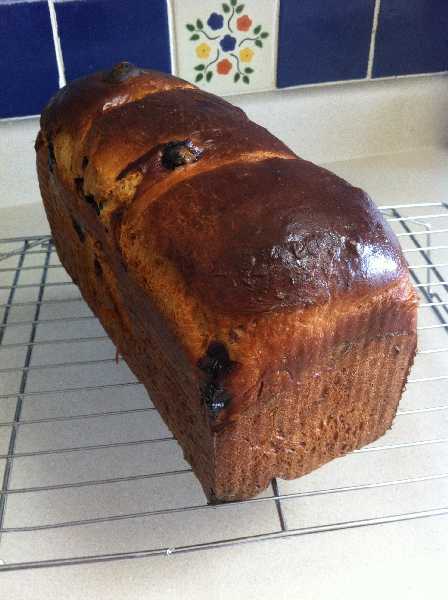
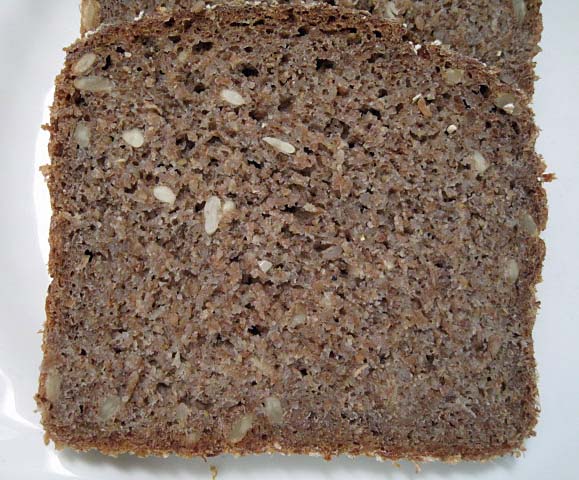
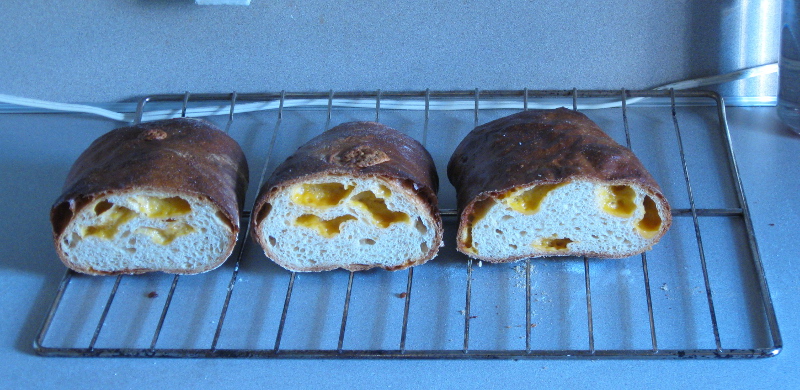
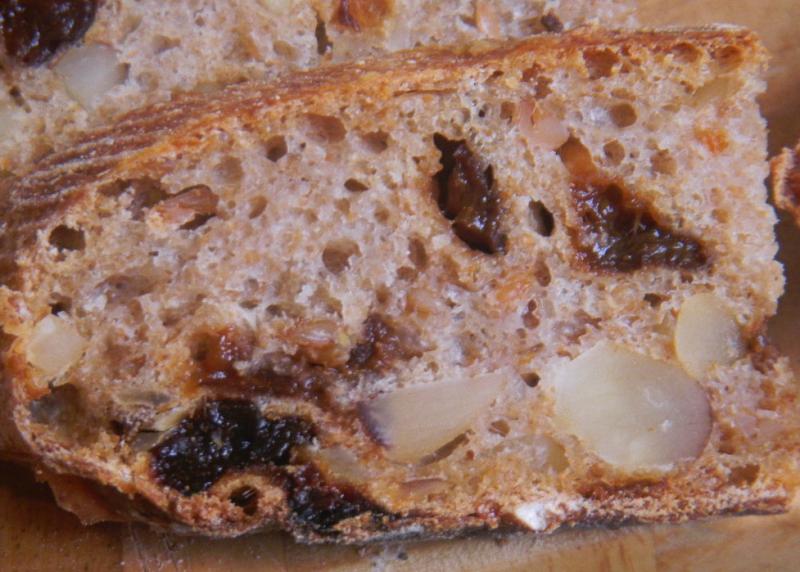
This is a fine bread that we like a lot.  The mix of SD, WW, prunes and Brazil nuts is awesome and the taste plain delicious.  Andy is really on to something here.  It did bake baked up handsome.  The crust coming out crusty and going to chewy as it cooled .  It was fairly open, moist and slightly glossy (sorry no sun today for outdoor pix's)  for all the add ins and whole grains.  It was fantastic toasted with butter.  The desem SD tang is there and we hope it gets stronger as it ages.  We think it would be improved with a more open crumb with less hydration, 100g more bread flour and some YW.   A 75% hydration variation might be really nice too.  All in all, it is a fine bread and confirms why Andy bakes it often and sells it out regularly!

Thank's Andy for a fine formula the results in a wonderful bread - just the kind we like.

Andy's Brazil Nut  and Prune Bread - 35% WW, Desem SD and WW Scald


Mixed Starter

Build 1

Build 2

 Build 3

Total

%

DesemSD Starter

20

0

0

20

4.71%

WW

40

40

35

115

38.33%

Water

40

20

15

75

25.00%

Total Starter

100

60

50

210

70.00%


Starter


Hydration

68.00%


Levain % of Total

21.63%


Dough Flour


%


Bread Flour

280

93.33%


WW

20

6.67%


Dough Flour Total

300

100.00%


Salt

7

2.33%


Water

270

90.00%


Dough Hydration

90.00%


Total Flour

425


Water

355


T. Dough Hydration

83.53%


Whole Grain %

34.12%


Hydration w/ butter

84.71%


Total Weight

972


Add Ins


%


Scalded WW Berries

40

13.33%


Butter

25

8.33%


Brazil Nuts

60

20.00%


Prunes

60

20.00%


Total

185

61.67%


Remember ,if you want to bake Andy's bread as he makes it and as I intended , add 100 g of bread flour to the fomula above.  We love this bread for breakfast, lunch and dinner.  It is a top 5'er for sure.

dmsnyder's picture
dmsnyder

Hamelman's "Vollkornbrot" is a 100% rye bread with sunflower seeds. The flour Hamelman calls for is "rye meal," which I just happend to have in quantity due to my error in ordering "medium rye meal" when I had intended to order "medium rye flour" from nybakers.com. Well, as Kubler-Ross wrote, "There are no mistakes, no coincidences. All events are blessings given to us to learn from."

As it happens, I have intended to work on baking 100% rye breads for some time, my  past attempts having been less than wonderful. Clearly, my unconscious mind highjacked my nybakers.com order. So, after blessing my unconscious ... or something like that ... I proceded to takle this project.

Hamelman's formula for Vollkornbrot calls for 68.4% rye meal and 31.6% rye chops. I had abundant rye meal (see above), and I had a pound of cracked rye from Central Milling, which I used in lieu of rye chops.  60% of the rye meal is pre-fermented. The cracked rye is included in the form of a 100% hydration soaker. The overall hydration of the dough is 82.1%.

Other than substituting cracked rye for rye chops, I followed Hamelman's formula and procedures to the letter. The dough was drier than I expected, but still very sticky. It had no difficulty holding together. I shaped it on a wet board with wet hands and, after shaping a log, placed it in a pullman pan and smoothed it out with a spatula. The top was dusted with more rye meal, as instructed by Hamelman. I baked it with steam for 15 minutes at 470 dF then for another 60 minutes at 380 dF. I then dumped the loaf out of the pan and baked another 15 minutes with the loaf sitting on a baking stone. This was to firm up the crust, although it was very firm already when taken out of the pan.

After baking and cooling on a rack for several hours, I wrapped the loaf in baker's linen and let it rest for about 30 hours before slicing. The crust was very firm and chewy. The crumb was very dense, as you can see, moist but not gummy. The aroma and flavor were earthy and slightly sweet. I had some for breakfast with cream cheese and smoked salmon and enjoyed it. I think this bread would make great Danish-style open face sandwiches.

I have never had this type of bread before, except once long ago from an imported package. So, I really don't have a good model with which to compare my bread. From what I've read and pictures I've seen, I think I hit the target. I wish I knew how close to the bullseye I got. This bake was certainly superior to my few previous attempts at a 100% rye bread.

I'm hoping TFL members with more experience than I have of this type of bread will offer constructive criticism and suggestions.

David

pmccool's picture
pmccool

I have been on a baking hiatus, of sorts, realizing that the stash of bread in my freezer needed to be reduced.  Having worked through that gradually, I finally got around to baking again the weekend before Labor Day.

What my mouth wanted was something robust, chewy, mildly tangy, and thoroughly wheaty.  And it had to serve as a reliable foundation for sandwiches.  What to do, what to do?  Leader's Local Breads beckoned, and in it I found the Whole Wheat Sourdough Miche, modeled loosely after the Poilane miche.  After checking the metric weight quantities (which are generally less error prone than the others in this book) and deciding that it was safe to proceed, I hauled my starter out of the refrigerator and gave it a couple of good feeds.  It didn't take long for the starter to bounce back to vigorous health, especially with kitchen temperatures just slightly below the 80F mark.  It more than doubled in less than 5 hours!  

For once, I stuck pretty closely to the formula and process.  The one deviation of note was that I dissolved the levain in the water before adding the rest of the final dough ingredients.  Since I mix by hand, I find it easier to do that than to mix the levain into the already-mixed dough as Leader instructs.  Other than making my life easier, I don't see that it makes any real difference in the outcome.  Because of the warmth of my kitchen that day, I did have to trim fermentation times to avoid over-fermenting the levain and the final dough.

The outcome, by the way, was stunning!  A deep, brown-verging-on-black crust, lightly crackled; a firm, moist crumb; a heady aroma redolent of toast with sweet and tangy overtones.  I can't remember a recent bake that I was happier with than this.  And then there is the flavor!  It was everything the fragrance promised, and more.  Roasted nuts and malt, a gentle hint of acidity, a down to earth wheatiness, and other good things that I don't have words for.  The crust, after cooling, was more leathery than crisp but that played well against the moist coolness of the firm crumb.  The crumb texture is rather fine-grained for this style of bread; that comes from the extended kneading that Leader recommends.  Frankly, I didn't knead it as long as he recommends and I might even cut it back to just a couple of minutes of kneading for future bakes, combined with more stretch and folds to build strength.  That would open the crumb somewhat, but not to the point that condiments would be oozing out of sandwiches.

Here's a picture, which doesn't do the bread justice:

Good stuff, even if it is me that says so!

Both our daughters and their families were with us for the Labor Day weekend, which gave me the excuse to do some additional baking.  The tally for the weekend included Portugese Sweet Bread as rolls for barbecue pork sandwiches, sourdough English muffins for one morning's breakfast, and lemon oat scones for another breakfast.  Fun!

Now I need to finish testing the breads that I plan to teach at the Culinary Center of Kansas City, starting in November.  More fun!

Paul

Epsilon's picture
Epsilon

I've decided that I'm gonna start sticking these on a blog rather than the forums. Mostly because this is the first -really- successful bread I've made. Like, I'm making another two loaves of it right now, just with a bit less rising time. :P

The ingredients:

4c AP flour
1/2tsp salt
8oz medium cheddar cheese, diced
1/4c VWG
2oz grated parmesan
1/2tsp ground chipotle pepper
2c water
2 1/2tsp ADY
1tsp liquid smoke flavor
1 egg, beaten with some water to thin it out (for a wash)
1 sugar cube (to proof yeast)

Put the yeast and 1/4c of water into a measuring cup with a sugar cube to proof. While the yeast proofs, put the flour, salt, VWG, chipotle pepper, and parmesan into a bowl. Combine thoroughly, so you don't need to worry about mixing it. If possible, try and break up any chunks of parmesan - they'll make hard little nodules in your bread if you don't.

Once the yeast is proofed, add the yeast along with the other 1 3/4c of water. Also add the liquid smoke flavoring at this point. Knead the dough until developed (and I'll admit, I still haven't quite figured out what dough feels like when "properly developed," but I've had good luck so far...) and toss in your mixing bowl, and cover it to proof.

While the dough proofs, take your 8oz of cheese and cut it up into roughly 1/4-1/2" cubes. Once done, stick it in the fridge until your dough is ready. Don't rise it too much - you'll get that "beery" flavor, and not everyone enjoys the taste of straight CO2! (although I kinda like it, I admit...)

Once the dough has risen to about 1.5-2x its original size, take it out and stretch it out 'til it's about 1/2" thick. Put the cheese cubes on top of the dough, trying to spread them evenly. Now fold the dough, press it out a bit, fold it, press it out a bit, and just repeat 'til you start getting pieces of cheese breaking through or almost breaking through the outside of the dough. Since there's no egg or anything in the bread, it should be perfectly safe to nom on the cheese that falls off - consider it a bonus. ;)

Shape them as you desire (personally, I went with two batard-like loaves, but I don't see why you can't do a boule, a baguette, etc. shape with this?) and let rise again. Rise them until they're about doubled.

While they're rising, preheat your oven to 500F. Once risen (which should be helped by the heat from the preheating oven,) brush the loaves with your egg mixture, slash the tops however you want (I use three slashes down the long axis of the loaf, though I forgot this time...) and stick 'em in the oven with steam (again, personally, I use an old lasagna pan I keep in the bottom of the oven, and toss a cup of water in there. By the time the cup of water is boiled off, that's "enough steam".) For the love of <your deity of choice>, don't make this on a baking stone unless you -want- to scrape burnt cheese off the thing. If you do, at least cover it somehow.

Drop the oven temperature to 400F, and cook for 50 minutes. Enjoy the smell from the liquid smoke that you mixed into it, along with the slight crispy-burnt cheese smell coming from the bits that should have been hanging off the loaf. Feel free to eat the crispy bits - I think they're the best part of the bread!

Pictures:

Cooling loaves:

Crumb porn:

Very tasty bread. I alluded to this when I was writing the instructions, but the first batch of this I made was overproofed - I had a strong CO2 (i.e. "beery") flavor in the loaf. I've got another batch in the oven (since I'm actually making these for other people) that should be significantly less beery. Still though, the crumb is wonderful, the loaf itself is nice and fluffy, and the taste is awesome.

Edit: Oh yes. MUCH better. So much oven spring out of the loaves this time around. I definitely overproofed it the first time, and I think I know exactly where I went wrong.

The Black Sheep Baker's picture
The Black Sheep...

Hi all 


Firstly- apologies for the lack of postings to those of you kind enough to read and post on this blog.  The past few months have been a mixture of intense activity combined with long periods of extremely frustrating inactivity.  I won't go into the specifics of why things have been progressing so slowly because I don't want to rock the boat where fragile inter-personal relationships are involved!

Anyhow,  even though we still have no electricity supply to the bakery we are finally moving in the right direction.  For the last month I have been baking bread for the farmer's market at Gibside (national trust property in north-east England) and the Quayside market in Newcastle.  It has been hard going working by myself at night then going straight to market in the morning but customer feedback has been great and it is an incredibly rewarding way of selling the bread.  I have kept my range quite small with three main types of bread (white, granary and pain de campagne), one special  (something with spelt), potato stotties and a couple of pastry products- mainly pain au raisin and chocolate brioche.

I hope to expand the range to include more pattisserie items and a soft yeasted white bread to be used for sandwiches.  Right now I am using a 20 qt Hobart mixer powered by my generator which is slowing production down a lot.  There is an 80 qt machine in the bakery but unfortunately the generator will not run it.

So far all breads are sourdoughs and I am working on around a 24 hour total ferment time- most of which is in the bulk ferment stage.    The breads range in sourness from the white which is mild to the p.d.c which is tangy, fruity even.  I was concerned that it may be too much for the general public but so far it has been the first to sell out.  I have been producing around 20kgs of each dough and have been lucky enough to sell out at each market so far.  Happy days!


This whole experience has been a steep learning curve but with each bake I am definitely getting closer to the kind of bread I hoped to make.  My shaping and slashing are improving along with general hand speed though I am surprised at the amount of back breaking labour that can go into producing a relatively small quantity of bread (200 loaves or so).  Understanding the oven has also been a challenge and I must thank Steve for his efforts during the firing process.  We really need to find a source of wood as far to much effort is being expended at the moment to find, haul and cut wood for the oven.


I promise that I will post some recipes on here ( I did make this claim before!) but I have to say my methods are fairly simple and there are probably far better recipes on other people's blogs.  Where I am lucky I think is cooking with the oven I have as when it is properly fired it is a dream to bake in and it can churn out a lot of bread.  Oven spring is tremendous too!

Below are some pics I took at the markets I have been attending- most pleasing was the bread for last Sunday's Quayside market.


Thanks for reading!

Robert

yozzause's picture
yozzause

Hi Fellow TFL folk

I have recently returned from a 3 month holiday that took us to the UK. We flew with Emirates on the 7th May from Perth @6.00am for  a non stop flight to Dubai aboard a Boeing 777 -200LR literaly overseas for 11 hours ,a quick 1 hr 15 minutes to change planes and an Airbus A380-800 to London. a mere 6hrs and 45 minutes. arriving at local time  6.40pm  we were then taken to the Hilton hotel in Kensington for the night, an extremely long day (32 hours.)

We travelled by coach down to Southampton  to catch the first of the 3 Cunard Queens that we were to travel on, QUEEN VICTORIA was to take us up to the  Baltic on a 14 day cruise takeing in Norway,Sweden,Denmark,Finland before St Petersburg in Russia then Estonia and Brussels back to Southampton.

We then stayed a night at the Devere hotel and the following day boarded the QUEEN ELIZABETH for 14 day cruise of the Mediterranean visiting Gibralta, Sardina, Italy (Rome) Barcelona and  Monte Carlo before returning to Southampton where the three Cunard Queens  were to meet to celebrate the Queens Diamond Jubillee. On the morning of  June the 5th  at first light  we followed in line behind QUEEN MARY2 and QUEEN VICTORIA to tie up in Southampton, there were hundreds of small craft escorting us to our berths and after much hooting and tooting the three Queens were altogether for the first time.

We then transfered to the Queen Mary 2  for a 5 day cruise taking in Rotterdam Brussels and LeHavre in France. there were big celebrations planned but as the weather worsened the air display was cancelled  but the fireworks still went ahead  as the Queen Mary positioned herself adjacent to the other QUEENS for more hooter blowing  and then an orderly procession out to sea in pooring rain.

 We did enjoy our first introduction to cruising and i managed to get an invite to the bakery from the executive chef on board the  Queen Elizabeth. The bakery operates 24 hours a day with 4 bakers, i had  asked the question why were the bread rolls so leathery on both the first two cruise ships.

The bakery was quite spacious  and had a number of deck ovens the head baker an indian gentleman ran through the procedures an said that steam was applied for the first five minutes of baking and again for the last 5 minutes  which for me explained  a possible cause, i enquired if it was laid down in a manual or something as both ships were producing similar results. There was also a dough on the bench which i was told were scones and were about to be pressed out placed on a tray and into the retarder for later baking which also sort of explained why the scones had very little lift. With a ship full of grannies i thought there would have been plenty thinking they could have done a much better job of the scones. Any way as a guest i didn't want to be to critical., but a baking contest for best scones would have been a hoot!

I will add some photos after i have posted this as i dont want to loose  what ive written so far.

Part 2 of the adventure will continue when on our 50 day car hire and travel through the UK we meet up with Andy (Ananda) in Northumberland and during a stopover on the flight back to Australia i meet up with Khalid (Mebake) in Dubai. 


 kind regards Yozza


Pages

Subscribe to RSS - blogs