The Fresh Loaf

A Community of Amateur Bakers and Artisan Bread Enthusiasts.

Blogs

hanseata's picture
hanseata

1971, when I was a student, I traveled with my best friend, Andrea, through England, Cornwall and Wales. We didn't have a fixed itinerary, we just followed our nose to places we had read or heard about.

We didn't stay in hotels (only once, and that was as dusty as it was expensive), we preferred B&Bs, always looking for interesting old buildings. We slept in grand manor houses, rustic inns, cozy farm houses, and even a water mill from the sixteenth century.

People always complain about the English food - I never had a really bad experience, I would always find something I liked, as long as it started with "apple" and ended with "pie"!

We often ate in pubs, having sandwiches with cheddar and chutney, and I was delighted to try the different beers.

With all these fond memories in mind - no wonder I wanted to try master baker Dan Lepard's Alehouse Rolls. You will find it in his book "Short and Sweet", or here.

I had just bought Newcastle Brown Ale at the Bangor commissary, and thought this was very appropriate for British rolls.

The dough is made with a hot beer soaker - ale and oats are brought to a boil, with butter and honey added to the hot liquid - and the rolled oats are toasted.

It also has some whole grain flour, to make the rolls even heartier (and give health conscious bakers a better conscience!)

Dan Lepard has a nice, minimalistic approach to working the dough, he handles it gently, kneads it very briefly, and allows it to develop while resting (autolyse).

As a psychotherapist this method appeals to me a lot: give the patient dough the means and time to develop, without pushing and hectoring - and it will grow just fine!

I chose rye as whole grain flour, and had to add a little more water to achieve a soft, slightly sticky dough. Instead of letting the dough rest for a final 30 minutes on the counter, I did what I usually do - and put it to sleep overnight in the fridge.


This cold fermentation of the dough fits much better in my schedule than doing it all on one day. Though I like baking in the morning, I don't want to get up in the wee hours, so I prepare everything the day before, and only have the shaping and baking left to do.

Having to choose between large sandwich rolls (à 235 g a piece) or smaller dinner rolls, I opted for the more petite version - 12 rolls à 92 g.

The recipe suggests rolling the rolls first over wet kitchen paper towels and then in oat flakes. I didn't read the instructions thoroughly, and, therefore, dunked only the tops in the oat meal.

Whereas the giant sandwich rolls have to bake for 20 minutes at 210º C/410º F, and then some more at reduced heat, my little rolls were golden brown after 26 minutes (without reducing the heat.)


They tasted just as good as they looked, a semi-soft crust with a little crunch, and a hearty, somewhat nutty flavor.

And, since I am a stickler to etiquette, I didn't dream of pairing them with anything else but traditional Newcastle Brown Ale!


breadsong's picture
breadsong

Another gorgeous day for the Skagit Valley, and a sunlit breakfast waiting for us as we arrived for Day 2 :^)
 

…and, if you wished, you could have pie for breakfast!

***

After breakfast, Andrew Whitley, co-founder of The Real Bread Campaign in the UK, led the day with his keynote address “Bread Matters”.
MC-Farine has a really good summary of Andrew’s talk here:
http://www.farine-mc.com/2012/09/andrew-whitley-bread-matters.html


Andrew described his realization that for some, tasting bread can take them back to a place where bread mattered.
It was very interesting to hear Andrew describe what motivated him to become a baker, write his book, and to co-found the Real Bread Campaign, in efforts to improve the state of bread in his home country. I’m sure Andrew’s efforts have brought much joy to people, firstly by baking good bread for them, and then by teaching how people to make it for themselves :^)  

***

During the day, I popped in an out of the Professional Baking Class taught by Jesse Dodson (first picture below), Michael Eggebrecht and Martin Philip (second picture below). 
 

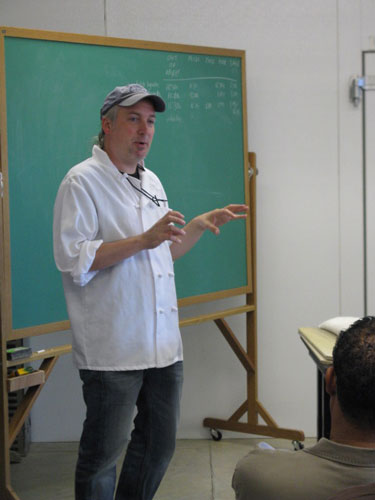
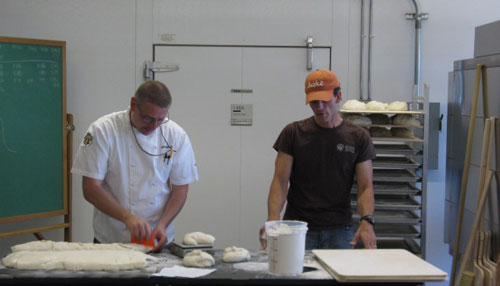
A wealth of knowledge with these three, and I tried to jot down interesting and helpful things they mentioned:

Whole Grains:
- whole-milled flour lasts longer (is more shelf-stable?) than flour that has been re-combined
- whole grains like to ferment a little warmer that white dough
- proofing for whole grains has to outpace the loss of gas; mix whole grains to 80F dough temperature, so the warmer temperature will promote faster gas production, resulting in shorter final proof/fast to the oven
- with whole grains, colder temperatures will amplify acetic flavors, warmer temperatures will amplify lactic flavors

Dough Temperature:
                               
- a good dough temperature for a French bread (baguette dough) is low 70’s (F); mixing too warm will
result in a tighter crumb (wish I’d thought to ask why!)
- dough temperature and effect on duration of bulk fermentation (assumed to be happening at 70F room temperature):  as a guide, you can expect a change of 7 minutes per degree per hour of fermentation; for example, ciabatta that might bulk ferment at 75F for 180 minutes (3 hours), if mixed to 78F instead of 75F, would have a 63-minute reduction in bulk fermentation time (7 minutes x 3 degree temperature difference  x 3 hours original bulk fermentation = 63 minutes) – so your dough would bulk ferment 117 minutes instead of 180 minutes
- if trying to use environmental compensations (fridge, or a warming device) for dough temperature that didn’t hit the target, your dough will ferment unevenly around the perimeter)

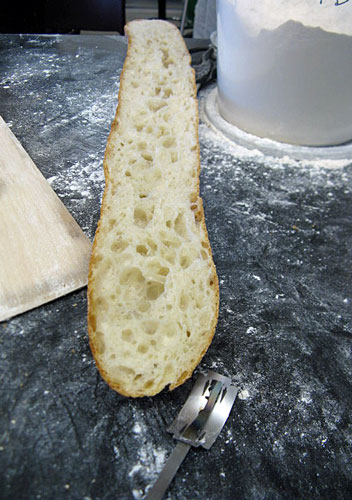
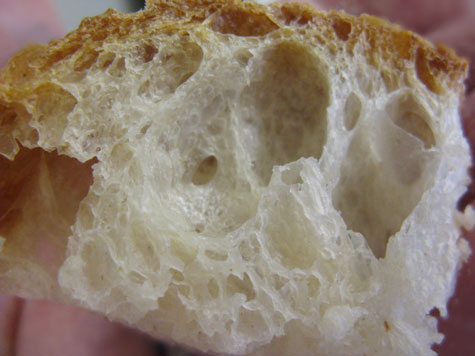
Masters of shaping and scoring:
It was a pleasure to see these talented bakers working with the dough, shaping and scoring!
This is pre-shaped baguette dough:

Jesse demonstrating blade angle, batard scoring:

Cutting épi de blé:
 

Steam:

                                            
- too little steam affects crust color and how cuts expand, but too much steam will also affect how cuts expand
- smaller loaves jump in the oven more quickly that larger ones, and so require less steam than larger loaves

Rye:
- the coarseness of the rye grind affects hydration but also the accessibility of the endosperm – what I understood Jesse to say was if the endosperm’s accessibility was reduced as a result of how the rye was milled, less starch could be converted to sugar and that would affect fermentation
- Jesse mentioned when baking dark rye, they tried steaming a second time, 8 minutes into the bake, and got another ½” of height in the baked loaves
- Andrew Ross noted, you can adjust the acidity in your dough if you know the amylase present (represented by falling number) in your flour, for a particular harvest

Baked!:


***

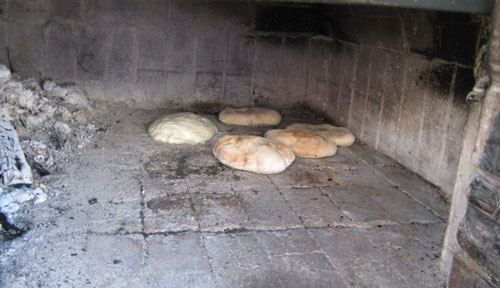
I would have loved to have caught Naomi Duguid and Dawn Woodward’s class “A World of Flatbreads” but did manage to get these pictures (flatbreads baking, tasty samples, and a happy dough, bubbling and fermenting away in the sunshine):


***

There was also an enormously fun demo by Mike Dash of Rolling Fire Pizza, with gorgeous and silky Caputo 00 dough for shaping and baking…
 

Guess which slice had my name on it? :^)

***

There was an afternoon tour of the Bread Lab and demonstration of the various pieces of equipment used for testing flour properties – what wonderful tools to have to help determine the baking properties of the beautiful grain being grown at this WSU extension.

***

Later that afternoon, Naomi Duguid and Dawn Woodward, along with Gary Moulton, presented “Sensory Analysis of Cider, and How the Descriptives Relate to Bread”.
             

It was very interesting to consider the aroma and flavor descriptions that typically apply to wine, beer and cider and consider how those descriptions translate to the aroma and flavor of bread:
                       

***
Then, more Skagit Valley Tastings! More delicious cider (apple, and a gorgeous blackcurrant from Finn River), accompanied by some beautiful barley bread, made by Andrew Ross (who taught a barley class last year at KCW), and Hannah Warren:


***
Also so enjoyable, the beautiful, sweet bouquet of sweet peas,

intensified by the warmth of the late summer sun...

***

Then, a delicious BBQ dinner provided by Bonanza B-B-Q,  as the sun started to set on this second, wonderful day :^) …

Previous:  Kneading Conference West 2012 – Day 1
Next: Kneading Conference West 2012 – Day 3


breadsong's picture
breadsong


Having had such a wonderful time at last year’s Kneading Conference West, I jumped at the chance to attend this year’s event and be immersed, once again, in all things grain. It was really good to see friendly faces from last year and meet new people – so many interesting, and interested people to chat with, and learn from!

***To see some wonderful write-ups of this event, and more pictures, please see these posts:
Floyd’s http://www.thefreshloaf.com/node/30236/kneading-conference-west-part-1
Floyd’s http://www.thefreshloaf.com/node/30241/kneading-conference-west-part-2
MC-Farine’s http://www.farine-mc.com/2012/09/kneading-conference-west-2012.html
Naomi Duguid's  http://naomiduguid.blogspot.ca/2012/09/notes-from-skagit-valley.html
Rhona McAdam’s http://reallygoodwriter.com/food-festivals/kneading-with-a-k
Teresa from Northwest Sourdough's http://www.northwestsourdough.com/discover/?p=3199
Teresa from Northwest Sourdough's http://www.northwestsourdough.com/discover/?p=3237


Washington State University’s Mount Vernon extension, where the event was held, is located in the beautiful
Skagit Valley and is an ideal location for this event – lovely fields and orchards, conference spaces and labs –
and the staff there are such gracious hosts! Here is the extension’s director, Dr. Steve Jones, serving up some yummy pretzel samples,
freshly-baked in Andrew Meltzer’s class:  

More sharing of good bread: a gorgeous wood-fired miche someone brought; check out the brick pattern imprinted on the bottom during the bake :^)

 
      I regret I didn’t get to taste this: 


We enjoyed some pretty amazing company: Keynote Speakers Naomi Duguid and Andrew Whitley;  so many great instructors, volunteers, bakers, millers, and maltsters;  old, and new friends;  and also, enjoyed very delicious ‘tastings’, accompanied by glorious and perfect late-summer weather…

...a lovely orchard apple, ripening in the September sun  


***
The conference opened with Naomi Duguid’s keynote address, “Bread Over Time”.
Naomi talked about looking back – how we are standing on the shoulders of peoples’ determination, creativity, labor and achievements in the absence of technology, in using grain - a rich and difficult resource - to survive; and discussed respect and how we may be able to give grain-based foods value again by getting back to local grains, individual varietals with local, distinctive flavors – so we might know where our grain comes from, recognize the effort it takes to produce food from grain, have a commitment to a piece of our bread’s production and a relationship with those that have a part of producing it. MC-Farine has captured so well Naomi’s address!:
http://www.farine-mc.com/2012/09/naomi-duguid-bread-over-time.html


***

The next session I attended was “Whole Grains: We Need the Whole Story” presented by Bob Klein, Tom Hunton, Cliff Leir, and Andrew Whitley. The panel discussed milling methods and that ‘whole-wheat’ might not mean ‘whole-grain’.
As part of this panel discussion a video was shown that described (and I hope I’m paraphrasing correctly) “A wheat kernel may be more than the sum of its parts – it’s a system – all pieces are designed to work together; how can we outsmart a well-designed seed?; we may not have all of the science yet to know what phytochemicals we may be missing when we exclude certain parts of the grain from our flour”.
It was noted “what’s in the mixing bowl may not be usable by our bodies” and how study is needed to determine how long fermentation may help make the nutrition in the grain more available to us.

Bob Klein, of Community Grains, presented an example of product labelling that might help the consumer understand what they were purchasing:

I remember seeing coffee beans for sale at a market once, which listed on the package, the place and elevation where the beans were grown, along with the name of the farmer that grew the coffee. That packaging, as with this labelling from Community Grains, causes me to think of the people behind the product :^)

There was discussion too, on how to improve consumers’ perception of whole grain flour, perhaps by emphasizing freshness, that the product was produced with integrity, the product’s good/distinctive flavor and by creating more positive connotations of the product with better description (describing a bread as “golden” instead of “brown”, for example).


***

In Julie Richardson and Laura Ohm’s class, they were preparing some beautiful pies and tarts; these were peach and plum with raspberry – pleated pie and pastry perfection! (a picture of baked ones coming up, next post): 


***

In the afternoon, we enjoyed a Skagit Valley Tasting - incredible beer from Skagit Valley Malting, delicious goat cheese from Gothberg Farms, and crispy, flavorful, hand-crafted crackers from Dawn Woodward, of Evelyn’s Crackers:

And from the gorgeous gardens, a yellow poppy,
catching some of the last of the day’s sunshine :^)

***

After the beer, cheese and cracker tasting, and a extremely tasty wood-fired-pizza dinner (thanks to Mike Dash of Rolling Fire Pizza, and Mark Doxtader of Tastebud Farm), the day ended with a talk given by Richard Scheuerman about the heritage of grain-growing and the agricultural history of the Hudson’s Bay Company in the Pacific Northwest, illustrated with beautiful artwork
(really lovely botanical drawings of various heritage grains): 

Richard talked about the biodiversity of the grains that used to be grown in the Puget Sound region and explained these grains were landrace grains, strains with rich genetic diversity that adapted over time to the locales in which they were grown. I thought I heard Richard say some of the historical varieties he researched are now being grown at the WSU extension (I hope I heard correctly), because if that is the case, isn’t it wonderful the ‘terroir’ of some of those Pacific Northwest grains is being preserved? :^)


Continued with next post: Kneading Conference West 2012 - Day 2

Last year's event: Kneading Conference West 2011

GSnyde's picture
GSnyde

I've been absent from TFL for about a month.  I had a rotator cuff injury that kept me out of the kitchen.  Then a couple busy weekends.  So I've only baked once or twice in the last 5 weeks, and didn't take any photos.

This weekend, we were home and I had time to bake.  I decided to try Hamelman's Vermont Sourdough with Whole Wheat for the first time.  A very nice bread.  As you can see, I baked boldly.  Thick crust and tender crumb.  Very wheaty flavor.  It would be a good base for a seed bread.  

I made one batard and one boule.  The boule decided to expand asymmetrically, likely due to my uneven scoring.  

I hope to get back to more baking and blogging.

Glenn

Stephanie Brim's picture
Stephanie Brim

I am lazy sometimes. Well, most of the time in the last few weeks. Family still has to eat, though, and after fajitas were a hit last night, I threw the rest on a basic 75% hydration pizza dough thusly:

Yay for chicken, bell peppers, onions, and cheddar pizza. :D

wassisname's picture
wassisname

This mixed-starter sourdough has become my favorite style of light-ish sourdough.  It has proven itself capable of standing up to my "creativity", and that alone counts for a lot.  The rye flour takes some of the chewiness out of the crumb and prefermenting it lends the flavor of the bread a distinct tang.  If sour isn't your thing then this probably isn't the bread for you.  But, it really works for me.   1/3 whole grain gives it some substance and 70% hydration keeps it easy to work with.  I started the dough in the mixer, just until it came together, then kneaded by hand.

Under the influence of the aforementioned "creativity", I baked one of the loaves with the seam-side up.  I wasn't sure it would be a good idea, but in the end there was little difference between the two loaves.  If anything, the seam-up loaf had a somewhat better crumb.  The scored loaf was scored a little too cross-wise and wasn't able to expand as much.

Seam-Up

Seam-Down

Adjustments for next time:  I think I will take 30 minutes or so off of the bulk ferment time and add it to the final ferment.  Also, one fold instead of two - the dough was already pretty tight, but because it was kneaded by hand I gave it the second fold.  I think I would have been better off without it.  Lastly, the whole wheat starter was more ripe than I would have liked, even with the salt in it.  As the nights get cooler into autumn that should become less of a problem.
Oh, and now that it is officially autumn the next batch will probably be loaded with seeds! 

On a side note:  The trouble I go through for a decent loaf of bread is nothing compared to what I'll put up with to grow a few good vegetables.  I decided to expand the garden a bit and began prepping the ground for next season.  The soil here is dismal so "prepping" generally means digging a big hole and filling it up with something better than what was there originally (except with grapes, grapes just love it).  The only thing worse than the soil is the chalky, volcanic rock underlying the whole neighborhood.  I've been surprisingly lucky in placing my vegetable beds... until now.  There was no getting around this one.

Anyone have a stick of dynamite handy?  I'll be back in the kitchen working on my next bread!

Marcus


Isand66's picture
Isand66

Over the last few weeks I have been experimenting with making different styles and recipes for baguettes.  A couple of weeks ago I tried TxFarmer's 36 hour sourdough version but I had some issues transferring the rested baguettes to my oven and the results were less than stellar.  This time I decided to concentrate on a recipe from Dave Snyder for his "Rustic Sourdough Baguettes after Phillipe Gosselin".  This recipe is also similar to Peter Reinhart's formula for Pain a l' Ancienne from The Bread Bakers Apprentice where he uses yeast and no starter.

I wanted to give Dave's recipe a try using Yeast Water instead of a sourdough starter and I also wanted to incorporate some Durum flour into the mix.  I created a Durum Yeast Water starter over 3 builds and also used some KAF French Style flour in the final dough which is medium protein, high ash flour which is supposed to mimic the flour used in France for their world-famous baguettes.

The only mistake I made on this recipe was the forming of the baguettes.  I knew I should have re-read the directions from TBBA but I was too lazy and paid the price.  I didn't use nearly enough flour to control the extremely wet 75% dough and had a difficult time forming them into baguettes without man-handling them.  The final result turned out pretty good with a nice open crumb and sweet nutty flavor.  Keep in mind this dough is very wet and is not meant to form the baguettes in the normal fashion.  You basically just pat the dough out into a rough rectangle and cut 3-4 strip and carefully stretch them out to form a baguette.

Procedure

Yeast Water Starter Build 1

60 grams Durum  Flour (KAF)

60 grams Yeast Water Starter

Mix the flour and Yeast Water in a bowl until thoroughly combined.  Cover the bowl and let it sit at room temperature for around 4 hours.  The starter should almost double when ready to proceed to build 2.

Build 2

Add ingredients below to starter from above and mix until incorporated.  Cover with plastic wrap and let sit at room temperature for 4 hours.

100 grams Durum Flour

100 grams Yeast Water

Build 3

Add flour to starter from above and mix until incorporated.  Cover with plastic wrap and let sit at room temperature for 4 hours or until bubbly and either use immediately or put in the refrigerator for the next day.

60 grams Durum Flour

60 grams Yeast Water

(Note: I made extra starter since I wanted to use this for another bake.  You can cut the amounts down to make the 200 grams needed in the recipe)

Main Dough Ingredients

100 grams Durum Flour

300 grams French Style Flour (You can use AP flour to substitute)

200 grams  Yeast Water Durum Levain from above

275  grams Ice Water

8.75 grams Sea Salt or Table Salt

Procedure

Build your Yeast Water levain the day before you are ready to bake or start in the morning the day before you want to bake the actual baguettes.

The evening before you want to bake, mix the mature levain with the flours and 225 grams of the ice water.  (I measured the water and added a few ice cubes for a minute and then removed the cubes and measured again).  Immediately put the flour mixture in the refrigerator in a covered greased bowl.  (Note: you can follow Dave's original recipe and substitute your 100% hydration sourdough starter for the Yeast Water starter).

The next morning, (Due to my schedule as we took a ride out east to buy some pumpkins and taste some wine I didn't prepare the dough until about 8 PM),  add the salt and 50 grams of ice water to the dough and mix using your hands until all the water is absorbed into the flour.  You will have to squish the dough and the water together for a few minutes until all the water is absorbed.  I did this in the same bowl the dough was resting in the refrigerator in, but you can transfer to a clean oiled bowl if desired.

Cover the bowl with the dough and ferment at room temperature until the dough has doubled in volume which should take around 3 hours.  Every 30 minutes for the first 2 hours do a stretch and fold in the bowl.

About one hour before ready to bake, set your oven for 500 degrees F.and make sure you prepare it for steam.  I have a baking stone on the top shelf and the bottom and use a heavy-duty rimmed baking pan that I pour 1 cup of boiling water into right as I put the loaves into the oven.

After 3 hours or when the dough has doubled, transfer the dough to your well floured work surface (use about 1/2 cup of flour).  Sprinkle more flour onto the top of the  dough if necessary and using a wet dough scraper and wet hands pat the dough out into an oblong .  Be careful not to degas the dough or you will lose all of the nice big open holes you are looking for.  Cut the dough using your metal dough scraper into 4 strips and transfer them with floured hands to a piece of parchment paper on the back of a baking sheet.  Gently coax the dough until it is about 12-14 inches long.  You may need to let it rest for 5 minutes to relax before doing this step.  Score the dough as best as you can.  You may have to dip the blade in ice water between each cut.

When ready to bake place the loaves into your on  your oven stone with steam and lower the temperature immediately to 460 degrees.  It should take around 20 minutes to bake  until the baguettes  are golden brown and reached an internal temperature of 200 - 205 degrees F.

Let the loaves cool down for at least an 20 minutes or so before eating as desired.

The results were pretty good with a nice open crumb and light but crispy crust.  I will certainly try this one again and hopefully follow my own directions about shaping this time!

Floydm's picture
Floydm

I'm in the process of starting a new starter.  I decided to try it without raisin water or pineapple juice or anything special, just whole wheat flour and water. 

At the end of day one, no activity but no problem.  Similar after day two.  At the end of day three it smelled nice when opened the cupboard, so I removed the plastic covering the bowl and...

Ew.  

So now I'm trying again using the pineapple juice formula that Debra Wink and SourdoLady recommend.  Hopefully the additional acidity will prevent this from happening again.

In better news, I tried baking crackers the other day.

I didn't exactly nail it but they were better than any crackers I had previously made.  

-Floyd

Isand66's picture
Isand66

I just received my delivery from KAF and I wanted to use some of the new flours and ingredients I purchased.  I decided to make a multi-flour bread using white spelt, whole spelt, rye chops (chopped up rye berries) and some black cocoa. The black cocoa is the darkest version you can buy and really turned the dough a beautiful chocolate color.  The final dough was a nice dark color with a chewy crumb that was also just light enough to be perfect.

You don't really taste the cocoa very much but with the  addition of the rye chops and the 2 different spelt flours I was very happy with how the crumb and crust came out.

I used my standard 65% AP starter for this recipe.

Directions

AP Starter

227 grams AP Flour

71 grams AP Seed Starter

151 grams Water at Room Temperature (80-90 degrees F.)

Mix ingredients in a bowl until thoroughly combined.  Cover the bowl and let it sit at room temperature for around 8 hours.  The starter should almost double when ready to proceed.  You can either mix in final dough or put in refrigerator for at most 1 day before using.  If your kitchen is warmer than mine which is usually about 70-72 degrees with my air-conditioning you can proceed sooner.

Main Dough Ingredients

425 grams Refreshed AP Starter (65% hydration) from above

110 grams White Spelt Flour (KAF )

110 grams Whole Spelt Flour (KAF)

300 grams European Style Flour (KAF, you can substitute bread flour with a little whole wheat mixed in)

50 grams Potato Flour (KAF)

70 grams Rye Chops (KAF)

15 grams Dark Cocoa (KAF)

25 grams Olive Oil

16 grams Sea Salt or Table Salt

400 grams Water  (Room temperature)

797 grams Total Flour

551 grams Total Liquid

69% Hydration

Procedure

Mix the flours, dark cocoa and rye chops with the water (leave out about 50 grams for later) in your mixer or by hand for 1 minute. Let it rest covered in your bowl for 20 minutes.   Next cut the starter into small pieces and put in bowl and also add oil, salt and the rest of the water.  Mix for 5 minute to incorporate all the ingredients. I mixed on speed #1 for 3 minutes and speed #2 for 2 minutes.   The dough should have come together in a ball and be tacky but not too sticky.

Next take the dough out of the bowl and place it on your work surface or as in this case place it in an oiled bowl or container.  Do a stretch and fold and rest the dough uncovered for 10 minutes.  After the rest do another stretch and fold and cover the dough and let it rest for 10 minutes.  Do one more stretch and fold and put the dough into a lightly oiled bowl and let it sit at room temperature covered for 2 hours (if it is already in a bowl just make sure to cover it).   After 2 hours you can put the dough into the refrigerator for 24 hours or up to 2 days before baking.  Feel free to do some additional S & F's if you feel it is necessary.  I baked the bread about 24 hours later.

The next day (or when ready to bake) let the dough sit out at room temperature for 2  hours.

Next, form the dough into your desired shape and put them in floured bannetons, bowls or on a baking sheet and let them rise covered for 2 hours or until they pass the poke test.  Just make sure to not let them over-rise.

Score the loaves as desired and prepare your oven for baking with steam.

Set your oven for 500 degrees F. at least 30 minutes before ready to bake.  When ready to bake place the loaves into your on  your oven stone with steam and lower the temperature immediately to 450 degrees.    When both loaves are golden brown and reached an internal temperature of 200 degrees F. you can remove them from the oven.

Let the loaves cool down for at least an 6 hours or so before eating as desired.

Feel free to visit my other blog at www.mookielovesbread.wordpress.com for all of my recipes.

sungmo kim's picture
sungmo kim


Country bread with Pate Fermentee
@1day (pate fermentee)
spelt flour     150g
Water            90g
Salt                2.7g
dry yeast        0.06g

1.Mixing    just smooth.
2.Rise        12 to 16 hours 70F


@2day
Spelt flour      150g
Water              114g + 1Tablespoon
Salt                 2.7g
Dry yeast        0.66g
pate fermentee all of above

1.Mixing                       Supple and loose and wet  but, dulable Muscle has. 
                                      moderate(medium) gluten develop.  77F
2.Bulk ferment              two times to volume untill.
3.Folding                       Twice
4.Dividing,Shaping     
5.Final Ferment             about 1hours. 80%-90 % untill after shaping volume
6.Baking                        450F  Steam(Color in side until it)   about 25min.
7.Cooling
Crust has became damp when cooling stage. what problem? Ever, Excessive amount of steam? Humidity inside the oven is too high, Because the amount of one steam ejected too high (use steam oven)?And the crust does not sound.What Problem?Help me please.

Pages

Subscribe to RSS - blogs