The Fresh Loaf

A Community of Amateur Bakers and Artisan Bread Enthusiasts.

Blogs

letrec's picture
letrec

I've been baking a lot of sourdough as of late, and since I'm stubborn I don't ever refrigerate any of the starter and maintain it exclusively on the counter. While this lends to a vigorous starter it also encourages (ok, demands!) frequent baking, or you're going to either end up with the starter that ate your kitchen, or be exceptionally wasteful by refreshing the starter so frequently.

I have a little bit of a sweet tooth, and love blueberries so this was a natural next step.

I have adapted this recipe from this recipe at Sourdough Home:
http://www.sourdoughhome.com/index.php?content=blueberrymuffins

I made some adjustments as to my taste and added a crunchy Streusel topping!

Ingredients
-----------

1 egg
1 tsp vanilla
1/4 tsp salt
1/4 cup oil (EVOO works great here)
1 cup 100% rye sourdough starter at 100% hydration!
2tbsp of Greek Yogurt (adds a little more acidity, good fat)

1/2 cup whole rye or wheat flour if you must
1/2 cup of organic buckwheat flour
1/3 cup of ground flax seeds
1 tsp baking soda
1/3 cup sugar or fructose
3/4 cup frozen blueberries

Streusel Topping

2 cups pecans or walnuts (8 oz.)
½ cup packed light brown sugar (I combined molasses and caster sugar)
⅓ cup old fashioned rolled oats
1 tsp. ground cinnamon
¼ tsp. salt
2 Tbs. vegetable oil (I used more EVOO, though next time I may be decadent and use coconut oil)

Method

Preheat oven to 425F. (I use a convection oven, so actual temp was 400F)

Prepare streusel by combining nuts, sugar, oats, cinnamon and salt in food processor and pulsing a few times until a coarse mixture is achieved. Slowly drizzle in oil taking care to stop before creating a paste. The ideal consistency will be damp, but very crumbly. Set aside.

Combine dry ingredients in small bowl and then stir in blueberries. Combine wet ingredients in medium bowl.
Add dry ingredients to wet ones.

Place muffin cups inside tin and oil and dust them.
Oil a large dough or ice cream scoop and spoon batter into cups.
Sprinkle a liberal amount of Streusel topping over each cup such that you can no longer see the batter.

Bake at 425 for about 20 minutes or 16 min for convection

Allow to cool for 5 minutes in tin and then transfer to rack to cool to room temperature!
This should yield about a dozen full sized muffins. Enjoy!

GSnyde's picture
GSnyde

This is true in bread baking, of course.  We are all more or less methodical, trying to get everything just right.   But everything is never just right.  Then, something inexplicably wonderful happens and the best bread ever known comes out of your oven.  And it’s either because you’re amazingly skillful, or pixies, leprechauns, angels or karma paid a visit.  In my case, I would bet it’s pixies.

The same is true in photography (that’s why they’re called “pixels”). 

Yesterday was a lucky day both for bread and photography.

The bread was Hamelman’s Five Grain Levain, a bread I’ve made 5 or 6 times.   This time I used real cracked rye—as called for in the formula—instead of the cracked wheat I’d been using.  And I scaled the dough into six mini-batards (or short, chubby baguettes).  They came out spectacularly well—crust, crumb, ears, spring, flavor.

Then, of course, I had to capture them on camera.  So I pulled out my new underwater camera, placed the cooling loaves in the sunny dining room, and … PIXIES!!

The shots below are in more ordinary light, but still nice.

May luck visit you all.

Glenn

tsjohnson85's picture
tsjohnson85

This is my first TFL write up.

While I have only made some comments on posts within the last couple of months, I have been stalking the wonderful forums and submissions on this site since I started baking bread regularly, about four years ago.  I think a big thank you to the collective of the website is in order, if not something more.

This particular bread was born out of frustration: I tried a 100% whole wheat miche about a week ago (all whole wheat, except for a rye starter) and it failed pretty miserably.  I know why it failed.  My apartment is cold (around 62 F), especially since it is a NYC basement apartment, and I wanted things to go much more quickly than they needed to.  So, the loaf was under proofed and also, as I found out when I cut into it the next day, under baked.  Out of shame, there are no pictures. 

So, the next day I tried to redeem myself but ended up repeating many of the same mistakes.  I again tried to rush things and was again disappointed.  For this loaf, however, I made two modifications: 15g of toasted wheat germ in the final dough, and instead of going for 100% whole wheat (again, aside from the rye starter) I added 100g white bread flour.  This made the final dough a little more forgiving, and this loaf I was willing to eat.  However, with the high hydration of the dough (around 82%) and an under-floured banneton, the dough stuck when I unmolded it and this shows on the final loaf.  So again, no photos.

The following was my attempt to redeem myself.  I had just gotten back from a research trip in France and since I could still taste the bread the sting of frustration was all the more harsh.


Total Dough

200 g whole wheat flour (Bob’s Red Mill)

100 g white bread flour (Pillsbury—it’s what I had on hand)

15 g toasted wheat germ (Bob’s Red Mill)

100g rye starter at 100% (using NYC tap water and Arrowhead Mills organic rye)

7 g kosher salt

265 g water

Hydration: 86.3%


Preferment

100 g rye starter

200 g whole wheat flour

15 g toasted wheat germ

215 g water

            Preferment temp was 23C / 73F

Covered and left alone at room temp for 24 hours.  This day the kitchen temp hovered around a whopping 15C / 59F.

The Rest

100 g white bread flour

50 g water

7 g kosher salt

After mixing in the remaining flour and water—water into preferment, then flour—I let it rest for 30 minutes. Before kneading.  I’m a fan of slap and fold and did that for two minutes before adding in the salt.  Then, I kneaded for another 8 minutes before forming a boule and putting in an oiled bowl.  Dough temp: 16.6C / 61.5F

The bulk ferment lasted 5 hours with three-part folds at 1.5 and 3 hours. 

After 5 hours, I turned the dough out and pre-shaped the dough for a boule and let the dough rest for 20 minutes.  I then shaped the boule, plopped it into a banneton—well-floured this time, mind you—and parked it in the fridge for 16 hours. 

The next day I took it out of the fridge and let it come to room temperature (again, around 15C) for two hours on top of the oven, which was heating breakfast and then preheating for the bake.

I baked the loaf in my preheated cast iron skillet at 500F with steam for the first 20 minutes and then at 450F with no steam for another 25 minutes.  At the end of the bake the loaf’s internal temperature reached 214F.  I then left the bread in the oven for 1 hour after I killed the gas. 

Oven spring was good, though not as even as I would have liked: again, a part of the dough stuck in the banneton.  This banneton is newer, so this tendency to stick might decrease with use.  I also might just outfit it with a linen liner.

 I wish I had baked the loaf at 500F for the whole time, since I like an aggressively scorched crust and this loaf had only gotten chestnut brown.  I also might need to do a check on the accuracy of my oven temps… 

--Scott

Isand66's picture
Isand66

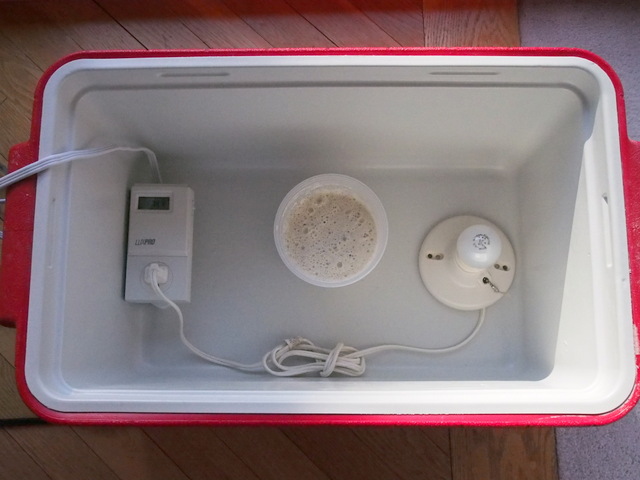
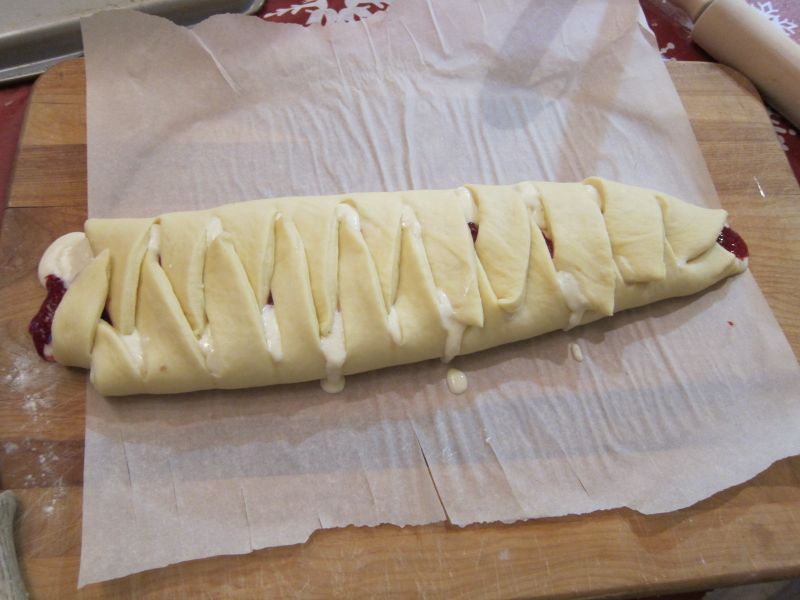
I just refreshed my Yeast Water starter earlier in the week after returning home from a long business trip.  I have had great success mixing the Yeast Water starter with a traditional sourdough starter so I decided to follow a similar path.  To make things interesting and because I happen to love durum breads I decided to make a 65% hydration YW starter using only durum flour and for the sourdough starter I converted some of my AP starter first to a 100% hydration starter using durum flour and sprouted whole wheat.  I built both starters up in 3 stages over 2 days to make sure I had nice and lively starters.  I didn't quite think through the amounts correctly so I ended up with a lot of extra starters.  Not too worry as I'm making some YW Durum English Muffins tonight withe the extra starter.  Feel free to adjust the amounts below if you don't want any left-over starter.

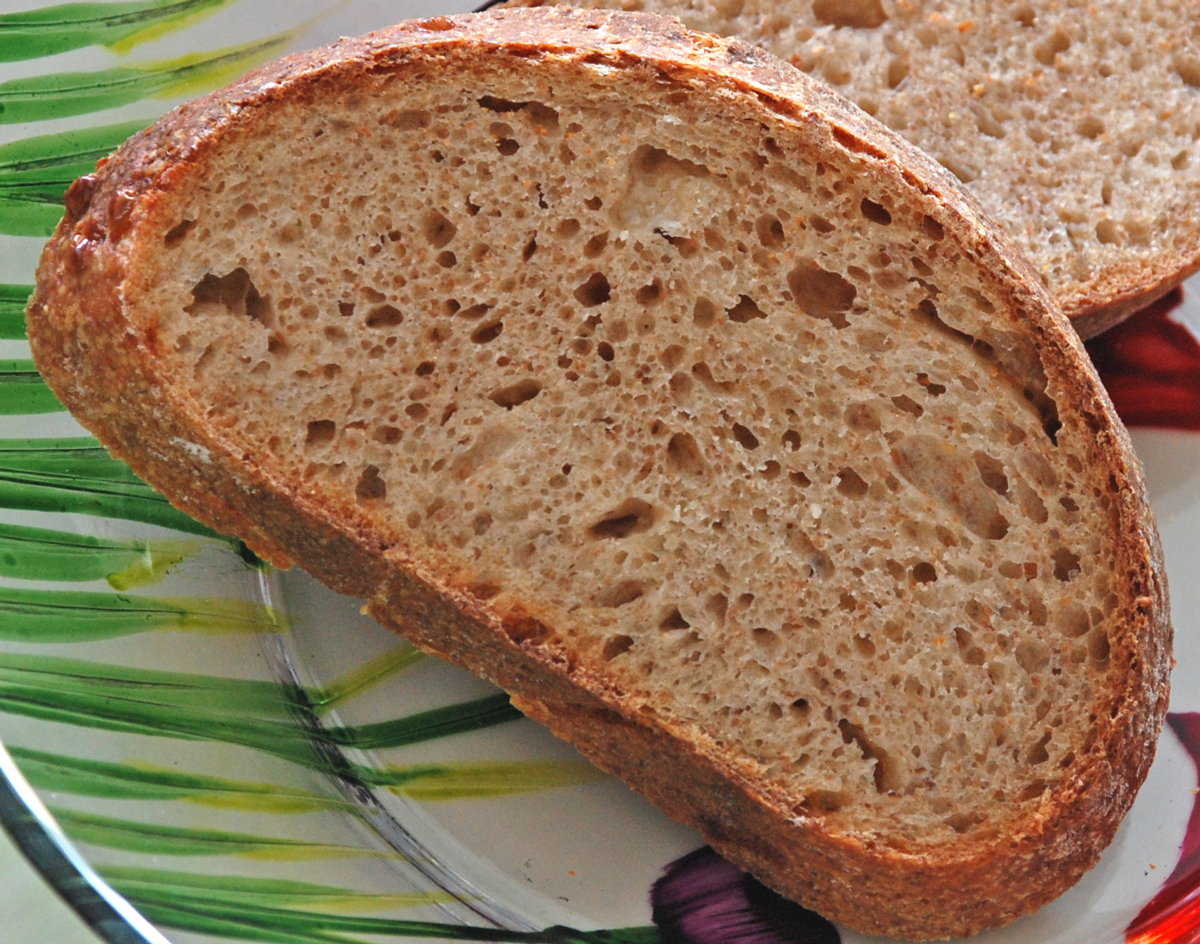
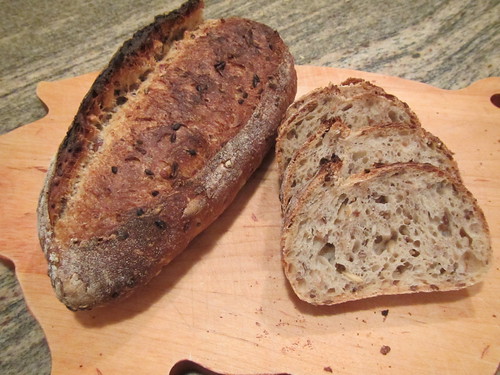
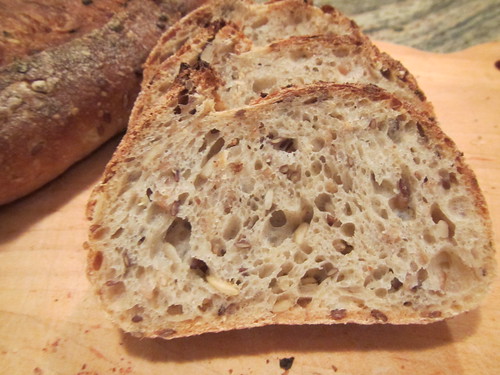
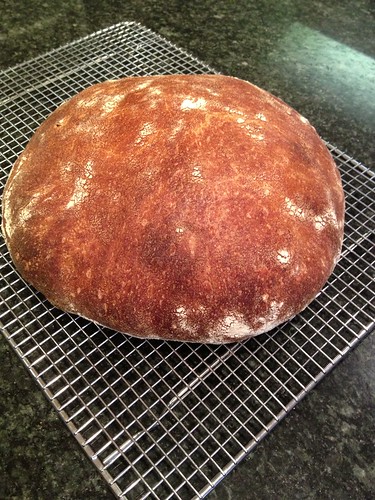
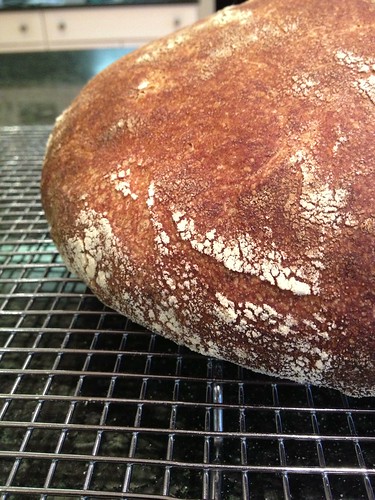
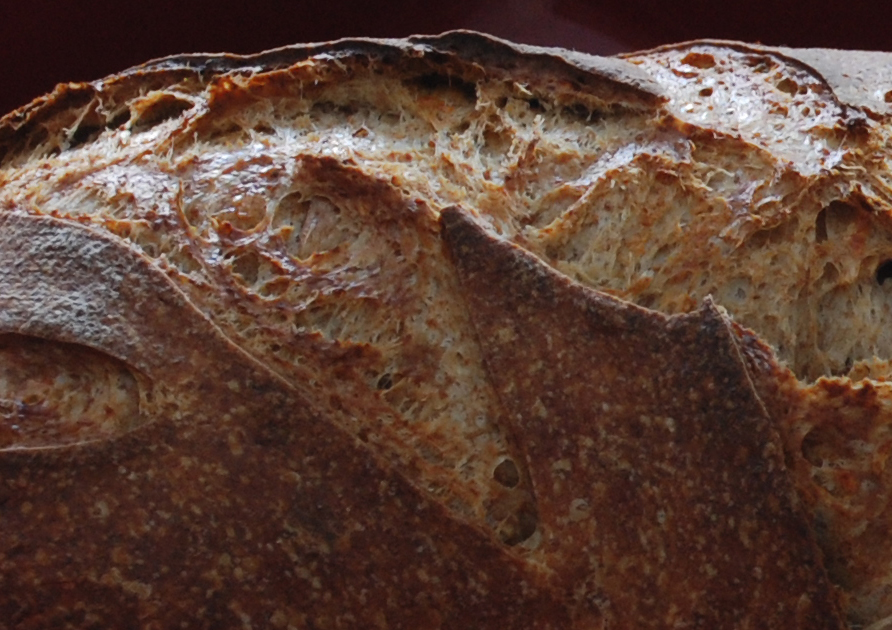
The end result was a nice open flavorful crumb with a crisp and chewy crust.  You can taste the Parmesan cheese but it's a subtle flavor and does not overpower.  This is a nice hearty bread to have with a nice Italian meal or a tasty sandwich.

Enjoy!

Procedure

Yeast Water Starter Build 1

60 grams Durum  Flour (KAF) (note: this is not the same as Semolina Flour which is for pasta)

60 grams Yeast Water Starter

Mix the flour and Yeast Water in a bowl until thoroughly combined.  Cover the bowl and let it sit at room temperature for around 6-10 hours.  The starter should almost double when ready to proceed to build 2.

Build 2

Add ingredients below to starter from above and mix until incorporated.  Cover with plastic wrap and let sit at room temperature for 6-10 hours.

100 grams Durum Flour

100 grams Yeast Water

Build 3

Add flour to starter from above and mix until incorporated.  Cover with plastic wrap and let sit at room temperature for 4 hours or until bubbly and either use immediately or put in the refrigerator for the next day.

100 grams Durum Flour

10 grams Yeast Water

(Note: I made extra starter since I wanted to use this for another bake.)

Sourdough Starter Build 1

63 grams AP Starter

30 grams Durum Flour

33 grams Sprouted Whole Wheat Flour (You can use regular Whole Wheat)

75 grams Water

Mix the flour, starter and water in a bowl until thoroughly combined.  Cover the bowl and let it sit at room temperature for around 6-8 hours.  The starter should almost double when ready to proceed to build 2.

Sourdough Starter Build 2

60 grams Durum Flour

40 grams Sprouted Whole Wheat

100 grams Water

123 grams Sautéed Onions (sautéed in olive oil)

Mix the flour and water with the  starter from build 1.  Cover and let sit at room temperature for 6-8 hours until doubled and nice and bubbly.

Sourdough Starter Build 3

62 grams Durum Flour

40 grams Sprouted Whole Wheat

Add the flour to the starter from build 2 and let it rest covered for 6 hours until bubbly and nearly doubled.

Main Dough Ingredients

200 grams Yeast Water Durum Starter from Above

225 Sourdough Starter from Above

250 grams French Style Flour (KAF) (You can use AP Flour or Bread Flour to substitute)

150 grams Durum Flour (KAF)

100 grams Sprouted Whole Wheat Flour

70 grams Roasted Wheat Germ (this really adds a nice nutty flavor to the bread)

16 grams Seas Salt or Table Salt

51 grams Shaved or grated Parmesan Cheese

22 grams Olive Oil

425 grams Water (80-90 degrees F.)

Procedure

Build your Yeast Water levain and Sourdough starter the day before you are ready to bake.

The evening before you want to bake, mix the flours and the water.  Mix on low-speed in your stand mixer or by hand for about 1 minute until the ingredients are combined.  Let the dough autolyse for about 20 minutes to an hour.

Next add both levains and the oil along with the salt and mix for 3 minutes on low.  After 3 minutes add the cheese and mix for about 1 minute until incorporated.  The dough will come together and be slightly sticky.  Place the dough in a slightly oiled bowl and do a couple of stretch and folds.  Cover the bowl and let it rest for 10-15 minutes.  Do another stretch and fold in the bowl and let it rest another 10-15 minutes.  Do another stretch and fold and let the dough sit out in the covered bowl for another 1.5 hours.  Place the dough in the refrigerator until ready to bake the next day.

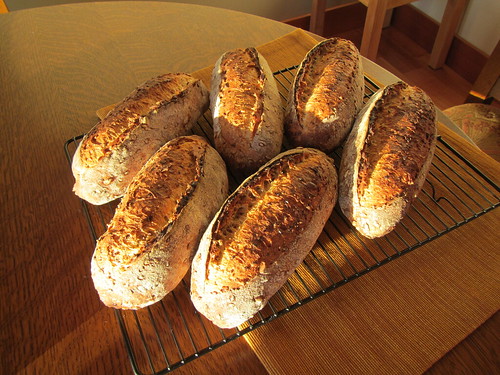
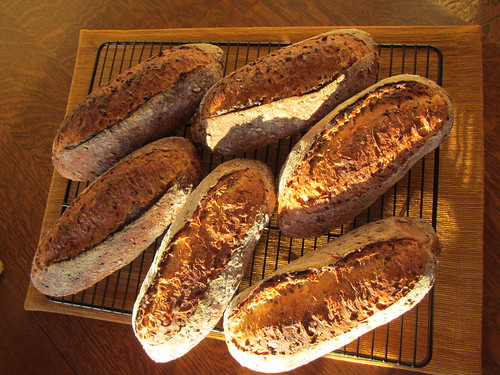
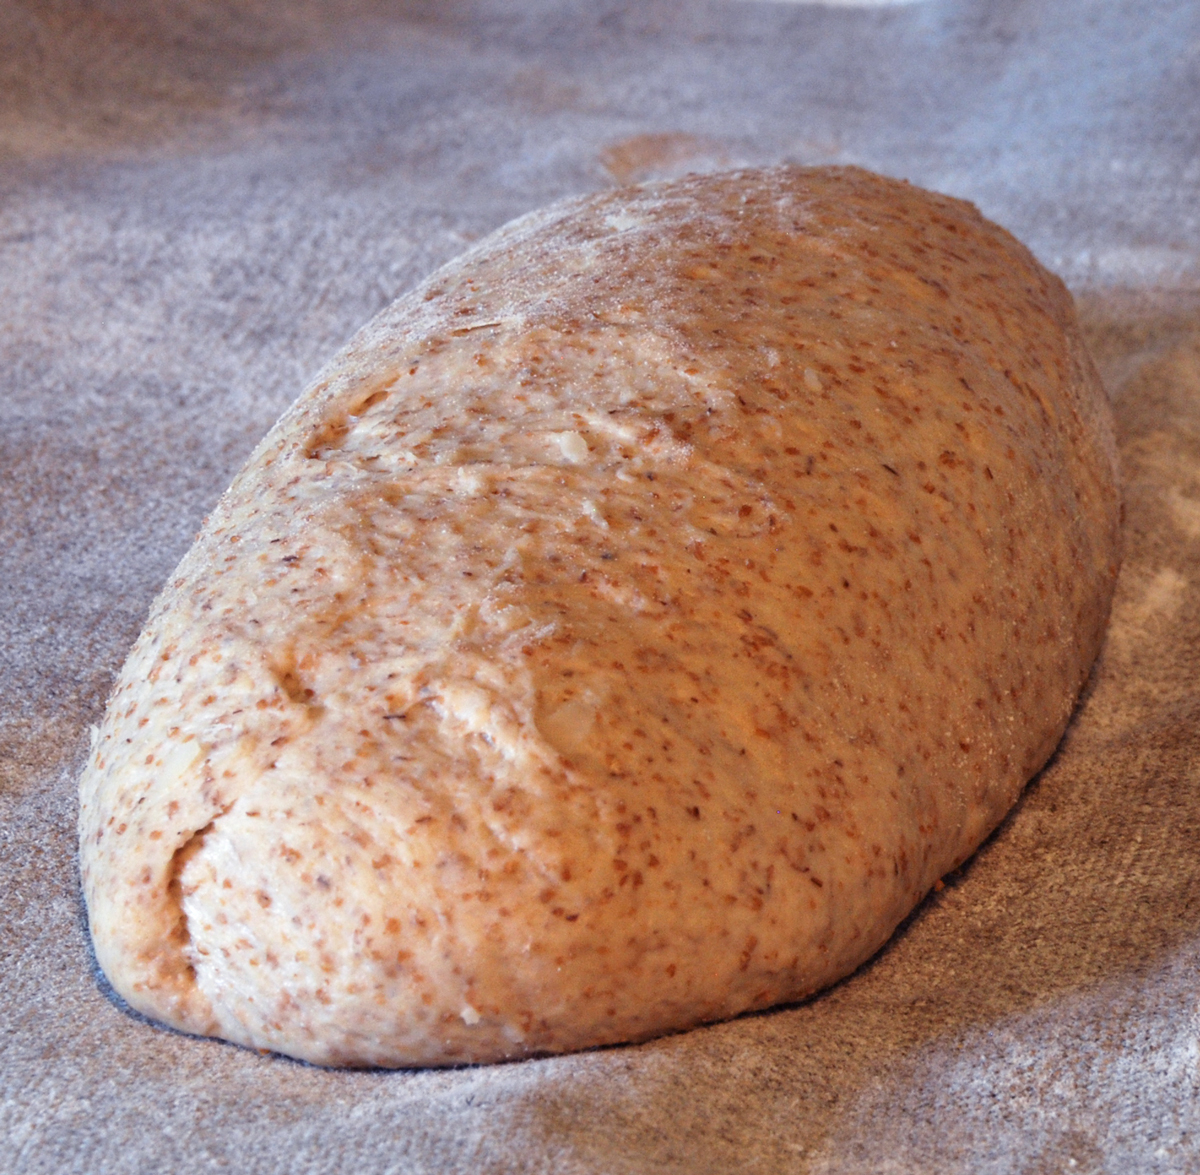
When ready to bake take the dough out and leave it covered in your bowl for 1.5 to 2 hours.  Next divide the dough into 2 loaves and either place in a banneton or from into batards and let them rest in floured couches for 1.5 - 2 hours.

About one hour before ready to bake, set your oven for 500 degrees F.and make sure you prepare it for steam.  I have a baking stone on the top shelf and the bottom and use a heavy-duty rimmed baking pan that I pour 1 cup of boiling water into right as I put the loaves into the oven.

Score the loaves as desired.

When ready to bake place the loaves into your oven on  your oven stone with steam and lower the temperature immediately to 450 degrees.  It should take around 30 minutes to bake  until the breads  are golden brown and reached an internal temperature of 200 - 205 degrees F.

Let the loaves cool down for at least 2 hours or so before eating as desired.

Shiao-Ping's picture
Shiao-Ping


Background:       Stormy Queensland rain, a cyclone passing through

                            Vivid greenery against thick dark clouds

                            Cozy tearoom


The world out there is wet and blowy:


Inside my tearoom the air is sweet.  A bird came to visit me and rest on the railing outside:


My baking has not stopped. Such a delight to be able to create:


This bread was my very first sourdough baked in Taiwan. My family and I spend a lovely Christmas and New Year holiday in Taipei. My oven is Bosch there. I used no steaming mechanism. Spray can did the trick for me on this bread. I did not aim to make a perfect bread, just a bread.


We thoroughly enjoyed this bread, but I had no hesitation to put my starter away. On holidays these days I prefer not to spend too much time in the kitchen. Maison Kayser and Frédèric Lalos Bakery are both in Taipei and their breads are very good.

During this last trip to Taiwan, I made an effort to go to A-Li-Shan Mountain to see the ancient red cypress trees there. The oldest alive in Taiwan is estimated to be 2,700 years old! Look at the picture and the stats below:


Age: approx. 2,700 years old

Height: 43 meters

Circumference: 20 meters

Altitude: 2,350 meters


There are about 20 of these ancient giant red cypresses in Taiwan, ages ranging from 1000 to 2700 years old.  The Japanese left them untouched at the turn of the last century because back then these trees were already hollow in the middle and were considered to have no economic values.  The Japanese ran a massive logging industry in Taiwan during their 50 years of occupation before the end of the Second World War.  The red cypresses were shipped back to Japan for use in their temples and their Emperor’s residences.  

It was not possible to take a good shot at the giant tree with my poor camera.  It was very early morning and the sky was still dark blue.  But as the morning progressed, I was able to take beautiful shots of the mountains and the sea of clouds:


The holiday is now over and everything is back in full swing.  My daughter is in San Francisco on an exchange program for the first half of the year, and my son is busy preparing for a medicine exam in March.  Christmas tree was folded away for another year; more time now to enjoy my tea:


Happy baking everyone!

Shiao-Ping

BobS's picture
BobS

Flour, water, salt, time, and temperature. The right combinations of those variables, plus technique, make good bread.

Along with a few simple tricks.

I've learned how to make pretty good bread from this forum. This is the first of a set of posts describing a few of the things I've learned. Maybe they will help somebody new.

Here in New Hampshire temperature can be a problem. Like this week when the overnight low was -6F and the temperature in our kitchen was 55F. Yeast growth is really dependent on temperature and there is a happy zone in the 70-80F range. A proofing box gives me the control over temperature. There are several threads on proofing boxes on TFL. and there are commercial products. I made one, mostly with stuff I had around the house.  It was one of the things that made a big difference in my ability to make consistent bread. Here it is in pictures.

I started with a cooler we had in the basement:

Any size will do, as long as it is 'big enough'. Then I added a 15W light bulb and socket, and a thermostat. Nothing fancy, just shoved it all in there. The extension cord coming out of the box is flat, rather than round, so it is not too badly squished. The light bulb could probably be smaller wattage. You do want it some distance away from the thermostat.

That's Earlene, my starter Fred's love child, bubbling in the middle after a warm and pleasant overnight stay. The thermostat is a Lux Pro PSP300. I got mine from Amazon:http://www.amazon.com/LuxPro-PSP300-Programmable-Digital-Thermostat/dp/B0032JUG46/ref=sr_1_2?ie=UTF8&qid=1359256101&sr=8-2&keywords=lux+pro+psp300.It's a little expensive, but it works well. I think their WIN100 model, which is a little cheaper, would work too.

I can also fit a proofing bucket for bulk fermentation in there:

Cambro buckets work very well for bulk fermentation. Make sure you get yours from a local restaurant supply rather than a 'bread enthusiast' web site: mine cost $6.

That's Hamelman's Five-Grain Levain, more or less, in there.

I usually retard my sourdoughs, for better flavor and scheduling. But sometimes I do the final proofing in the box. For that I built a little stand that lets me stack bread pans or bannetons.

The box is tight enough and the loaves are wet enough to create a nice humid atmosphere inside without the need to introduce additional humidity.

The thermostat works for both heating and cooling. Sometimes I use it to control a little portable electric cooler (which doesn't have a thermostat) when the fridge is full and I need to retard some dough.

Bread runs on its own schedule. A proofing box help it conform, to some extent, with yours.


Floydm's picture
Floydm

My fight against scurvy (not really) and the wintertime blues (really) by baking fruity things continued today.  This time I went for raspberries and made a Raspberry Cream Cheese Braid using the Blueberry Cream Cheese Braid formula on the site.

 Very very good, as expected!

Elagins's picture
Elagins

As many of you know, I've been fascinated with rye for years (am working on a book about it). Here's one of my faves, a wonderfully flavored, wonderfully simple Polish rye made with prunes. (pics below)

Yield: Two 21.5 oz./610 g loaves


Ingredient

Volume

Oz

Gr

Pct

Sponge

Rye sour

1 cup

6.70

189

34%


Water

½ cup

4.00

113

20%


Medium rye flour

1¾ 2 cups

8.20

235

42%

Dough

Coarse rye meal

½ cup

2.40

70

12%


Medium rye flour

2 cups

8.80

250

45%


Water

1 cup

9.50

270

48%


Granulated sugar

2 Tbs

0. 80

22

4%


Table salt

2 tsp

0..0

12

2%


Pitted prunes

½ cup

3.00

85

15%

1. Combine the sponge ingredients and let stand at room temp overnight.

2. Combine the sponge and the dough ingredients, except for the prunes, and mix until smooth and evenly hydrated. Ferment at room temp for 5-6 hours.  The dough will be very bubbly.

3. Soak the prunes in warm water for about 30 minutes, dry them on paper towels and chop coarsely. Fold the prunes into the dough, divide into well-greased loaf pans and let proof about 2 hours at room temp, until the top of the dough shows bubbles on top.

4. Preheat your oven to 45oF/230C with the baking surface in the center. Brush the loaves with water and bake with lots of steam for 10 minutes, then reduce the temp to 400F/200C and bake for another 40-50 minutes, until the loaves are nice and brown.

5. Brush the top crusts with boiling water as soon as you remove them from the oven and let cool for at least 12 hours before cutting.

Stan Ginsberg
www.nybakers.com


Sjadad's picture
Sjadad

I baked David's version of Pane Pugliese. I didn't have durum flour so I followed Peter Reinhart's suggestion in BBA and used 1/3 as much semolina. Otherwise I followed David to a "T". To be honest, I was a bit concerned about not scoring the loaf. I had visions of a tight, dense crumb.   I worried for nothing, as you can see.


dabrownman's picture
dabrownman

This bake was similar to the last one with a few additions.  We added some spelt and rye upping the whole grains to 60%.  We upped the water roux another 40% or so because we liked the last bake so much and 40 percent more of fine tasting has to be teeth dropping,.  We added aromatic seeds including coriander, anise, black and brown caraway and fennel.  We also put in some pumpkin and sunflower seeds and some pistachio nuts.


Since this bread got larger and more weighty, we decided to make a boule instead of a loaf and hope to be able to turn it out into a round cake pan before putting it into the hot MagnaWare turkey roaster.


This bread is even wetter than the last one, in the very high 70’s at least and we didn’t want it to spread out too much so, the cake pan would have been useful to hold the boule together and keep the spread to a minimum but it wouldn't fit.


We stuck to the 4 and 40 hour method of the last bake hoping the extra whole grains wouldn’t cause the loaf to ferment too much in the fridge.  After 24 hours it looked fine so we cross our fingers and hope that it will hold up after the last loaf over proofed.


This time we will bake this bread cold out of the fridge hoping to catch it before this one can over proof.  Since we had so much add ins to incorporate, we divided them into 3 separate adds – one for each S&F.  The scald went in first followed by the aromatic seeds and then by the rest of the seeds and pistachios all 15 minutes apart.


Also trying to keep the bread from over proofing, instead of an hour of ferment on the counter after S&F’s and  after shaping we cut these down to 30 minutes each.  And instead of S&F’s this dough was so wet we did French swlap and folds to incorporate the add ins instead.  It is really weird to have an apprentice speaking French with a German accent.

The bread un-molded easily onto parchment that was lowered after a quick T-Rex slash into a cold aluminum DO.  The DO was placed into a cold oven that was set for 450 F.  When the beeper went off (about 20 minutes later), saying the oven was at temperature, we set the timer for 25 minutes of steaming woth the lid on. 

After 25 minutes we took the lid off and turned the oven down to 425 F convection this time.  5 minutes later we took the bread out of the CO and placed it on the stone where it hit 205 F on the inside in 6 minutes.  Total time in the oven cold and hot was right at 56 minutes. 

We let the boule crisp on the stone in an off oven with the door ajar for 10 minutes.  Can’t wait to cut into this bread because the smell off the aromatic seeds is quite nice and near intoxicating.  I was hoping to wait 24 hours to cut this bread open but ……

Sadly, this bread also had little spring and bloom but it didn’t collapse either – just like the last bake.  It may be that the 40 hour retard is too much when using a YW and SD levain in conjunction with a biga and Tang Zhong.  That is the great thing about bread.  With a baseline established there is no telling what might be possible.

Janet's mash with the whole multi-grains and 3 yeast boosters, seeds nuts and scald really made this bread taste fantastic.  If you were stranded on an island this is the bread you would want to take with you.  I thought the last batch was tasty but this puts it to shame. the aromatic seeds really put it over the top.  The crumb isn't as open as the last bake but this one is more glossy and it has way more whole grains that we love so much.  My apprentice finds it much more difficult to eat holes anyway.... and this bread is plenty airy enough as it is.

Formula

Starter Build

Build 1

Build 2

Total

%

WWW & AP SD Starter

10


10

1.83%

White Whole Wheat

62.5


62.5

11.42%

Spelt

0

30

30

5.48%

Dark Rye

0

30

30

5.48%

AP

62.5


62.5

11.42%

Yeast Water

75


75

13.70%

Water

50


50

9.13%

Total

185

60

320

20.09%


SD Starter Totals


%


Flour

172.5

31.51%


Water

130

23.74%


Starter Hydration

75.36%


Levain % of Total

24.00%


Dough Flour


%


Red Malt

2

0.37%


Toadies

6

1.10%


Vital Wheat Gluten

5

0.91%


White Malt

2

0.37%


Rye

90

16.44%


Spelt

90

16.44%


AP

180

32.88%


Total Dough Flour

375

68.49%


Salt

9

1.64%


Dough Soaker Water

245

44.75%


Dough Hydration w/   Starter

65.33%


Scald & Soak


%


Spelt

50

9.13%


Rye

50

9.13%


Total Scald & Soak

100

18.26%


Add - Ins


%


Sunflower, Pumpkin 20   ea

40

7.31%


Pistachio

30

5.48%


Barley Malt

17

3.11%


Coriander, Black &   Brown Caraway

15

2.74%


Anise 5, Fennel 5

10

1.83%


Tang Zhong

190

34.70%


Total

302

55.16%


Total Flour w/ Starter

547.5


Total Water w/ Starter

375


Hydration w/ Starter   & Adds

70.05%


Total Weight

1,334


% Whole Grain

60.70%


Tang Zhong not included   in hydration calculations includes


12.5 g each Spelt and Rye and 10 g Oat w/ 175 g of water


Pages

Subscribe to RSS - blogs