The Fresh Loaf

A Community of Amateur Bakers and Artisan Bread Enthusiasts.

Blogs

SylviaH's picture
SylviaH

This is an Irish bread very similar to an Irish Soda bread, except an authentic Irish Soda bread only has flour, buttermilk, salt and baking soda in it's ingredients.  

Since I have 'Sylvia's Irish Soda Bread' recipe on my blog.  I wanted to add the Irish Buttermilk Bannock as well.  Here it is a very traditional type bannock, which includes raisins or currants and eggs.  Quick, easy and tasty to whip up to enjoy at teatime or anytime.

Irish Buttermilk Bannock

Pre-heat Oven 350F

4 Cups of All Purpose Flour -  125 gms. = l cup AP Flour  - You can use a little less or more.  

3 tsp. Baking Powder - Fresh

1 tsp. Salt

3/4 tsp. Baking Soda

1 Cup  Currants or Raisins  -  I used golden and dark raisins - fresh and moist

2 Large Eggs

1 1/2 Cups Buttermilk - 1 Cup Buttermilk = 240 grm - 8.5 oz - I used 390 gms and little extra flour

In a deep bowl.  Sift or wisk together your dry ingredients and mix in the raisins.

Mix the 2 Eggs into your Buttermilk.  A large measuring cup comes in very handy.

Make a well in the dry ingredients.

Pour in the buttermilk and egg mixture

Quickly and gently blend until the mixture is moistened and comes just together.

Scrape the mixture out onto a well floured surface.

With floured hands.  Press gently together and give it a very gently kneading...I do about 3, while shaping into a disk.

Shape into about 2-3 inches high disk and place into one lightly greased pie pan.

With a large kitchen knife.  Cut a cross down as far on the sides as you can go.

Bake about 1 hour and a quarter.  Until nice and browned and sounds hollow when tapped on the bottom.  Cool about 15 min. and remove from pan.

I enjoy a slice, while still slightly warm.  Very tasty with jam and butter, plain or toasted.


Happy St. Patrick's Day!

Sylvia


bakingbadly's picture
bakingbadly

For weeks I ventured into the herbal and spicy world of Southeast Asia. Cambodian mint, Thai basil, black and white peppercorns, cassia, cardamom, ginger, turmeric, galangal, lemongrass, kaffir lime leaves, star anise, and so on...

For days I spent fine-tuning an Indian beverage called masala chai---a brew consisting of black tea, milk, sugar, and an assortment of spices and herbs.


Over the course of a month, I visited four separate Indian restaurants to order one thing: masala chai. Yes, I had other Indian dishes but my only concern was to imprint the flavours of the said beverage into my memory.

(Off tangent story: As a Canadian who's fond of Italian cuisine, I'm not too familiar with Indian food, and during my first visit to an Indian restaurant in Cambodia I requested "spicy" rather than "non-spicy"---BIG mistake!)

After taste-testing four different variations, I noticed that each masala chai possessed a few common traits: they were faintly to mildly sweet, fragrant of spices (namely cinnamon), and induced the sensation of burning warmth (not chili hotness) in the back of the throat and around the mouth. 


My version of masala chai was an adaptation of this photo-based recipe.

Through trial and error I learnt that 1) prolonged boiling and simmering of tea leaves results in sharp bitterness and astringency; 2) excessive amounts of ginger irritates the throat, which may incite bouts of coughing; 3) too much water dilutes the flavour; 4) milk alone cannot counterbalance the bitterness of black tea.


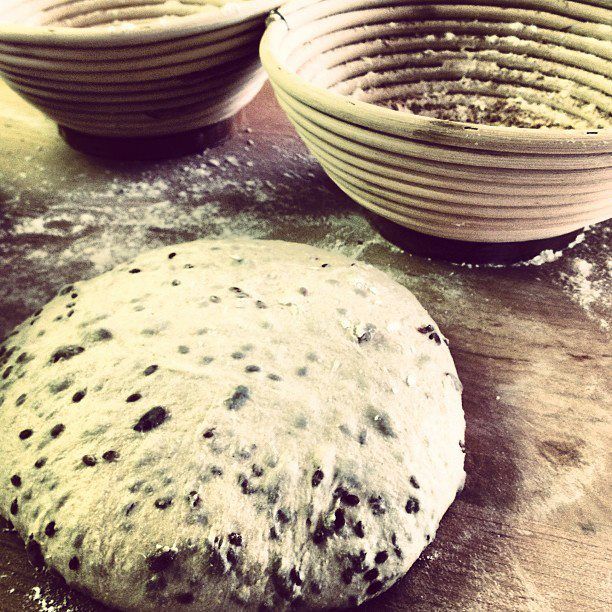
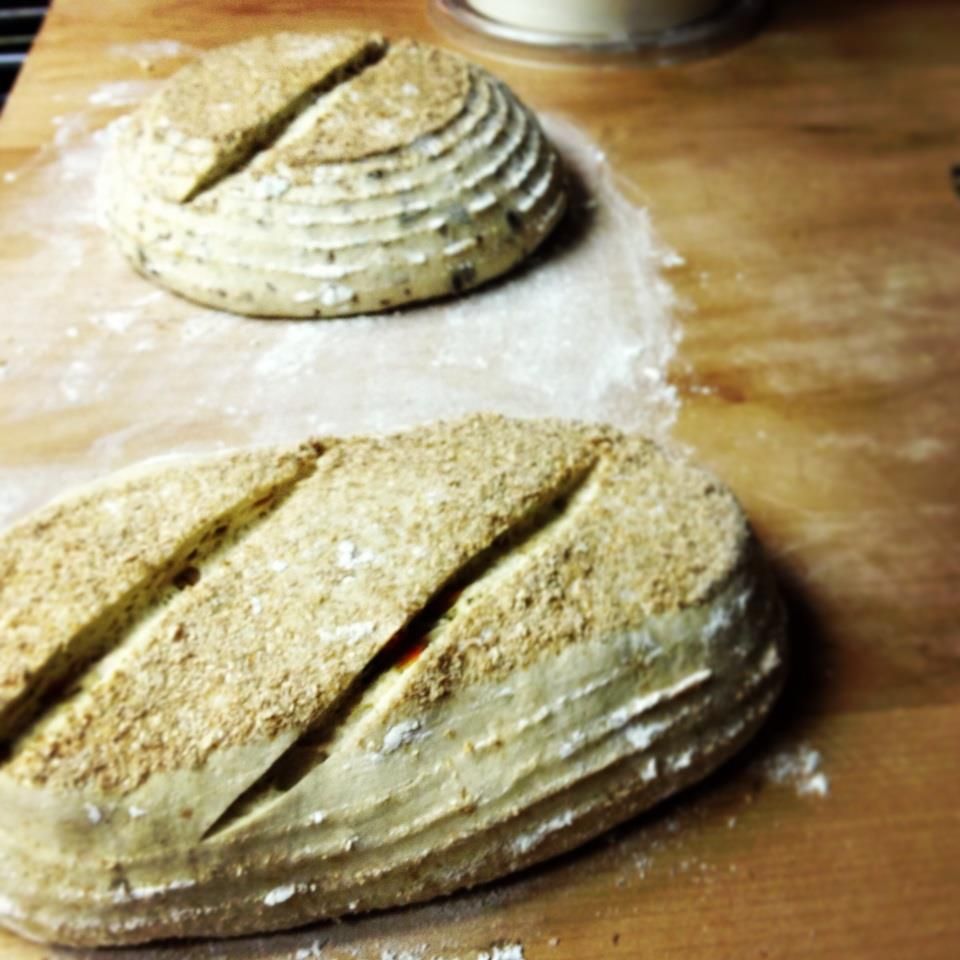
While kneading by hand, I found myself questioning the consistency of the dough.

"Why isn't it coming together!" I exclaimed

Then, my intuition alerted me to my mistake. Somehow, I ommitted the salt from my written recipe, as well as the dough. This negligent error was amended by adding a spoonful of salt---and just like that, the dough pulled itself inwards, tightening into a sticky, wet blob.


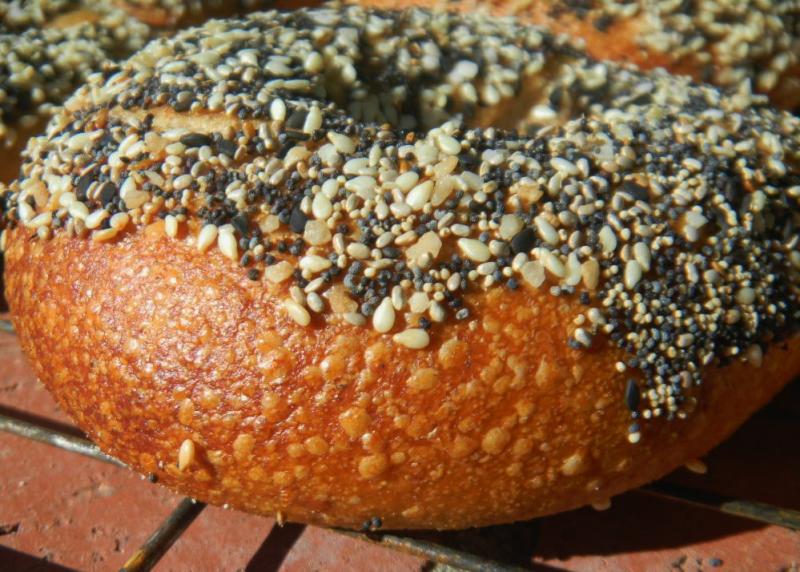
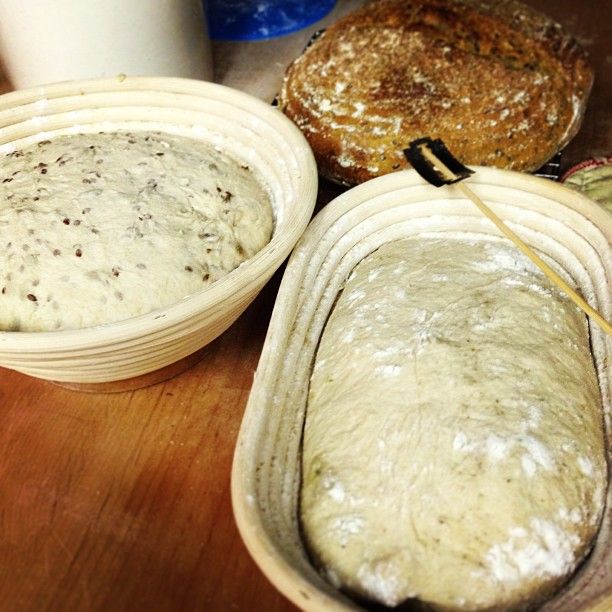
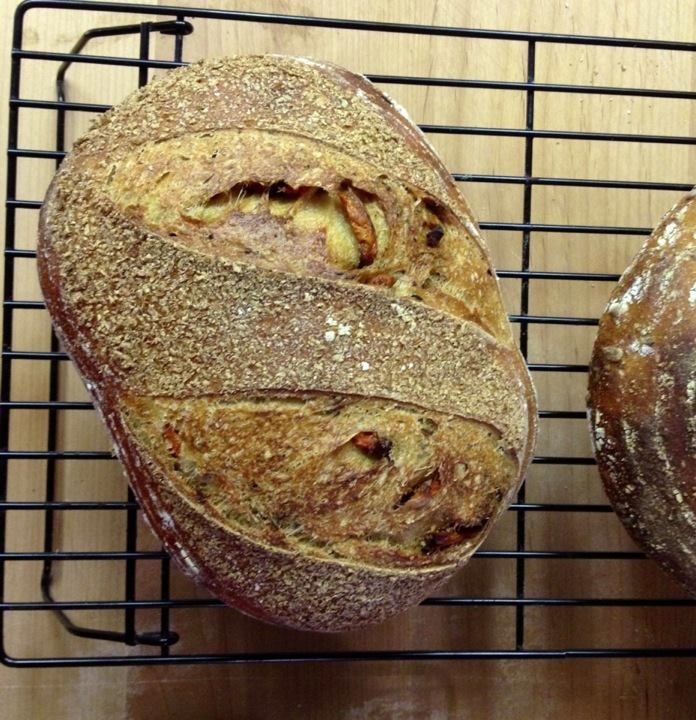
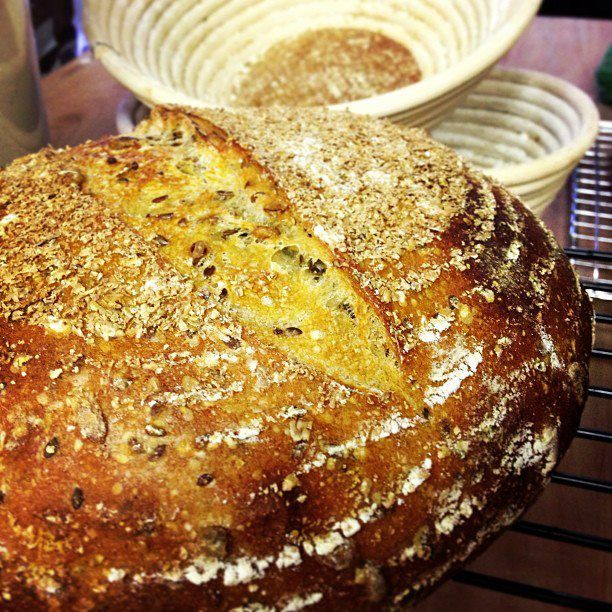
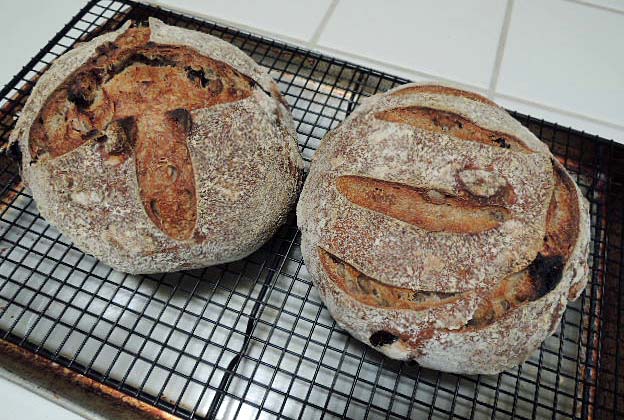
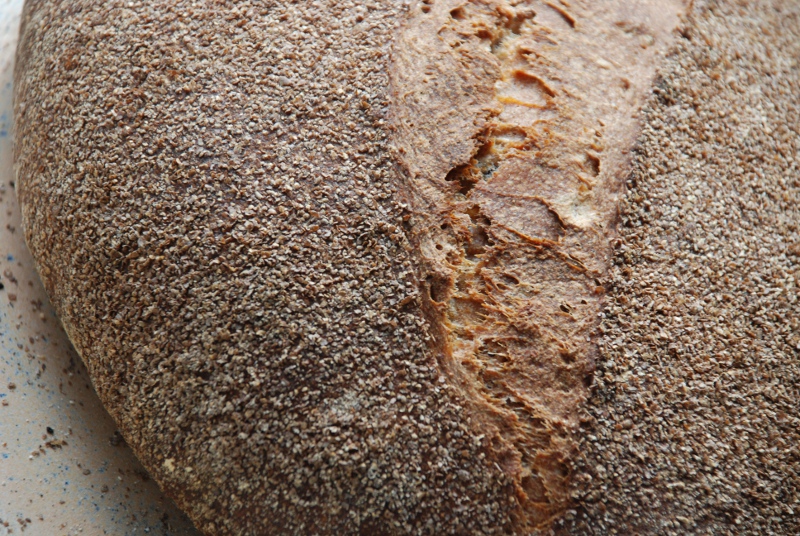
Enriched or sweetened dough aren't typically baked in a steamed oven, but I wanted to observe its effects. So what happened? Well, the crust was paler and thicker than expected, and it didn't set until much later into the bake.


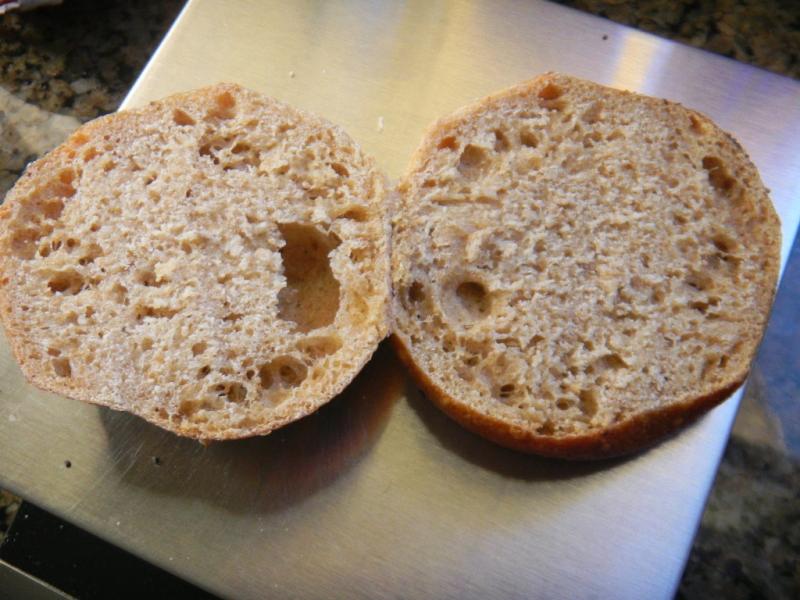
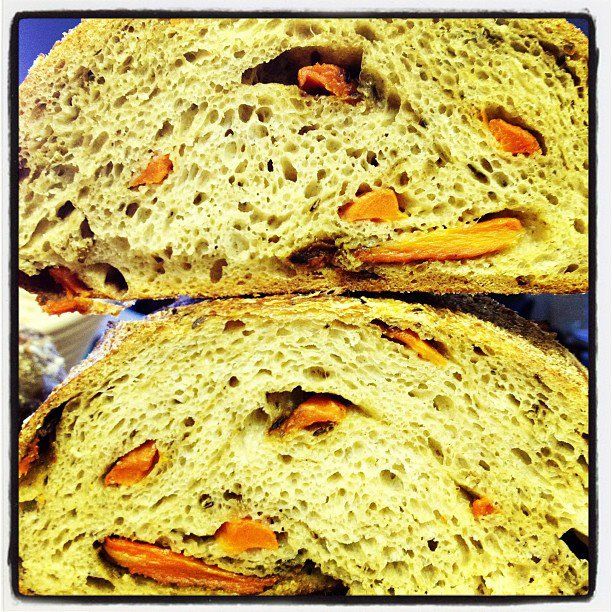
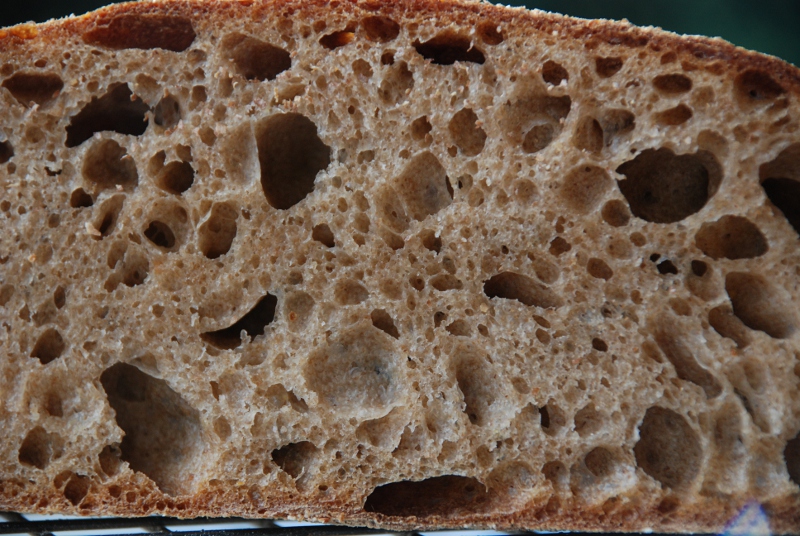
For those of you who can instantly "read" the flesh of a loaf, you may notice that the pores are oddly arranged---blotches of open and closed crumb. During final shaping, I accidentally disfigured my batard and then hastily shaped the dough into a boule.

The above was the result. 

Flavour-wise, the bread was rather bland (due to a lack of salt), harboring a hint of sweetness and butteriness, accompanied by a faint tang. Interestingly, a very subtle cooling / numbing sensation was felt in the back of my throat while eating the loaf. Additionally, the crust and crumb wafted a distinct and pleasant smell of cloves and cinnamon.

If you're interested, you may find my recipe below:

White Sourdough Starter:

  • White sourdough starter, 60% hydration [13 g]
  • Mineral water [149 g]
  • Type 55 French flour [259 g]

Soaker:

  • Unbleached all-purpose flour [526 g]
  • Masala chai, Iced, Strained (variation of this recipe) [361 g]

Final Dough:

  • White sourdough starter [372 g]
  • Soaker [801 g]
  • Unsalted butter [60 g]
  • Sea salt [7 g] (increasing salt amount is highly recommended)
-----
  1. Mix starter ingredients; rest starter at above room temperature for approx. 12 hours
  2. Prepare and chill masala chai; when cool, add ice cubes, wait 10 to 20 minutes, and strain masala chai
  3. Mix soaker ingredients; chill soaker for approx. 12 hours
  4. After 12 hours, briefly mix starter and soaker until dough forms
  5. French knead dough for 10 minutes; add salt
  6. French knead dough for 20 minutes; add unsalted butter
  7. French knead dough for 15 minutes or until medium gluten development
  8. Shape (wet, sticky) dough into rough ball and place into oiled bowl
  9. Bulk ferment (rest) dough at above room temperature for 2 hours or until double
  10. Shape deflated dough into ball (add flour as needed) and place back into oiled bowl
  11. Bench rest at above room temperature for 20 minutes to relax gluten
  12. Shape dough into ball (add flour as needed), place onto parchment paper, wrap with flour-dusted cloth
  13. Proof (rest) dough at above room temperature for 2 hours or until double (perform "poke test" every 30 minutes to prevent overproofing)
  14. Preheat oven to 220C / 428F (convection mode off) for 1 hour, with steam (optional)
  15. Lightly dust dough with flour and score / slash dough
  16. Bake dough at 220C / 392F (convection mode off) for 10 minutes, with steam (optional)
  17. Bake dough at 200C / 392F (convection mode on) for 75 minutes, without steam
  18. Rotate dough every 15 minutes to ensure even heat distribution
  19. Cool loaf for at least 24 hours to develop flavour

 Thanks for reading. Best wishes to all and have a happy baking. :)

d_a_kelly's picture
d_a_kelly

Hi Everybody,

this is my first post on TheFreshLoaf, though I've been starting in amazement at everyone's baking for quite some time. This is my attempt at Iginio Massari's Colomba Pasquale recipe from his book "Non Solo Zucchero vol.II". I'm not sure if this book is available in English yet. I bought my copy in a shop in Milan. This version seems to be quite a bit richer than that found in Cresci, and presented me with a number of difficulties :) Please be kind!

First impasto tripled in volume

1st impasto

sourdough starter (50% hydration) 59

water 69

sugar 72

yolk 50

flour (very strong) 189

butter 79


All measurements are in grams. It took almost exactly 12 hours to triple in volume, held at c.28 degrees C. I then went to the second impasto. This was considerably more difficult, and I didn't get it quite right. The flour I'm using is the strongest I have been able to find in a UK supermarket and it's not a "00". I think it's somewhere in the region of w320 in terms of strength. The second impasto calls for a flour of w360 (something like the manitoba you can find in Italy). I couldn't find anything this strong in the shops. I added a guestimate of vital wheat gluten to try to balance the recipe, which wasn't entirely successful as you can see from the sloppy shaping in the paper case. The dough was still a little too sticky: very usefully "non solo zucchero" has photos in the back of the book showing all of the processes, and I could see that the colomba consistency was quite different from what I had achieved. 

2nd impasto

aroma veneziana 1.2

vanilla: a quarter of a pod

flour (very strong) 51

gluten powder 1.8

sugar 50

honey 22

yolk 35

salt 3.6

water 20

butter 112


I then took 795g of the impasto and added in 205g of candied orange. This version is very rich in fruit! I then split the dough into two balls of 500g and put them in my homemade proving box for an hour, at c.30 degrees C. and humidity of 70%.

Then, with very very well buttered hands, I shaped the two balls and put them in the form:


Back into the proving box for 6 hours and then it was ready to be glazed and go in the oven (170 for 50 minutes).

and then glazed and dusted


When it came out of the oven I suspended it upsidedown for about 12 hours. I was reasonably happy with the oven spring. Most recipes I've seen for colomba use less candied fruit, so I was expecting this not to grow quite so much. Not because the fruit would interfer with the yeast, but simply because there was less dough in the case (only 795g of impasto, rather than the 850g to 870g I've seen in other recipes).

I had a slice of it for breakfast this morning and I was quite happy. Soft and tasty crumb, packed with fruity, buttery flavour. I'd like to try this again using the recommended flours. I've found, from limited experiments, that strong 00 flours seem to produce a more plastic, slack dough, which I'm sure must contribute to the texture and feel of the crumb. However I'm not yet prepared to buy a 25kg bag of caputo rosso or similiar just to make the occasional colomba which only uses... what? 240g? 

Here's the crumb:


One thing I ought to add: in order to save a bit of money and waste, I used powdered egg yolks in this recipe rather than fresh yolk. The recipe here is written for use with fresh yolk. (If using powdered yolk, substitute 48% of the weigh of yolk with powder, and the remainder with water). I've not noticed any difference with quality. I've also used the powdered yolks to make creme anglaise and creme patisserie with success. The only downside is they don't have that extraordinary colour which I've seen in yolks in Italian eggs - something I'm told is a result of the diet and breed of chicken.

dabrownman's picture
dabrownman

The quest for the New Your bagel continues.   This time we lowered the hydration 2% to 56%, used more barley malt, used 27% whole grains (the bulk of which was whole wheat in the dough flour to try to mimic first clear flour) and we used AP with VWG since we didn’t have any bread flour.


We also changed the process around a little bit too.  We built a full strength SD starter out of whole grains, stiffened it up to 65% and then let it sit in the fridge for 3 days to get sour.  Then we built a levain from that using 15 g of seed and whole grain spelt, rye and WW.  We made the yeast waster levain separately and replaced the whole spelt with AP flour.


Once the two levains had doubled, the SD levain was placed into the bottom of the container and the YW levain was put on top of that and they were placed in the fridge together for 2 days.

The levains were removed from the fridge to warm up.  While they warming we autolysed the rest of the ingredients, including; the salt, malts and VWG for 2 hours after having kneaded them together.  Dough like this would kill the KA so hand kneading is always the wiser choice but a hard slog.

After the levains hit the autolyse it took a while to work then in the hard dough by squeezing it through the fingers.  Then we kneaded the dough until it was tough but silky smooth.  After a 1 hour rest we shaped the bagels around the knuckles at 135 g each and put them on semolina dusted parchment where they rested for 1hour before gong into the fridge for a 32 hour retard.


Sorry, cut into one for a taste while they were still quite warm.

After coming out of the fridge, we let the bagels proof on the counter for 4 hours.  The bagels doubled over that time and then we refrigerated them again for 1 ½ hours to stiffen them up.  Next time we will put them back in the fridge after 3 hours and let them cool for 2.  The bagels were gently boiled for 30 seconds each side, in water that had barley malt and baking soda in it, just to shock them awake. 


Bagel hole?  Made a little dough ball for floating to see if the bagels were ready to boil and that they too would float!

They were flipped on a kitchen towel to get rid of the excess water and then dunked into the seed mixture.  The 3 mixes this time were white, brown and black poppy, white and black sesame and a multi-seed and salt one comprised of the previous seeds plus oregano and basil seeds, black and brown caraway seeds, nigella seeds and kosher salt.  We made twice as many of the combo salt ones since they are our favorite.


Looks and cuts better when fully cooled,

The steam was supplied by 1 of Sylvia’s steaming pans and a 12” skillet with lava rocks and we used both stones to accommodate the 13 bagels and 1 small roll.   They baked with steam at 450 F for 8 minutes and then steam was removed and they baked for another 8 minutes at 425 F convection until they were deemed done and nicely browned.

Beautiful skies don't have to be sunsets or sunrises.  The sunset was great too!

After deflating in the boil they managed to puff themselves back up nicely in the steam.  These are getting very close to NY SD Bagels and would be way sourer without the YW in the mix to tone it down.  The blistered crust is crispy, the crumb chewy but the taste is near spot on too.  Even my wife is having one for breakfast today instead of Einstein’s.  Now that takes some doing.  We like this batch very much but will make some changes next time as we always do still searching for the perfect bagel that doesn’t exist.

I never eat two bagels at once but did when they came out of the oven yesterday - yummy!  Cream cheese schmear and buttered with minneola marmalade.

Formula

SD Starter

Build 1

%

SD Desem & Rye Sour

15

1.34%

Spelt

18

1.80%

Whole Wheat

30

3.00%

Dark Rye

30

3.00%

Water

60

6.00%

Total Starter

153

12.90%


YW Starter

Build 1

%

Yeast Water

58

5.80%

AP

18

1.80%

WW

18

1.80%

Dark Rye

18

1.80%

Total

112

11.20%


Starters


%

Flour

115.5

11.55%

Water

125.5

12.55%

Hydration

108.66%


Levain % of Total

13.22%


Dough Flour


%

Whole Wheat

200

20.00%

AP

800

80.00%

Dough Flour

1,000

100.00%


Salt

18

1.80%

Water

500

50.00%

Dough Hydration

50.00%


Total Flour

1,115.5


Water

625.5


T. Dough Hydration

56.07%


Whole Grain %

27.57%


Hydration w/ Adds

56.27%


Total Weight

1,823


Add - Ins


%

Red Rye Malt

5

0.50%

White Rye Malt

5

0.50%

VW Gluten

18

1.80%

Barley Malt

36

3.60%

Total

64

6.40%


Wingnut's picture
Wingnut

Messing around with flavors I like and see if the will work in bread.

the first one is Toasted Fennel Seed and Roasted Carrots Whole Wheat.

The next is Flax and Sunflower Seed Whole Wheat.

Cheers,

Wingnut

Wingnut's picture
Wingnut

Anyone use one of these grain mills for a Kitchenaid Mixer? Any feedback on this mill would be appreciated.

http://www.kitchenaid.com/flash.cmd?/#/product/KGMA/

Cheers,

Wingnut

dmsnyder's picture
dmsnyder

San Francisco-style Sourdough Bread with Walnuts and Dried Sour Cherries

March 12, 2013

On March 3, 2013, I blogged about the San Francisco-style bread with Walnuts and Figs I had baked. More recently, SallyBR tried that formula, substituting dates for the figs and found it to be very good. Today, I baked another version this time substituting dried sour cherries for the figs. The formula was otherwise the same. The procedures were different only in my treatment of the levain which was adapted to my scheduling needs.


Total Dough Ingredients

Bakers' %

Wt (g)

AP flour

76

416

WW Flour

8

46

Bread flour

14

78

Medium rye flour

0.7

4

Water

69

378

Salt

2

11

Stiff starter

12

66

Walnuts

18

98

Dried sour cherries

18

98

Total

217.7

1195


Stiff levain

Bakers' %

Wt (g)

Bread flour

95

78

Medium rye flour

5

4

Water

50

41

Stiff starter

80

66

Total

230

189

  1. Dissolve the starter in the water. Add the flour and mix thoroughly until the flour has been completely incorporated and moistened.

  2. Ferment at room temperature for 6 hours.

  3. Refrigerate overnight.


Final dough

Wt (g)

AP flour

416

WW Flour

46

Water (80ºF)

337

Salt

11

Stiff levain

189

Walnuts

98

Dried sour cherries

98

Total

1195


Method

  1. In a stand mixer, mix the flour and water at low speed until it forms a shaggy mass.

  2. Cover and autolyse for 30 minutes

  3. Coarsely chop or break apart the walnut pieces and toast them for 8 minutes in a 300ºF oven. Allow to cool.

  4. Add the salt and levain to the autolyse, and mix at low speed for 1-2 minutes, then increase the speed to medium (Speed 2 on a KitchenAid) and mix for 5 minutes. Add flour and water as needed. The dough should clean the sides of the bowl but not the bottom.

  5. Add the walnuts and the cherries to the dough and mix at low speed until well-distributed in the dough. (About 2 minutes)

  6. Transfer to a lightly floured board, do a stretch and fold, and form a ball.

  7. Place the dough in a lightly oiled bowl and cover tightly.

  8. Ferment at 76º F for 2 1/2 to 3 hours with a stretch and fold at 50 and 100 minutes.

  9. Divide the dough into two equal pieces.

  10. Pre-shape as rounds and rest, covered, for 10 minutes.

  11. Shape as boules or bâtards and place in bannetons. Place bannetons in plastic bags.

  12. Proof at room temperature (68-70º F) for 1-2 hours.

  13. Cold retard the loaves overnight.

  14. The next morning, proof the loaves at 85º F for 2-3 hours.

  15. 45-60 minutes before baking, pre-heat the oven to 480º F with a baking stone and steaming apparatus in place.

  16. Transfer the loaves to a peel. Score the loaves as desired, turn down the oven to 460º F, steam the oven, and transfer the loaves to the baking stone.

  17. After 15 minutes, remove the steaming apparatus, and turn down the oven to 435º F/Convection. (If you don't have a convection oven, leave the temperature at 460º F.)

  18. Bake for another 15 minutes.

  19. Turn off the oven, and leave the loaves on the stone, with the oven door ajar, for another 15 minutes.

  20. Transfer the loaves to a cooling rack, and cool thoroughly before slicing.

The crust was crunchy, and the crumb was chewy. The bread is moderately tangy. It is delicious with bursts of tartness when you bite into a cherry. This is a very good bread. Personally, I prefer the version with figs, but your taste my be different.  My wife likes the cherry version better, but she says, "I like them both. Yummmm..." My recommendation: Try both. 

David

Submitted to YeastSpotting


Postal Grunt's picture
Postal Grunt

Some of my classroom time for the Master Food Volunteer Program run by Kansas State Research Extension Service has been spent at the Olathe, KS campus of Kansas State University. It's a nice, modern building equipped with up to date classrooms, communications, conference rooms and a well equipped test kitchen that my class has been fortunate to use as a kind of playground for making jellies, baking pies, drying foods, and more.

Last Wednesday, we had a scheduled class about grains and I just happened to bring in a loaf of French Country Bread that I made according to the 3-2-1 formula. I wasn't bragging too much, I was really just demonstrating that it's possible to make a really good loaf of bread without professional equipment.

Her are a few pictures of some of the equipment and the area we get to work in. It's no wonder that we never complain about cleaning up the playground.

We actually do get homework for our classes. I've spent some four hours this past weekend researching, writing, typing, and printing handouts for a five minute presentation on preparing a healthy alternative diet for preschoolers. It's been over fourty years since I graduated from college so it will take some time to get up to speed on this stuff. With so many well educated and talented fellow students, I have to bring my A game every class just to keep up with them. It's much more fun than I had in many of my college classrooms.


varda's picture
varda

No not a publishing company, or a fancy new German housewares line - just a humble cobbler's loaf and miller's miche.  

Continuing on with trying to absorb the King Arthur rye class I took a few weeks ago, I decided to  make a Schuster Laib, or cobbler's loaf.   Mr. Hamelman explained that this upside down rye loaf was probably originally some apprentice baker's error and so the head baker called it a cobbler's loaf, because for some reason, calling someone a cobbler was a big insult.   Now of course, cobbler's loaves are made on purpose, and I've always gasped in admiration whenever I saw one.   (Breadsong's version comes to mind.)       At our class, while we were making the 80% rye loaves with rye soaker in Pullman pans, Mr. Hamelman quietly put one of these together.    So this time, I made an 80% rye loaf as a free standing upside down hearth loaf.  

At the class we had to sign (at least in our minds) an affidavit promising not to cut into the 80% loaves for 24 hours.    So I can't get a look inside just yet, as it's only been around 4.   

Update:   So I had a few people over this morning and served the bread (they were expecting maybe coffee cake?)   and they liked it, so I hacked it up to give them some to take home, almost forgetting that I owed a crumb shot.   Fortunately there was a little bit left.  

The flavor was very intense - that rye sour smell that I've been talking about transformed to taste.    As much flavor as you'll ever get from flour and water.     

So as not to have a day go by without bread, I decided to make a second loaf today.   My home-milled flour has been getting cranky, as I make one rye loaf after another, so I decided to pull it out of the closet and take it for a spin.    Loaf two is a miller's miche, so called because I used my home milled and sifted flour for the final dough, and sprinkled the whole loaf with the sifted and remilled bran. 

The dough was so sticky when I flipped it out of the basket using my hand to steady it onto the peel, that it stuck to my hand, and I had to scrape it off and pat the loaf back together, so I was expecting a disaster.   It recovered quite nicely in the oven, though, and is happily edible by humans. 

The rye loaf was made with my new twice daily fed rye sour, and the miller's loaf was made with twice daily fed white starter.    For today's bake, I finally got the smell that I remembered from the rye sour at King Arthur, although much less overpowering, as much smaller quantity.    My wheat starter seems happier and more active as well, so I'm happy with the new regimen.  

I used the exact formula from the class for the 80% rye, but modified process a bit to suit my baking conditions.    I will list what I did rather than Mr. Hamelmans precise instructions.

Formulas and methods:

Schuster's Laib

3/10/2013


1st feed

2nd feed

2nd feed

Total

Rye sour


12:30 PM

9:30 PM

9:30 PM


Seed

54


Whole Rye

28

100

-55

150

223

Water

26

82

-45

122

185


408

Soaker


Coarse Rye

109


boiling water

164


273


3/11/2013

Final

Sour

Soaker

Total

Percent

Whole Rye

137

192

109

438

80%

Sir Lancelot high gluten

109


109

20%

Water

153

158

164

475

87%

Salt

10


10

1.8%

Yeast

5


5

1.0%

Sour

350


Soaker

273


Rye Sour seed hydration


90%


Rye Sour hydration


83%


Starter factor


0.86


Total Flour


547


Total Whole Grain


80%


Total Dough


1037


Percent prefermented flour


35%


Hydration


87%


Build rye sour as listed.   Sprinkle top with rye flour after 2nd build


Make soaker at the same time as final sour build


After 12 hours when sour is ripe (smell, and islands of the sprinkled rye flour)

mix all ingredients.   Consistency is paste.


Bulk Ferment 30 minutes.    Shape sprinkling top with rye after folding in

each corner.    Place seam side down in lined basket.


Proof 1 hour 45 minutes.


Preheat oven to 550 for one hour (plus) with stone and large cast iron pan

Turn oven off, load loaf, and pour water into cast iron pan.   Close oven and

listen.   If hissing stops before 5 minutes is up, add water.   After five minutes,

turn oven to 470F for 15 minutes.   Then reduce heat to 440 for 40 minutes.

Remove and cool.


When cool wrap for overnight.  


Miller’s Miche

3/10/2013


1st feed

Total


9:30 PM


Seed

43


KAAP

25

118

143


Whole Rye

1

7

8


Water

17

84

101

67%


252


3/11/2013


Final

Starter

Sour

Total

Percent

KAAP


130


130

21%

Whole Rye


8

22

29

5%

Golden

450


450

74%

Water

350

92

18

461

76%

Salt

11


11

1.8%

Starter

230


Rye Sour

40


Starter seed hydration


67%


Starter hydration


67%


Starter factor


0.9


Total Flour


609


Total Whole Grain


79%


Total Dough


1081


Percent prefermented flour

26%


Hydration


76%


Autolyse flour and water 30 minutes


Add remaining ingredients and mix at speeds 1 and 2


to medium development


Rest 5 minutes.   Stretch and fold in bowl.


Bulk Ferment 2 hours.  


Shape into boule and place in lined basket.


Proof for 1.5 hours.  


Bake at 450 with steam (cast iron method - see above) for 5 minutes

without for 40. 


Remove and cool.


Note that Rye Sour is leftover from the Rye loaf.   


HokeyPokey's picture
HokeyPokey

Easter came early in our house this year J

No, seriously, I wanted to re-jigg my Hot Cross buns recipe in time for Easter and decided to start practicing well in advance.

The result has exceeded all my expectations – deliciously fluffy buns, studded with a variety of spiced fruit – read the whole recipe on my blog here


Pages

Subscribe to RSS - blogs