The Fresh Loaf

A Community of Amateur Bakers and Artisan Bread Enthusiasts.

Blogs

Skibum's picture
Skibum

This bake was done almost exactly as the last boule bake with a couple of exceptions. I upped the hydration to 77 from 75% and compensated by autolysing for 40 minutes and proofed for 50 instead of 45 minutes.  I also increased the bake time in the covered cast iron DO from 10 to 11 minutes and finished with 10, convection, turning often.


Ken Forkish seems to like to push the limits on his bakes and it is fun pushing things up on my baking!I I proofed this one Forkish style, seam down and prior to baking decided to once again score a deep half moon across the seam I thought most likely to burst.in case the seams didn't open. Well, I got great spring and the seams also exploded and created perhaps the most interesting looking loaf I have ever baked. Among other things I like is Ken Forkish's bake seam side up for that 'organic' look. 

Well the slash opened nicely and the seams burst to create this interesting KF style 'organic' loaf!

I am getting a great kick in pulling stuff like this out of my home oven!

I really love the crumb, crisp crust and flavour of this bread and I have found feeding my starter daily and baking off half has improved my breads. 

Finding my chops . . .

Happy baking and best regards! Brian

Floydm's picture
Floydm

I just returned from my trip back East.  It was a great trip, we saw all kinds of wonderful things, and the fall colors were amazing.

Definitely one of the highlights of the trip was getting to try real Montréal bagels.

We had time to try two bagels shops in the Mile End district: St-Viateur Bagel and Fairmount Bagel.

Neither place was much more than a mixer, bench, a wood oven, and a cash register.  You don't come to these places for the decor, just the bagels!

But the bagels... 

It is hard to do justice to the bagels! Sweet and crisp on the outside and slightly charred sometimes.  Wow... 

 In Vancouver we have Siegal's Bagels and Rosemary Rocksalt -- run by the same family -- that are doing a good job of recreating Montréal bagels.  They've certainly got the rig set up right:

But ... I don't know what it is, but I've never found myself just standing on the sidewalk lost in thought while munching on their bagels the way I did the Fairmount bagels.  They were that good.  Truly something to experience, if you ever get the chance!

dabrownman's picture
dabrownman

Lucy is so excited in finding out that her Mice and Pumpkin won runner up in the Arizona Republic’s Halloween Baking Contest.  She won a gift card and this Wednesday she has her entry featured in the Food and Drink section of the newspaper along with the winner and the other runner up.


She has been beside herself all day yet managed to produce one of the best bakes ever today.  She is on a hot streak and I’m guessing poor Max will have hard time measuring up to her new standards for baking and companionship.

Casey_Powers's picture
Casey_Powers

Unfortunately, the site will turn my photos upside down.  I think there is a Mac issue.  This is my 5 AM Double fed sweet Levain.  It is a 9.5 hour retard compared to a 12-14 hour.  The crumb is very moist and airy

Foodzeit's picture
Foodzeit
bread fresh from the oven
After seeing this wonderful recipe over there - inspired by Chad Robertson - (it is really great and even includes the timing for the preparation and I got the inspiration to do so from there of course) and after having read many times about the overnight storage of the bread in the fridge in order to increase the flavor profile, I decided to try this as well. I am referring to the recipe that I found over here, but it can be found on many blogs in the blogger sphere as well. After trying this bread, I have to say that this was my first, but not my last time to make the bread using the long overnight fermentation. I definitely will also try to create my own recipes using this way of increasing the flavor because the flavor of this bread is just the most intense bread flavor that I had so far, ever, since I started making my own breads. It shows me again why I am using the slow fermenting pizza dough in order to make my favorite pizza as well. In this recipe I replaced the different wheat and spelt flours by the only type of flour that I had available, whole wheat flour.As I know that my sourdough is not the most active one, I added some yeast to the recipe and last but not least, I added a good portion of Rosemary to it as we just love herbs and spices in our bread. All in all my dough was a bit drier than the one in the description and for sure I did not get a crumb nearly as good as the one on the picture. But honestly, I think I must use more liquid next time because liquid dough’s tend to develop bigger holes in the crumb then dry ones. That being said, I know very well that I need to put more effort and research in how to make a crumb with bigger holes in the future. But still, I am very happy with the bread and it won’t be the last time I made it. Here is my version of the recipe.If any of you has any hints and tricks for the crumb development, I am always open for your great suggestions
     Ingredients and timing:
     Day 1 – Midnight
-40 g of wheat sourdough starter
-53 g water
-73 g wheat flour
Mix all the ingredients and leave them over night ferment on a warm place (ideal would be 25 degrees Celsius), 12 – 16 hours.
sourdough before fermentation
     Day 2 – morning 10:30Sourdough part 2
-132 g water
-165 g wheat flour
Mix everything and let it ferment on a warm place in the house (same place as before, 25 degrees Celsius)
sourdough after fermentation
     13:15:-593 g whole wheat flour
-66 g rye flour
-330 g water
-2 g dried yeast
-2 g rosemary
I added yeast to the recipe in order to get more activity in the development of the crumb; I also added some rosemary as well as we love to have herbs on our bread. Let everything rest of half an hour
fresh kneaded dough ball
     13:45:We add 13 g salt to the dough and mix it with the sourdough. We really mix and knead the dough well until it is soft and the gluten developed in the dough. That can be that you need to knead about like 10 – 15 minutes. At this stage I had to add some water as the author said that the dough is VERY soft and mine was not so soft but still a bit dry. Here I just think that it is due to the flour that I am using instead of the kinds of flour that is suggested by the author of the recipe.
adding the salt to the dough
     14:15:Let the dough rest till 18:15. During the resting period make sure that you stretch and fold the dough every 45 minutes in order to increase and develop the gluten in the dough.
before folding the dough
folding the dough 3.rd time
     20:15:Shape the dough and let it rest in the fermentation basket
cutting the dough in half to make two breads
shaping the breads and resting them in my fermentation basket (plastic cups)
     20:15:Place the dough in the fermentation basket in the fridge until the next morning so the flavors are developing overnight.

     Day 3 – in the morning:
Now I drop them upside down from their bread baskets on my permanent Teflon baking foil on which I already sprinkled a bed of flour. I also cut the bread and sprinkle a layer of flour on top of the bread before putting in the oven. The oven should be pre heated on 250°C. Now pour a cup of hot water in the oven (if you do not have this inbuilt steaming program in your oven at home), pop the bread in the oven and also place a cup of water on the floor of the oven to give some additional steam later on. Quickly close the door so the hot steam will be caught within the oven. Having all that steam in the oven is, like mentioned many times before, extremely important for a scrumptious crust and a great consistency of the bread.
Bake the breads for 10 - 15 minutes like this until it reached the right brown color that you are looking for in a bread crust, then open up the door, let the steam out, lower the heat on 200°C and continue to bake the bread for another 35 - 40 minutes. Now switch off the heat, keep the door open and let the bread cool down slowly. I always spray a bit of water on top of the fresh loaf when it's still hot. It gives a nice and shiny surface the fresh baked crust.
Isand66's picture
Isand66

Warning...if you don't like the flavor of coffee you will not like this bread.  I have used coffee in my breads before and usually it is very subtle since I use a higher percentage of whole grain flour and add-ins but since most of the flour in this bake was on the white side the coffee flavor was very strong.

This bread did come out very nicely and the addition of the potatoes in combination with the Durum flour, sprouted whole wheat and dark rye really produced a nice open and moist crumb.  As usual I couldn't leave well enough alone and had to add some garlic olive oil, dried shallots, cheese powder and aged balsamic vinegar which really added to the complex flavor profile of this bread.

If you don't like coffee you can replace it with water and you will be very happy with the way this bread turns out.

I was doing some research on the hydration levels of different ingredients and discovered that boiled potatoes are 81% water which really helps create a moist dough but not enough to make this dough unmanageable.

Closeup2

CoffeePotatoSD

Secondloaf

Levain Directions

Mix all the levain ingredients together for about 1 minute and cover with plastic wrap.  Let it sit at room temperature for around 7-8 hours or until the starter has doubled.  I usually do this the night before.

Either use in the main dough immediately or refrigerate for up to 1 day before using.

 Main Dough Procedure

Mix the flours, and 350 grams of the coffee together in your mixer or by hand until it just starts to come together, maybe about 1 minute.  Let it rest in your work bowl covered for 20-30 minutes.  Next add the salt, starter (cut into about 7-8 pieces), and the rest of the ingredients and mix on low for a minute.  Next add the rest of the coffee unless the dough is way too wet.   Mix on low-speed for another 4 minutes.  Remove the dough from your bowl and place it in a lightly oiled bowl or work surface and do several stretch and folds.  Let it rest covered for 10-15 minutes and then do another stretch and fold.  Let it rest another 10-15 minutes and do one additional stretch and fold.  After a total of 2 hours place your covered bowl in the refrigerator and let it rest for 12 to 24 hours.

When you are ready to bake remove the bowl from the refrigerator and let it set out at room temperature still covered for 1.5 to 2 hours.  Remove the dough and shape as desired.  I made 2 loaves using my bannetons.  Place your dough into your proofing basket(s) and cover with a moist tea towel or plastic wrap sprayed with cooking spray.

Risen

The dough will take 1.5 to 2 hours depending on your room temperature.  Let the dough dictate when it is ready to bake not the clock.

Around 45 minutes before you are ready to bake, pre-heat your oven to 500 degrees F. and prepare it for steam.  I have a heavy-duty baking pan on the bottom rack of my oven with 1 baking stone on a shelf above the pan and one on the top shelf.

Right before you are ready to put them in the oven, score as desired and then add 1 cup of boiling water to your steam pan or follow your own steam procedure.

Scored

After 1 minute lower the temperature to 450 degrees.  Bake for 35-50 minutes until the crust is nice and brown and the internal temperature of the bread is 205 degrees.

Take the bread out of the oven when done and let it cool on a bakers rack before for at least 2 hours before eating.

Boule

Crumb1

Closeup1

Crumb2

 
Skibum's picture
Skibum

I would like to make a big shout out to dabrownman for pm'ing his detailed for producing and maintaining a YW starter. I have tried and failed twice and this time I was anal: boiled the glass jar, boiled the Brita filtered tap water and sat in the sun in a glass jar for the day to fully eliminate the chlorine. Next as per dman, 1/2 un-washed organic apple cored and minced and half crushed, ditto 20 organic raisins ditto. I am going to follow the dman's instructions to the tee and post daily photos. Another new fun project.

Thanks again dab, you are DMAN!

Regards, Brian

greedybread's picture
greedybread

Yep, thats right!  ....Don Corleone...

I love Don Corleone...Not Micheal so much but I digress...

What does the Godfather have to do with bread?

Sicily...

Pane di oggi e' dalla Sicilia.

Stupendo, Bellissimo, Sfarzoso.....

amo questo il pane.

Che e' giusto, amo, amo, amo il pane dalla Sicilia.

Urgh my Italian is very very RUSTY!!

Another trip is needeD soon!!
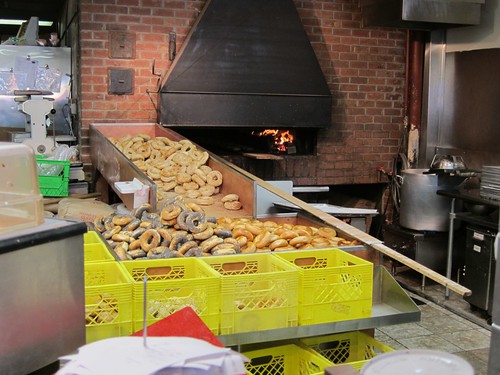
the eye (occhi )
the eye (occhi )

Practice, I will.....I promise before I lose any ability what so ever.

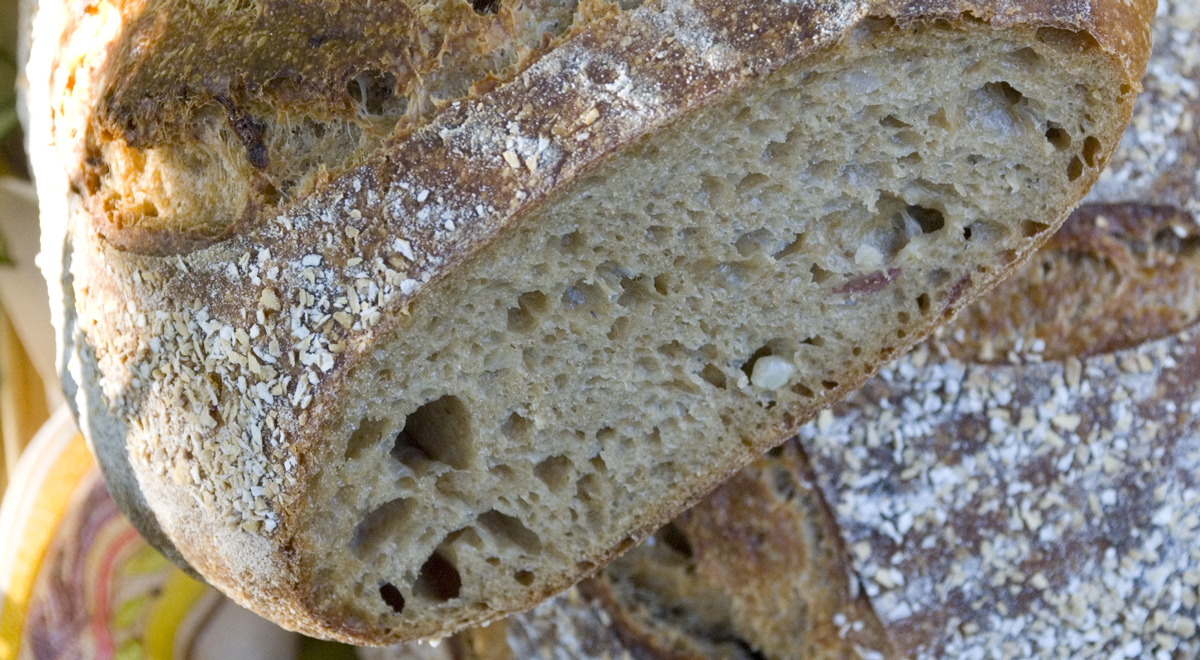
So yes, this yumminess is from Sicily.

It is distinct because it uses a lot of durum wheat flour.

I believe the durum wheat gives it a distinct  taste.

The recipe that I have used allows the durum to brew like a biga for a few days..

Tasty!

You need 2-4 days for this bread.

I will often start it on a Wednesday and we will have it for Saturday dinner.

DO NOT BACK OUT NOW!!!

Well worth the wait!

Lovely and fresh...
Lovely and fresh...

When people go "oh white bread , is so crap for you etc etc"...

It makes me angry because homemade white bread cooked with no additives or rubbish is fabulous...

Nothing like the taste...

It is only when we stick rubbish in it.

I love grain and rye breads too but there is nothing like a fresh white bread.

Anyhow without any further blithering....

the dough....
the dough....

WHAT WILL YOU NEED?

For the starter...

1 cup of durum wheat flour (semola)

1 cup of bread flour

1 tsp salt

1 tsp dried yeast

1 cup, maybe more of warm water to make a sticky dough.

For the bread:

All of the starter

2 cups of durum wheat flour  (semola)

1 & 1/2 cups of bread flour.

1 tsp salt

2 tsp dried yeast

4 tbsp olive oil

1 tbsp honey

1 and 1/2 cups of warm water.

Some sesame seeds....

My sons hate sesame seeds so I had to use poppy seeds which they will TOLERATE...

stretching it...
stretching it...
shape it..
shape it..

Mix all your dry starter ingredients together.

Add in the warm water, forming a dough and knead the dough for 6 minutes.

Place dough in a lightly oiled bowl and cover, leave for 90 minutes.

Remove dough from bowl and knead a little to knock it back.

Return to the covered bowl and place in the fridge.

The minimum time is one night but I like to leave it for 2 nights...

Flavour develops more...

mafalda
mafalda
sesame seeded mafalda
plain occhi
plain occhi

Now the bread:)

Take the starter from the fridge and hour or so before you want to use it.

Warm the water, add in the honey and dissolve it and then stir in the yeast.

Let it become frothy..usually 10 minutes, add in the Olive oil.

Add this yeasty mix to the original biga and combine well.

Mix all the dry ingredients together and then add in the above wet ingredients, forming a dough.

Knead for about 8 minutes, you really need to work this as durum is a hard wheat.

Place in a lightly oiled bowl, cover and leave for 2 hours.

ready!
ready!
ready!
ready!
double trouble
double trouble

Remove from the bowl and divide into 2 pieces.

I will usually roll each piece to be 30-35cms long.

I will make the occhi(eye) by rolling in one end to half way and then repeating on the other side.

The Mafalda, you do by giving it a zigzag shape and then pulling the tail up through the middle of the bread.

Place bread on a greased tray that is sprinkled with semolina.

I will then lightly brush with water and sprinkle on the seeds if any.

Cover the trays with plastic bags and tie tightly.

Place in the fridge overnight, at least 12 hours .

slice it real good!
slice it real good!
Occhi up close
Occhi up close
gorgeous crumb
gorgeous crumb

Remove from fridge and allow to come back to room temperature for about 90-120 minutes.

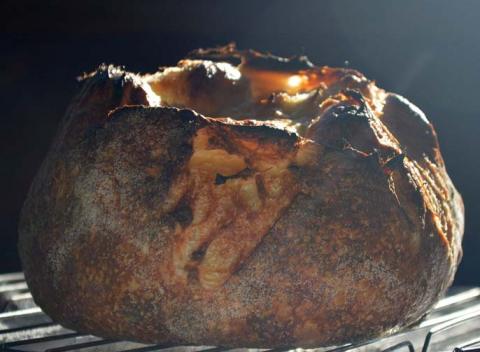
Preheat the oven after 90 minutes to 245 Celsius.

When bread is ready, place in the oven.

Spray the oven walls to create the moist atmosphere we want to get that great crust.

Close the door and repeat 2 more times in the next 5 minutes.

Turn oven down to 210 celsius and bake for 15 minutes.

Turn the trays around, turn heat down to 200 celsius and bake for another 10-15 minutes or until golden brown.

Remove from oven and allow to cool on a wire rack.

Try to restrain yourself for 45 minutes before slicing the bread.

Slice and ENJOY, ENJOY, ENJOY!!

Gorgeous with Fig jam or chutney & cheese or just alone...

Cold meats, salad....tasty:)

a little butter?
a little butter?
yum...
yum...
yummy..
yummy..
full frontal..
full frontal..
white bread??
white bread??
the occhi..
the occhi..

Did you love this bread?

Have you tried the Pugliese?

Or the ciabatta?

Maybe the focaccia?

delish!
delish!

To make this bread I have over time adapted recipes from 'The Bread Bakers Apprentice by Peter Reinhart & "The Italian Baker' by Carol Field.

Grazie to both for their bread wisdom.


http://greedybread.com/on-this-dayi-give-my-only-daughter/

CAphyl's picture
CAphyl

I just posted the Sicilian Lemon Orange Sweet Bread that I made for dessert for my husband's birthday.....the main course was pizza (with salad made from lettuce and vegetables from the farmer's market. This was the healthy part of the meal....it was his birthday, so we were indulgent with pizza and dessert!)  I found a great sourdough pizza dough recipe that makes thin, crisp crust the way we like it (particularly my husband).  This was the first time I made it (I've made other recipes and the crust was too doughy), and this recipe really worked well.  I learned some things along the way, as it always happens, but there is no question I will be making this again. (Link to recipe below)

After rolling out the crust (very thin), bake it at 500 for 7 minutes (you'll see big bubbles), take it out and brush with olive oil to seal it and then put on the ingredients. Return to oven and bake until crust is done (I think it was another 7 minutes). I topped it with tomato sauce and mozzarella (not too much) and pepperoni, gorgonzola, mushrooms and marinated black and green olives. It was a nice meal!  If you like thin, crispy crust and have sourdough starter to spare, this is the recipe for you.

http://www.food.com/recipe/sourdough-pizza-crust-98733


CAphyl's picture
CAphyl

When I was in the UK lfor a wedding around Easter time, I made this Paul Hollywood traditional Sicilian lemon orange sweet bread for my husband's family at Easter.  I didn't do the best job as I never made it before, but it tasted great and everyone liked it.  My husband requested it for his birthday yesterday, so I made it.  It turned out well.

When I made it earlier, it didn't rise very much and was more like cake.  This time, it got huge!  Live and learn.  I've attached a link to the recipe below:

http://harleybeecroft.wordpress.com/2013/05/08/band-of-bakers-paul-hollywoods-sicilian-lemon-and-orange-sweet-bread/


Pages

Subscribe to RSS - blogs