The Fresh Loaf

A Community of Amateur Bakers and Artisan Bread Enthusiasts.

Blogs

dmsnyder's picture
dmsnyder


The San Joaquin Sourdough has been my wife's favorite bread for quite a while now. It's not that she doesn't like other breads. She thought Salome's Potato-Nut bread that I baked yesterday was “amazing.” But, if I had an “everyday bread,” I guess this would be it. The recipe and background on this bread are described in my blog entry for Pain de Campagne.

While this loaf used the method I have described a number of times, the ingredients were a bit different. I had about 20 gms of 100% hydration starter left over from another bread, so I used it and made up the rest of the 100 gms of starter from my stock 1:3:4 mixed flour starter. I'd exhausted my stock of Giusto's whole rye flour, so I used KAF Pumpernickel, which is more coarsely milled. I figured the 100% hydration starter provided a little more water, but the pumpernickel probably absorbed a little more, so I used 10 gms less water to mix the dough. In other words, I kind of faked it.

The dough tripled during cold retardation in bulk! That's probably why I didn't get much of a rise during proofing or much oven spring. The poor yeastie beasties must have been starved. <sniff>

I baked under an aluminum foil roasting pan for 10 minutes at 480F/Convection, then another 20 minutes at 460F. There wasn't a lot of oven spring, and, while there was respectable bloom, no real ear formed.


It turned out that the bread had a nice crumb structure, and the taste was as good as I've ever made, if not better. It was assertively sour, which we like. Interestingly enough, while I'd been having mild problems with the retarded dough being slacker than I wished, this dough was a bit more elastic. I can't explain it, unless it was due to the slightly lower hydration (73% vs. 75%).

I think I'll bake this bread again with 10% pumpernickel flour.

David


Pablo's picture
Pablo

A Tale of Two Boules

I wanted to find out if I could bake a decent loaf without adding any flour to a starter.  I keep my starters on the counter and feed them twice a day at 1:5:6.  My routine has had me taking 5 grams out and mixing that with 25 grams of water and 30 grams of flour.  The leftover I then mix with flour down to ~50% and stash in the 'fridge.  I'm currently running two starters, my own that I started around the time that I started here at the Fresh Loaf last August that has been with me through thick and thin, which is fed 85% white, 10% rye and 5% ww, and Carl's Oregon Trail starter that I rehydrated a week or two ago and have been feeding 100% white.

The starter balls on the left are Carl's, accumulated for a few days, those on the right are my regular starter.  I'll get to the bread cubes in a minute.  For the Carl's loaf I had 375g of starter at 50% hydration and I kneaded in 45g water mixed with 6g salt.  The dough handled nicely, I proofed it for 2.5 hours at room temp and baked under a bowl. 

The loaf looks nice, but the crumb is very close.

I haven't played with the Carl's starter yet at all.  This was my first usage.  I imagine that treated differently I'll get a more open crumb.  It's certainly edible bread. 

For the other starter I was inspired by reading David and Mini's recent comments about including old bread in your loaf.  As long as I was experimenting anyway...  Something I learned is that I probably want to cut the crust off tough old SD (leftover from the proofing experiment) before using it.  Luckily I picked up from David the idea of soaking the bread before adding it.  I did not do that with the BBA Pumpernickle loaf that is now proofing and I think what I'll have is "Chunky Pumpernickle".  Since the soaked bread crumbs were a complete hydration unknown I just winged it adding water and I added a little too much, the dough was pretty tacky, but I could handle it, barely.  I was determined to not add any flour and to just use 100% starter.  It was doing fine until it stuck to the couche when trying to get it onto the parchment paper to bake.  I panicked and just abandoned it to the Oven Gods.  What I think I should have done was treat the inadvertant degassing as simply a degassing and reformed the loaf and let it rise again.  Lesson learned.  So the poor flat thing went in the oven and came out as above.  But, look at the crumb!

Not spectacular but much more open than the first one.  How 'bout that.

So, I answered my own question about whether I could bake a serviceable 100% starter loaf.  Yes. 

:-Paul

weavershouse's picture
weavershouse

Today I made Mark Sinclair's wonderful Multigrain. I've made it before and don't know why I waited so long to make it again. The aroma of this bread baking should be enough to get me to make it often. Ehanner posted his loaves last year and his crumb is very open and beautiful. And the crumb on his is lighter in color for some reason. To see his take on this bread go here...

http://www.thefreshloaf.com/node/7905/really-great-multigrain


Mark's recipe makes 4.6 lbs of dough enough for 3 good size medium loaves and one that I made into a small cinnamon raisin pan loaf. Even with a tighter crumb than Eric's the bread is still light and delicious. Toasted for breakfast or for sandwiches is my favorite way to eat it. I used mostly white whole wheat for the whole wheat called for otherwise I followed the directions as given. I didn't use a mixer.


MULITGRAIN

chahira daoud's picture
chahira daoud

I am back but this time with no bread,,, I am back with my ful & Taameya. I promised before that I'll share the recipes with you. Sorry for being late but I had a lot of work to do. First talking about Ful Medames "Ful medammas also Foul Medammas (Arabic: فول مدمس fūl mudammas) is popular in Egypt , often eaten at breakfast. It consists of brown fava beans, partially or completely mashed, which are slow-cooked and served with olive oil, chopped parsley, onion, garlic, and lemon juice. Ful medames is typically eaten with Egyptian bread ('eish masri).'egyptian pocket bread or flat bread" Though originally a peasant food, ful medames has long been part of the daily Egyptian diet. Some have described it as being "like a stone in the stomach". This has led to it being consumed by many in the Middle East in the early morning meal to prepare for a day of fasting during Ramadan. The dish's name derives from the Egyptian language: ful is the Egyptian word for fava beans, and medames is a Coptic word meaning "buried." The second word hints at the original cooking method, which involved burying a sealed pot of water and beans under hot coals." Thanks to wikipedia ;))) So today I am going to tell you how we cook ful from scratch. Ingredients:- 200gr. Fava beans "the best quality has a lighter color" 50 gr. Of chickpeas "it is not in the original recipe but sometimes I add chickpeas for change, the original recipe contains just fava beans". 50 gr of yellow lentill 50 gr. of wheat seeds A half of small lemon. First wash all these seeds very well then cover it with water for 2- 4 hours. Rinse it again and put it in a pan we use a special pot, it is like a jar, we call it "damassah" The capacity of our pot is 3 litres. Put the seeds and fill the pot with water till the top just leave 1 cm without water. Put it on the stove till boiling then tranfer it on a heater like this one, a lot of people use the stove by putting the ful pot on the smallest and weakest flame, but this heater gives wonderful results because we will leave ful for 7 or 8 hours on the this weak heat. After this period take some with a spoon and test it , if it is done squeeze a half of lemon and pour your ful in a container so after being cooled you should put it in the refrigerator and it can be freezed very well too. If you test it and you find that fava beans still firm and there is no enough liquid in your pot add water but it has to be very hot, just to keep the lovely light color of beans.and let it more time on the heater or on the stove. you'll find all the pics in my blog. It is time now to talk about falafel , in egypt we call it taameya more than falafel it is a little bit different than the lebanese & the syrian one, we use more green herbs and we use just fava beans to make it. Fo me I use to make it with fava beans but sometimes as a change I mix with my fava some chickpeas. "Falafel is a fried ball or patty made from fava beans. Originally from Egypt,[1] falafel is a popular form of fast food in the Middle East, where it is also served as a mezze. Falafel is usually served in a pita-like bread, either inside the bread, which acts as a pocket, or wrapped in a flat bread. In many countries falafel is a popular street food or fast food. The falafel balls, whole or crushed, may be topped with salads, pickled vegetables and hot sauce, and drizzled with tahini-based sauces. Falafel balls may also be eaten alone as a snack or served as part of a mezze. During Ramadan, they are sometimes eaten as part of an iftar, the meal which breaks the daily fast after sunset." o.k thanks again to wikipedia. The ingredients;- 250 gr.skinless and crushed fava beans. Sometimes I put 125 chickpeas and 125 fava beans, but the egyptian original one does not contain chichpeas at all. 1 big onion 2 garlic cloves 125 of green herbs " leeks ,parsley, coriander, and dill Salt & pepper cumin and dried coriander. Wash the beans and rinse it then cover it well with water for 6 hours, if you are using chickpeas you will leave it for 12 hours. Rinse it and strain it very well then add to it the onions and the garlic and the fresh herbs "washed and cut to be ready to go to the food processor" you will mix all and put it in the food processor , it will take from you some time to be a real paste. You can add to it the salt, pepper , cumin and dried coriander or you can wait till you will start to fry it, I usually freeze all the quantity after dividing it into portions. To fry it , we need 250 gr of falafel paste and 1 big egg beat the egg with a fork and gradually add you falafel paste , add 1 tsp of sodium bicarbonate and continue to beat it for 2 mn. Add your salt , pepper , cumin and dried coriander. Apic for the whole meal. please check my blog to watch all the pics, I could not put it all in two places, forgive me !! Start to fry it, I made a videoooo, yes I did it for the first time in my life , my husband and me, were struggling two days to make it, but finally we did it , it is horrible but I hope that it really helps. You can watch it now on youtube http://www.youtube.com/watch?v=_ieAhoOakoI but please no laugh we are the worst editors in the world, next time would be better ;)) Thanks to all of you, this forum is really the best !! Chahira Daoud www.chahirakitchen.blogspot.com www.chahiraelkhabira.blogspot.com There was a fellow here on TFL, he was talking about "David" and how there is a lot of David on the forum...... David , I am a David too, " Daoud" is David but in Arabic, Cheers David ;)))

davidg618's picture
davidg618

Before today I'd never tasted nor baked Brioche. Yesterday I began by making the dough,  and today I made two tries baking it.

First Try

The crumb, and flavor, seem to be what I should expect, from this dough, so for a first time, ever, I'm pleased, especially after reading all the cautions--offered by the author, and elsewhere--about making high fat percentage doughs; but as you can see I have a long way to go learning to construct these rascals correctly. I've nicknamed the one in the upper left corner Nearly Headless Nick (Harry Potter fans will recognize the name.)

The formula is from "Baking Artisan Bread" by Ciril Hitz, and I followed it and the author's instructions to the letter, except constructing the individual rolls.  The ones shown were constructed using the little-ball-on-top-of-the-bigger ball approach. Additionally, the intructions called for 90g of dough for each mold, and I thought my molds were the same size as those shown in the author's pictures. They weren't.  One head slipped off entirely. The oven spring in this dough made them look more like popovers than brioche in my forms.

So I tried again. using some of the reserved dough--thus the 1 and 1/2 tries--with three changes. First I reduced the quantity for each mold to 65g, secondly, I'd baked the first four at 345°F on the oven's convection mode, as recommended by the author; the 1 and 1/2 try I used the recommended 265°F thermal mode setting, and lastly, I used the author's novel shaping. Here's an attempt to explain it in words. Starting with the dough pre-shaped into a ball, by pressing and rolling with one finger two balls--one large, one small--connected by a thin neck of dough is created. Then, the neck is stretched to three fingers width, the larger ball is turned into a doughnut shape, and the smaller ball--neck intact--is passed through the doughnut hole, and the doughnut shape is gently coaxed to collapse around the now curved neck. (I  hope readers can visualize this. I couldn't have done it with out the author's pictures.)

Try 1 and 1/2

Photo says it for me. Far from perfect, but OK.

David G

Talever's picture
Talever


Hello all

I am looking for some help finding a recipe to make a Danish pasty that I use to buy every Sunday for my grandmother in South Philadelphia.  It was rectangular pasty with a crumb and icing drizzled over it. 

If anyone is familiar with this or has any ideas I would appreciate the help


Shiao-Ping's picture
Shiao-Ping


My son asked if I could make hot cross buns for Easter three months ago, so I Googled the recipe and a whole new world opened up to me.  Up until then, I had hardly used internet recipes, and guess what - the first hot cross bun recipe that I came across was Dan Lepard's recipe and it came with this excerpt from Dan's website:

"Good bread comes from an understanding of its nature... a good baker recognizes that the doughs he makes are living things with individual identities, that they ultimately create themselves. The baker's skill is to encourage natural developments ...."

These few words enlightened me and I have since moved away from pastries and have come to a completely new frontier - sourdough! I began researching sourdough day and night for a period of three months non-stop. Before Easter, I had never heard of the word "sourdough."  I had made pastries for years and yeasted breads using bread machine every now and then, but strangely I had never heard of "sourdough" up until that point. 

I was trying to explain to my sisters back in Taiwan about this curious dough.  I had to translate the word into Mandarin to make myself understood. I said it is a "suan-mientuan," meaning "sour-dough" in Mandarin but I was not happy with the translation. Soon after that, I started to use "tian-ren-fa-hsiao-mientuan," meaning "naturally-leavened dough" to describe it and I am much happier with this translation.

I had leftover molasses mixed in water from making the last Horst Bandel's Black Pumpernickel.  I love the rich taste and aroma of molasses and I wonder what it would be like to put it in sourdough.  Here I go the fanciful side of me is working.

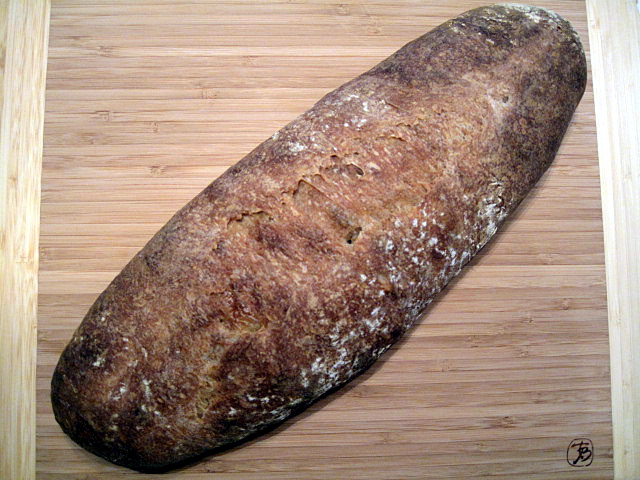
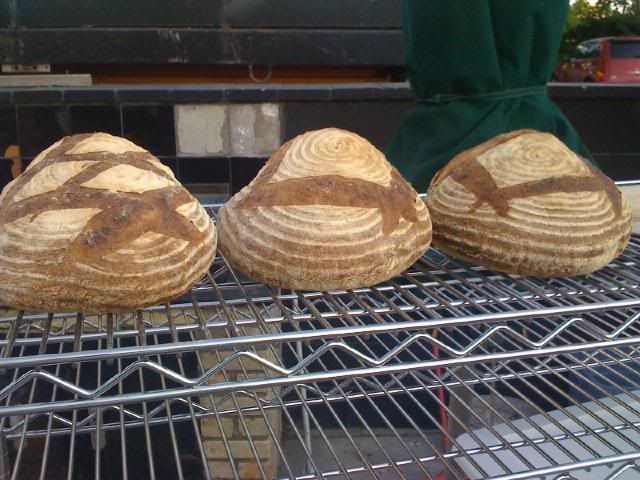
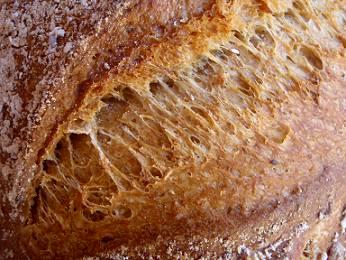
This Molasses & Light Rye Crusty Sourdough is my tribute to Dan Lepard. I thank him for opening up a brave new world of sourdough to me.


               Molasses & Light Rye Crusty Sourdough


My formula

196 g molasses starter @ 100% hydration (note: I used one part molasses to 9 parts water and 10 parts flour)

160 g rye starter @ 100% hydration

278 g KAF Sir Lancelot high gluten flour

121 g molasses water (again, one part molasses to 9 parts water)

22 g olive oil

9 g salt

(final dough weight 786 g, dough hydration 70%) 


The dough was bulk fermented for 4 hours and during that time it received 3 folds. Shaped, then into the fridge for cold retardation for 10 hours. Proofed at room temp for 2 & 1/2 hours this morning before baking.

I have found something quite useful for new sourdough baker like myself and that is to NOT over-steam the oven. With too much steam, the scores would seal up quickly in the oven and would not give nice grigne.

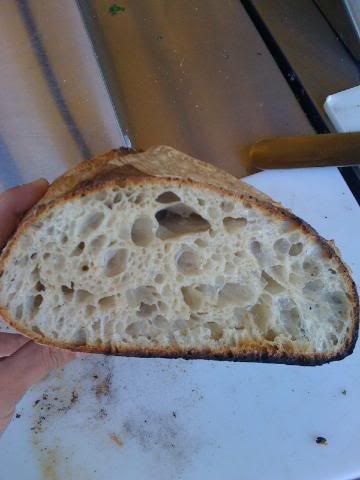
We had this sourdough for brunch today and it was really lovely. My son said he could smell a pleasant sourness.  He had a slice with peanut paste (how typical for a growing boy). My daughter had it with grilled capsicum in an open sandwich; my husband had his with a thick layer of butter, and I had it as is.  AND, Polly our dog got a slice too!


                                                                               As the loaf is being sliced ...


      Polly awaits anxiously ... to get her share.


Happy baking!

Shiao-Ping

Mebake's picture
Mebake

I made this loaf one month back. It was very pleasing to toast, very. i'd recommend all who live in Dubai to try that!

Typical Ingredients:

Whole wheat (coarse bran) Flour, Instant Dry Yeast, a wholewheat preferment, warm water, honey/brown sugar/molasses, sea Salt, whole milk powder, some butter.


Sliced!


and toasted with kashkaval cheese

dmsnyder's picture
dmsnyder


This recipe was contributed by Salome, who recently joined TFL. She is Swiss, and the breads she bakes represent a bread tradition which is new to me. The Southern Tyrolean Potato-Nut Bread (Südtiroler Kartoffel- Nussbrot) particularly appealed to me, since I have made potato breads a couple of times and really enjoyed them, and I like sourdough bread with nuts. It seemed to me that the combination of the potato and nut flavors would be delicious.


Ingredients

Potatoes (steamed, roasted or boiled)

400 gms

Active 100% hydration sourdough starter

200 gms

Bread flour

500 gms

Water

250 gms

Salt

10 gms

Ground coriander

1-2 tsp

Walnuts (Lightly toasted)

100 gms

Hazelnuts

150 gms


Notes: Salome's recipe calls for a mix of hazelnuts and walnuts. My usual source of hazelnuts has very poor quality stock at present, but their walnuts are very good. So I just used walnuts.


Procedure

  1. Prepare the sourdough starter by mixing 50 gms of starter with 100 gms AP or Bread Flour and 100 gms of water. Cover and let ripen until it has expanded somewhat and is actively bubbling. (8-12 hours)

  2. Cook and peel the potatoes. Mash them or put them through a potato ricer. (Salome says she usually steams the potatoes for this bread, but I decided to roast mine, thinking I would get a more intense flavor. I used Yukon Gold potatoes and roasted them in a covered pot at 375F for about 35-40 minutes. I peeled them and put them through a ricer, directly into the mixer bowl on top of the flour.)

  3. Place 200 gms of the sourdough starter in a large bowl or the bowl of your mixer. Add the water and dissolve the starter in the water.

  4. Add the bread flour and potatoes to the dissolved starter and mix to a shaggy mass with all the flour moistened. Cover this tightly and allow it to rest for 30 minutes. (This “autolyse” allows the flour to get fully and evenly hydrated and the gluten to start to develop.)

  5. Add the coriander and salt and mix them into the dough. I then mixed in a KitchenAid Accolade using the dough hook for 13 minutes at Speed 2. There was some gluten development, but the dough was very loose. It never cleaned the side of the bowl

  6. Transfer the dough to a floured board and, with well-floured hands, stretch it into a 14 inch square. Distribute the nuts over the dough, roll it up and knead for a couple minutes to get the nuts evenly distributed in the dough.

  7. Gather the dough into a ball and place it in a large, lightly oiled bowl. Cover the bowl.

  8. Ferment the dough until it has doubled, with stretch and folds at 40 and 80 minutes. (I think a third stretch and fold wouldn't have hurt.)

  9. Transfer the dough to a well-floured bench. Divide it into 2 equal pieces. Pre-shape into logs. Dust with flour and cover with plasti-crap. Let the dough rest for 10-20 minutes.

  10. Form the pieces into bâtards and place them on lightly floured parchment paper. Dust again with flour and cover with plasti-crap.

  11. Proof the loaves until they are about 1.5 times their original size. (1.5-2 hours)

  12. 45-60 minutes before baking, place a baking stone in the oven and make pr

    eparations for

    your oven steaming method of choice. Pre-heat the oven to 450F.


  13. Bake with steam for 10 minutes, then in a dry oven for another 20 minutes. If the loaves seem to be getting dark too fast (and they  probably will), turn the oven down 10-20 degrees.


  14. Bake until the internal temperature is 205F. Remove the loaves to a cooling rack.


  15. Cool completely before slicing.


Potato-Nut Bread from the South Tyrol


Potato-Nut Bread crumb


This is a very enjoyable bread eaten without any spread or addition. It has a mildly chewy crust, once cool. The crumb is tender, as expected, and has a cool mouth feel, like many high-hydration breads. There is a mildly sour under-tone, but the predominant flavor is from the toasted walnuts. The walnuts also gave up some of their oil into the crumb, so the crumb feels like it is oiled.


I thought this bread might be good with a blue cheese, so I tried it with some Point Reyes Blue. This is a rather strong-tasting cheese, and it overpowered the bread. Maybe a fresh Chevre? A nutty Compté?


David


Submitted to Yeast Spotting on Susan FNP's  Wild Yeast blog (This week, hosted by Nick at imafoodblog)

rhag's picture
rhag

Just posting up some results from my saturday wood fired bake. I did a pain au levain, running off of thoms country french but I increased the hydration a bit because my high extraction flour absorbs a lot of water due to a small bran content. I mill the flour myself and dont have a super fine sifter so the extra water gives quite an open structure. Comments and Questions are always welcome.


Pages

Subscribe to RSS - blogs