The Fresh Loaf

A Community of Amateur Bakers and Artisan Bread Enthusiasts.

Blogs

SumisuYoshi's picture
SumisuYoshi

Purple Multigrain Loaf Crumb

This bread is heavily inspired by the Multi-grain Extraordinaire recipe from Bread Baker's Apprentice and really, it came out of my desire to stuff even more grains and grain flavor into that bread. I first made the Multi-grain Extraordinaire back in late September, and while I liked it quite a bit I was really looking for a bit more graininess, so to speak. I hadn't thought about that again until this weekend, as I knew I needed some lunch bread but I wasn't sure what to make. When I was digging in the cupboard for the pasta I needed for a pumpkin stew (more on that in a later post!) I saw the forbidden rice and purple barley I got a while back. Suddenly I had it, time to rework the recipe in search of more 'graininess'! In light of the supposed royal nature of the forbidden rice (although that is probably mostly marketing) and the similarity in color of the cooked rice to the ancient Royal Purple, I decided to name this Royal Grains Bread.

Purple Multigrain Baked Loaf

Royal Grain Bread Recipe

Makes: One 2 lb loaf or 6-12 rolls

Time: 2 days. First day: soaker and starter. Second day: mix final dough, ferment, degas, shape, final rise, bake.

Ingredients: (baker's percentages at the end of hte post)

Grain Soaker:

  • 4 oz. assorted grains (I used 1 oz. amaranth, 1 oz. millet, 1 oz. whole oat groats, .5 oz. corn meal, and .5 oz. flax meal)
  • 3-4 oz. water (enough to just barely cover the grains)

Stiff Sourdough Starter:

  • 1 oz. 66% hydration levain
  • 6 oz. bread flour
  • 4 oz. water

Final Dough:

  • 11 oz. of above starter
  • 4 oz. bread flour
  • 4 oz. other grain flours (I used 1 oz. forbidden rice flour and 3 oz. purple barley flour, both home ground)
  • 1.5 oz. brown sugar
  • 1½ teaspoons salt
  • 1 oz. cooked brown rice
  • 1 oz. honey
  • 4 oz. milk
  • 1-2 oz. water (this will depend on how much your grains absorbed)

Directions:

  1. Mix the grains and water for the soaker together, use just enough water to cover the grains and then cover the container and leave it to sit at room temperature overnight.
  2. Mix the 1 oz. of levain (if you aren't using a stiff levain you can adjust the quantities for whatever hydration levain you are using) with 4 oz. of water until well integrated and nearly homogeneous looking. Incorporate the water and levain mixture with the bread flour until a ball starts to form. Let the dough rest for 5 minutes covered. Knead the dough briefly, just enough to get it well mixed and smooth, no need to develop the gluten yet. Return the dough to a covered bowl or container and leave at room temperature to ferment. Depending on the strength of your starter and room temperature this could take from 3-12 hours. When I made it the room temperature was about 63 degrees and it took nearly 12 hours. If you know your starter will develop fairly rapidly, start this early enough to degas the dough and refrigerate after it has doubled, otherwise leave it at room temperature overnight.
  3. The next day remove the starter from the fridge ( if it was put in the fridge) about an hour before you plan to start making the bread.
  4. Stir the rest of the bread flour, the alternate grain flours, salt, and brown sugar together in a medium large bowl. I like to mix the starter in with the liquid so it incorporates into the final dough more easily, so stir together the milk, honey and 1 oz. of the water (reserve the rest in case needed later) and then mix with the 11 oz. of starter. Now pour the starter and liquids, the soaker, and the brown rice into to the bowl with the dry ingredients. Mix all of the ingredients together until they just begin to come together in a ball.
  5. Turn the dough ball out onto a lightly floured counter and knead for 6-10 minutes, or until you get adequate gluten development (check with a windowpane test). In my experience making this bread the dough will generally be stickier than you would expect from the hydration level and stiffness of the dough, I think this has to do with the grains from the soaker. Try to avoid adding too much flour during the kneading, as long as the dough is stiff enough that it seems to be able to hold a shape it will turn out fine, just use a bench scraper to recover any bits that stick. Lightly oil a bowl big enough to hold the dough when doubled, form your dough into a ball, roll it around in the oil, cover the bowl and set the dough aside to ferment at room temperature. Again, the time on this will vary depending on your starter, but 2-6 hours is a good estimate. No matter how long, when the dough has nearly doubled it is ready.
  6. If you want to make a freeform loaf: Now that your dough has doubled, or nearly doubled, turn it out and gently degas the dough, flattening it into a vaguely rectangular shape. Give the dough a letter fold (folding it into thirds along the long side) and seal the seam with the edge of your hand if needed. Now you have a preshape for a batard, fold once again to ensure good surface tension. Give the dough 3-5 minutes to rest before rolling it with your hands on the bench to make the ends thinner and extend them. If you have a couche use it to support the loaf as it rises, otherwise you can use parchment paper dusted with flour or sprayed with spray oil, just put objects to the side of the loaf to hold the parchment in place during the rise, and cover the loaf with oil sprayed plastic wrap. If you want to make a sandwich loaf: Starting just after the letter fold, flip the dough and gently roll it back and forth with your hands to even out the loaf shape. Once your loaf is more evenly shaped, tuck the ends underneath and briefly roll it again before placing the dough in an oiled 8½x4½ loaf pan. Cover the loaf pan and set it aside for the final rise. If you want to make rolls: Divide the dough into 6-12 of evenly sized pieces of dough, briefly preshape them into rounds and let them rest covered for 2 minutes so the gluten relaxes a bit. After the rest, shape the rolls into nice tight little boules. The method I use is to put my hand over the ball of dough, surround it with my fingers and thumb. Then while applying slight downward pressure and slight pressure with my thumb and pinky, rotate my hand a quarter turn counterclockwise, release the pressure slightly and rotate back to the home position. Repeat this until the dough forms a nice tight little ball. Place the shaped rolls on parchment paper on a baking sheet, cover, and set aside to rise.
  7. The final rise should be shorter than either of the previous two, and be careful using a poke test on this bread as the inclusion of flours with no or little gluten will make it a bit more delicate. For me, the final rise took about 90 minutes (but I had also moved to putting it in an oven with just the light off because I was going to need to go to bed!). If you are making the loaf in a loaf pan, it should rise to about 1/2 to 1 inch above the edge of the pan. The freestanding or loaf pan loaves would benefit from a very light scoring, no more than 1/8 to 1/4 of an inch deep. Preheat the oven to 350° with the rack on the middle shelf. If you wish to top your loaves or rolls with seeds or some other garnish, spray them lightly with water and top shortly before putting them in the oven.
  8. Bake for 20 minutes, at which point if you were making 12 rolls there is a good chance they will be finished. If you are making larger rolls or loaves rotate 180º (or earlier if you know your oven heats very unevenly) and continue baking for another 10-20 minutes on freestanding loaves and 25-40 minutes for pan loaves. As usual, the loaves should sound hollow when tapped on the bottom if they are finished and be around 185-190º. The color of the finished loaf will vary widely depending on the grains and grain flours you have used.
  9. Remove the baked loaves to a cooling rack (taking pan loaves out of the pan) and allow to cool for 1-2 hours before slicing.
  10. Enjoy the delicious graininess!

Note: If you wish to make this loaf without levain, skip the levain step and in the final dough use: 10.5 oz. bread flour, 5.5-6.5 oz. water and add in 2¼ tsp. instant or active dry yeast (add the instant to the dry ingredients and the active dry to the water and stir well). The rise times will of course be very different, probably around 1.5 to 2 hours for the first rise, and 1-1.5 hours for the second rise.


Some more photos:

Forbidden Rice and Purple Barley:

Forbidden Rice and Purple Barley

Shaped and Panned Loaf:

Purple Multigrain Shaped Loaf

Risen Loaf:

Purple Multigrain Risen Loaf

Baker's Percentage: Soaker:

  • Grains 100%
  • Water 75 to 100%
  • Total: 175-200%

Starter

  • Bread Flour 100%
  • Water 66.7%
  • 66% Levain 16.7%
  • Total 183.4%

Dough

  • Starter 137.5%
  • Bread Flour 50%
  • Alternate Flours 50%
  • Brown Sugar 18.8%
  • Salt 4.8%
  • Honey 12.5%
  • Cooked Brown Rice 12.5%
  • Milk 50%
  • Water (about) 12.5%
  • Soaker 100%
  • Total: 448.5%

Straight Dough Version:

  • Bread Flour 72.4%
  • Alternate Flours 27.6%
  • Brown Sugar 10.3%
  • Salt 2.6%
  • Honey 6.9%
  • Cooked Brown Rice 6.9%
  • Milk 27.6%
  • Water 41.4%
  • Soaker 55.2%
  • Total: 250.9%
janij's picture
janij

Here in Texas the weather is cooling off and here in Houston we are catching up on some much needed rain.  Go figure the summer I get a wood fire oven there is a burn ban in effect from, oh, June til mid September.  So this summer I spent most of my time drooling and plotting over my new oven.  We did have time before the burn ban to get some experience with firing it, maintaining temperatures and such.  We still have disasters.  Like the burnt sanwich loaves from last weekend.  My hubby, the fire man, said I needed to put the pans in the oven, but the oven was still upwards of 600 deg.  I knew better but also knew arguing with him was pointless and he could learn the burnt way! 

So in essence I wanted to show off some pictures from some of our recent baking both in the WFO and in the regular oven.

Last weekend we fired the oven Saturday and baked a beef roast (forgot a picture but was very good) and the 5 loaves of burn bread.  Sunday we refired the oven in the am and had pizza for lunch.  Said pizzas are pictured below.  The small ones in the back were made by my 5 yr old and 2 yr old.  Our new favorite homemade pizza is Pesto, sliced romas, cooked chicken and parm mixed with mozarella. And our current favorite dough is Reinhart's Roman Dough from American Pie.

Pizza Bottom

As the oven cooled from the pizza I baked 6 new loaves of sandwich bread.  This time I made my hubby wait til 400 deg to load the bread.  After they baked we refired the oven a little and cooked 2 chickens.  When you cook meat in a wood fire oven the meat gets a great smoky, bbq flavor.  In this picture you can see the chickens and 1 1/2 of the sandwich loaves.

The last one I wanted to add was the sourdough ciabatta I made today.  I am so proud of it!  I used the recipe from here

http://www.thefreshloaf.com/lessons/myfirstsourdough

Anyway, I was proud because this was the first straight wild yeast bread I have made that was open and not gummy.  So all in all I was happy.  It went well with out butternut squash soup tonight.  The first pic is of the loaves, the second the crumb.  And there were cooked in my regular oven.

I just wanted to share. :)

Floydm's picture
Floydm

My son's 2nd grade class toured Franz Bakery today.  I chaperoned this trip, naturally.

Franz is a landmark in Portland, in part because it has been here over 100 years but also because of the giant rotating loaf of bread on the roof (only a few blocks away there is a giant rotating quart of milk).  Franz Bakery bakes all of the buns for Wendy's, Arby's, Burgerville, and a bunch of other fast food joints out here as well as thousands of loaves of bread each day.

The tour began in an area that had information about how you make bread, where wheat and flour come from, how yeast works, those sorts of things.   It was pretty cute but my son didn't find it terribly interesting, probably in part because his dad has told him these things 20 times already.

After that, we had to get on our hair nets and the tour began.

Unfortunately cameras were not allowed on the tour.  I noticed other parents surreptitiously taking shots but I was too concerned with keeping small fingers out of the machinery to take photos once the tour began.  A few things I noted though:

  • Franz is a bread factory, not a bakery as I think of bakeries.  I'm not making a value judgement in saying that, just noting that everything I saw was done by machine with operators tending to the machines, not bakers tending to the dough.
  • Ingredient-wise I saw palettes full of different flours including those from Cargill and Pendleton Flour Mill.
  • Dough was mixed in 1,000 pound batches, then dumped into troughs where it fermented for an hour or so.
  • Machines shaped the buns then slid them into a proofing machine that is kept around 100 degrees where they stayed for 50 minutes.
  • Buns travel through a 100 foot long oven for about 8 minutes to bake.
  • The buns are cooled on a track that travels all around the building before heading into the packaging room.
  • Watching the loaves fly around, I got this song stuck in my head (if you've watched Looney Tunes you'll know what I'm talking about).

The kids enjoyed the tour a lot, frankly a lot better than they would have enjoyed a tour of an artisan bakery with a single small oven and a dedicated group of earnest bakers talking about the nuances of fermentation.  I enjoyed it too and gotta admit it is impressive that they can automate so much of the baking process.  I was also pleased to hear that there is increasing demand to use local and organic ingredients even when baking on an industrial scale.

Finally, one knick knack I saw on the tour that I liked:

Postal Grunt's picture
Postal Grunt


Saturday night, my wife and i were invited by our friends across the river in Farley MO to help celebrate the 89th birthday of Rob's mother. We used the opportunity to present a copy of the BBA to their daughter Ryoko as a late birthday/early Christmas gift. She's a junior in high school and really very good in the kitchen. I brought a loaf of a sourdough potato bread that I'm working on as a recipe.

After the meal, Rob asked how I went about the making and baking of the loaf. I couldn't get very far because I was using weights in my description rather than volumes. I thought that I was explaining the practicality of weight in a formula or recipe for the consistency and quality of results but Rob wanted cups rather grams. I guess that was where I should've remembered Samuel Clemens' statement that "it's better to stay quiet and let people think you're a fool than to open your mouth and confirm their suspicions".

How many other people here have run into that barrier?


DonD's picture
DonD

Background:

A couple of weeks ago, my wife and I were down in the Outer Banks of North Carolina for our annual fall pilgrimage to Hatteras Village for a week of relaxation, fishing, oystering and clamming. As usual, we were joined by a couple of dear friends who are also lovers of good food and wine. We always bring everything but the kitchen sink down there so that we can all take turns cooking fantastic seafood meals to go with the several cases of wines that made the trip with us. The problem is that we cannot find good bread down there so this year, I decided to bring the most essential of ingredients and utensils so that I can bake some French Baguettes. Also my friend Barbara, ever since tasting my Baguettes had repeatedly asked me to give her a tutorial on how to make them. Because of our busy play schedule during the day, I thought that the Anis Bouabsa formula would be perfect because aside from being a great recipe, it allows me to spend 3 hours each evening over 2 days and we would have fresh Baguettes for dinner.

Baguette 101:

So with Barbara as my Assistant Baker and with a lot of trepidation, I proceeded to show her step by step how to weigh and mix the ingredients, to master the art of the Autolyse, the Stretch and Fold, the Cold Retardation, the Shaping and Scoring and finally the Baking with Steam. Trouble was I was not armed with my usual battery of utensils that I normally use in my baking. No Mixer, no Thermometer, no Couche, no Baking Stone, no Lame, no Calibrated Oven, no Water Spritzer Bottle, no Cast Iron Skillet, no Lava Rocks. Was I doomed for failure?

Au Contraire, Mon Frere! As I proceeded with mixing and working the dough by hand, it developed beautifully and after the cold retardation, I shaped the loaves and proofed them on a perforated baguette pan I brought along that I used  to bake with in my pre-TFL days. I used a plain double edged razor blade to score the loaves. I put a broiler pan in the old electric oven and poured in 1 cup of hot water for steam. The baguettes rose fine, the ears opened up nicely, the crust was crackly, the crumb was open and soft and best of all the taste was fantastic, as good as any I have baked under more ideal conditions. We greatly enjoyed the Baguettes with our Japanese style Bouillabaisse.

 No Frills Baguettes

 Roughing it Crumb

Conclusion:

I think that sometimes we are too dependent on non-essential gadgets. It goes to show that we can make great bread with good ingredients, our hands and the most rudimentary utensils.

Epilogue:

My friend Barbara was so excited about the results that once she got home, she decided to make a batch of baguettes on her own and she sent me these photos.

 Barbara's Outstanding Baguettes

 Barbara's Amazing Baguette Crumb

I would say that she graduated from Baguette 101 Magna Cum Laude!

Don


JoeVa's picture
JoeVa

Golosaria is a "culture and taste" exhibition. A unique event that brings to the fore the very best italian artisans. Every autumn they meet in Milano and Torino, and in spring in Monferrato to show you the most wonderful italian foods. Pasta, sauce, cheese, pastry, beer, chocolate, wine ...


I missed the date in Milano, so I went to Torino the following week (November 15, 2009)... and I went there as "breadaholic" to meet a master baker (Gianfranco Fagnola) and learn more about a famous miller (Molino Quaglia) and his top flour (Petra).

08:00 in the morning, get on the train to Torino (01:40 from Milano). Go straight to P.zza Mestieri Association Palace in "J. Durandi street, 13). Take a look around and stop at Molino Quaglia stand.


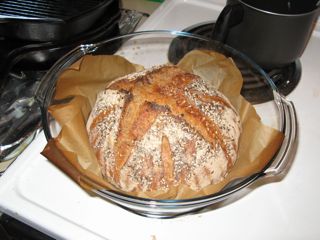
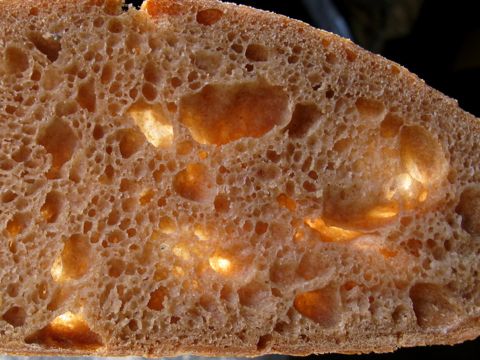
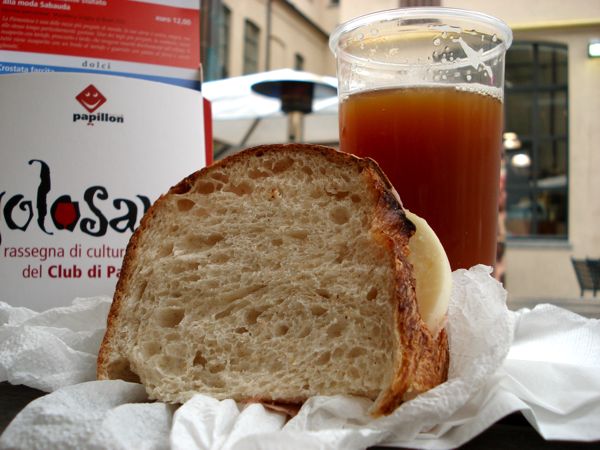
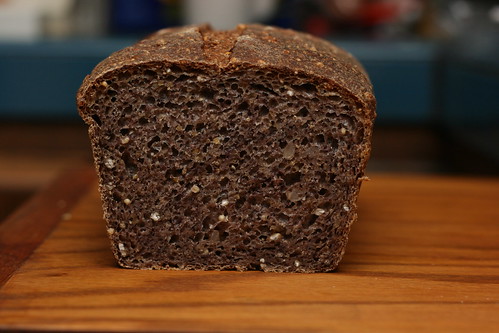
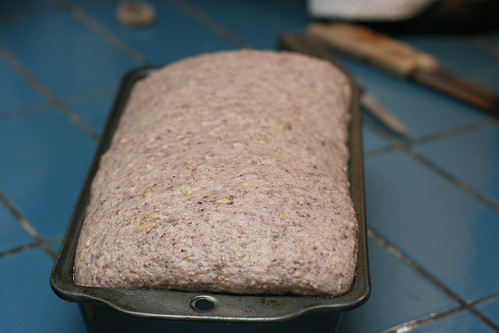
Here I spoke with the technical guy of Molino Quaglia: Giuseppe Vignato. He was really kind and he gave me a lot of information. Molino Quaglia is a big professional Italian miller located in Vighizzolo D'Esta (Padova). They build a "new concept flour": Farina Petra. In the above shots you can see Petra brochures and a loaf of Bread (Pane Bra a naturally leavened bread made with Petra by Gianfranco).

Petra is a stone milled in pureness flour made with the aid of modern technology, exalting the taste of wheat. Petra is made up of blends of selected wheat (most of them are not Italian) in order to give the taste of wheat, the protagonist, to bread, pizza and cakes. Here a few details: classified as Tipo 1 (extraction rate 80%), contains a lot of soluble fiber and the wheat germ, not malted (but checked in enzymatic activity, ie falling number), we do not have alveograph info but maybe >W300, proteins 14%, absorption 70%, milled with special stones controlled with laser technology.
They have Petra1 for bread, Petra3 for pizza, Petra5 for pastry and conTuttoIlGrano; my focus was on 1+3+conTuttoIlGrano. The last one is a whole version of Petra1 with added toasted bran (that's interesting!). Petra is perfect to be used with sourdough and indirect method (poolish and biga).

After the interview I asked Giuseppe to speak with Gianfranco, the baker. He was in the lab preparing all we would need for the afternoon (15:30) public session. So I met Giuseppe, a master and a gentleman! It was a cool experience as there were only three of us in the lab: me, Gianfranco and two baking teachers (the lab is located in the culinary school - Scuola Immaginazione e Lavoro). A lot of Q&A and hand-on tests!

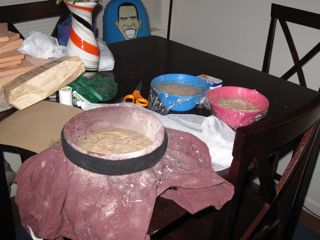
Before lunch we mixed the dough for Pane Petra. (Shots: liquid levain, spiral mixer, mixed dough, Gianfranco put out the dough, Gaetano put the dough in the fermentation cell).


(12:30) Then we had a lunch break. I ordered my hand notes and ate my (Pane Fermento) sandwich with a good red handmade craft beer from the microbrewery. 13:30 back to the lab!


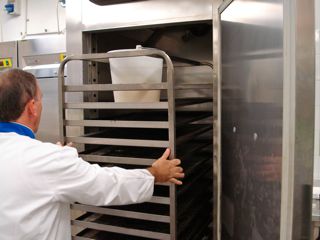
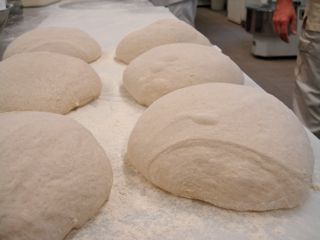
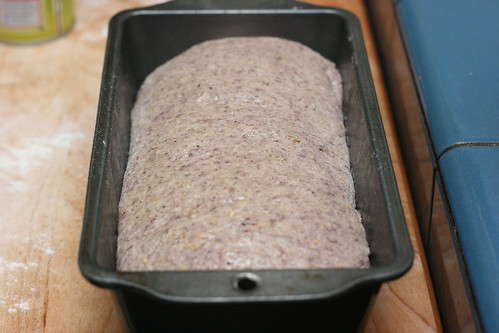
We pre-shaped the loaves, bench rest and final shaping. Back to the fermentation cell. (Shots: dough after bulk fermentation, pre-shaped loaves, Gianfranco shaping, fermentation cell)


In the afternoon the lab opens the doors (there were about 80 persons). Three sessions: bread, pastry and pizza.

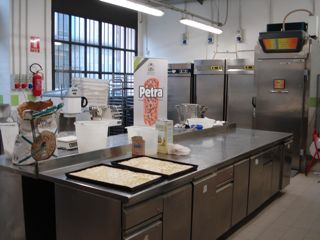
Here some photos of the lab (small fork mixer, small spiral mixer, sourdough temperature controlled machine, pastry ingredients, Petra ciabatta poster, the lab, tools):


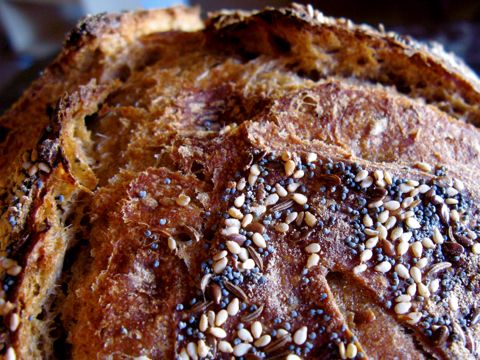
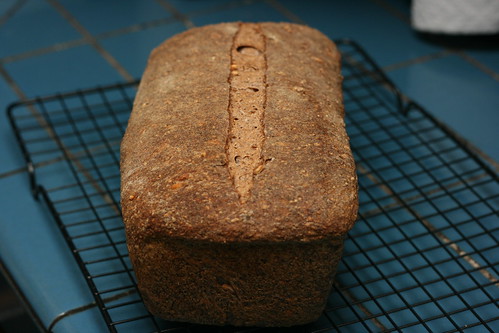
This was the bread session: Gianfranco showed two preferments, we tasted a biga and stiff sourdough, he showed sourdough refreshment and then scoring and baking. He answered to a question about starter activation, but I did not agree at all with him. (Shots: Gianfranco and Gaetano, the stiff mother dough, the refreshed stiff mother dough, scoring the dough, baking).


And now the information you are waiting for.

I think his "school" is the P.Giorilli's one. Gianfranco uses both stiff and liquid levain (the chef), his culture is refreshed 1:1:2 (stiff) and 1:2:2 (liquid) fermented about 04:00 at 28°C then kept stable at 12°C and used within 12:00, he feeds the culture with only white wheat strong flour (the same strong and balanced flour used for Panettone). He doesn't use (and I think he doesn't like) dough cold retardation. He says that he likes mild sourness and I don't agree with him, but after further information on the flavor I like (the French sourdough, Poilane style) he said my taste is elevated and most people in Italy do not accept this kind of flavor.

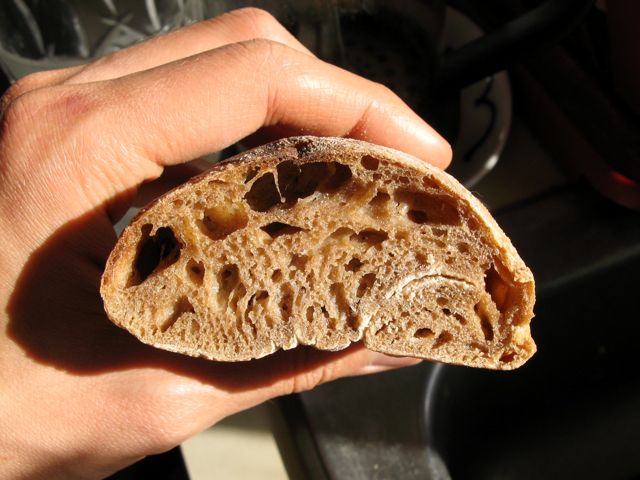
And now Pane Petra. Do not expect something unconventional, it's aligned with our processes.

Overall Formula

Petra1 100%
Diastatic Malt* 0.5%
Water 70-75%
Salt 1.8%

* this is the % for liquid malt.

Preferment

15% of the total flour is prefermented at 100% hydration (1:1:2). 

Dough consistency

Soft.

Desired dough temperature

28°C.

Process

  • Mix all ingredients except salt and malt, hold back 10% water.
  • Autolyse 00:20, then add salt and malt on top.
  • Mix on 2^ speed for about 00:15 and add slowly the remaining water to adjust the dough consistency.
  • Bulk fermentation 01:00 at 28°C 75% humidity.
  • Divide (800g) pre-shape and shape
  • Proof 03:00 at 28°C
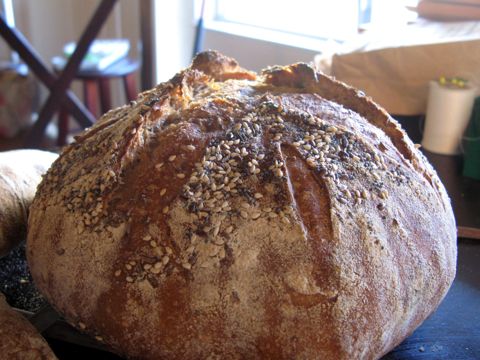
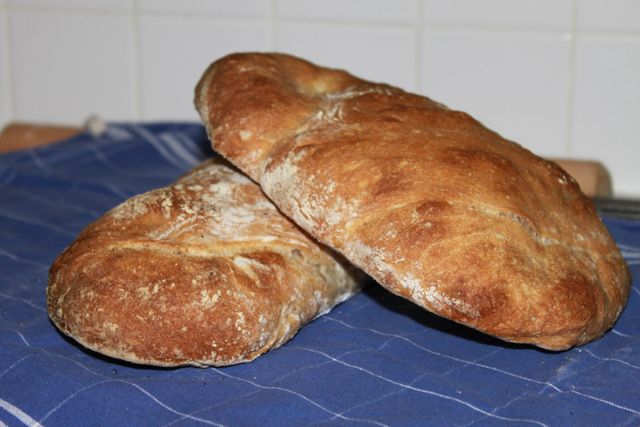
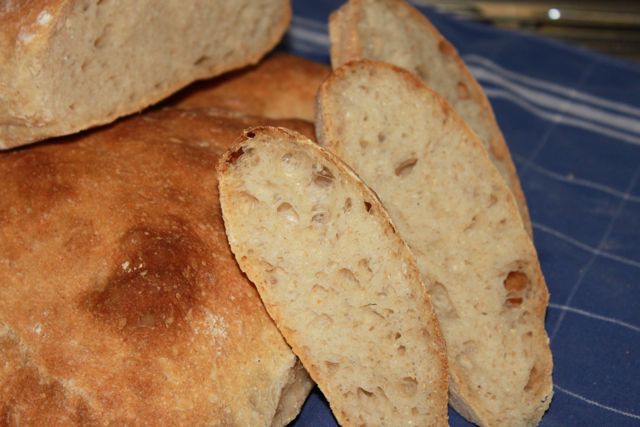
  • Bake on stone at 240°C->220°C for 00:50 / 01:00.

We did not have a good steamed deck oven, so Gaetano advise the use of a big rack oven. The result was good but the absence of the stone and hot deck produced a "small defect" in one loaf, we had a "tunnel"! No one is perfect!


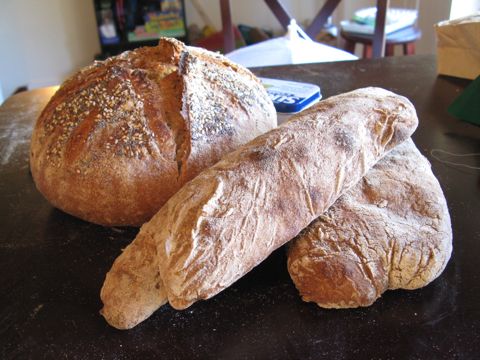
18:00 it's time to go home. And I bring with me a little piece of Gianfranco culture and 620g of Petra1 (this will be used for my "Petra test").


  Gianfranco Bagnola bakery is located in Viale Madonna dei Fiori, Bra (Cuneo).

Giovanni

Mini Oven's picture
Mini Oven

Peter Reinhart's  Thin Wheat Crackers on p.291  in  Whole Grain Breads

My interpretation used Spelt Flour type 700 glatt (fine) with additional 30g flour to the recipe.

Twentyfour hour rest on the counter top before cutting into small shapes and making windowpanes.  Place on parchment and continue to thin out the crackers...  Keep a towel handy to wipe off oil.  If I do this again I will use two tablespoons less oil in the recipe.  I like mine without the salt wash, which does give the crackers a little more strength but the crunch is better without it.

1000 words:

turosdolci's picture
turosdolci

Chestnut fettuccine with toasted pignoli nuts and sage bring out the pasta’s smoky and rustic flavor. Chestnut fettuccine compliments grilled venison and turkey and adds a new dish to your holiday dinner.

Chestnut flour has a very strong flavor and you may want to experiment with different amounts of flour.

http://turosdolci.wordpress.com/2009/09/03/hunting-season-begins-in-switzerland-and-venison-is-on-the-menu/ 


Yippee's picture
Yippee

I tried SteveB's double flour addition/double hydration techniques to make his ciabatta, one of the three beautiful breads I promised myself to learn from some of the most sophiscated, well-respected home bakers here at TFL when I first started making bread back in February this year. Since then I'd tried dmsnyder's baguettes and Susan's ultimate sourdough.  I've always tried my best to emulate the orginal formulas so that my breads would not 'disgrace' the beautiful creations by these bakers.  My ciabatta is no comparison to Steve's picture perfect creation, but at least I can say 'I've tried it'.  Thank you, Steve, for your inspiration of pursuing professional quality breads from a home kitchen.

http://www.flickr.com/photos/33569048@N05/sets/72157622813299190/show/

Caltrain's picture
Caltrain

I'm relatively new to breadmaking and I've been lurking here quite a bit. I think it's about time I made my first post, but since I want to show off my bread, why not make it a blog post?


^ Whole wheat sourdough ready for their overnight retard. Obama lurks in the background, waiting. Some 14 hours later, the boule pops out of the oven.

Lately I've been increasingly obsessed with baking (well, eating) the best damn whole wheat sourdough. WGB got me off to a good start, as did Laurel's but, ehh... something was missing. WGB was an amazing read, but its hearth bread made with sourdough... it was dense, chewy, and not at all what I wanted. The flavor was maybe not the right kind of nutty. So what it came down to was me searching this site inside out. There's quite a bit of valuable information around these parts! This last link also saved my sanity once or twice. :p

There were plenty of flat loafs in between, but I think I've got it.


^Bam.

I used 100% hydration sourdough starter that's ~3 months old. The final hydration was 82%.

I'm happy with how the loaf turned out. The oven spring was far better than I expected. I think the final tweak that made everything "click" was to not flip the dough onto a flat board for scoring, but into a shallow, parchment-lined bowl. The curvature of the bowl angled the dough in such a way that I got a flat surface to score. It made the dough look somewhat deflated and scoring actually harder without the surface tension, but somehow the "liveliness" of the dough was preserved better in the end. I scored the dough, then lifted it out by the parchment and dumped the whole affair into a covered 3.6 quart wide-lipped casserole. The casserole was also another great discovery. I dug it out of a thrift store intending to use the flat lid as a base, but found that using it right-side up gave the loaf juuust the right amount of structural support while still being largely free standing. I baked the loaf at 450 degrees for 30 minutes, and that was that.


^ The crumb.

I also whipped up some 115% hydration dough/batter for a shot at ciabatta.


^ The ciabatta posing with the boule in the back.

Like the round, I made an overnight soaker containing half the final flour and all of the salt and water. The ciabatta soaker was so hydrated that the water and flour gave up and separated into their own sedimentary layers. Not pretty. The next day I added the starter and remaining flour and stretch-and-folded it in the container with one hour rests in between. After the 3rd set of folding, the batter started peel easily from the container and I decided to divide dough into two and placed 'em in the fridge.

I wasn't expecting much of the ciabatta. It was just a side experiment, and the open vent on my aging oven makes steaming futile. I've gotten around on the boule with the glass casserole, but for the ciabatta, I just cranked my oven up to as high as it'll go and chucked in the ciabatta on the tiles for 10-15 minutes. There still managed to be pretty good oven spring.

So, how'd it do?


^ Damn. Either it was under-kneaded or flour simply wasn't meant to be this hydrated.

I ended up getting a cavern, and over-floured it while trying to shape it. Oh well; that didn't stop the bread from being some of the most deliciously airy and fluffy bread I've tasted with just the right tang. Once the excess flour was vigorously patted off, anyways.

So, there you go. If anyone would like the full recipe for the ciabatta, I'd be happy to post it. I'm still tweaking the hydration and so forth.


^ One last shot of the crust. Btw, apologies if the pictures seem washed out, poorly composed, or whatever. I'm not a photographer by any means.

Whole Wheat Sourdough

Soaker grams
whole wheat flour 230 g
salt 4 g
water 340 g
 
Final grams
soaker 574 g
starter (100% hydration)
140 g
salt 3-5 g
whole wheat flour 200 g
 
total 917 g
  1. On the day before:
    • Refresh the starter and thoroughly mix the soaker ingredients.

    • Cover the soaker and let it sit for 12 to 24 hours at room temperature for an overnight autolyse.

  2. Mixing and first rise:
    • Mix all final ingredients. Let the dough rest for 15 minutes, then stretch-and-fold in the bowl to ensure hydration is even. Cover the bowl, and let it sit at room temperature for 45 minutes.

    • I pre-heated an insulated proofing box (a cooler) with a heat pad set to "low". The ambient temperature should be around 90 degrees.

    • Stretch-and-fold the dough 3 times, with one hour rests following each iteration in the proofing box.

  3. Shaping and final proof:
    • Pre-shape, rest 15 minutes, then shape. Place the dough in cloth-lined proofing basket and cover snuggly with plastic wrap. Let the dough rest for 15 minutes.

    • Place the basket immediately in the refrigerator for a 12-24 hour overnight rise.

  4. Baking:
    • Remove the dough from the refrigerator and let it rest for 90 minutes.

    • Meanwhile, preheat oven to 475 F with a baking stone and a covered 3.6 qt glass casserole.

    • Flip the dough into a shallow, parchment-lined bowl. Score the dough.

    • Place the dough in the casserole, cover it, and bake for 30-35 minutes at 450 F degrees.

Pages

Subscribe to RSS - blogs