The Fresh Loaf

A Community of Amateur Bakers and Artisan Bread Enthusiasts.

Blogs

Stephanie Brim's picture
Stephanie Brim

This is what I get for trying a new starter.

This was not sour. I'd love to find out why. Write-up is here on my blog.

100g very ripe starter

944g flour

633g water

20g salt

Seriously, best tasting bread ever. At least to me. But it isn't sour. It's complex. Kinda nutty. But no tang at all.

I think my starter is more yeast than bacteria.

Marni's picture
Marni

The standard sourdough in my house is one posted a few years ago by Susan in San Diego.  I make it at least once a week. I 've been adding or changing it as my whim dictates. This week's version was 1/5 white whole wheat, olive oil and ground flax seed.

Here's the crumb:


They really had quite a bit of oven spring, although they look flatter here.  I doubled everything, and these were large.

I did not retard them, but left them out in a cool (70-ish) kitchen all day. (about 8-10 hours). They were baked on my cracked basalt stone under cover.

I thought the flax would show more, but it blended in. They have a distinctive, but not overwhelming sourdough taste and smell wonderful! 

Marni

txfarmer's picture
txfarmer

Made miche for the first time for the BBA challenge, here's the "cover shot" ;)


I used Golden Buffalo high extraction flour, and followed BBA instruction pretty closely. The only change is kneading method - I don't have the stamina or arm strength to knead 2KG of dough until "passing windowpane", so I just kneaded some and did a couple of french folds during bulk fermentation. Turned out pretty well - dense chewy crumb (as expected with relatively low hydration) and great flavor. I will keep tweaking it though, changing up the hydration level (I usually prefer much wetter dough, but this bread is surprisingly good too) and flour combo.

Went with the siganature "P" scoring mark

Hmmm, "someone" REALLY wants a peice of this bread!

inlovewbread's picture
inlovewbread

I've been baking my way through Hamelman's "Bread". Sometimes I don't always go in order- and right now, I'm stuck on the Sourdough Rye section. I decided to go with the "80% Rye with a Rye-Flour Soaker" (page 213) instead of starting with the first (40%) rye of the chapter. I deviated from the formula a bit as I baked a single pullman loaf instead of the 2 free-form loaves specified. I'm not afraid to shape rye- actually, I'm looking forward to seeing what it's like...but I do like the look of a pullman loaf. Same way I'm attracted to Volvo's, Frank Lloyd Wright architecture and cubism. Seems strong to me, nice lines, and perfect with a strong flavor like rye. If I bake all my future loaves in the pullman pan though, my posts would get very (or even more)boring.... However, my pullman pan was my Christmas gift and I intend to put it to good use :-)

I think this formula was a good starting point. I was going for experience with this loaf, but also to gain a sort of base-line. I want to eventually get to a high-percentage rye that is sweet (with the sweetness coming from the rye itself), very moist, dense and chewy. I'd also like it to include rye chops, cracked rye or whole rye berries as in Vollkornbrot- but I haven't found a good source for any of these yet. I do have Triticale- which genetically is 1/2 Rye. I was thinking of using this in place of rye berries or chopped rye. Not sure- anyone else tried it?

To confess, I have not had rye before. But the pictures in Hamelman's "Bread" of rye loaves were enough to draw me in.

I was pleased with the flavor and crumb of the bread, but not the crust. It was too hard and had to be cut off. Luckily that was easy because of the square shape! Maybe because I baked in in the pullman- the baking times could have been off, and like I said, this was my first try at rye. Crust aside though- this bread was nice.

Moving forward in the chapter, I'd like to try the 3-Stage Detmolder method- to satisfy my sourdough science nerd side I suppose. Sourdough cultures fascinate me, and I'd like to try this method and see what each stage is like. If you are not familiar with this method- basically it's building up your rye sour 3 times to bring about different aspects of the rye sourdough flavor by favoring each cultures preferred growth conditions. Really fun stuff. 

So here's my first rye loaf, waiting- waiting and waiting- wrapped in linen for the full 24 hours before being cut into:

And here's the loaf:

Not the best picture, I know. The holes are from "docking" the loaf as per a recommendation on another TFL thread about rye. I can't remember which one, I've read most, if not all of them recently. I wanted to avoid a hole in the crumb so I docked it. I don't know if it was necessary or not.

I'm looking for any and all comments on rye here. Any suggestions, favorite ryes, good rye for a pullman pan? Anything anyone has to say on the subject appreciated. 

Happy Baking

freefromjane's picture
freefromjane

So just reporting back from the croissant front, it got all rather messy (really my fault though), as the margarine was too soft. But nothing gets wasted so I added more flour, shaped one part of the dough into rolls and the other into a braided loaf. It turned out well in the end, and I'm going to give the croissants another shot.

So below are the rolls made from spelt four (white), soya drink and margarine, topped with poppy seeds. 

And here we have a loaf form topped with sliced almonds. I also brushed the rolls and loaf with egg and soya drink.

SumisuYoshi's picture
SumisuYoshi

Satsuma and Almond Bread

In my continuing quest to stick any fruit I can into a loaf of bread, I wanted to try adding some type of citrus to a loaf of bread. Pears, strawberries, and bananas worked, so why not right? I figured that if I left individual sections whole and was very gentle when handling the dough, they wouldn't add too much excess moisture. That meant I needed to use a rather small citrus, and since I happened to have satsumas around they got the nod. I made from zest from them to put in the dough too, and used an orange olive oil so the bread itself would also carry a bit of the citrus flavor. Almonds seem to pair the best with citrus to me, so I used some slices almonds in the loaves. In the future I don't think I'll use sliced almonds, they don't distribute quite as evenly in the dough, live and learn!


Almond and Satsuma Bread

Makes: 2 medium, or 3 small loaves

Time: Day 1: Elaborate starter. Day 2: Mix final dough, fold dough shape, proof, and bake.

Ingredients:

  Ounces Grams Percent
Starter      
Bread Flour 8 oz 230 gm 100
Water 5.25 oz 150 gm 67%
66% Levain 3 oz 85 gm 38%
Final Dough      
Starter 16.25 oz 461 gm 87.%
Bread Flour 13.5 oz 383 gm 72.9%
Whole Rye Flour 2.5 oz 70.9 gm 13.5%
Kamut Flour 2.5 oz 70.9 gm 13.5%
Satsuma Zest .2 oz 5.6 gm 1%
Water 9 oz 255.1 gm 48.6%
Pear Puree 4.35 oz 123.3 gm 23.5%
Satsuma Sections ~7 oz 198.45 gm 37.8%
Almonds 7 oz 198.45 gm 37.8%
Salt .25 oz 7 gm 1.4%
Orange Olive Oil 1.5 oz 42.5 gm 8.1%
Final Weight      
  64 oz 1816 gm 346.2%


Directions:

  1. Elaborate your starter however you choose, but ending up with the same flour and water weights. (or make a commercial yeast preferment) Allow it to rise overnight.
  2. The next day cream the starter with the water for the recipe, then add in the honey and hazelnut butter.
  3. Mix together the flours, zest, and salt, then mix in the starter, water, and oil til the dough just starts to come together as a ball. Let the dough sit covered in the bowl for 20 minutes
  4. Lightly dust your counter or work space with flour and scrape the dough out. With lightly floured hands, give the dough a stretch and fold and then flatten it out into a rectangle. Spread as many of the almonds as possible over the top of the dough, then give it a fold or two to incorporate them. Once the almonds are incorporated put the satsuma sections on the top of the dough and do two more sets of gentle stretch and folds to incorporate the satsuma pieces.
  5. Leave the bowl covered for 40 minutes to an hour, turn the dough out (seam side up) and give it another stretch and fold, then return it to the bowl. You can also give the dough one final stretch and fold after about 40 minutes.
  6. Let the dough rise until nearly doubled, and turn it out again onto your work surface.
  7. Prepare well floured brotforms, or flour a towel you can use for the final proofing of the bread. Treating the dough gently, seperate it into however many pieces you want loaves. Either shape the loaves into boules, batards, or do a letter fold and stretch them tight for brotforms. Place the shaped loaves in brotforms or on the towels (seam side up)
  8. Leave the loaves, covered, to proof, for me this was about an hour and a half.
  9. Preheat the oven to 500 degrees with your baking stone (on the middle rack) and steam pan inside and heat 2 cups of water to just shy of boiling.
  10. Very gently grab loaves rising on a towel, and move them to a peel with flour, cornmeal, or parchment paper. If using brotforms, just invert the loaves onto parchment or a peel. Just before you load the loaves into the oven give them a few shallow slashes. Load the loaves into the oven and carefully pour the hot water into the steam pan. Be careful of the window and light bulbs in your oven.
  11. Bake for 10 minutes, turn loaves 180 degrees and remove parchment paper if using. Continue baking for another 10-25 minutes, the loaves should sound hollow on the bottom when complete. Remove finished loaves to a cooling rack and let sit for at least 1 hour before cutting.

I think what really made this bread work was the incorporation of the zest and orange olive oil. The weight on the zest is actually a bit variable, same for the satsuma sections, I just used 3 satsumas and all the zest and sections from all 3. The oil and zest really help bring a subtle citrus flavor to all of the bread, leaving the pieces of satsuma as still slightly juicy bursts of citrusy flavor. The satsumas don't get completely dried out, but they do get somewhat concentrated. I can definitely say this is a bread that needs no orange marmalade! The pear puree can be replaced with probably about 3-3.7 oz of water, however I think the puree helps to keep the bread a bit moist and carry the citrus flavors better. I had a little trouble with the stencil on this one, the characters had some 'floating' sections so I had to cut the stencil with small lines connecting those. I need to work on a way to make that look a bit better. Now I just need to decide on a fruit to tackle next...

Some pictures:

Satsuma and Almond Bread

Satsuma and Almond Bread

Satsuma and Almond Bread

Satsuma and Almond Bread

Shiao-Ping's picture
Shiao-Ping

Recently, I was thinking why there are more famous Master Chefs in the world than there are Master Bakers.  A Michelin-starred restaurant cannot have poor quality bread to be earning a Michelin star.  No way.  But the issue here for me is:  Can bread be a stand-alone meal, complete in all its nutrition, but more importantly, in its artistry and flair, technique, and satisfaction, such that once you have it, your body and mind do not desire other food? 

Recently, also, with my post of the apple and molasses Swedish Rye Bread here at TFL and Sourdough CompanionMaedi of Sourdough Companion and I were exchanging views regarding ying and yang of bread.  In his view, ying and yang is manifested in each loaf we made either at the bread level or at how we enjoy the bread (with a topping on it, or with a meal or soup, etc.).  When it is at the bread level, this could include building unique ingredients into the bread to create interesting flavours and textures.  I said that, however, many experienced sourdough bakers seem to go for the "pure" flavor of flour in bread and, therefore, would play with fermentation potentials in flour rather than with the combination possibilities of non-flour ingredients.  On page 145 of Bread, Master Baker Hamelman notes, "... it is my hope that every baker will learn the subtle art of fermentation - the truest skill of the baker - before exploring bread formulas whose ingredients mask the taste of fermented flour." 

I don't intend to make a bigger discussion here than I am capable of.  I can only say that, purist or not, I find both ideas attractive; ie, the idea of trying to let the true flavour of flour shine and the idea of building interesting ingredients into the bread for extra textures and flavours.  This bread is my attempt on both front (fronts?).   So, thank you, Maedi, for your thoughts and for crystalising my thoughts for me.

I wish my daughter were here to read my draft and help me out with whatever needs to be corrected with my grammar and sentences.  She is only gone for a few days but I am already missing her.  The very loud music of Van Morrison streams out of my tea room as I write.  The music energizes me.  I am in love with it and I can feel my heart throbbing, almost painful.  My daughter would enjoy this music too.  The boys are playing golf today.  When they return, they will bring me fish for dinner tonight, as they always do. 
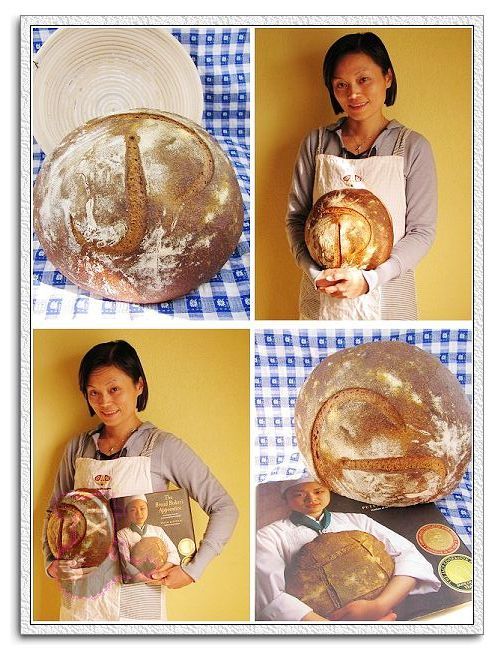
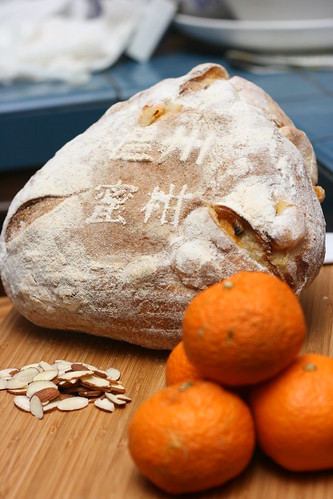
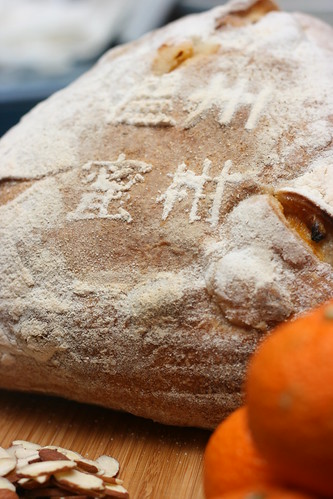
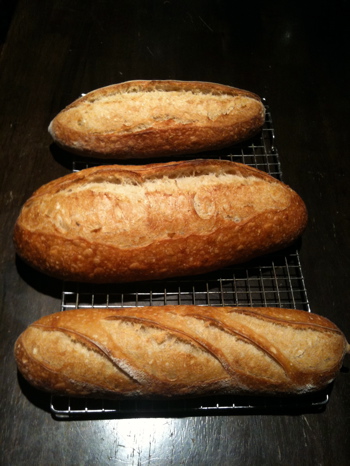
Here is this bread:    


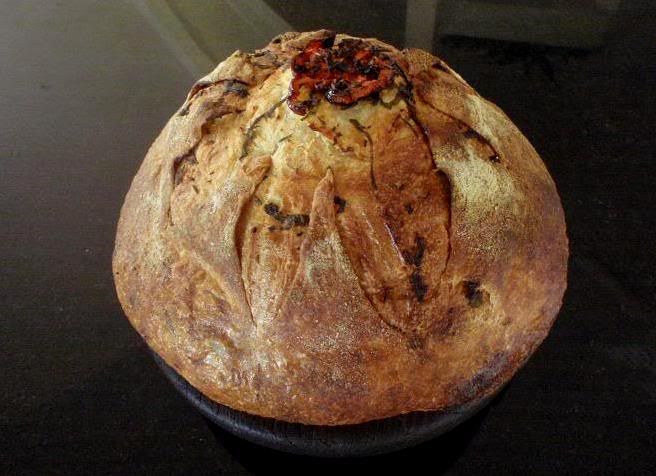
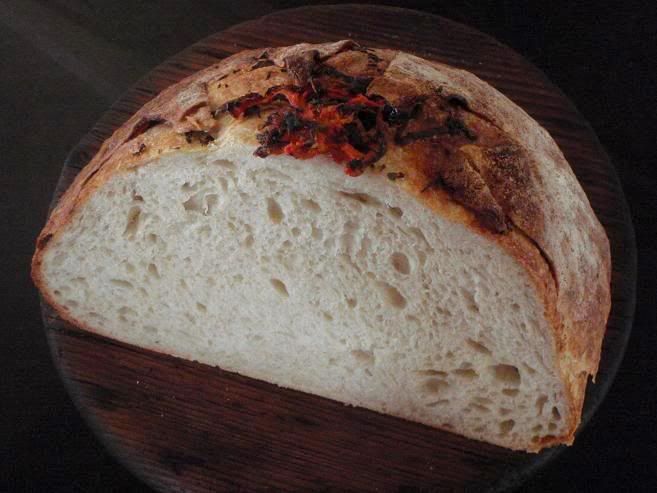
                                                           Pain au Levain with Herbs and Tomato  


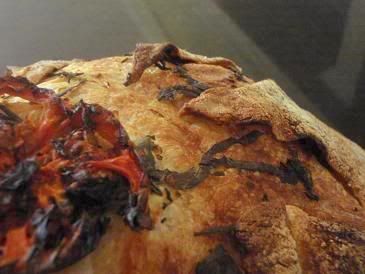
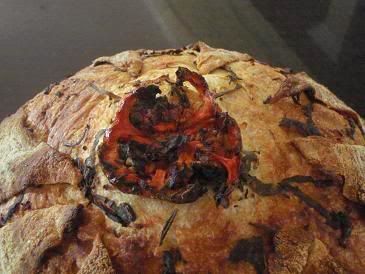
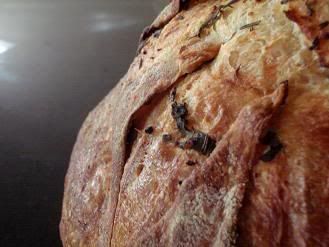
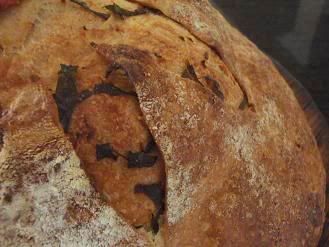
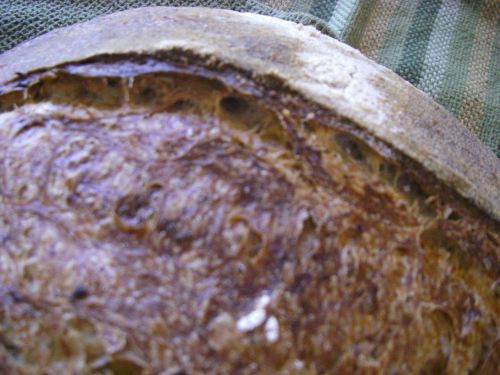
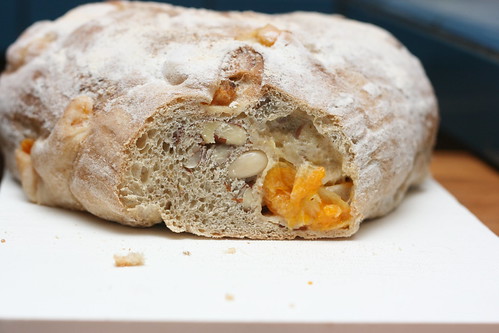
This bread was very satisfying to make.  I was surprised at how much oven spring I got and how open the crumb was, considering that this was a 68% hydration dough.  What has helped me a lot is the understanding of at what stage I should take the starter to mix my dough.  For the pain au levain style of bread that I make, I like to take it as soon as it domes.  If it domes but when I touch it, it "shrinks" and flattens, the starter has gone too mature for me.  No doubt it can still leaven dough, but I don't think it is at its most rigorous.


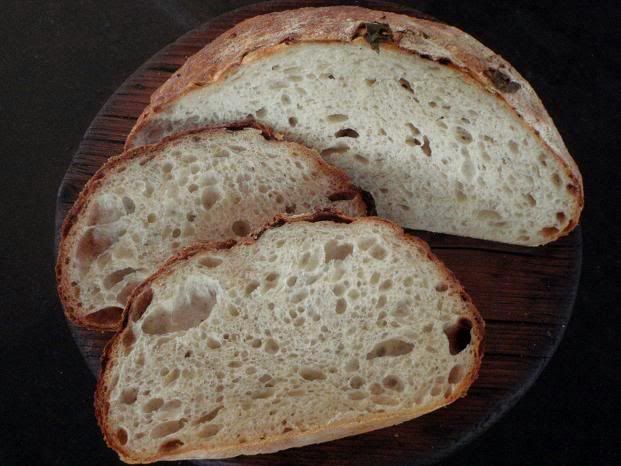
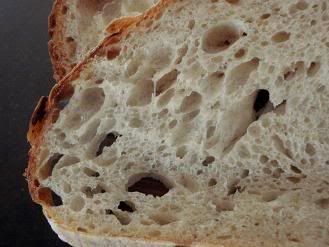
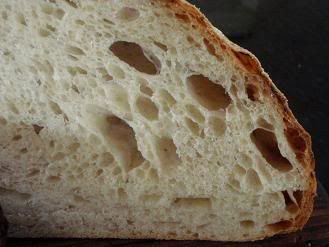
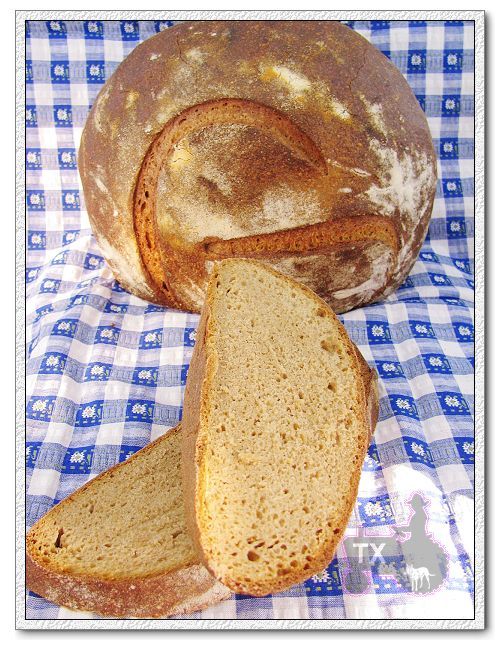
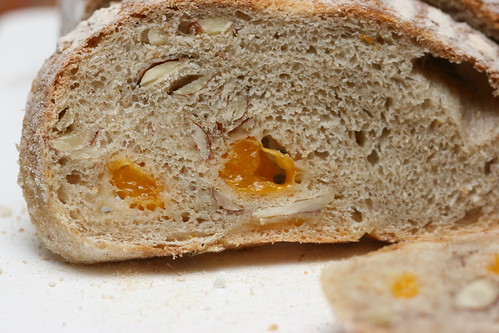
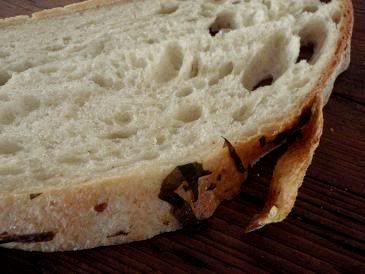
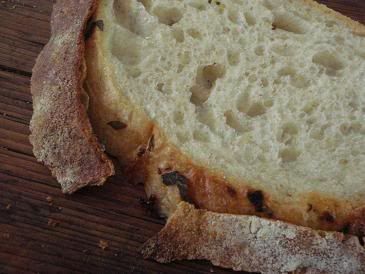
The crumb was beautiful but the lighting at the time when I took the photos did not allow the creaminess in color to show through.  (It is a constant battle trying to have enough light but not too much at the same time to do justice for the color of the crumb.)   The crumb had a very delicate flavour.  The sour tang, while mild, is there.  If I were to change anything, however, I would perhaps increase the rye and whole wheat flour components of the dough from 3% and 6%, respectively, to 5% and 10%, or even higher, in which case the hydration may need to be adjusted.  


My Formula

for the dough

  • 200 g just ripe 75%-hydration starter (30% baker's percentage)
  • 25 g medium rye flour (3% of total flour)
  • 50 g whole wheat flour (6% of total flour)
  • 590 g organic unbleached plain flour
  • 444 g water (if you wish, you can substitute 3 tbsp of olive oil and 400 g water; the olive oil will make the crumb really tender)
  • 13 g salt

for the herb mixture - or any herbs combination of your choice.  Mince the following except the tomato:

  • A sprig of rosemary (about 15 cm in length, no more than 20 cm)
  • Basil from one stalk
  • One clove of garlic (no more, unless you love garlic)
  • 2 - 3 very, very thinly sliced ginger
  • 2 tbsp of olive oil
  • Rock salt
  • One slice of tomato (sliced horizontally)

Total dough weight was 1320 g and overall dough hydration was 68%.


Main points of my method 

  • (1) Mix your dough as normal.  (My bulk fermentation was 3 hours and my room temperature at the time was 25 - 26 C.  I did 4 sets of stretch and folds of 20 strokes each, no more, over the 3 hours period.  When I do my S&F, with each stroke I try to do it gently and slowly so as not to tear the dough.)
  • (2) Prepare the herb mixture and put it aside.
  • (3) When it is time to divide the dough, section off a piece of dough about 250 grams (or 300 g if you wish) and set it aside.
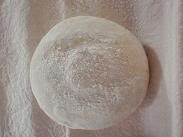
  • (4) Pre-shape and shape the main dough as you would normally for a boule.
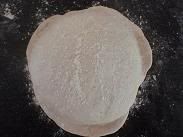
  • (5) Roll out the small piece of dough to a round disc with a rolling pin or with your hands as if you are making a pizza base.


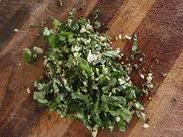
  • (far left) the herb mixture
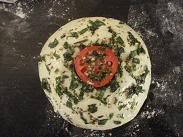
  • (centre left) rub the herb mixture over the surface of the main dough and place the piece of tomato over the top
  • (centre right) place the small round disc over the dough
  • (far right) turn the dough over, tuck in the edges; turn it over again (right side is now up) and lightly tighten the boule (if you try to tighten it too much, the thin layer of dough may break).  Place it on a dusted couche or tea towel (right side up) as in the picture.


  • (6) Proof for 1/2 hour (no more, because by the time all this pre-shaping and shaping is done, 1/2 to 3/4 of an hour is gone by, and that  all adds to the fermentation time).  My room temperature was 25 - 26 C, so adjust your fermentation time if your temperature is different.
  • (7) Place the boule in the fridge for overnight retarding (from the time I started dividing & shaping to the time my boule was sent to the fridge, it was one hour.  I did 15 hours retarding.  Anywhere between 8 hours and 24 hours is fine.
  • (8) Bake with steam at 230C (no higher as the oil on the inner surface of the dough may burn too quickly if the temperature is too high).  I baked it for 40 minutes.  (For the last 8 - 10 minutes, I had to drop the temperature to 210C as the crust was already getting good color.)


This levain bread was fun to make, satisfying for my mind and body -


As I was finishing the draft for this post, my husband walked into my tea room with a bottle of Mt Pleasant single vineyard Lovedale 1996 Semillon, his favourite.  I decided the fish would have to wait for another night.  For now, all that I can manage is this -


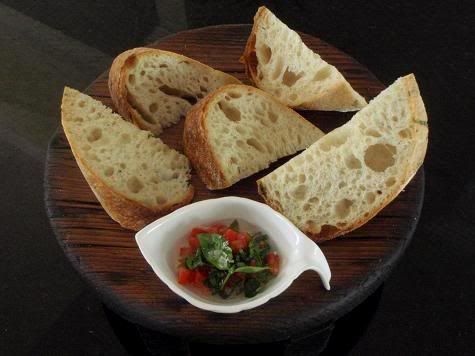
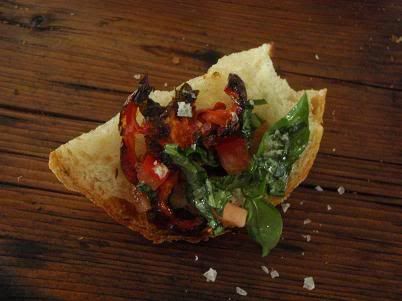
A piece of today's bread with tomato, basil, olive oil, and Margaret River pink rock salt from Western Australia


A satisfying day for my mental and physical indeed.


Shiao-Ping

freefromjane's picture
freefromjane

This is my first blog, so I joined the website a couple weeks ago, already tried a few recipes and I'm joining the chorus of gratitude, thanking everybody for sharing their lovely recipes. My aim is to put up a few recipes myself. Just a little bit about my baking, as I'm on a wheat and dairy free diet, I adjust pretty much every recipe to my own needs, so far it worked. Phew! But I haven't baked much with yeast, my regular bread would be made with baking powder, quite nice.(Will put the recipe up soon). So now I can't wait to try out more of the lovely things that I found on this site. 

I made a lovely basic white spelt bread this morning, Crust was lovely and very tasty with strawberry jam.

For now my next project is to make croissants, already have the butter chilling in the frigde, will report back with further results.

Arbyg's picture
Arbyg

Hello all,

This is my second bread post on TFL and I'm loving this site!

I would like to thank everyone for sharing their breads because it's getting me excited about bread again. I have been out of the bread business for 3 1/2 years and this site has motivated me to make bread again. I am sure it will lead me back to my passion. The starter I used here is 100% hydration made from dark rye that was later replaced with white flour. I learned this starter from Hammelman which I attended his course over 12 years ago. I feed it in small quantities in morning then later before bed. Simple recipe enjoy.

1000g bread flour

35% starter

2%salt

69% total hydration

Mix for 3min slow speed let rest for 15min mix med speed 3min

Fold after 20 min twice then again 1 hour later, proof until double divide let rest for 30-45 min then shape

I like to retard my dough for 8-10 hours but make and bake makes great bread as well

I bake at 450 10 min then reduce to 410 for about 35 min

I have not experimented with much of the elaborate steaming techniques found on this site, so I just dump two 1/2 cups of ice cubes during first 10 min 

occidental's picture
occidental

I recently baked Pain au Levain from Hammelman's book 'Bread..."  This is the second formula I've tried from this book, following two fairly sucessful attempts at Vermont Sourdough.  There are a few differences between the two.  Vermont SD starts with a liquid levain while PaL starts with a stiff levain.  Hammelman calls for whole rye in Vermont SD while calling for medium rye flour in PaL.  Also, a long final ferment is called for with Vermont SD while it is recommended not to go for the long ferment with PaL.  I didn't vary from the formula and had pretty satisfactory results.  I also had good results with a new brotform following a previous episode where the dough stuck and I ruined a couple loaves a week or so ago.  Here are a couple pics of the look of the loaf and the crumb:


From bread

From bread

I've just run across the roasted garlic levain on page 183 and am thinking that is going to have to be one of the next attempts. Have any of you tried this formula?

Pages

Subscribe to RSS - blogs