The Fresh Loaf

A Community of Amateur Bakers and Artisan Bread Enthusiasts.

Blogs

darren1126's picture
darren1126

I'm new to baking bread and have a question about density. I have baked the bread from the recipe provided in lesson 2. This has turned our great several times, but, I'm wondering what the trick is to making it less dense. I'm looking for a good bread to use for Sub's.


Thanks,

Darren

ehanner's picture
ehanner

This is a bread that I have been wanting to try for some time. Jeff Hamelman did a great job of presenting it in his book, "Bread" and the story that goes with how he learned about it is heart felt. This style of bread is a long way from just about everything you might be familiar with. It isn't airy and light. It doesn't have a beautiful crust in the traditional way we usually think of a nice golden color, expanding at a well placed slash. What it is, is a compact, almost waxy mass of slowly baked rye and wheat dough in a high hydration formula. It is baked in a covered Pullman Pan with straight sides for 12 hours at slowly reducing temperatures.

Before I attempted this bread, I looked at txfarmers thread from last year where she posted about her attempt and learned a lot about the process. If you are interested in baking this, I suggest reading this thread first.

I had the opposite results as far as rising during baking as txfarmer. I apparently had to much dough in the pan and although it had risen to within 1/2 inch of the lid during proof, I checked after 1 hour of baking to find the lid had been blown off the pan. Hmmm. I got my trusty serrated bread knife and sawed the dough level with the pan top, replaced the lid and pretended like that was part of the plan.

To back up a little, Hamelman says the bake time should be around 12 hours but that includes some time in the oven after it is turned off. I didn't get a good feel for how much time at what temperature so I improvised a little.  I preheated my fire brick in a pan I use for steam, the stone I sometimes use and a 1/2 box of unglazed tiles in a 350F oven. I figured the additional thermal mass would give me a slowly cooling environment similar to a WFO or a big commercial oven like Jeff has to play with.

There are a lot of variables on the path to a great Horst Bandel. It took me a while to get the required rye components together and the Pullman Pan on the same day. I used freshly ground whole rye, rye meal and rye chops from flourgirl51 and her wonderful Organic grain/flour mill. Surprisingly the various forms of rye are hard to come by here in the upper Midwest of the US. When I discovered I could get everything from one known source, I got myself into gear and started the ball rolling to learn this bread.

Here are a few images I took as an after thought after the bake. I'm very happy with the results of my first attempt but there is room for improvement. This isn't rocket science but, it is chemistry. I went pretty much by the book and got a good result. I plan on adjusting the volume of dough, baking temp profile and cooking of the whole berries on the next attempt.

If you try this bread, you must be prepared for a flavor experience that is so full I would call it "adult". If you appreciate fine smoked meats and fish, capers or black caviar on cream cheese or dry butter, then this is for you. It is that good.

Thank you Jeffrey. And thank you Mini and txfarmer for your assistance.

Eric


AW's picture
AW

After much searching for a whole wheat sandwich bread that would be soft yet nutritious, my friend Ben shared this recipe with me. Ben and his mother have perfected over the years and given us some choices on substitutions for ingredients, which is so nice.

I think the texture and crumb are simply perfect. The dough can also be nicely worked up into individual soup rolls, though I have to say that I much prefer it as a sliced loaf. If you'd like a step-by-step show of this friend me on FB.

___________________________________________________________________

Whole Wheat Sandwich Bread

From Ben Chaffee

Makes 2 loaves (8-1/2" by 5-1/2")

1 package active dry yeast or 1 cake compressed yeast (2-1/2 tsp)

1/4 cup water

2-1/2 cups hot water

1/2 cup brown sugar (can interchange honey or molasses 1:1 for brown sugar)

3 tsp salt

1/4 cup shortening*

3 cups (374 g) stirred whole-wheat flour

5 cups (663 g) stirred all-purpose white flour           


  1. Soften active dry yeast in 1/4 cup warm water (110°) or compressed yeast in 1/4 lukewarm water (85°). Combine hot water, sugar, salt, and shortening; cool to lukewarm.
  2. Stir in whole-wheat flour, 1 cup of the white flour; beat well.
  3. Stir in softened yeast. Add enough of remaining flour to make a moderately stiff dough. Turn out on lightly floured surface; kneed till smooth and satiny (10 to 12 minutes).
  4. Shape dough in a ball; place in lightly greased bowl, turning once to grease surface.
  5. Cover; let rise in warm place till double (about 1-1/2 hours). Punch down (or fold). Cut in two portions; shape each in smooth ball. Cover and let rest 10 minutes.
  6. Shape into loaves.† Place them in greased 8-1/2" by 5 2-1/2" loaf pans. Cover with a damp towel. Let rise till double (about 1-1/4 hours).
  7. Bake 375° for 45 minutes. When tapped, the bottoms of the loaves should have an almost hollow sound. Cover with foil last 20 minutes, if necessary.


*Other fats, such as vegetable oil or butter, can be used 1:1 for the shortening.

Place dough on counter. Press out large bubbles and gently form each dough ball into a rectangle. Ensure the shortest side of the rectangle is approximately the longest size of your loaf pan (8-1/2"). Roll up the dough. Pinch the seam closed. Tuck open sides down and under. Place in loaf pan.


Whole Wheat Sandwich

Yippee's picture
Yippee

This year is the Year of Tiger.  It’s a tradition for Cantonese to make cakes for the Chinese New Year.  The pronunciation of cakes, which is ‘GO’, is the same as the word ‘tall’ in Cantonese.  Seniors in the family like to wish their grandchildren grow tall and healthy (快高長大) in the New Year.  Therefore, cakes are an indispensable part of the Chinese New Year celebrations. 


We make all sorts of cakes, sweet and savory, from rice or glutinous rice flours.  My favorite is radish (daikon) cakes.   You’ll find them where dim sum is served in a Chinese restaurant or they are sold pre-packaged in a Chinese grocery store when it’s close to the Chinese New Year.  But let me tell you, these are no comparison to the homemade ones. For the ones money can buy, they are usually made with a very high proportion of flour and very little radish and other ingredients.  Therefore, these cakes often turn out very hard and have very little flavor. 


Before the New Year, I usually prepare a very fancy version of daikon cake which consists of Japanese dried scallops(瑤柱), dried shrimps(蝦米), Virgina ham (金華火腿), Chinese style cured and smoked ham(臘肉), Cantonese style sausage(臘腸), plenty of shredded daikon and a small amount of rice flour. The mixture of all ingredients is steamed for about 45 minutes and let cool on wire rack.  During the New Year, we normally lightly pan fry the cake before enjoying it. It is crispy outside with flavorful seafood and meats.  Instead of the usual gumminess you’ll experience from store-bought daikon cakes, the mouthfeel of the inside of this cake is moist and soft, with the fibrous chunks of shredded daikon coming apart.  With all the ingredients, it’s a big, tasty meal in itself and I like to dip it with Lee Kum Kee (李錦記) chili sauce before serving.


I must give credit to my husband for his efforts to assist me in the preparation of radish cakes this year.   He took on the role of dicing and weighing ingredients and shredding the radish, which are the most time consuming parts of the process.  He wanted to do this with me so that we can spend more precious time together.  I truly appreciate his thoughts and prepare many good foods in return. The radish cake served today was pan fried and pictured by my husband as well.    


As a parent, I too wish my children grow tall and healthy after eating my radish cake, the ‘GO’, and have a head start in the New Year.


http://www.flickr.com/photos/33569048@N05/sets/72157623330067415/show/

zoltan szabo's picture
zoltan szabo

Hello to everybody,

I would like to share with you guys my todays bread. I used 100% hydriation sourdough and ground caraway.


Formula:


ingredients

% quantity mea need mea
Flour 100% 375 gr 375 gr
Water 66%   gr 247.5 gr
Starer 34%   gr 127.5 gr
Salt 2%   gr 7.5 gr
Oil 2.5%   gr 9.4 gr
Total          

 Plus 1 level teaspoon of ground caraway seed.

I mixed together every ingredients yesterday , then today morning i knead it back, then placed into a floured banneton. I left to proof for 3hrs then baked in 220C oven for 30 min. rested on wire rack.

The crust is a wee bet chewy but a bit crunchy(if this makes any sence).

happy baking! zoltan

txfarmer's picture
txfarmer


Got this idea from "Flavored Breads: Recipes from Mark Miller's Coyote Cafe", it reconstructs the classic pastrami on rye sandwich, and makes the ingredients (pastrami slices, onion, mustard, cream, milk, and rye) into a flavorful bread. However, the book only has volume measurements, and the ingredient ratios look rather "interesting" as the result. If I assume 120g of flour per cup, I end up with a 89% hydration level, without counting that 1/2cup of yellow mustard! So I basically changed up the ingredients ratio according to my preference, and turned the bread into a sourdough one too. 

100% starter, 200g

bread flour, 200g

rye flour, 180g

milk, 120g (I used nonfat)

heavy cream, 120g (it add some richness to the bread, just like Russian dressing does to a traditional pastrami rye sandwich)

butter, 28g

salt, 2tsp

mustard, 1/2 cup (I used yellow mustard I had on hand, but the book recommends half Dijon half whole grain mustard, I will try them next time, I image the flavor will be different)

brown sugar, 1tbsp, packed

pepper, 1tsp

onion, 2tbsp, diced (I used some caramelized onion I had on hand)

pastrami, 113g, cut into thin slices


- Mix together everything but onion and pastrami, autolyse for 20 minutes.

- Knead until gluten starts to develope, then knead/fold into onion and pastrami. It's a bery stick dough, and my hands were a nice shade of yellow.

- Bulk fermentation for 3.5 hours, S&F at 30, 60, 90 minutes.

- Shape into a batard (a big one, over 2lbs, I was too lazye to divide it), put into a brotform, cover and into the fridge it goes.

- 2nd day (15 hours later), take out and finish proofing (about 100 minutes)

- bake at 430F for an hour, steam for the first 15 minutes as usual.


Pretty decent ovenspring and bloom considering all that rye flour, and pastrami


Moist crumb, very flavorful. Mustard taste is very noticable, which I like, and I think a better quality/flavor mustard would enhance the bread even more. Pastrami and onion also play dominant roles in the taste.Not the most open crumb, but expect from a rye bread with so much fillings.


We all like this bread, tastes great, a meal in itself. The book has other intersting flavor combos that I want to try, but I probably won't use the exact formulas from it.

bakinbuff's picture
bakinbuff

I decided to try making a savory olive bread using my usual sourdough recipe, and just adding herbs and chopped Queen olives.  I would occasionally buy an olive baguette from our nearest supermarket, until they stopped making them.  It was a good thing I only bought them occasionally, they were delicious and somewhat addictive.  Anyway, having enjoyed getting the hang of basic sourdough bread, I decided this would be the perfect base for an olive bread.  Because I have lots of fresh Rosemary growing in the garden, that seemed like an obvious and delicious addition, and who can eat Olives and Rosemary without a little Oregano?  Anyway, I mixed it all up yesterday morning, let it triple over about 4 hours, shaped and popped it in the fridge.  I re-shaped just before bed, and baked this morning.  All I can say is YUM!!!  I don't know whether this loaf will make it past today...


Recipe and Method:

1 Cup of high hydration starter directly from fridge

1 Cup of freshly ground whole wheat flour

1.5 Cups of strong White Bread Flour

1 scant  tsp salt

Handful of pitted sliced Queen Olives

Handful of finely chopped Rosemary

Pinch of Oregano

1 Tbsp Olive Oil

A few splashes of warm water


I mixed everything up in a bowl with a stiff plastic spatula, then turned it out and kneaded for 10 minutes until smooth and elastic.  Placed back in oiled bowl and covered with clingflim, and left in a slightly warmed oven for 4-5 hours.  By then it had nearly tripled so I shaped into a boule, placed on parchment paper on a baking tray and put in the fridge.  Reshaped at 10pm and put back in the fridge.  Took out of the fridge and turned on the oven with roasting pan and stone inside at 8am.  Baked in preheated oven under the roasting pan for 20 minutes at 250C, then reduced temperature to 190C, removed roasting pan and baked another 15 minutes.  I let it cool on the counter and cut when just barely warm.  Yum yum yum!  Will try REALLY hard to wait until lunch to eat another slice......


koloatree's picture
koloatree

Greetings all,
Last week I tried the Portuguese sweet bread from the book titled "Bread and Pastry" by Micheal Suas. All I can say is that it is pretty darn good! I highly recommend it.

Question, I noticed that the dough can double its original size 4 times. However, I baked after the dough doubled in volume from its final shape. Would it be better to wait till the dough doubles its original volume 3.5 times?

The following is the formula.

Preferment

  • bread flour
  • water 192%
  • yeast 32%
  • milk powder 90%
  • sugar 45%

ferment for 1hr at 70 degrees

final dough

  • bread flour
  • water 40%
  • eggs 15%
  • yeast .4%
  • salt 1.29%
  • sugar 30%
  • butter 14%
  • sponge 35%

Mix all, wait till doubled in volume, shape, wait till doubled in volume, bake!

I baked with convection, a little steam, at 380F for 20-30mins. I also did a quick egg wash on 2 and sprinkled a little raw sugar. I plan on making a cinnamon sugar version and another one with fruit and nuts.


extra chunky chocolate chip cookies. (http://allrecipes.com/Recipe/Best-Big-Fat-Chewy-Chocolate-Chip-Cookie/Detail.aspx)


Chausiubao's picture
Chausiubao

So I'm writing a recipe for everyone. Its intended so that anyone, regardless of experience can try to make bread. So far, I've been told that the recipe reads as a technical document. As yet, I'm not sure if thats a good thing or a bad thing. 

But please read and tell me if its not detailed, too detailed, or in general too wordy.

--------------------------------------------------------------------------------------------------

4.00 Cups Bread Flour
1.00 Cup Water
4.00 Tbsp Water
1.00 Tbsp Instant Yeast
1.00 Tsp Salt
3.00 Tbsp Melted Butter

Notes:

Bread flour has protein content of between 11-14%, the bag should say which, but all purpose works too (generally the more protein the better)

Instant yeast can be mixed directly in with the flour, bread machine yeast works, but if all you can get is active dry yeast use 1.5 tablespoons, and proof it in water with some sugar first, it should bubble (use some of the water you have measured for the bread).

Water at around body temperature is great, around 80-90F (25-30 C), but any hotter and you risk getting the water too hot for the yeast. Use your finger as a thermometer (finger test!), if you can't tell if the water is hot or cold, use it.

(the instructions to this recipe may seem long, but I am describing everything from start to finish in as much detail as I can, really the process is quite simple)

Procedure:

1.) Melt your butter.
2.) Measure out all your ingredients. Mix the flour and yeast in a large mixing bowl, then mix in the salt.
3.) Pour the water and melted butter into the mixing bowl on top of the dry ingredients.
4.) Using one hands, scoop and fold the ingredients in the bowl; with the other hand continuously turn the bowl.

After a few minutes the dough will come together into a sticky mass.

5.) Turn the dough out onto a table and knead the dough by stretching it away from you and folding it towards you.
6.) Seal the fold by pushing the dough against the table.
6.) After sealing the fold give it a quarter turn (turn it 90*) and repeat until the dough is smooth and tacky.

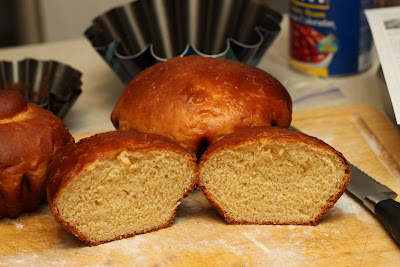
You will know the dough is finished when it is smooth, and just slightly grabs your fingers (tackiness). By this time your hands should be no longer covered in dough (the gluten has settled).

7.) Cover the top of the dough with plastic wrap to prevent oxidation, and boil a small pot of water
8.) Put your mixing bowl into a turned off oven, put the steaming pot of water below it
9.) Let the dough ferment until it has doubled in size (this takes about one hour)
10.) Take the dough out of the bowl and divide it into sixteen equal sized pieces

11.) Beat one egg with salt to make egg wash.
12.) Line a baking pan with parchment paper (dusting with semolina flour, or oiling up the pan also works)
13.) Lay the dough onto the paper seam side down, and brush it with egg wash
14.) Boil some water in a small pot; cover the dough with plastic wrap
15.) Put the baking pan in the oven (with the oven off) along with the steaming water for about 15 min

Press Test: press the dough, it should spring back halfway, thats when you know its proofed

16.) Preheat your oven to 400 F, bake the rolls until they are well browned and sound hollow when thumped

When baking, you must always bake it until it is done!

17.) Let the dough cool before cutting into it

-------------------------------------------------------------------------------------------------------------------------------

Thanks

--Gabriel

droidman's picture
droidman

I've been working on this one for quite awhile. The original was a variation on the Basic Sourdough in the Bread Baker's Apprentice. Between trying different proportions of the ingredients and consulting the good advice on The Fresh Loaf, I've arrived at this version, which I'll probably stick with for awhile. I've pushed it up over 75% hydration, so I've had to switch from kneading to stretching-and-folding. 

Have also solved problem of oblong boules by turning them out of the bannetons onto small sheets of parchment, instead of sliding directly off the peel. Don't know why I didn't think of this before. Saw it in DMSnyder's educational scoring video and had one of those forehead slapping moments. Still need to work on my scoring...

Regarding the goat milk: I've tried this recipe with whole milk and half-and-half, and have to say that there's something about the goat milk that I cannot put my finger on... I want to say that the flavor is more creamy, but I don't know if that makes sense. 

Firm Starter (biga)

  • wild yeast starter (75% hydration) [200g]
  • bread flour (Dakota Maid) [163g]
  • water [92g]

Final Dough

  • bread flour [617g]
  • whole white wheat flour [127g]
  • sea salt [20g]
  • goat milk scalded then cooled to room temp [307]
  • water at room temp [307]

Steps

  1. Mix up firm starter, mist with spray oil, cover bowl with plastic wrap, let rise for approximately 4 hours until doubled.
  2. Refrigerate overnight (12 – 18 hours).
  3. Remove starter from fridge and set on oil-misted countertop. Cut into multiple small pieces, separate, mist with spray oil, cover with plastic wrap, and allow to warm to room temperature (a couple hours).
  4. Mix final dough. If mixing by hand like I do, you'll probably have to turn it onto the counter and knead a couple minutes to make sure starter is fully incorporated.
  5. Cover and wait 10 minutes. Then do a series of 4 stretch-and-folds, every 10 minutes or so. 
  6. Allow to rise for 3-4 hours until doubled.
  7. Cover tightly, and refrigerate overnight.
  8. Remove from refrigerator and allow to warm up a couple hours. 
  9. Gently remove dough from bowl, shape into two boules, place in floured bannetons, lightly mist bottom with spray oil, cover and proof for at least four hours.
  10. Preheat oven containing bread stone and steam pan to 500 degrees at least one hour before proofing is complete.
  11. Sprinkle semolina on bottom of loaf, then flip over onto piece of parchment paper on peel. Score loaf as desired.
  12. Pour one cup of water into steam pan.
  13. Slide onto baking stone.
  14. Bake until internal temp is nearing 205 degrees, 15-25 minutes.


Pages

Subscribe to RSS - blogs