The Fresh Loaf

A Community of Amateur Bakers and Artisan Bread Enthusiasts.

Blogs

hanseata's picture
hanseata

I had a visit by a rep from my wholesaler, Downeast Food Distributors, who left a sample of a new gluten free bake mix to test some bread and pastry recipes. It consists of a mixture of rice flour, potato starch, sugar, salt and 5 different gums plus methylcellulose. This chemical array is necessary to enable the bread to rise at all and not fall apart.
I haven't tried it, yet, but I don't envy those poor people with celiac disease. I could go without a lot of things, but living without bread? Apart from that they have to pay a lot for gluten free goods: a 5 lb bag of bake mix costs 40 - 50 bucks - wholesale!

hanseata's picture
hanseata

Last week I had bad baking karma. On Monday I wanted to make Broetchen, the deceptively simple, crispy, white roll, as German as baguettes are French.
After several trials that never yielded the soft, fluffy, "pull-out" crumb typical for Broetchen I finally got it right with Italian 00 flour (from "Micucci" in Portland). But would simple American pastry flour work, too?
I made a beautiful looking batch, sprinkled with sesame, poppy and sunflower seeds. It went into the oven, I set the timer and started tidying the kitchen. The smell of something burning did not bother me at first, I thought it was some spill on the oven floor.
But the nasty smell grew stronger, and an anxious look into the oven showed a sheet full of charcoals instead of cute golden rolls. Even though not even half of the baking time was over, my rolls were completely burnt. The LED display showed the right temperature, so it must have been a short in the oven's electronic brain - or was it simply a bad bread day...?
Tuesday I tried a new bread - "Wheat Almond Bread", adapted from one of my German baking books. This time the oven meekly supplied the right temperature, and the loaves came out just right, golden brown, and smelling wonderful.
One was for Aaron and Lynn from Richard Parks Gallery, my cheerful part time employers. Their bread was ready to go, but I was distracted and forgot the bag in the hallway. We were not even down Cottage Street when I realized my mistake and went back.
I opened the door, and Buffy the Chow Hound ran upstairs - always a sign of a dog fleeing its owner's rightful wrath. Brown paper pieces littered the floor - but not even a crumb of the Almond Bread. It had been completely wolfed down, in less than five minutes!
I was still steaming when Richard, the best of all husbands, suggested that I might just see it from a different point of view: the Almond Bread was excellent - Dog Approved!

ejm's picture
ejm

These rings (based on the recipe for 'Greek Sesame Galettes (Κουλούρια)' in "Mediterranean Street Food" by Anissa Helou) were baked in the barbecue.

Sesame Twisted Rings - May 2010


It was hot in the kitchen. It was noon. But I mixed the dough anyway. And because it was so ridiculously hot , it was ready to be baked by dinnertime. We baked the rings in the barbecue.

We had the rings with grilled pork, beet tops, green beans and oven-roasted potatoes last night. And this morning, we had them for breakfast with Monforte "Don's Blue" ash chèvre and really good coffee. I can’t decide which way was more delicious.

Many thanks to Anissa Helou for this wonderful recipe. (I have just one small quibble: what is it with recipes that do not include water in the list of ingredients?! I hate having to read the instructions to find out how much water to use.)

-Elizabeth

(further details and my take on Helou's recipe: Sesame Twisted Rings)

Marni's picture
Marni

My wrist was declared healed about two weeks ago, and I am thrilled to be able to stretch and fold (both in the bowl and out) and shape two handed again!

Here is one of loaves I made first:

This is the 1,2,3 formula with the addition of dried rosemary which I soak in warmed olive oil.  I add both the rosemary and oil to the dough late in the first mixing.  This is one of my favorite breads.

txfarmer's picture
txfarmer

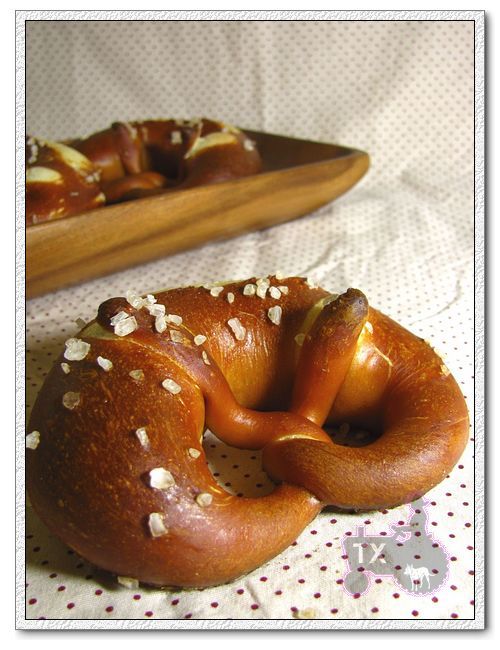
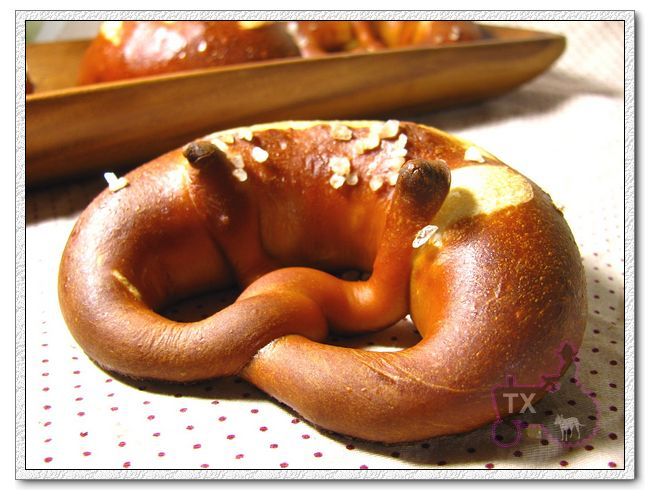
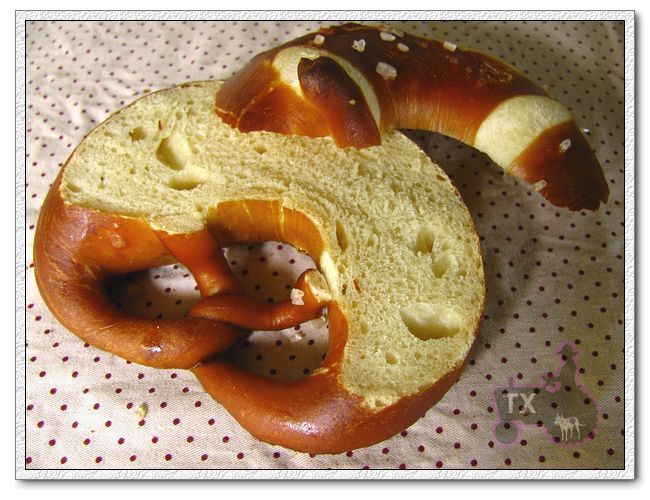
I posted a few days ago asking why my lye pretzels are not dark enough, after much reading and some experimenting, I think I figured out why. After I mixed up the lye solution, I didn't let it sit and completely dissolve, so the solution was too weak. The first time, I mixed and dipped the dough right away. This time, I mixed up a 3.5% lye solution (between 3% and 4% is good, the higher the darker, but don't go beyond 4%) with room temperature water, let the solution sit at a safe place for 15 minutes, slowly stir for the first few minutes. The solution heated up at first, then started to become clear and cooled down. After that, dip the dough for 30sec each, bingo, this time I got the color and shine I want. The devil is in the details huh?!


Also made some other shapes, I think they look cute with wide open scoring marks.

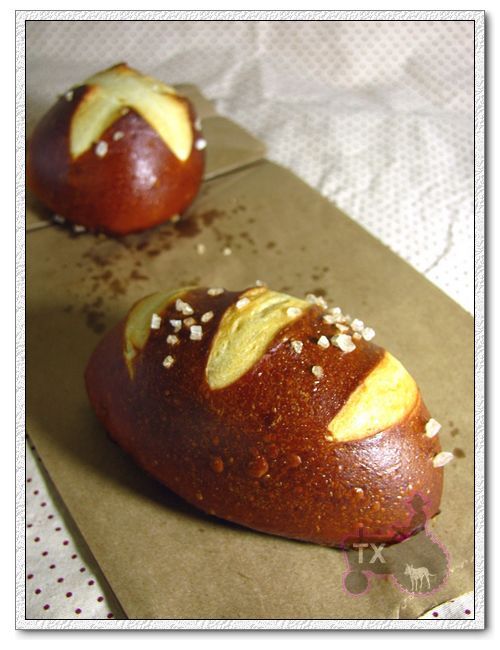
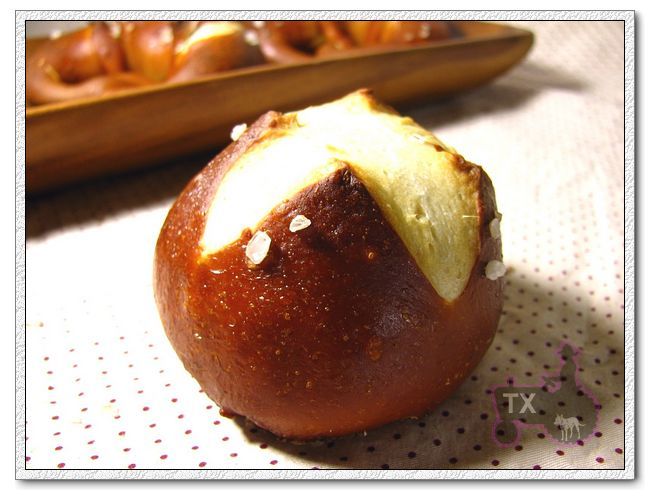
The recipe is from Jeffrey Hamelman's Bread, I did make one change: after reading a suggestion on the web, I used milk instead of water in the formula, I do think it tastes more authentic that way. I loved how the pretzels tasted and looked when I stayed at Germany a few years ago, crispy and hard shell, soft and chewy crumb, and a special "lye pretzel" taste. It's decidely different from American style soft pretzels boiled in baking soda solution (which I also like), good to split open and make a sandwich with. I do need to work on my shaping techniques to get rid of the unsightly holes in the crumb.

I have a whole lot of lye left, will be practicing making pretzels for a while!

hmcinorganic's picture
hmcinorganic

here is today's loaf!  it turned out well.  I made the french loaf from "The bread breakers apprentice" but tried the stretch and fold technique instead of kneading.  It worked;  I was amazed.  I put the dough in the fridge overnight and shaped them cold on the counter.  I had a hard time getting them off the counter.  I cooked it at 500 (by accident, forgot to turn it down to 450 when I put the loaves in) with steam.  They didn't rise much after removing them from the fridge, and are a bit misshapen from uneven rising and manhandling them onto my stone. Good oven spring though, and the crust color is great.  I heard them crackling as they cooled, which I've never heard before!  I think I have undercooked them before.  I haven't cut into them yet, but will post a picture later today.

bnom's picture
bnom

My love affair with my 50 year old GE Hotpoint 40" range has been, literally, on and off these past few weeks. 

I was so excited to get a new 20 inch Fibrament stone (no more stubby baquettes!) but then my bottom element burned up.  So I replaced it (doing the wiring myself) and was back in love again. But then I started noticing that the bottoms of my loaves were not browning up and I wasn't getting good oven spring. And I had been making such nice progress on my bread too. I was so distraought...was it my shaping?  Was the dough too slack?  Could it be  the baking stone???

It finally occurred to me to toss a bit of water on the bottom element. Dead. All the oven heat was coming from the top element (which I thought only came on if set to broil).  What an idiot! What a relief!  I trewired again. Plugged it in, turned it on and POP! The entire range dead. I finally realized it was time to call a professional.  Except for the indicator light it's working again. 

But I'm wondering....should I keep this baby or finally get a new stove.  Are the stoves on the market right now that good?  I was told by a repairman once that they stopped making good stoves around 1960. Is that still true?

Here's what I love about this stove:  Working space between the two burners. Two ovens of useful size. Temps are spot on.  Never have to worry about steam messing with electronic sensors or breaking glass. I can (usually) replace elements and such myself. No hood interfering with my highly needed over the stove cabinet. As vintage as me and my kitchen. 

On the other hand, I could wire gas to the stove for a dual fuel stove (don't want gas oven). I could get convection. Or I could try induction (if it works with Al-clad and cast iron pots). Smaller oven footprint in my small kitchen.  I don't want really want to spend more than 2000 for a stove btw.  

So, TFL'rs thanks for reading this long post.  I'd be very interested in your thoughts. Do you feel passionate about your stoves?  Am I stuck in the 50s?


Yippee's picture
Yippee

This was another white bread with a small amount of whole rye flour.  I’ve started to enjoy the simple shaping of a boule.  Actually, as they say in the commercial, ‘I’m lovin it.’ It does not require much intense planning or attention to details.   Processing of this type of bread is quite soothing, especially at the end of a long day, to an exhausting body and mind.   My original plan was to make baguettes but it was running late so I switched to a boule instead.

This loaf was quite similar to the previous one except for a few things.  Multiple levains were used in this bake and they were refreshed the night before mixing.  As a result, no commercial yeast was needed this time and fermentation was relatively speedier. Diastatic malt powder was used in anticipation of an extended fermentation. I was still experimenting with my oven temperature in order to achieve the right balance between optimum oven spring and color. The loaf still came out a bit too dark to my liking.  Further adjustment of temperature and timing is needed in next bake. 

I’ve been constantly on the look out for a more care-free way of making bread, as long as the quality of my loaves is not compromised. Retarding is one of the methods that enables me to complete the final proof without being too attentive to the dough. However, I’ve found that the temperature of my fridge is too low for the dough to rise to its full capacity. I’d like to have the dough ready to bake when I take it out of the fridge and not have to wait for it to warm up and complete its final proof afterwards.  Hmmm, wouldn’t it be nice to own a retarder as well? Well, before I have that extra gadget, here’s what I did: During my waking hours, I raised the temperature of my proofer a bit so the dough was about 80% complete of its final proof before I shut down.     The remaining phase of final proof carried on in the fridge overnight until I was ready to bake in the following afternoon. This ‘strategy’ worked out pretty well to further fit bread making into my schedule.

The multiple levains had brought more elaborate depth of flavors to the loaf.  It’s slightly tangier than the previous one as extended, cooler fermentation was employed. The initial light and velvety mouthfeel contrasted distinctively with the soft crackling of crust into smithereens that followed. What a sensation! Everybody in the family was satisfied.

A summary of the formula and procedures is as follows:


Here are some pictures:

http://www.flickr.com/photos/41705172@N04/sets/72157624142112386/show/


Adorabull Deb's picture
Adorabull Deb

I love this site!  After taking the lessons, I can FINALLY make decent bread. 

So now I'm experimenting.  I added one T. beet powder to my favorite white bread recipe. 

Can any of you breadheads* out there tell me why my beet bread isn't PINK in the center?  It isn't even white.  It's brown, like whole wheat!  Only the crust is PINK.  Here's a photo:

beet bread

Thanks,

Deb

*so called with much respect and admiration

Marni's picture
Marni

After seeing the fabulous Monkey Bread that Txfarmer posted about here, I had to try my own version.  I have to say that hers runs circles around mine- especially as far as the photography, but we enjoyed it.

Because we don't eat bacon ( I rarely eat any meat at all) I substituted a soy bacon.  It definitely is not the same.  Still, it was tasty, fun to make and looked great.  I'm sorry I don't have a pic of the finished product, I didn't have access to a camera at the time.  But here are some work in progress photos:


Pages

Subscribe to RSS - blogs