The Fresh Loaf

A Community of Amateur Bakers and Artisan Bread Enthusiasts.

Blogs

breadbakingbassplayer's picture
breadbakingbass...

So my friend sent me this link to check out: http://vimeo.com/13181134

I need to figure out if this will make it to the theaters here in NYC...

sourdoughboy's picture
sourdoughboy

I'm lucky enough to work with foodies whom I like to share bread with. So in between more ambitious weekend bakes, I'm trying to find a way to bake a nice loaf in the hour or so I have in the morning, to take to work. I found some inspiration on TFL here and here, with the old no-knead influencing my thought-process.

Tried two tactics: a slow overnight proof and an AB-in-5-ish method.


Sourdough with Rye Experiment One: The Auto-Loaf

Slow proof/cold start/auto-oven for bread when I wake up


From Wild Yeast Recipe for Norwich Sourdough, I'm targeting a final dough with: 540 g white flour and 60 g rye flour @ 65% hydration + 11g salt


Ingredients:

80 g 100% starter

500 g KA bread flour

60 g Hodgson rye

368 g water (600*.68=408; subtract 40g water from starter)


1. Mix all together. Autolyse for 30. (7:30pm)

2. Add salt, work until gluten is moderately developed (I was feeling super lazy and used a handheld mixer).

3. Fold at 50, 100 minutes.

4. Form into boule. 

5. Put in ceramic pot. Brush with oil to prevent drying out. (10pm)

6. Set automatic oven to 450 for 1 hour, starting at 6am. Pray.

7. Wake up at 7am, take out of oven. Take to the office. Share. Eat.

Result: Funky dinosaur egg-like exterior. Shocked that the timing worked out to a tee. I really liked this loaf. It's an odd looking duck, but it's hearty, with a tight crumb, thin but solid crust, and great flavor. Very good soup companion. And convenient for me. Will be doing it again, with a variation or two.


Experiment 2: AB in 5 Sourdough style rye... deferred

AB in 5 should not be blamed for this disaster. I saw that AB in 5 runs at about 83% hydration, so I simply went for an 83% hydrated dough, but substituted my sourdough starter for the yeast. There was plenty of fermentation but...


500g KA AP

100g Hodgson Rye

480g water

200g 100% white sourdough starter

1 tb coarse salt


1. Stir everything together.

2. Let rise/fall at room temp for four hours. Refrigerate.

3. Next morning, I took a peak and found it was completely unshapeable. 

4. So I added another 100g or so of KA AP, kneaded until the dough semi-workable. Formed into boule, put in oiled bowl to proof in refrigerator.


5. Next morning, was ready to pop in oven Ab in 5 style. But it hadn't proofed at all. So I heated a cup of water in the microwave, and then stuck the bowl in there, to proof for about an hour.

6. Preheated oven to 450, with cast iron pizza pan.


7. Slid boule in, splashed cup of water on oven floor. Baked for about 30 minutes.


8. Late to work.


The result: more spread than poof, as could be expected. My co-workers really enjoyed eating it. The crust was, as they say on Top Chef, very toothsome. With the funky proof et al., the crumb is predictably uneven. I was happy that i was able to salvage the failed experiment.

Look forward to making more Auto-Loafs next week! Maybe with a little less total flour (too much for the ceramic pot I have), AP instead of bread, and kneading the AP before adding the rye.


RonRay's picture
RonRay

Calculating Recipe File 

(update 100928-4 PM *** I finished and sent out copies to those who had made a request - Ron)

After posting the Conversion Calculator Example - http://www.thefreshloaf.com/node/19720/conversion-calculator-example -
I thought that there seemed to be some who would find an expanded version helpful, as well. At my age, it is easy to have great ideas - the trick is remembering them tomorrow. I find that my computers are my most reliable reminders of the ideas I have been fooling with. So, quite naturally, I have accumulated a lot of computer aids to my baking activities. Without a doubt, the way I "think" about any bread formula that I'm interested in, would be considered overkill by most others, but hey, it is my kitchen and my time, and yes, my pleasure. The result of this line of thought was a watered down version of what I use to think through a bread's formula. I cut out some - like calorie considerations and overall percentage calculations - and added in aids for those who are not that used to baker's percentages and hydration levels. I hope it may help in seeing how they fit into the overall recipe/ formula.

Here is a peek at what I came up with as a "Calculating Recipe File". The first image is an example of how someone might use it to examine bread formula. The second image is what they could maintain as their Master file, from which they would use a copy for creating recipe files.

For me, one of the greatest benefits is that I can have two, or more different files on the screen at the same time for comparisons (not true in Excel) because the spreadsheets in the free Open Office program permits multiple spreadsheets to be open at the same time. Not only can they be open, but you can copy material from one into another. For example, the last time you baked a loaf, you were less that totally pleased. You save a copy with a new name "2nd try" and open that beside the original. Make your considered changes in the new file - even note what your reasons were. Print a copy out and go start the your bread making efforts.

The 1st 4 columns permit you to indicate which of 4 categories the ingredient belongs in - Ref. Only, Flour, Water, Other. Notice that this allows you to parse the sourdough into the flour and water categories for hydration level information by only referencing the total strater entry. The 4th and 5th columns are where you name the ingredient and provide its weight reference - in grams per cup. The cup, Tbs, and tsp columns are where you play to create the value you want in the M (grams) and N (ounce) columns - Note ounces are only for info, and not used. As you run down the ingredient entries, the last 6 columns and the Percent Hydration Level (%HL) are calculated for you so that when the last entry is made, you already have the categorized amounts columns and the Bakers percentages in two sets of 3 column pairs - the 1st 3 by in grams, and the last 3 in Baker's Percentages. I think I would have been very pleased to have some tool like this when I was first trying to wrap my head around all of these considerations.

These images have been updated 100926 15:05 to show the Excel version after modifications.

This is just an example of what one might enter into a file.  The Master Blank is shown below, and that is what one would start from in using this form of Calculating Recipe File.  The Master Blank should have its [Properties] option changed to set the [Read Only] option as ON. Then one opens the Master and saves it with different "new work" file name. If you forget and attempt to modify the Master, you will be reminded that it is Read Only. Thus, you are much less likely to find that you have accidentaly destroyed your only Master Blank.


These images are in the Excel screen format, but if viewed in Open Office, there would be still be horizontal lines in the areas with background shading. For anyone using the free Open Office Spreadsheet, this program is available Open Office as well as Excel, and preferred by me, as it permits multiple files to be opened at the same time for cross referencing.

********* Updated 100928-4PM

I have finished the "Getting Started" write-up for "Calculating Recipe File". For those wishing a copy, send an e-mail with "TFL-CRF" in the subject line to - Ron@ronray.us .


I will send you the following collection of files:

1/ [Excel] "Ounces per Cup Baking Calculator": It just might be useful with the others - at times, so it is included.

2/ [Excel] "Grams per Cup Baking Calculator": It just might be useful with the others - at times, so it is included.

3/ [Word] "Getting Started with Calculating Recipe File": Hopefully with enough information to get you on your way in using the Calculating Recipe File.

4/ [Excel] "Excel_Master Calculating Recipe File": This is the Excel version of the Bread Formula program. It differs from the next file only in some additional background colors not being used in Excel.

5/ [Open Office] "Open Office_Master Calculating Recipe File": This is the Open Office version of the Bread Formula program. It differs from the previous file only in some additional background colors being used that are not in the Excel version.

end update ========== 100928.

Ron

*** Next blog:  101010

       http://www.thefreshloaf.com/node/20032/1-little-2-little-3-little-chia-rye-loaves


SylviaH's picture
SylviaH

These loaves are from http://www.northwestsourdough.wordpress.com.  The recipes can be found on Teresa's Blog.  The Mill Grain @100 was so delicous and disappeared so fast, lots of lovely grains, poppy seed, sesame seed, whole oat berries, millet, rye flakes, wheat flakes, flax and sunflower seeds, from KAflours, is the grains I used and they are just delicious, this time I made 2 loaves, still to warm to be sliced.  I would like to try this mix in a JH formula for his mix grain loaves...whats a few extra grains! 

The Rye Sourdough with Roasted Cracked Wheat, is my first attempt.  I made 3 small loaves and had to slice into one as soon as it cooled.  I cracked my wheat and it toasted up very nicely and smelled so good.  The flavor is delicious without being bitter or sour, a lovely complex flavor with a sweetness of the wheat and little added soft chew with some larger pieces of the cracked wheat thoughout.  I thought the loaves a little flattish looking but the crumb seemed nice for these small loaves. 


                                               Rye Sourdough with Roasted Cracked Wheat


                                                             2 large Mill Grain loaves and  3 Rye Sourdough loaves w/roasted cracked wheat


                                               Crumb of Rye Soudough w/RCWheat


                                                                  Added crumb of Mill Grain loaf


                                                                   Sylvia


wayne on FLUKE's picture
wayne on FLUKE

This is the 3rd recipe I have baked out of Peter Reinhart's Artisan Bread Every Day. I followed the recipe quite closely, choosing to go with 1 cup of buttermilk and the rest no-fat milk (from instant powdered milk). I used white sugar and canola oil for sweetener and fat. The only real change I made was to add 1 Tablespoon of Hodgson Mills Vital Wheat Gluten (first time I ever used this).

I refrigerated immediately after mixing as suggested and am glad I put it in a larger container cause it way more than doubled overnight. I made one loaf from about 900 grams of dough (9x5 pan) and 3 rolls at 75 gr and 3 rolls at 100 gr. Egg wash and seeds on everything.

Here are some pics.

Rolls

And here is a close-up.

Close Up

And an extreme close-up.

Extreme Close-Up

And now the crumb. Love my Presto slicer!

Close up.

Crumb close up

And one artistic shot (well, it is artistic for an old engineer!)

Soft Whilte artistic shot2

I will try to remember to update this with some comments on flavor and texture after we eat some. Hopefully it will be soft as decribed by Peter.

Comments always welcome, wayne

TASTE UPDATE (Sat 9/25): We had some of the rolls for lunch today for deli meat sandwiches. Very pleased with texture and taste. Will definately make these again.


breitbaker's picture
breitbaker

Hi everyone...I've been MIA the past few months...certainly not from baking, but mostly from commenting on this site. I still consider this an invaluable resource though!

Somehow, summer overtakes.

I have begun blogging at a separate domain though, so come on over and see what I've been up to! It's my adventures in the kitchen along with snippets of the things I grow and create....

See ya there!     http://www.brightbakes.wordpress.com

Cathy B.pane siciliano.JPG

breadsong's picture
breadsong

Hello,

I tried a half-batch of Hamelman's Baguettes with Poolish, to make four half-size baguettes. I'm fairly certain these don't qualify as baguettes, due to appearance! as well as size...!
I tried Richard Bertinet's mixing technique and found this made a good strong dough.
I don't have a couche cloth, so proofed on a floursack (tea-type) towel. I didn't flour it enough and the dough stuck a little bit when trying to move the loaves to the peel.
I also wasn't careful enough when transferring one of the loaves to the peel so two of the loaves ended up sticking together, for their complete length! That was dicey, trying to separate them without deflating them.
I found my dough to be hard to score this time, with a lot of pulling and dragging on the dough. After shaping, the loaves proofed for one hour, loosely covered with plastic wrap, and the room may have been a bit on the warm side.
I don't think they were overproofed though but this is something I'm having a difficult time judging.

I look forward to any suggestions regarding what went wrong!  They taste good though; we tucked in for breakfast.

Regards, breadsong


amolitor's picture
amolitor

I have posted this recipe, more or less, elsewhere, but I am recording it in my blog for posterity, with some updates to my process and my thinking:

Again, this isn't a recipe for the baker who prefers precise measurements!

This is a two levain naturally leavened bread, based on Joe Ortiz' recipe from The Village Baker but modified so that, well, to be blunt, it works which the original doesn't really. The only substantive change is at the beginning, rather than starting a chef from scratch and expecting to get a sufficiently active culture to raise a loaf, I start with a liquid-ish starter.

My "storage starter" is a all whole wheat starter, fed every 2 days and kept at the consistency of mayonnaise, more or less. I use a pinch of salt in it to slow it down a little more. I use it often enough to keep it out of the fridge, but not often enough to want it sitting around eating its head off all day! So, I keep it a little hungry, and a little slow.

Step 1

Feed my starter. If I'm planning to start the next day, I make sure to feed my starter the night before so that it's pretty active the next evening. I could probably improve this by feeding the morning of, and getting the first levain started in the evening. Anyways, making sure the starter is pretty active is important -- the levains will be lethargic and slow to work otherwise.

Step 2

First levain:

  • approximately 1 oz liquid starter (2 tablespoons)
  • approximately 1 oz water
  • 2-3 oz whole wheat flour

I vary this according to how active my liquid starter is. If it seems a little sleepy, I will make this levain a bit larger AND use a higher percentage of starter in it. You're looking for 4 to 5 ounces of stiff dough here. It should feel like a regular american bread dough (say 50% hydration or so). I cover the bowl with plastic wrap, which keeps a crust from forming. I think it you cover with cloth, you may get a crust, which you might want to discard -- if so, make the levain bigger to you have some extra to discard!

In any case, use amounts of flour and water as indicated, but in ratios such as to give this stiff dough. The hydration of your starter will affect things as well, of course. I think that, based on the level of activity of your starter:

  • use 2 oz flour, and 2 tablespoons starter if Very Active
  • use 3 oz flour, and 3 tablespoons starter if Kind of Sleepy
  • use something in between if your starter is somewhere in between

Then add water sufficient to make a stiff dough. I use 'the fountain' method which seems to give pretty good control here, but I have also just mixed all the stuff in a bowl as well. Knead a bit for some little development, but don't worry much about that at this point.

This rises overnight, 8 to 12 hours. Again, if the initial starter seemed sleepy, I might give it 12 hours. It will become soft and inflated, at least doubling. One test I have seen and used for ripeness is 'does it float' (or does a little piece snipped off and not degassed much float). When you deem this levain ripe:

Step 3

Second levain (the next morning):

  • all of the first levain
  • 2.5 to 3.5 ounces of water
  • 5 to 7 ounces, total, of flour -- equal parts whole wheat and white bread flour

At this point, again, the size of the second levain will be determined by how sleepy the first levain seems, and how big it was. If the first levain still seems a little slow, I'll mix the second levain smaller (to have a higher percentage of first levain in it -- I could make the first levain "richer" by adding more liquid starter, but at this point you're stuck with the first levain as-is, so the way to enrich is to actually mix smaller). The result will be 12 to 16 ounces of levain, again mixed quite stiff.

You'll cut the first levain up in to bits, and let them soak in the water (use maybe 2 ounces of water, 1/4 cup, for this), and then add flour as you think best to mix a smaller or larger levain (5 ounces flour if the first levain is Kind of Sleepy, 7 ounces if Very Active, and in between if in between) and then add water as necessary to get a stiff dough. Kneading this to get a little more dough development is probably worthwhile, as we'll be making up dough and baking today, most likely.

This rises for 4 to 6 hours, until doubled or so. You can use the float test here as well.

It should be about mid-day at this time.

Step 4

Final dough:

  • all of the second levain
  • 12 to 16 ounces of white bread flour
  • 8 to 11 ounces of water
  • 1 tablespoon salt or less

Break up the second levain into 1 cup (8 oz) of water and let soak, add in appropriate flour. As usual:

  • if the second levain seems sleepy, use less flour (12 ounces, you're going to bake a smaller loaf)
  • if it seems active and excited, use more flour (16 ounces, hooray, you get a bigger loaf)
  • if your second levain is somewhere in the middle, use somewhere in the middle!

Adjust salt. A tablespoon is good for the larger loaf, reduce it proportionately (probably never below 2 teaspoons).

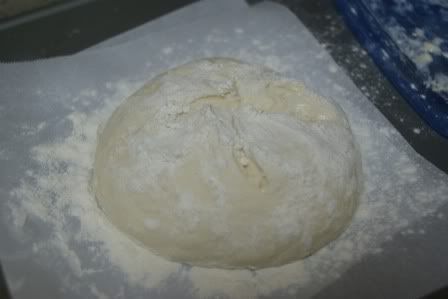
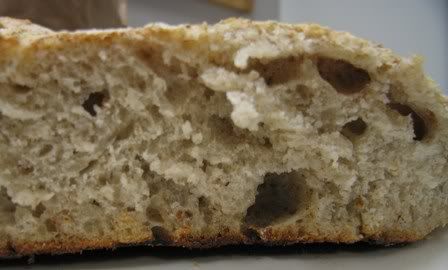
Add water sufficient to make a wetter dough than the levains, but not a "wet" dough as such. 60% hydration, maybe. It will get wetter as it proofs, so err on the side of 'stiff'! If the levains have been slow and sleepy, mix this stiffer since you'll be proofing longer, and if you feel like you've got a vigorous and excited culture, you can go a little wetter. Knead thoroughly. It should windowpane, but perhaps not very well, as you'll be proofing for a while. I proof for a couple of hours, with a stretch and fold every hour or thereabouts.

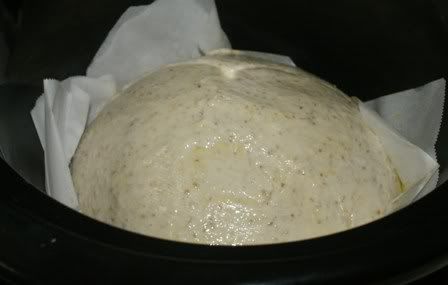
Shape your loaf, and let proof until ready (poke test -- I use 'poke it gently, making a hole 1/4 to 1/2 inch deep; the hole should slowly refill, being mostly gone after several seconds').

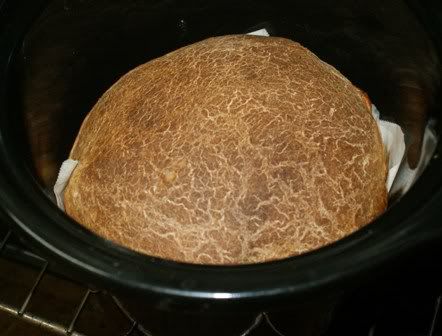
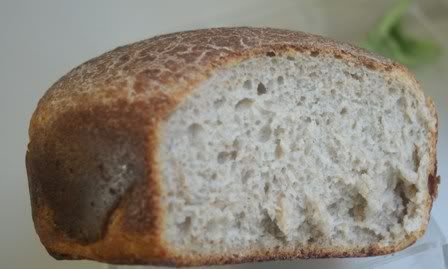
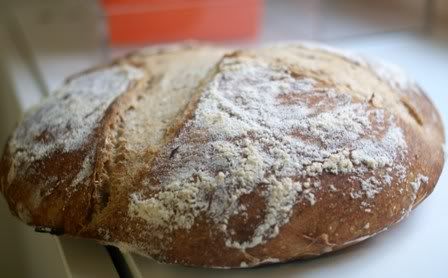
Bake at 425 or thereabouts suitable to the loaf size and shape, with steam. I use 40 minutes for the "smaller" loaf shaped as a batard, and 50 minutes for a full-size boule (when I am able to mix the "full sized" loaf). You could probably bake it hotter and faster if you liked!

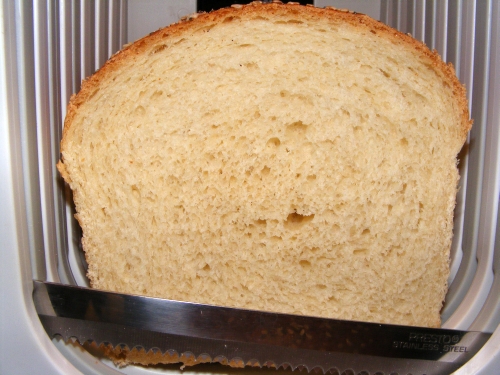
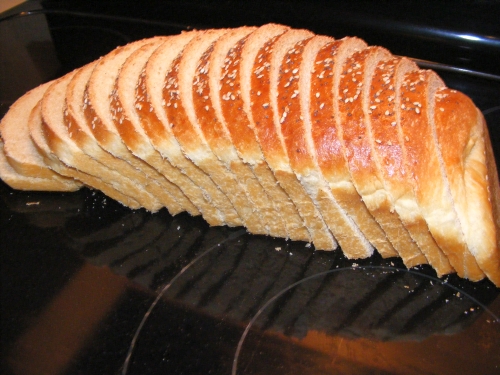
Pictures below are the batard, with levains mixed at, roughly: 5 ounces, 15 ounces, and final dough at around 35 ounces (probably baked down to 30 ounces or less):


Mebake's picture
Mebake

This particular bake was a redemption, after several all-sourdough Multigrain failures in a row. Having seen David, Lindy, and many other TFL bakers exhibit their wonderful 5 grain levain loaves, The recipe was on my to-do list for some time.

Also, Hamelman praises the flavor of the said loaf in his "BREAD". Yesterday, I gathered some nerve to start another sourdough, this time armed with the collective wisdom thankfully shared by fellow TFL members.

I discovered that the cause of my levain loosing vigor and character soon as it is built is because the starter culture that seeded the levain did not contain enough happy yeasts. I apparently underfed my starter or did not correctly nurture the yeast population in it, which lead to less than optimal culture, and consequently weak proteolytic levain.

yesterday, i had a well fed starter and at the peak of its activity. I seeded the levain, and took it to work for observation. It peeked during my duty after 8 hours, and i had to refresh it. Eventually, the final dough was full of vigor.

I chose to omit the yeast, so i retarded the dough for 10 hours at 10C.


I had some slices today, and it is very light and tasty. It is only remotely acidic. i suppose it should taste better tomorrow. I believe that omitting the yeast changes the special flavor that Hamelman praises, so i'd want to try it next time with yeast.

khalid

Elagins's picture
Elagins

Baker Ben suggested that since the testing is over and we had such a great group come together, that I continue to blog about the actual process we'll be going through to actually get the book into print.  I think it's a great idea, so, with thanks to Ben, here goes:

July and August were simply insane.  I was putting out a couple of dozen recipes each month, keeping track of all the testing and feedback and trying to get all of the other stuff written.  It was madness, to the point where everything else on my to-do lists (several) simply had to be pushed aside so that I could get the manuscript done by the 9/1 deadline.  

Norm and I were on the phone at least weekly -- usually more often than that -- going over recipes, fine points and all of the background stuff that needed to be included in the book we wanted to write.  If I tell you all that I got very little sleep over the last couple of weeks, it wouldn't be an exaggeration.

Those last 2-3 weeks are a blur now, writing, researching, fine-tuning, making sure all of the measurements and conversions were right, all of the steps and procedures consistent and all of the narrative smooth and where it was supposed to be.  

9/1 came around and I had about 99% done ... everything except for the Acknowledgements, Picture Credits (since we hadn't yet made final picture choices), and a couple of last-minute recipe tweaks.  Nonetheless, I assembled what we had -- about 280 pages, including somewhere around 130 recipes -- and emailed it off to our publisher and our agent.  

So of course the publisher said, "Well, no rush.  Just put everything together, print it all out, burn the files into a CD and send it off to me when you can."  When I met with him back East the beginning of July, he didn't seem like he was terribly concerned about deadlines, but I like to honor my commitments.  

So Norm and I went back at it, doing illustrations of the challah braiding, strudel dough stretching, and a couple of other recipes, including the rye flour honey cake (lekach) and revised plum cake (flomenkuchen). I figured I'd take a couple of weeks to make sure we got it all in shape. So naturally, less than a week later, I get an email from Edward (the publisher) asking, "When will we get the package?" Shift into high gear, put the final touches on it.

At that point, my laptop died.  I mean really died: motherboard, display, keypad, who knows what else?  Of course, I'd been backing up to spare hard drives, pen drives and whatever, so I had three or four backups and didn't lose a thing.  Switched to an old Dell that we had lying around ... slow as honey on a cold day ... got the manuscript all put together and start printing .... now at 260 pages, after some cuts and consolidations.  

Print, print, print.  At page 243, my printer dies <sigh>, so I load the finished file into a pen drive, take it downstairs and finish on my wife's printer.  That's Monday morning a week ago (9/12).  Then I discover that the old Dell's CD drive can only read; it doesn't burn.  Back downstairs to burn the CD on Syl's puter.  Pack it all up into a FedEx box and drive it down to the local Kinko's/FedEx office. 

A week earlier, I had asked our agent, Stephany, about typical production schedules and she said, "Be patient.  It usually takes a publisher 9-12 months to get a book into print." Nine months to a year ... feels like an eternity.

At that point, I had such mixed feelings ... so much intense work, suddenly ground to a halt, all this energy with no place to go and exhaustion suddenly setting in.  For two days, I could barely think.  But at the same time, I felt the same way I did when I took my kids to their first day of kindergarten:  proud, full of anticipation, a little bit afraid that they wouldn't do well and also sad that in an instant I was no longer as needed as I'd been the day before.  Norm and I spent a lot of time on the phone, talking about the closure of that part of the process, which he said was less real for him, since he wasn't involved in any of the writing.  

It was strange, the sense of loss finishing the book created -- first the dissolution of our tester group, which had brought together well over 100 people and created a very intimate bond of shared experience, and then the departure of my youngest child (the book). 

I waited until today (9/23) to phone Edward to find out how things were going with the book and whether he could give me more information on the production schedule, other next steps and how much more work would be needed.  Instead I got Brad, the head editor, a very kindly man who clearly loves books.  "It looks very good," he said.  "We just need to get it to copy editing and then we'll have a better idea of what else needs to be done, but I don't think it will be very much."

Then I asked the question I really wanted answered:  "Any idea of the publication date?"

"We want to get it out before summer ... probably in the March-April timeframe.  We want this book to look terrific, so we're choosing our designer carefully."

March-April! Six or seven months!  Wow!  .... Other things to think about now ... promotion and finishing up all the remaining tweaks and revisions (there are still a few), getting all of the photo permissions in place ... 

We've entered a new level of reality.

Stan Ginsberg
www.nybakers.com

(to be continued)

Pages

Subscribe to RSS - blogs