The Fresh Loaf

A Community of Amateur Bakers and Artisan Bread Enthusiasts.

Blogs

GSnyde's picture
GSnyde

My first attempts at baking bread-like objects involved pizza.  About a year ago, Brother David made pizza.  It was good. I mean, it... was... GOOD!!!  I figured I could do that.  So I asked a few (too few, I now realize) questions, and he pointed me to the Pizza Primer on TFL, where I found the Reinhart Neo-Napolitano recipe.  I followed it (I thought) a few times, and the results were passable (I thought).  The crust was thin (I like that) but not crispy and it didn't really get a big holey crumb around the edge.  I sorta gave up on homemade pizza for several months.

Now as (both of) you who've been following my novice baker adventures know, I have recently come to realize that I had a defective baking stone.  It was advertised as a baking stone.  It looked and felt like a baking stone.  Only problem was it didn't seem to get really hot.  So, after many blond-bottomed breads with little or no oven spring, I've replaced it with one from NYBakers, and I'm making San Joaquin Sourdough this weekend for said Brother David to sample, critique, and hopefully enjoy.

But I couldn't wait for tomorrow to try the new stone in the old oven.  And I happen to have Mozzarella, Parmagiana, Sweet Italian Sausage, Pesto, fresh tomatoes and Mushrooms in the house.  So I set out on a preliminary test of the stone.  I went back to look at the Reinhart recipe, and started to mix it up.  It says "1 tsp instant yeast".  I slapped by forehead with the heel of my hand (a gesture so common among us d'Oh Boys that we usually have very flat foreheads).  Back before I started baking bread, how was I to know that the little yeast packet my wife had in the fridge was not instant yeast?  Now I know better.  I'd been making the dough with dry active yeast.  

So tonight, armed with real instant yeast and my New York baking stone, I made magnificent pizza!  Nice air pockets in the crust, big wholey crumb within the crispy rim.  So was it the yeast?  Was it the stone?  Was it my much improved dough handling?  I'm not sure I care.  It was GOOD! The dough had so much pop, I think it's still expanding <urp!>

IMG_1618

IMG_1619

Tasha really wants some.

IMG_1622

Anyway, it's always a comfort to know I'm not as stupid as I was before (at least in one respect).

Glenn

wassisname's picture
wassisname

 I want my weekends back.  Some of them , anyway.  I would like to have the option of not being tethered to my kitchen, with the ticking clock in the back of my mind, for most of a day off.

The trouble is, I am hopelessly addicted to whole wheat, sourdough, hearth bread.  Not a good place to start.  Staying up half the night during the week is not the answer either, not for me.  I need my sleep.

I realize I am being a little silly here.  There are lots of breads I could, and do, make during the week, but this is the one that I can't get out of my head.

Tinkering with conventional scheduling strategies got me pretty close to my goal.  Build a starter one night, mix a final dough the next, cold ferment, then warm/shape/bake the third night.  The third night has been the problem.  My reliable window of opportunity is generally 4 hours.  The lump of cold dough just wasn't coming around quickly enough.

After a while I was just thinking in circles and getting nowhere.  A new tack was called for.  Why not start from the other end of the spectrum and work back toward the middle?  Goodbye tried and true, hello bizarre and unusual. 

Night 1

Build a large amount of starter.  288g WW bread flour / 216g water / 95g seed starter.  Refrigerate immediately! 

Build a small soaker.  100g WW bread flour / 75g water / 2g salt.  Leave at room temp.

Next Morning

Take starter out of refrigerator.

Night 2

Combine starter and soaker.  Add 50g Whole Rye flour / 7g salt / 40g water (added while kneading).

Knead 7-8 min.  Rest 10 min. Shape.  Rise 2 hrs.  Bake w/ steam 10 min @ 475F, then 425F for 40 min.


If you're still reading this I'm sorry.  This is more for me than for you - like therapy.

If you're following the logic I'm impressed, because even I'm having a hard time keeping track of what I was trying to do.  At this point, I'm having a hard time just keeping track of what tense I'm in.

Here's the thinking:  Skip the bulk ferment - put nearly all the flour in the starter and soaker to develop flavor and gluten ahead of time.  Huge starter percentage- Nearly 70% of the weight of the finished dough to strengthen the dough, speed the final rise and further compensate for lack of bulk ferment.  Refrigerate starter first- then bring it out to ferment so there is nothing cold going into the final dough.  Add Rye to final dough- to jumpstart fermentation.

I was expecting disaster, but I have certainly made worse loaves.  The gluten seemed pretty worn out during kneading and it shows in the final result.  The crumb is fairly tight, but soft and moist.  It didn't go gummy, which surprised me.  I see a few obvious improvements I could make to the method so I'll probably give it one more go, but I'm not sure the result is worth all the strangeness.

Final note - it occurred to me just before I started this post that I could simply split my conventionally prepared dough into two smaller loaves and save at least 20 min on baking time right there... huh... waddayaknow... but where's the fun in that!

Marcus


txfarmer's picture
txfarmer

Another winning recipe from Nancy's Silverton's "Breads from the LA Brea Bakery", I adapted it slightly to use my 100% starter, and changed the fermentation schedule a little too. The best part about this walnut bread is ... the walnuts, A LOT OF walnuts. The original recipe asked for 14oz, which is a lot to start with, I tend to go overboard with nuts and dried fruits in breads,  ended up dumping in all the walnuts in the jar, a little less than a pound. I don't regret one bit. So fragrant, rich, and crunchy, walnuts are a great match for the ww and rye flour in the dough.


Walnut Levain

*makes 2 big loaves, each a little over 2lbs

- sourdough sponge

water,430g
mature starter (100%),139g
milk,30g
barley malt syrup,21g
ww flour,227g
rye flour,99g
salt,0.25tsp

1. Mix, cover, leave at room temp for 5 hours until there are visible bubbles on the surface, put in fridge for 8 to 12 hours.

- main dough

water,170g (I added a bit more to make the dough softer, didn't measure how much more though, I tend to like softer/wetter dough)

sugar, 1tsp

bread flour,624g

salt,3.25tsp

walnut oil,2tbsp

sponge

walnut halves, 14oz (I used almost 450g)

2. Mix water, sugar, flour, sponge, autolyse for 20min. The books says: add salt, mix until medium strength, mixer at medium speed for about 5min. Add oil, mix until well absorbed, another 2 min. Knead in walnuts. I mixed for much less time since my dough is softer and I intend to S&F.

3. Original recipe says to store the dough in the fridge right away for overnight bulk rise. I know from experience that it wouldn't be enough time, and I don't have a lot of time the next day to finish the bulk rise, so after mixing, I let the dough rise at room temp for 1 hour then put the dough in the fridge. Since my dough is softer than the original version, I did 2 S&F during that hour too.

4. The next day, take the dough let it continue to rise at room temp to double of original size if it hasn't so far. Mine needed another hour. Divide into two portions. Round, rest, shape into whatever shape you like. Rise upside down in brotform. Mine only needed 1.5 hrs, even though the book says 2 to 2.5.

5. Bake with steam for 45 min at 450F.


I really like this scoring pattern.

It bakes pretty dark, and that's the way I like it. The fully caramelized crackling crust matches perfectly with crunchy walnuts. And it sings!

There are so many walnuts, they are peaking out everywhere

This is a bread perfect for toasting. The recipe yields a lot of bread, I at first considered to only make half, luckily I didn't. It's so delicious and fragrant that we can't seem to stop eating it!

From all the breads I've made, and there have been a lot, this is definitely one of our top 10! And it's not hard to make at all.


Sending this bread to Wild Yeast's YeastSpotting event.

amolitor's picture
amolitor

I'm working on this recipe.

My current state of the art is:

Evening of Day 0

  • 1/4 cup WW flour
  • 3 T water
  • 1 T WW starter

(this approximates 100% hydration starter mix). Let rise overnight.

Morning of Day 1

  • starter from last night
  • another 1/4 cup WW flour
  • another 3 T water

Let rise until about noon (6 hours). Should be Quite Active at this point.

Noonish of Day 1

Toast 1/4 cup + 1 T cracked wheat in dry skillet until Dark Golden Brown, mix with 1/4 cup + 1 T boiling water. Let rest/soak/cool.

  • starter
  • 1/2 cup rye flour
  • 1/2 cup WW flour
  • 1 cup + 1 tablespoon water
  • 2 tsp salt
  • toasted cracked wheat mixture
  • sufficient bread flour to hit a moderately high hydration dough

Knead dough until it starts to develop. The dough will be moist and sticky, if you form it into a blob and grab one end you can lift the blob up off the working surface. Holding it there, it will sag, eventually pouring slowly out of your hands over a minute or two. It's as thick as a Very Thick muffin batter, and somewhat springy due to gluten development. Mine was starting to windowpane, weakly -- I didn't want to overdevelop since the ferment goes on a while.

Bulk ferment for 5 hours, S&F every hour.

Into the fridge around 6pm.

6 am Day 2

Remove from fridge, place somewhere warm. S&F after an hour. Form up a loaf after 2 hours. Proof until done (2 hours in this case). Bake at 450 with steam for 20 minutes, reduce heat to 425 for another 25 minutes. Results:


I had good development going in to the fridge in the evening, but it seems to have started to vanish by morning. I feel like the dough was starting to fall apart. The next test will be to follow the same pattern, but aim for mixing dough about 3-4 hours later, so there's only 8-9 hours in the fridge instead of 12. This experiment went off rather better than the previous run (the dough was less sticky, and much more willing to stand up, but the surface gluten network wasn't quite what I want it to be). The flavor and texture are very very similar to the previous result, and the loaf is more staisfying to me, but I feel I have more work to do.

Previous experiment is here: http://www.thefreshloaf.com/node/19856/rye-sourdough-roasted-cracked-wheat

Sam Fromartz's picture
Sam Fromartz

Here are some pictures of the winning breads at the Coupe Louis Lesaffre Competition at IBIE from Team USA. They now go to the Coupe du Monde in 2012 in Paris to compete against 11 other national teams. Background on the competition process is here

Bread Sculpture, Harry Peemoeller, Team USA

Bread sculpture by Harry Peemoeller, instructor Johnson and Wales, Charlotte, NC


IMG_0735.JPG

Mike Zakowski, The Baker (Bekjr), Sonoma, CA, with his breads


Team USA breads

Pictures of Mike Zakowski's breads.

One of Mike's entries was a loaf with type-80 wheat mixed with white flour and cracked spelt soaked in agave nectar for 12 hours. It was the best bread I had at the entire convention -- I think (there were many great breads). I asked him where he got cracked spelt, since I had never seen it. He said he grinds it himself with a hand grinder. Although he works at Artisan Bakers in Sonoma, he sells his own bread at a farmers' market in Oakland.

I did take pictures of the beautiful viennoiserie made by Jeremey Gadouas, a baker from Bennison’s Bakery, Evanston, IL, but they were too blurry.

Here are a couple of pictures of rye breads made by Jeffrey Hamelman of King Arthur.

Hamelman's 40% rye

Hamelman's 40% rye, it had nuts and dates I think but I may be wrong. 

Jeffrey Hamelman

Jeffrey Hamelman in a light moment

Hamelman's 60% rye

Hamelman's 60% rye, one barely viewed on left has sesame seeds.

Hamelman noted that he scores some ryes before proofing, to get more bloom in the oven at the cut. The first one pictured above was scored before proofing. 

Images: by Samuel Fromartz

breitbaker's picture
breitbaker

I've made these flour tortillas for the past year or so...and with the approach of fall, and things beginning to slow a bit, I'm on a mission to find my "perfect" version.....take a look and give me your ideas....Thanks!

http://www.brightbakes.wordpress.com

Cathy B.

paulm's picture
paulm

As I was feeding my starter (Ralph), rather than discarding I fed the discard and used it to make my first sourdough cinnamon rolls.  I'm up to my ears with sourdough pancake mix and just couldn't bear to flush half of Ralph.  I happened on the following recipe in COOKS.COM and with only very minor adjustments, I made the cinnamon rolls shown below.


SOURDOUGH CINNAMON ROLLS
Printed from COOKS.COM

1/2 c. starter
1 c. evaporated milk
2 c. flour
1/4 c. butter
3 tbsp. sugar
1 egg
1 1/2 c. flour (approx.)
1/2 tsp. soda
1 tsp. baking powder
1 tsp. salt
2 tbsp. melted butter
1/4 c. brown sugar
1 1/2 tsp. cinnamon
1/4 c. raisins
1/4 c. chopped nuts
Melted butter

Combine starter, milk and flour (2 cups) in a large bowl. Cover and leave at room temperature overnight. Next morning, beat together the butter, sugar, and egg. Blend into sourdough. Combine 1 1/2 cups flour, salt, soda, and baking powder and mix with other mixture. Turn out on floured surface and knead until shiny. Add flour as needed.

Roll out to an 8 x 16 inch rectangle. Brush surface with melted butter, sprinkle with brown sugar, cinnamon, raisins, and nuts. Roll up dough, cut roll at intervals, dip in butter and place in 9 inch square pan. Let rise about 1 hour and bake at 375 degrees for 30 to 35 minutes.


I eliminated the nuts (allergies) and used granulated white sugar rather than brown sugar (pantry deficiency).  I made an orange glaze using the zest of one orange,  juice of 1/2 orange and 1 2/3 cups powdered sugar.  Waiting for them to cool before I can report on the taste but they smell devine.


wally's picture
wally

My last rye experiment involved a variation on Hamelman's 66% rye sourdough found in Bread.  The variation was the inclusion of a boiling rye soaker (brühstück) and toasted sunflower seeds.  I was pleased with the result, especially the sweetness imparted by the soaker.

Since then I have ventured farther away from his recipe with two further experiments.

The first involved repeating my earlier variation, but with the addition of a portion of old rye bread (altus).  I soaked the bread in hot water for 4 hours, and then attempted to wring as much water from it as I was able.  But it almost immediately dawned on me that the addition of this (I added 15% of total dough weight in altus) was going to complicate my attempts at arriving at the proper hydration level since I neglected to weight the stale bread before soaking it.  Nevertheless, I decided to press ahead and assume as a matter of fact that the overall hydration would be in excess of 75% which is called for in the formula.

Once I began mixing the dough it became evident that the hydration was way in excess of 75% - the mix resembled a thick pancake batter, and it never came together even somewhat during the 10 minute mix on speed 1.  I poured it into a bowl and gave it a 45 minute fermentation. 


Following that I attempted briefly to handle it with wet hands and see if I could shape it.  Failure - the dough/batter was simply too wet to allow for shaping.  So I scraped it into a bread pan, allowed it to proof for another 45 minutes, until it had just cleared the sides of the pan, and then placed it in a pre-steamed oven (to the extent you can presteam a gas oven), and baked it for 75 minutes. 

The initial temperature was 475° F for 15 minutes, followed by a reduction to 425° for 30 minutes and then a final 30 minute bake at 400°. 

As you can see, the loaf slightly deflated - it came out of the pan level with the rim, whereas it was slightly above when I placed it in the oven.  I feared for the worst - insertion of a toothpick seemed to indicate that the interior had collapsed.  However, I dutifully allowed it to cool, wrapped it in a linen towel, and waited 24 hours before cutting into it.


My surprise was that it had not collapsed, and though I think the openness of the crumb may be an indication that I pushed it almost to the point of overproofing, it has been (and remains) very good.  It is quite moist, but not gummy.  And between the altus and hot soaker it has a wonderful flavor, full of sweetness and dark caramel tones.

Should I attempt this again (and given the flavor I probably will), I will weight the althus before soaking it, so that I can retain some control over how hydrated the final dough is.

As I now realized that even a hydrated dough that resembled a batter could yield good results, I spent the last couple weeks thinking about a further variation on Hamelman's rye - one that still incorporated the hot soaker, but went for considerably higher hydration levels.  As luck would have it, inspiration came in the form of SylivaH's wonderful seeded bread and hansjoakim's very timely seeded sourdough rye that features a quite wet dough.

So, I decided to draw from these and construct a rye that would be an all-sourdough bread with no commercial yeast, use a boiling soaker, and feature the addition of other seeds.  The general numbers I had in mind were a levain that comprised 40% of total weight and a soaker of equal weight.  Thus, I was looking for fully 80% of the dough to be either preferment or soaker.  Here is the formula in full:

I should mention that the 'high gluten' flour I use is KA's Bread flour, which, with a protein content of 12.7%, is at the low end of what can be called high gluten flour.

The levain and soakers were created 12 hours in advance of the final dough mix.  I first mixed them together with the small addition of water to fully disperse the levain, and then added the remaining flour, seeds and salt.  The first thing I noticed was that while the hydration here was 100%, the dough was still more dough-like than batter-like, and I attribute that to the amount of water absorbed by the flaxseeds. 

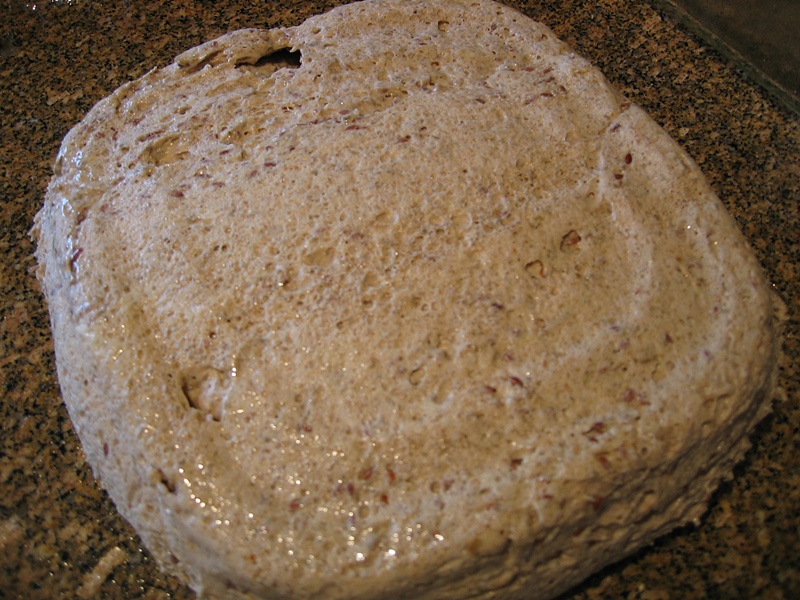
I had planned on a primary fermentation of 45 minutes, but as the pictures below show, in just 30 minutes the dough had doubled in volume and was threatening to climb out of the bowl it was in. 


I'm assuming that the fact that the levain accounts for 40% of the dough weight is responsible for this - my other rye experiments generally involve a levain that constitutes about 25% of total weight.

The dough was divided and deflated and then shaped and placed into the bread pans. 


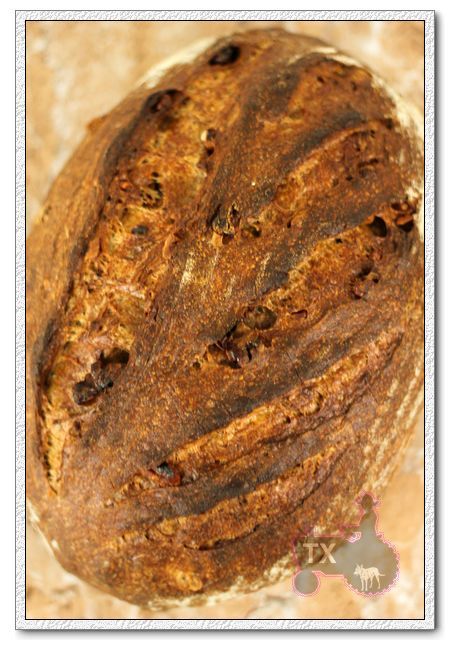
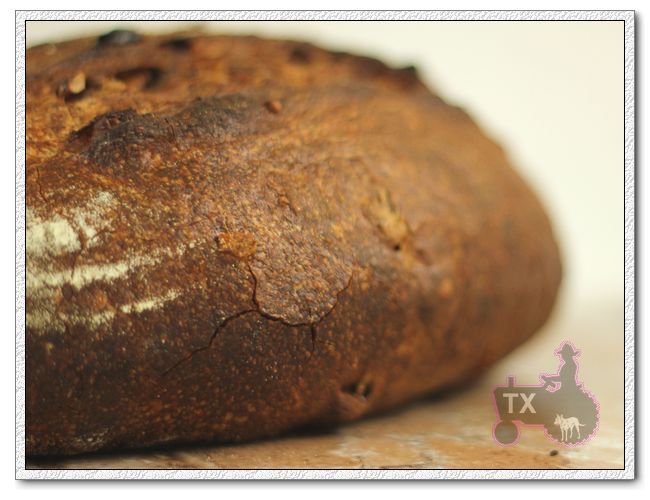
I had the forethought to immediately begin preheating the oven which was fortunate, because in just a little over 30 minutes the loaves had risen just above the rim of the pans and I knew that they needed to be placed into the oven at once or else risk overproofing and collapse.


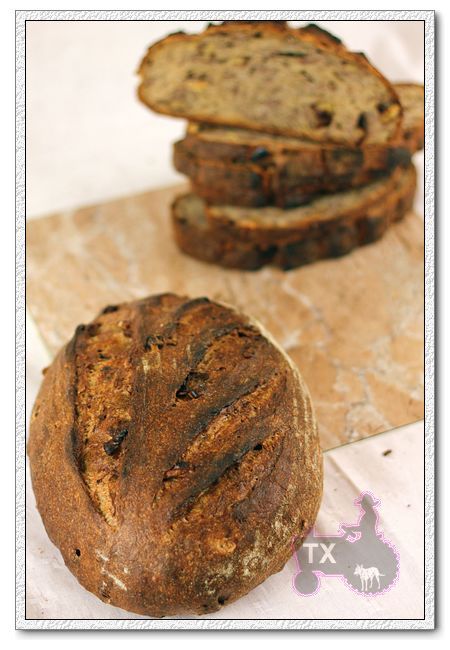
The total bake time was 75 minutes, beginning at 475° and then decreasing the temperature by 25° in 15 minute increments, so that the final 15 minute bake was done at 375°.  I cooled the loaves, shown below, and then wrapped them in linen for 48 hours.

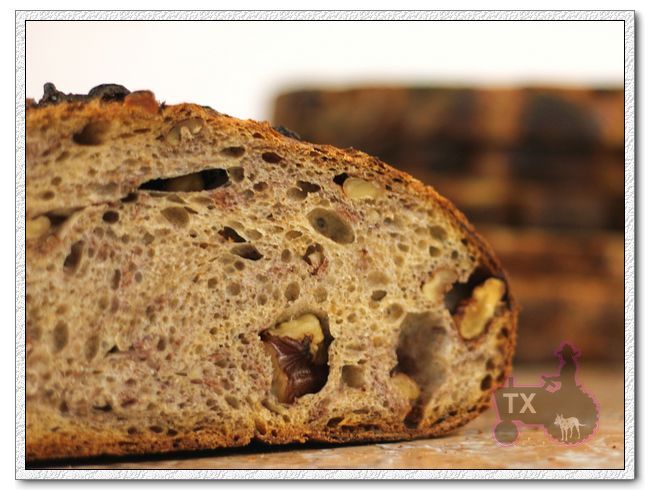
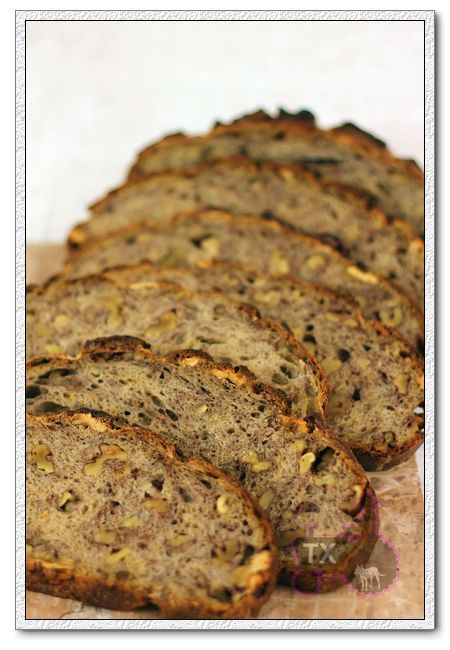
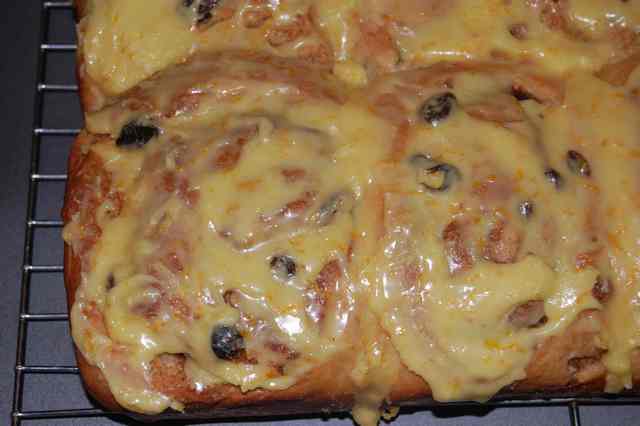
This afternoon I finally cut into one loaf and found a very agreeable crumb that while moist, is nowhere near as moist as the previous loaf made with altus.


The addition of sesame and flaxseeds to the toasted sunflower seeds is quite noticeable and the sesame seeds add a nice complexity of flavor and balance out, along with the sunflower seeds, the sweetness from the hot rye soaker.

I must admit that I have become smitten with ryes.  The flavor(s) and texture are just exquisite.  I grew up hating rye bread, because the only rye I was ever exposed to was the caraway seed laden version sold in most groceries.  I hated caraway seeds as a kid, and I've never outgrown that.  So it was not until quite late in life that I've finally discovered the wonders of rye.

Better late than never - and even better with a little goat's cheese!

Larry


proth5's picture
proth5

Oh,

for North/Central America

Winner - TEAM USA!!!!!! They ROCK!

proth5's picture
proth5

 8:30 AM - a full hall to listen to Ciril Hitz talk about laminated pastries and brioche.

Even the professional's heads were reeling with the amount of information Mr. Hitz can pack into a lecture.  We were given a CD with links to Youtube instead of the traditional paper sheets.  There was just that much material...

There were, however, some points that were both useful to home bakers and quite memorable.  Mr. Hitz spent some time talking about mixers for making bread dough in general and sweet doughs in particular.  He is a big proponent of the professional needing both a spiral and a planetary mixer.  He described the action of the spiral mixer as a trip to the massage parlor (it's Las Vegas...) - your back is rubbed with long strokes and eventually feels just right - the muscles have been worked.  A planetary mixer, he opined, was more like a bar brawl.  One person throws the other against a wall and eventually the muscles are worked, but in a much more violent way.  I've never quite heard it put that way before.  It will take some time for me to get that image out of my head.

Continuing on he said that the most important thing to evaluate when choosing a planetary mixer is the tolerance between the dough hook and the bowl.  If it is tight, the dough will pick up well and mix cleanly.  If it is loose, the dough will ball on the hook and make trouble.  This is certainly something I have seen with my faithful KitchenAid (which will soon be supplemented with a spiral) where the hook clears the bowl by several inches.  But the spiral really is a "one trick pony" - it exists to mix dough.  It does not cream or whip, so for someone working pastries, the planetary mixer will still be required.  For home baking, Mr. Hitz likes the Viking (now, don't everyone rush out to buy it - although independently I have heard good reviews on this mixer) he feels that with it he can develop dough 25% faster than with a KitchenAid.

He also weighed in on the great fresh vs. instant yeast debate  For all of his baking, especially at Johnson and Wales, he has transitioned all of his formulas to instant yeast.  He claims that he can find no degradation in the finished product.  He uses a conversion factor of .4 for fresh to instant rather than the more traditional .33 (and I am still too sensitive on the subject to report what he said about yeast and salt during mixing.)  Please, let's not open that debate, I just thought it would be interesting to report this, because he is a picky man with strong opinions.

He also describes osmotolerant yeast as "the way to go" for any sweet doughs.  He feels it lasts up to six months in the refrigerator (hardly "forever") once the package is opened. 

As he was showing us pictures of over fermented pre ferments, someone asked about making use of those.  The distinguished bakers who gave us the lectures on pre ferments had indicated that they could be used - with some product degradation - at a lesser percentage of the total flour.  Mr Hitz expressed agreement, (especially about the product degradation) but told us that when his students allow the pre ferment to get over ripe, he makes them use all of it because next time they will pay better attention to what they are doing.

I write 'em like I hear 'em.

A class with Mr. Hitz is not really a logical linear progression.  It is a kind of Mr. Toad's Wld Ride - high energy with bits of learning on the way.  So we are now reduced to some great quips and quotes.

On proper gluten development: "There is nothing that beats time and controlling dough temperature in a proper development."

On butter: "I cannot emphasize enough that the butter used in lamination must be at least 83% fat content."  Any other butter must have a drying agent (flour) added to avoid it cracking apart in the lamination process.

And my favorite: "My theory is, if you don't have a sheeter - don't laminate." (Ok, no throwing of hard objects - he was talking to a group of primarily professional bakers - and for professional bakers he has a point. Did I mention he is opinionated?)

He also passed on a tip he had gotten from Peter Yuen (if you don't know who he is, type the name into your favorite search engine) which was to drill a 1/8inch or so hole in the bottom of brioche tins so that the steam could dissipate and the bottoms bake evenly and flat.

And so much more.

Mr. Hitz is currently in the thrall of blast chillers (for some good reasons) and the question and answer period had spun itself out to a discussion of the best way to use these marvels.  So I had a more important destination - the competition area for the LeSaffre Cup.

I neglected to mention the teams that competed yesterday.  Once again, very beautiful breads.  Peru had a fabulous decorative piece of a working pendulum held aloft on framework of bread.  Very nice.

The ceremony to declare the teams who would compete at La Coupe du Monde de la Boulangerie had a familiar air.  Folks went on and on in three languages (too bad for Brazil, eh?) thanking everyone who was even remotely connected with the competition.  There was of course the City of Las Vegas, the Bread Baker's Guild of America, many individuals, the artisan baking community in general...Oh, you want the results?

Teams would be chosen for South America and for North/Central America.  There would be a challenger team and the team that would actually compete in Paris.

For South America:

Challenger Team - Brazil (thought they might regret that bland decorative piece)

Winner - Peru  (and the crowd goes nuts!)

For North/Central America

Challenger Team - Costa Rica

Pages

Subscribe to RSS - blogs