The Fresh Loaf

A Community of Amateur Bakers and Artisan Bread Enthusiasts.

Blogs

dmsnyder's picture
dmsnyder


I've been thinking about baking a sourdough nut bread for some weeks. They are so nice plain and with cheese. With lots of family expected for several days around Thanksgiving, I'll want a variety of breads I can take out of the freezer to serve with meals and for snacks. I like to serve sourdough nut breads with hors d'oeuvres.

I thought over the breads with nuts I've made before but decided to try something new: a French-style (not too sour) Pain au Levain with hazelnuts and currants.

I based the bread on Hamelman's Pain au Levain from “Bread.” I added about 25% nuts and currants to the dough at the end of mixing and followed Hamelman's procedure for bulk fermentation, proofing and baking.


Levain build

Wt.

Baker's %

KAF AP flour

4.6 oz

93.50%

Medium rye flour

0.3 oz

6.50%

Water

3 oz

60.00%

Mature (stiff) starter

1 oz

20.00%

Total

8.9 oz


Final dough

Wt.

KAF AP flour

1 lb, 9.8 oz

Medium rye flour

1.3 oz

Water

1 lb, 1.8 oz

Salt

0.6 oz

Levain

7.9 oz

Roasted hazelnuts

4 oz

Zante currants

4 oz

Total

3 lb, 13.4 oz

Procedure

  1. Mix the final levain build 12 hours before the final mix. Cover the bowl and let it ferment at room temperature (about 70ºF).

  2. Mix all the ingredients except the salt and levain to a shaggy mass. Cover and let rest (autolyse) for 20-60 minutes.

  3. Sprinkle the salt over the dough and distribute chunks of the levain over the dough. If using a stand mixer, mix with the paddle at Speed 1 for 1-2 minutes to incorporate the added ingredients and then with the dough hook for about 6 minutes at Speed 2. There should be moderate gluten development. Add the hazelnuts and currants and mix for another 2 minutes or so at low speed. Desired dough temperature is 76ºF.

  4. Transfer the dough to a lightly floured board and knead briefly to evenly distribute the nuts and currants. Then round it up and place it in a lightly oiled bowl and cover tightly.

  5. Bulk ferment for 2 ½ hours with two folds at 50 minute intervals.

  6. Divide the dough into two equal pieces and preshape as rounds or logs. Let the pieces rest for 20 minutes.

  7. Shape each piece as a boule or bâtard and place en couche or in a banneton. Cover with plastic or a towel.

  8. Proof the loaves for 2 to 2 ½ hours.

  9. Preheat the oven to 500ºF with a baking stone and steaming apparatus in place 45 to 60 minutes before baking.

  10. When proofed, transfer the loaves to a peel, score them and transfer them to the baking stone.

  11. Turn the oven down to 440ºF and bake with steam for 15 minutes, then in a dry oven for another 25-30 minutes.

  12. Transfer the loaves to a cooling rack, and cool completely before slicing.


    Notes on my baking procedure

  • To steam the oven, I use a cast iron skillet filled with lava rocks. This is pre-heated along with the baking stone. Right after the loaves are loaded on the stone, I place a perforated pie pan with 10-12 ice cubes on top of the lava rocks.

  • I start my bake with the oven at conventional setting. At the end of the steaming period, I switch the oven to convection bake and lower the temperature 25ºF.

  • For this bake, when the loaves were fully baked, I turned off the oven and left the loaves on the

    stone with the oven door ajar for 10 minutes.


We tasted the bread when (almost completely) cooled. The crust is very crunchy. The crumb was denser than I had hoped, although this is a rather low-hydration bread. My experience with nutted breads has always been that the crumb tends to be less open than expected, so now I expect it.


The crumb was very chewy. The flavor of the bread was lovely, with no perceptible sourness, except for the sweet-sour flavor of the currents. At this point, the bread, nuts and currents each contributes its distinctive flavor. Quite nice.


I'm looking forward to having this bread toasted for breakfast. 


David


Submitted to YeastSpotting


Franko's picture
Franko

Savoury Polenta Levain


This summer our garden provided us with a bumper crop of little cherry tomatoes , so many in fact that we, or rather my wife Marie, ended up putting a large portion of them in the dehydrator so we could make use of them through the winter time. The tomatoes were cured briefly in a mix of salt, olive oil and fresh oregano before going into the dehydrator. When they were finally ready to eat we were amazed at how well the pure tomato flavour had been retained. I've eaten a lot of the sun dried type that you can find at the grocer or deli over the years, but I've never had any with quite as intense a flavour as these little gems. At last count we had just over a half pound of dried cherry tomatoes , which made me think that we could spare a few to make a bread with. The idea of using them in a loaf with polenta came from remembering an excellent grilled polenta with a sun dried tomato, garlic, parmigiano and olive oil dressing that I'd had years before at a pot luck BBQ with some friends.

Searches on TFL and the web in general didn't turn up much that I was interested in as most them called for eggs and milk or other ingredients I wasn't keen on, so I thought a little experimentation was in order to make the bread I had in mind. It had to be made with natural yeast, polenta -(more accurately, a hot cornmeal soaker), and the dried tomatoes, other than that I was pretty open to using whatever I felt would help compliment the flavour of the tomatoes. Thinking about the grilled polenta dish that I'd had, I decided to just go with some roasted garlic and parmigiano as the flavour additions and see how that worked. Well it worked just fine! The tomato flavour came through as the main player, the garlic and cheese offering subtle support, and the polenta adding a soft texture to the overall loaf. The sour sort of plays around in the background, which is what I was hoping for since I wasn't going for a tangy or sharp flavoured bread. The polenta gives it a soft crumb, and the wheat provides a good chewy crust, making for a pleasant contrast while you're eating it. This bread is great for panini sandwiches and toasts up quite nicely as well, but to me this is what I call a 'cocktail bread' , or something that you might make to take to a friends for dinner, or to have with some olives and cheese and a glass of wine as your waiting for the main course to finish cooking. There are a number of other things you could add to it such as toasted pine nuts, various herbs, or a different type of cheese but if you're looking for the taste of the tomato to shine through I'd recommend using a light hand. The recipe is included below as well as some photos. If any TFL'rs are interested in giving this one a whirl, I'd be interested to hear your thoughts on it.


All the best,

Franko


                      SAVOURY POLENTA LEVAIN

Ingredients

%

Kg

Kg


Levain


Mature liquid Culture

13

10


Bread Flour

100

78


Water

125

100


Polenta


Water-144 F

100

300


Yellow Cornmeal

33

100


Butter/olive oil *

5

15


Final Dough


Bread Flour

100

600


Polenta

69

415


Honey

2.5

15


Roasted

Garlic/

Shallots


6

36


Parmigiano Cheese

10

60


Levain

31

188


Salt

2

12


Water

25

150


Dried Tomatoes

*

10

60


Total


1305.5


Notes:

*drizzle a little olive oil over the tomatoes to soften before starting the mix.

sundried tomatoes packed in oil and drained can be used as well -all or in part

* either butter or olive oil work well, use butter if a richer flavour is desired

Procedure:

  • Mix the levain 16-18 hrs before making the final dough and keep at room temp.


  • Make the polenta at the same time as the levain. Pour boiling water over the cornmeal and butter/oil and stir well then heat in microwave on high for 1 minute, stir until it begins to thicken, then heat for another minute or less and stir again till the polenta is very thick. Pour into a shallow container and let cool overnight. The polenta should be soft and slightly granular, not gelatinized or rubbery.


  • Break the polenta up in the mixer using the paddle attachment on 3rd speed for 1 minute, then add and mix all the ingredients except the salt and tomatoes on 1st speed until combined in a rough mass. Add the salt and mix on 1st speed for 3-4 minutes then on 2nd speed for 7-8 minutes. Adjust the water if needed to attain a medium soft dough. The dough should be soft enough to incorporate the dried tomatoes easily.


  • Mix in the dried tomatoes on 1st speed until thoroughly combined. Knead the dough by hand on the counter for 4-5 minutes using minimal dusting flour and a scraper until it's developed and the dough is smooth and elastic.


  • 1st stretch and fold after 1 hr, then again after the 2nd hr.

  • Retard at 45F or less for 18 hrs. Allow the dough to come to room temp of 70-75F for 1-1/12 hr before shaping.

  • Lightly round the dough, cover and rest for 15-20 minutes, then shape as desired and roll the loaf in semolina. Try to tuck any tomatoes poking through the suface back inside or underneath the loaf to keep them from scorching. Let rise for 2-1/2 to 3 hrs, then slash and slide on to a stone in a preheated 500F oven with normal steam and lower the oven temp to 460F. Bake for 15 minutes then rotate the loaf for even baking if using a non convection oven and bake an additional 20-25 minutes, rotating the loaf once more.

  • Cool the loaf on wire racks for 8hrs wrapped in baker's linen

breadsong's picture
breadsong

Hello, I recently purchased the Tartine Bread book, by Chad Robertson, when I had an opportunity to visit the Bakery.
I was there for breakfast, so alas, did not get to taste Mr. Robertson's bread, but did get to enjoy a lovely croissant & have a good look at his book... 


I really liked how Mr. Robertson described his journey as a baker and it's beautifully written and illustrated.
I especially liked what he said about fermentation...I had to have this book to add to my collection back home!

My dear father-in-law celebrates a milestone birthday this weekend, so I wanted to bake this special Country Bread for him.
I really tried to make sure I was fermenting the dough in the right temperature zone...ensuring a cool enough environment for the leaven and then a warm enough environment for bulk fermentation...requiring some woodstove management as I tried to control temperature in the house!

I retarded the loaves in the fridge for 7 hours before baking. I don't have the combo cooker that is recommended in the book so just baked my usual way.  The first loaf went in straight from the fridge, and I had an interesting blow out on the bottom of the loaf, that actually made the loaf sit up pretty for pictures! The second loaf proofed for about 45 minutes prior to baking, and I scored it differently, hoping that would help control how the loaf expanded.

I scored the tops with an "F" for Father-In-Law...the aroma of the baked loaves is heavenly...the loaves sang nicely and the crust crackled!
I don't have a crumb shot yet because the bread's for the 'big day' tomorrow...I hope father-in-law likes his bread!!!  
Regards, breadsong

MadAboutB8's picture
MadAboutB8

Whole wheat multigrain sourdough from Jeffrey Hamelman's Bread cookbook is the bread that I bake quite often. I really like the mild sweetness from honey and the aroma from the mix of honey, whole wheat flour and grains. It got a nice texture and taste. I am always amazed at how sweet the bread is for a little amount of honey in it.

I wanted to try experimenting Peter Rienhart's whole wheat flour soaker with this WW multigrain loaves. I was so impressed with the 100% whole wheat sandwich loaf from Peter Rienhart's Wholegrain Bread. It delivered a tasty and soft crumb loaf (the details of that bake is here: http://youcandoitathome.blogspot.com/2010/10/100-wholewheat-sandwich-bread-peter.html.)

I was so curious to see what the difference Peter Reinhart's soaker method will deliver to the bread that I baked often and know its taste and texture profile.

Well, what can go wrong with matching technique and recipe of the two bread masters I admire the most, Jeffrey Hamelman and Peter Reinhart. 

The soaker method didn't dissappoint. It delivered more open and softer crumbs. I don't know if I was only imagining...but I think, by using soaker method, the WW multigrain also tastes nicer and sweeter. The taste and aroma from honey is more pronounced. All and all, I'm happy with incoporating soaker method to whole wheat recipe..and will definitely do it again in my future WW bake.

More photos and recipe can be found in the below link.

http://youcandoitathome.blogspot.com/2010/10/lastest-experiment-with-whole-wheat.html


Sue

http://youcandoitathome.blogspot.com/

breadsong's picture
breadsong

Hello,  I recently attended a weekend workshop at SFBI where we made six different kinds of baguettes. This workshop was a lot of fun and we benefited from excellent instruction from our talented, organized, extremely knowledgeable and hard-working teacher Frank!
On day 1 we made three kinds of baguettes (straight dough, sponge dough, poolish dough).
On day 2 we made teff, then wheat germ, then sunflower seed baguettes.
All were good, with the poolish, teff and sunflower seed baguettes being my favorites flavor-wise.
We were using an 11.8%, hard winter wheat flour for these baguettes.

I tried to take pictures showing what the dough looked like as it developed, and showing how the dough was shaped, as we progressed.
Some pictures are a bit blurry due to my poor photography skills, and the speed at which our instructor's hands shaped those baguettes. 
There are some really nice pictures for this baguette class from an earlier post by txfarmer:
http://www.thefreshloaf.com/node/18489/sfbi-baguette-weekend-workshop-photo-report

This was our very well-equipped working area (those OVENS!):


The hand mix, gluten developed after hand mix, gluten developed after machine mix (Frank demonstrated machine mixing for us on the second day)


The dough after 3 stretch and folds


Dividing the dough into square shapes, for preshaping


Preshaping (after gently degassing, first roll, then three pictures showing the second roll)


Shaping (after gently degassing, first roll, reversing the roll, second roll, then five pictures showing the last roll & seal)


 Extending (Frank's hint: press down and move hands outward while rolling, but don't stretch the dough sideways)


Frank's expertly shaped baguette


Proofed baguettes


Frank demonstrating scoring and my straight dough baguettes ready to bake


My first baguettes out of the oven!, the results of day 1 and a crumb shot

The results of day 2 and a crumb shot (this was a teff baguette)

While the dough fermented and proofed, Frank taught us about ingredients and fermentation among other things, upstairs in the classroom.

Frank also demonstrated how we might produce the same baking result in a home oven:

Cast iron pan with cast iron ball bearings heating in the bottom, fire bricks for top and bottom radiant heat, 550F temp!
Load bread, place perforated pie pan filled with ice cubes over cast iron pan, close the door, watch the steam pour out!
(I think Frank tried to plug the oven vents with tin foil but lots of steam escaped from the oven anyway, as the ice melted and dropped onto the hot cast iron)


This was a really, really good class. My classmates were all super nice people and enthusiastic learners who all made lovely baguettes!
The quality of Frank's instruction was superb, and thanks too to the bakers who took care of us and spoiled us with beautiful breads and pastries at breakfast, and wood-fired oven pizza for lunch on our last day!  
I hope you like the pics everyone.  Regards, breadsong 


hmcinorganic's picture
hmcinorganic

text to come soon, but here are some pictures of my sourdough from october 28th.  They turned out well!  I need a scoring lesson.  any good recommendations on this site?

baguette

boule before cooking.  I'm not really sure how to slash it...

and after

<picture>  not uploading right now...

this is my old standby the 1,2,3 sourdough.  I used 9 oz starter, 16 oz water (my starter is too wet) and 9 oz white, 9 oz bread and 9 oz whole wheat flour.  and 1 Tbsp salt.  I mixed for 2 minutes in my KA and then did 3 stretch and folds over 2 hours.  It developed nicely.  I fermented in the fridge for about 6-8 hours and then shaped using my brotform pans (that I haven't used in several years).  One boule and one baguette.  I couldn't get the chill off the dough so the rising time was a long time.  more than 90 minutes.  I have a real hard time telling if the bread has rose enough.

Scoring was ok;  I think on the baguette I should have had only 3 slashes;  but the top and bottom ears turned out really well with "gringe?"  the boule did not rise as much.  I think I need to try a tic-tac-toe scoring.  

these are for a dinner party tomorrow.  I 'll try to grab a crumb shot before they evaporate.  They smell great!

Floydm's picture
Floydm

I received a copy of Tartine Bread in the mail today and realized my baking bookshelf is now full.

My bread book shelf

(click the photo to see a higher res version on Flickr).

Um... yeah... I guess I'm going to need to start a new shelf!

Tartine Bread reminds me a lot of My Bread.  A West Coast version.  I haven't had a chance to bake from it yet but there are some interesting sounding recipes in there, like the Olive Oil Brioche that TXFarmer posted about recently.  I'm excited to check it out!

ananda's picture
ananda


Late in September, and with one week's notice of the event from the Publicity People, I approached my Level 2 students and invited them to enter the Young Baker of the Year Competition.  

This was hosted by Warburton's, who are one of the "Big 3" baking companies who dominate bread sales in the UK.   Six students entered and prepared their own recipes, which they spent a couple of weeks perfecting.   Of these, two were chosen to compete in the Regional Final held at Warburton's Bakery on the outskirts of Newcastle upon Tyne on Friday 15th September.

There were 5 students in the Final: 2 from Middlesbrough College, 1 from South Tyneside, plus Katie and Faye from Newcastle College.

The recipes are posted below.   There are also some photos from the event.   The loaves were made the day before and taken along for selected staff and managers at the Warburton's Bakery to judge.

Katie made bread using a local stout to make a traditional barm.   She also included a linseed soaker.   Fantastic recipe; malty with hydration at 75%: very attractive and flavoursome!   Faye used nettles, gathered from her own garden.   The bread was made with a white levain, and lightly spiced with roasted cumin and coriander.   Thanks Karin [hanseata] for your post which was the original source of some inspiration!

Hey, Faye was the winner!   She won £250, and now has a place in the National Final.   The prize for that is £1000, plus a work placement at a Warburton's Bakery!   The Final is a live "bake-off" at the HQ in Bolton, near Manchester, on 10th November.   How exciting; I can hardly wait to get on that train myself!


Baker Competition

Stout and Flaxseed Bread.


Stout and Linseed Bread Recipe


Barm

Formula (g)

Recipe (g)

Strong White Flour

25

750

Beer

25

750

Yeast

0.2

6

Total

50.2

1506


Soaker

Formula (g)

Recipe (g)

Golden Linseed

10

300

Water

30

900

Total

40

1200


Final Dough

Formula (g)

Recipe (g)

Barm

50

1506

Soaker

40

1200

White Flour

50

1500

Brown Flour

25

750

Beer

20

600

Salt

1.8

54

Fresh Yeast

2

60

Total

189.0

5670


Bread Method


Firstly the... Over Night soaker-


Weigh out 300g of golden linseed into a bowl and add the 500g of cold tap water.

Leave over night in a cool place for approx. 7 hours.

Then the...Over Night Barm-Beer ferment-

Weigh into a large bowl 750g of strong white bread flour- preferably Canadian and rub in the 6 g of fresh yeast gently with your fingers. Then pour in 750 of dark Allendale stout. Just combine the mixture to a paste then cover bowl to make airtight. Leave this in a reasonably cool place over night. 6-7 hours.

 On the Day the...Final Dough-


Weigh out dry ingredient first, the white and brown flour into a large mixing bowl. Rub in the fresh yeast gently with fingers and pour the salt to one side of the bowl. Weigh out the overnight soaker and add this to the bowl then weigh out the barm and add this also. Weigh out and add the stout. Attach to a mixing machine then attach the dough hook. Place on number 1 or lowest speed for 10 to 15 minutes. Periodically scrape excess dough from the sides and bottom of the bowl. After 10 minutes of mixing take a piece of dough and check the elasticity-the window pane method. If the dough doesn't stretch out enough place back onto a slow mix.

When mixed, take the dough out of the mixing bowl. Lightly grease another large bowl with shortening/butter. Very gently knead the dough in the bowl, cover with a cloth and leave in a warm place for ten minutes. Take bread dough out of bowl and weigh into 1kg pieces, then shape each piece into ovals/ balls. Sprinkle a dusting of semolina and brown flour into large bread proving baskets and transfer each loaf smooth side up into each basket. Then place baskets into a prover for about an hour until the bread has doubled and is not over proved.

Transfer each loaf onto a peel finely dusted with semolina and slash each top with a lame as desired.

Pre-heat the baker's oven to 210°C. Place in the oven for up to 25 minutes and pump the oven with steam straight after the bread is on the oven sole. Open the dampers, and bake a further 5 minutes.   Cool on wires. [Photos Below]

..

PIC_2617PIC_2618

Nettle Bread [Photos Above]


Makes a large loaf of 1000grams and a smaller loaf of 450grams.

Pre ferment -  Wheat Levain

Flour 284g

Water 170g

Total 454g


Final Dough

Flour - 568g

Salt - 16g

Yeast - 24g

Preferment - 454g

Water - 367g @ 20 degrees centigrade

Roasted cumin seeds - 3g

Coriander seeds - 4g

Dried nettle - 4g


Oven dry the nettles

Roast off the cumin

Crush the coriander seeds in a pestle and mortar

Boil 200g of water with a bunch of nettles and allow to cool

Place the flour, salt, preferment and yeast in a mixing bowl and the 200g of nettled water and 167g of cool water combined with a temperature of 20 degrees.

Place the mixing bowl on the machine and mix on speed 1 for 3 minutes

Then mix on speed 3 for 6 minutes until fully mixed

Mould the dough and rest for 5 minutes

Divide the dough into one small 450g loaf and a 950g loaf and shape

Place into baskets and place in the prover

Prove for 45 minutes to an hour at 35 degrees

Bake @ 220 degrees in a deck oven with the top to be set at 6 and bottom at 5 for 25 minutes.

Remove from oven place on wires and allow to cool.

To be fully enjoyed serve with cheese or soup.

PIC_2619PIC_2629

PIC_2637


I made the following breads at home over the half term holiday:

Pain Siègle

Material

Formula [% of flour]

Recipe [grams]

1. Rye Sour


Dark Rye Flour

10

169

Water

16.6

281

TOTAL

26.6

450


2. Final Dough


Rye Sour [from above]

26.6

450

Strong White Flour

90

1521

Water

51.4

868

Salt

1.8

30

TOTAL

169.8

2869

Pre-fermented Flour: 10%.   Overall Hydration: 68%

Method:

  • Build/elaborate the leaven and ferment overnight for 18 hours prior to use
  • Combine all the final dough ingredients, except the salt, and "autolyse" for one hour.
  • Add the salt and mix the dough for 15 minutes to fully develop.
  • Bulk ferment for 3 hours with 2 S&F...hourly intervals
  • Scale and divide into 2 equal sized pieces.
  • Mould round and place upside down in prepared bannetons.
  • Final proof is 1½ to 2 hours. Cut the top of the loaf just prior to baking.
  • Pre-heat the oven to 250°C. Bake with steam for 20 minutes. Drop the heat to 210 °C and bake a further 35 minutes.
  • Cool on wires
  • DSCF1419DSCF1426


White Levain with a Seed Soaker 

This was a cold soaker, using sesame and blue poppy seeds with no salt addition.   These were soaked for six hours prior to dough mixing.   I utilised an overnight retard for this bread.

Material

Formula [% of flour]

Recipe [grams]

1. Levain


Strong White Flour

33.3

480

Water

20

288

TOTAL

53.3

768


2. Soaker


Sesame Seeds

5.2

75

Blue Poppy Seeds

5.2

75

Water

31.2

450

TOTAL

41.6

600


3. Final Dough


Levain [from above]

53.3

768

Soaker [from above]

41.6

600

Strong White Flour

66.7

960

Water

20.8

300

Salt

1.9

28

TOTAL

184.3

2656

Overall Hydration

72%


Pre-fermented Flour

33.3%


Method:

  • Elaborate the levain and make the soaker 6 hours in advance
  • Mix all the ingredients to form the final dough, and fully develop this for 15 minutes.
  • Bulk prove ambient for 2 hours.
  • Retard overnight at 3°C in the fridge, covered.
  • Scale and divide in 2. Mould round, top with a mix of the seeds and prove in bannetons.
  • Bake profile is as Pain Siègle. Cool on wires.
  • DSCF1436DSCF1441


Best wishes to you all

Andy

probably34's picture
probably34

How do I upload pictures? It always says upload failed

txfarmer's picture
txfarmer

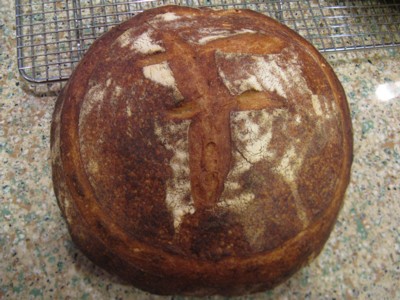
I am part of the wildly popular monthly "Daring Bakers" challenge. Joined this past April, since then, we've done some very interesting pastry recipes(I post my "official" DB post at my Chinese blog site). This month I did my first "yeast-y" challenge with them, so I want to shared it with TFL. The theme of Oct is doughnuts, so I picked the yeast doughnut recipe by Alton Brown (his recipe always works), and added my own Autumn twist by adding pumpkin puree and spices, as well as maple glaze and maple creme filling. Oh, also added a bit of my sourdough starter just for the extra flavor.

Pumpkin Sourdough doughnuts (adapted from AB's recipe)

Makes 12 to 13 doughnuts

AP flour, 280g

milk, 146g'

starter (55%), 71g

salt, 6g

instant yeast, 7g

egg, 1

butter, 35g

sugar, 25g

pumpkin puree, 82g

cinnamon,1.5tsp

clove, 1/8tsp

ginger, 1/2tsp

nutmeg, 1/4tsp


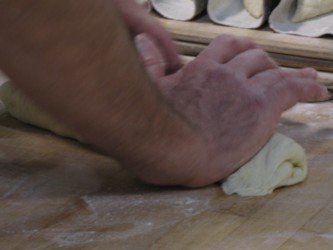
1. Mix everything but salt and yeast, autolyse 30min, add salt and yeast, mix/knead until the dough is smooth and strong. It's a very very very wet sticky dough, try not to add flour. I mixed until it pass the window pane test. Very strong gluten structure. However you'll still get soft doughnuts if you knead less, crumb would just be slightly less open.

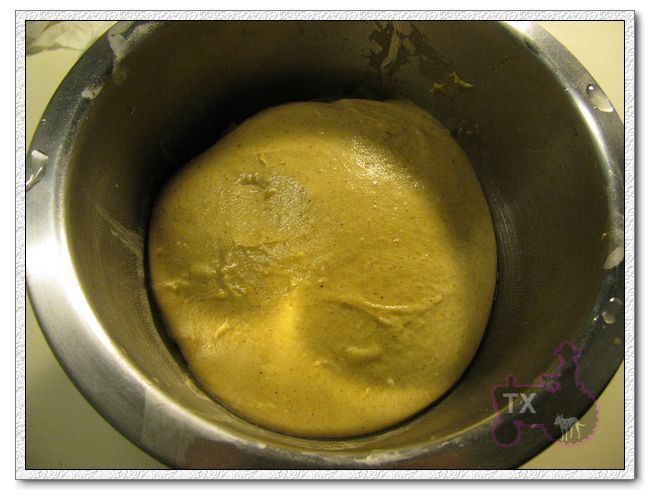
2. Cover and rise for one hour (~73F), there's a lot of yeast in the dough, it rises fast. The dough needs the extra yeast to expand properly in the short fry process. 

3. Punch down, cover and put in fridge so that we can fry them next morning and have fresh doughnuts for breakfast!

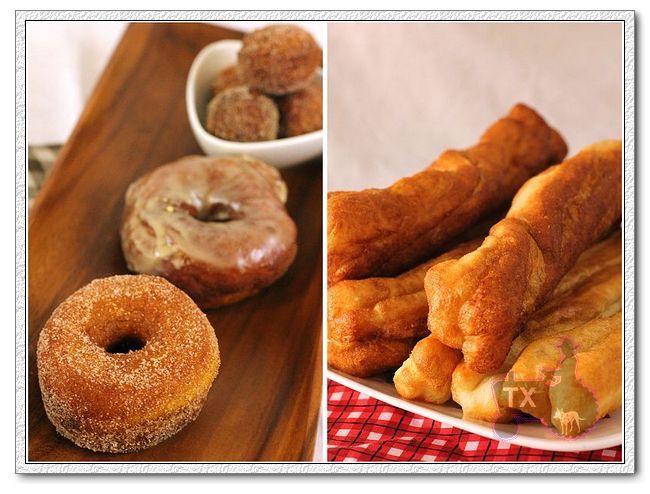
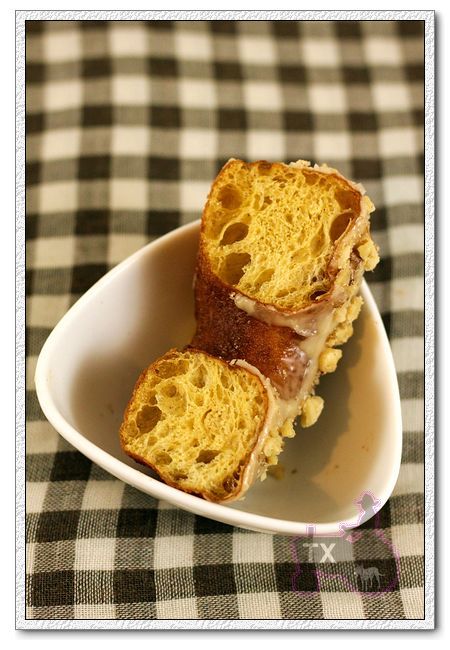
4. Next morning, pat out dough into 0.8inch thickness and cut out any shapes you like. At this time, you can fill them with maple cream (put in between two rounds and seal), or you can fill them after frying.

5. Let rise for 30 to 40 min until puffy, fry in 375F oil for 30 to 60 seconds until golden.

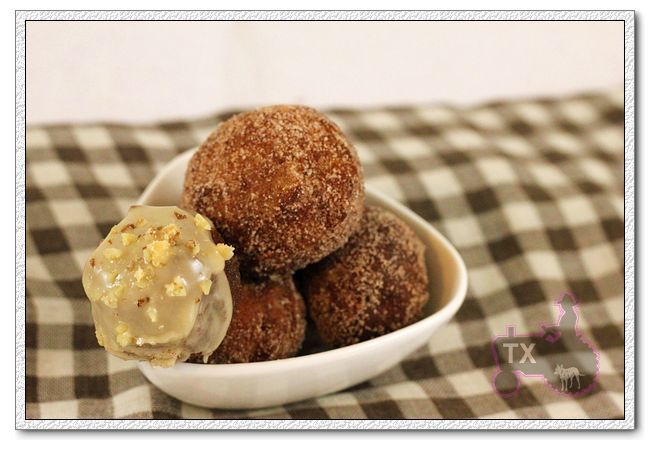
6. Fill with maple cream if you wish, then roll in cinnamon sugar or maple glaze.

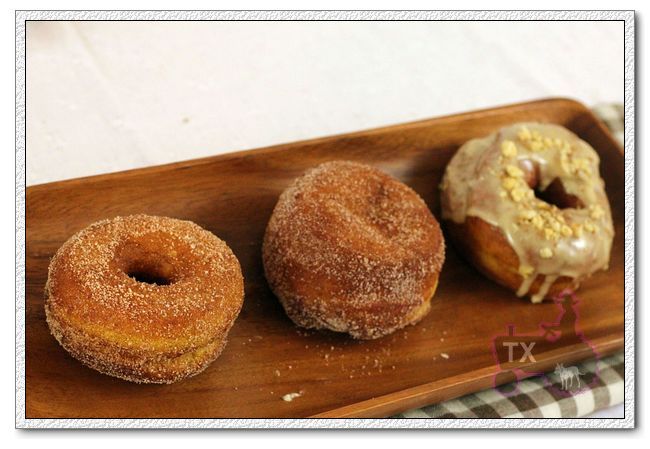
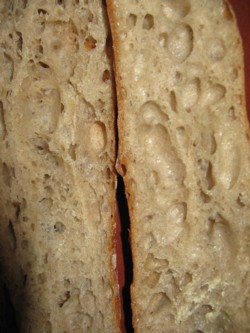
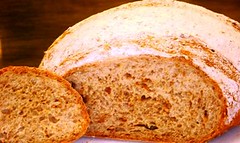
The incredibly open, soft, rich crumb is brioche-like, due to the enriched dough, as welll as a lot of kneading.

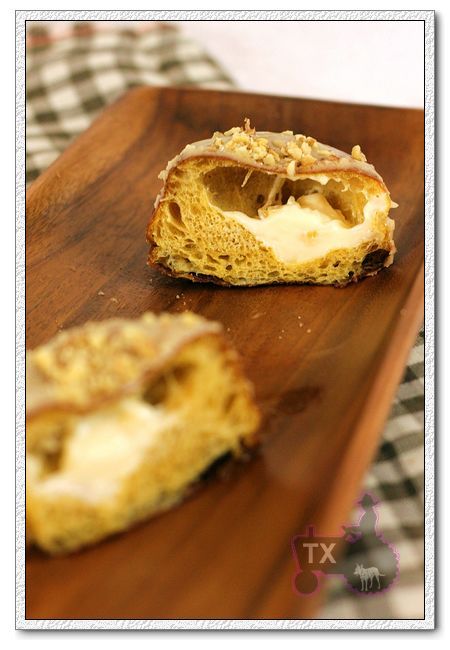
Maple glaze and cream went perfectly with pumpkin spice, classic.

Maple cream:

cream cheese, 113g

butter, 28g

powdered sugar, 50g

maple syrup, 1tbsp

- Beat until smooth


Maple Glaze:

powdered sugar, 100g

maple syrup, 80g

vanilla: 1tsp

- Beat until smooth


I particularly liked these doughnut holes, went down a little too easy. :P

--------------The Asian Twist -----------------

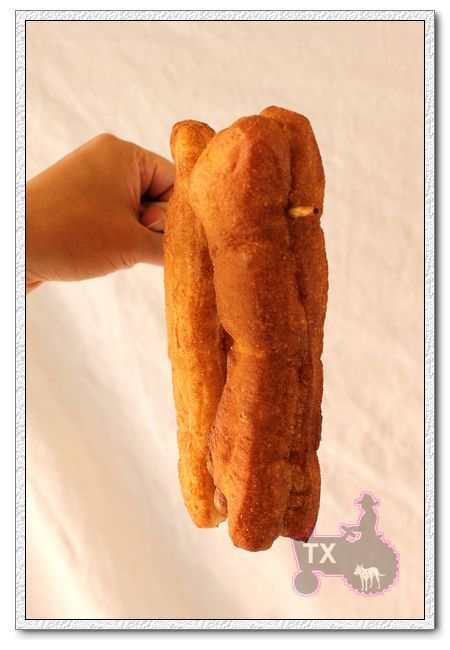
Since I had all that oil left, I decided to make 油条 - a popular traditional Chinese deep fried pastry. I grew up having it for breakfast, they are sold during morning rush hour by street vendors, wrapped in cheap plastic bags. Similar to doughnuts, they are deep fried, delicious, cheap, popular, and utterly void of nutritional value. :P  Yet, this is one of the comfort foods that I dream of often.

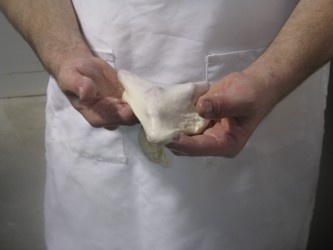
There are various ways to make 油条, in a home setting, we don't need those extra stuff to make it extra fluffy (less dough, more volume, hence more profit), so it can be made easily with a process similar to doughnuts, the difference is that the dough is plain without any fat or sugar.

油条

AP flour, 258g

milk, 180g+15g

starter (55%), 65g

salt, 5g

instant yeast, 6g

baking soda, 1/4tsp

1. Mix flour, starter, 180g of milk, autolyse 30min. Add salt and yeast, mix until smooth and pass windowpane.

2. Let rise until double, about one hour. Mix baking soda with 15g ofmilk, knead into the dough. Cover and fridge.

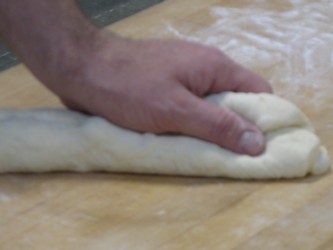
3. Next morning, roll out dough into rectangle, let rise for 40min

4. cut into 1.5inch wide stripes

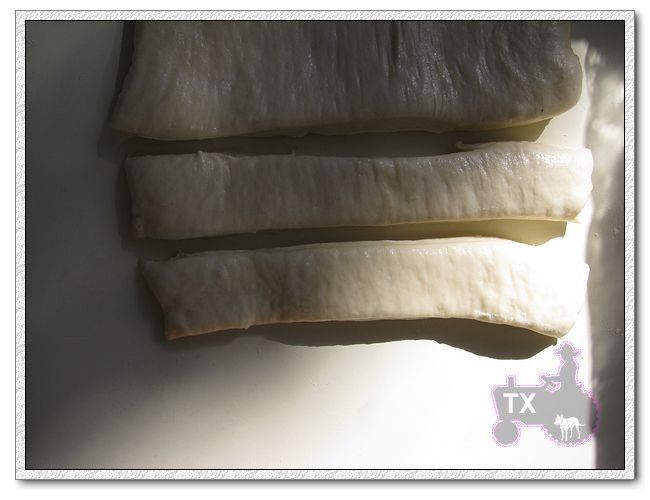
Lay one stripe on top of another, use chopstick to press an indentation in the middle

Stretch them longer (no longer than the size of your pot though)

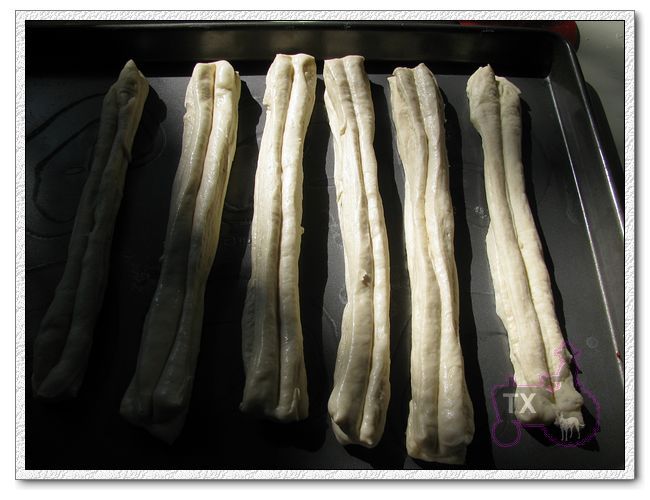
5. 375F hot oil, deep fry until golden, flip as necessary.

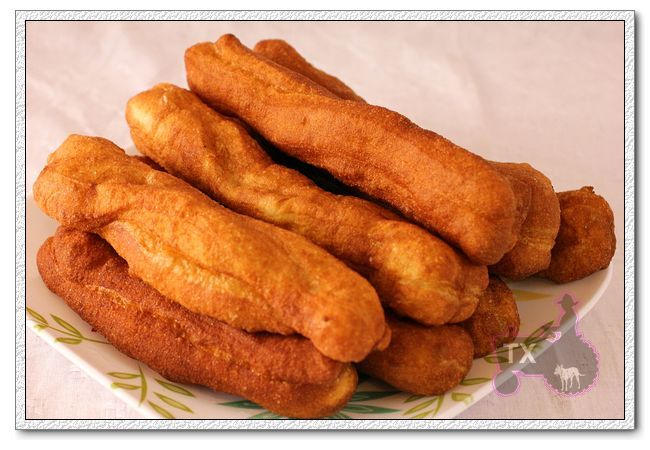
They are the most delicious fresh. There are many way of eating them. My family used to dip them in "salted fermentated tofu"(sounds strange? very yummy!). A popular way is to eat them with (or soaked in) warm sweet soy milk. In fact they are good with most dipping and sauces.

A popular street food combo is to wrap it with an egg crepe, finished with sweet sauce. Yum, just like my memory from Shanghai.

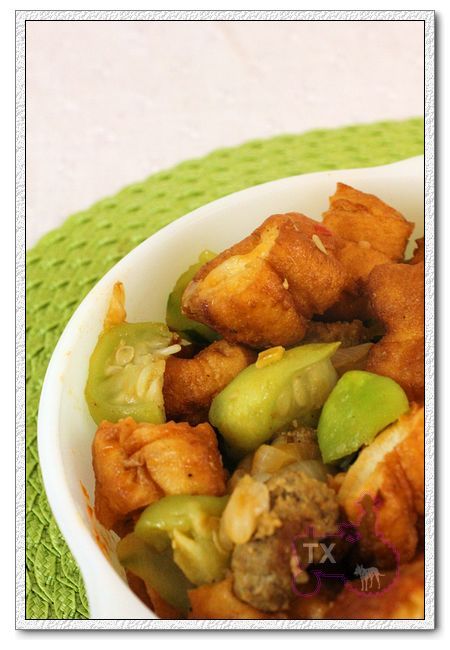
The leftover can even be cooked into dishes. I stirfried some with Chinese squash and meatballs.


I am very happy about this challenge. This is my first time to deep fry anything, I got to eat fresh doughnuts, AND relive some of my favorite food memories from Shanghai.


Pages

Subscribe to RSS - blogs