The Fresh Loaf

A Community of Amateur Bakers and Artisan Bread Enthusiasts.

Blogs

AnnieT's picture
AnnieT

I thought this might be of interest to fellow limeys, both here in the States and back home. My English neighbor gave me a well used booklet "Home recipes with Be-Ro Self Raising Flour" and "Home Recipes with Be-Ro Plain Flour". This had belonged to her mother, and unfortunately there is no date anywhere but Mary is 80 years old so it has to be pretty old. The recipes are given in grams and ounces and there are lots of pictures and useful hints and tips. I was especially interested to read that the company was offering three additional "specialist" flours - Be-Ro Strong White Bread Flour, Be-Ro Brown Wheatmeal Bread Flour and 100% Be-Ro Wholewheat Bread Flour. Their range even included dried yeast, each sachet being the right quantity for use with a 1 1/2kg bag of bread flour. Sorry to say I don't remember what brand of flour my mother used. Does this ring a bell with anyone? This little treasure measures 3 3/4"x 7 3/4" and just reading the index brings back happy memories of some good old English treats. A.

Franko's picture
Franko


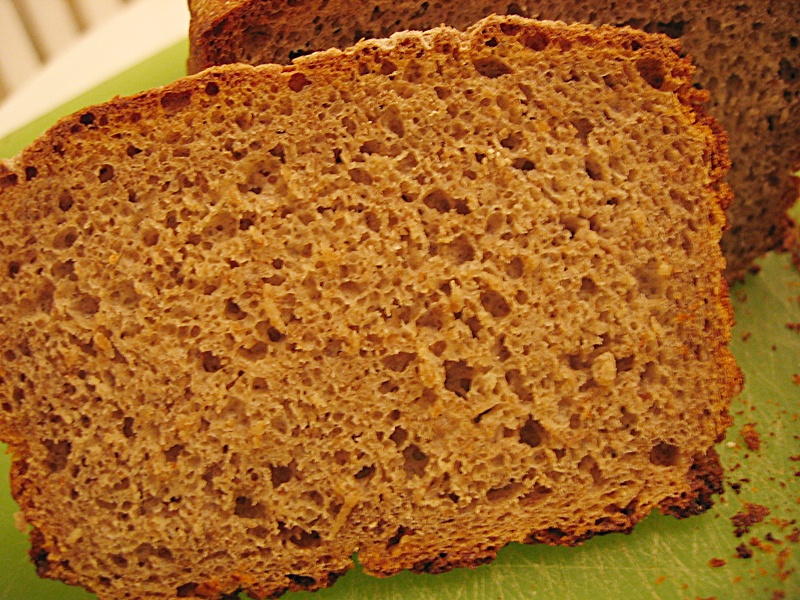
Horst Bandel's Black Pumpernickel from Hamelman's 'Bread' has been on my radar for as long as I've owned the book (about 9 months). The recipe is like no other pumpernickel that I've ever seen before, as all the ones I've come across previously have had caraway in them. I just assumed that it wasn't true pumpernickel if it didn't have caraway, so I've never bothered making it at home, having never acquired a taste for the stuff. When I read the formula for the HB pumpernickel I began to wonder if I'd ever really had a true pumpernickel since this formula and Hamelman's write-up preceding the recipe made it look very authentic to me. One of the other aspects of this bread that intrigued me was the long slow bake time of 12-16 hours. The process of slow cooking has always held a fascination for me through it's use of controlling heat and moisture, as well as smoke in the case of BBQ, to create something that is greater than the sum of it's parts. Anyone who's had the pleasure of eating a Texas style beef brisket or Southern style pulled pork shoulder will know exactly what I'm referring to. Never having baked a bread for much longer than an hour, the HB was something that I needed to try, just for the experience if nothing else. Last week I finally had all the things in place that I needed in order to make it, including the necessary free time. Two of the items had to be ordered such as the Pullman pan and the rye chops, and that took a few weeks, but in the interval I used the time to glean as much information from Andy, Nico, and others posted experiences with this bread as I could.

There are several components to this bread requiring a little preparation in advance, however I'm not going to go into all the detail here since Andy, Nico, Eric Hanner, Tx Farmer and Shiao-Ping have all covered this in their posts far better than I ever could.

http://www.thefreshloaf.com/node/17254/horst-bandel039s-balck-pumpernickel

What I will tell you is that this is without a doubt the stickiest, most cake-like bread dough that I've ever mixed by hand or machine. At one point early on in the hand mixing I wondered if the dough would ever come together enough that I could mold it, but with a little flour correction and some patient but gentle table work I finally managed to get it to a state I was confident it would mold properly after it's bulk fermentation of 30 minutes. Other than that everything went well thankfully, and I put it in the oven for it's overnight bake at 4:00PM, then gradually lowered the oven temp from 375F over the course of the next 5 hrs. Before going to bed I put the pan on a rack placed over an aluminium foil roasting pan and added 2L of boiling water to the roaster and lowered the heat to 170F (as low as the oven goes). Except for a 3AM check of the water level, the loaf went undisturbed until 8:00AM at which point I tested the loaf for excess moisture with a bamboo skewer. The skewer came out dry and the loaf was removed from the oven. By this time the house was filled with the rich aroma of rye and an almost a caramel like scent that even my wife Marie thought was quite wonderful. Remarkable, since she's not a fan of rye bread by any means.

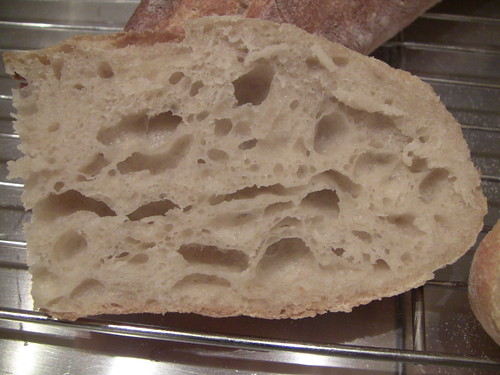
About 12 hours later I gave in and cut off a thin slice to have my first taste of this amazing bread. Trying to describe the flavour of this bread is like trying to describe a full bodied red wine. There's so much going on in it, from sour to sweet, to fruit nuances, overall balance, depth of flavour and finish, etc. It's simply the most flavourful and complex bread I've ever tasted. As for the bake, I think I could have gone with a little less time, as the crust is slightly thicker than I’d prefer, but the crumb is even textured and remains moist even after 5 days. For the most part I'm fairly happy with the result, but knowing that there is considerable room for improvement. I'm happier still with the fact that now I have a better idea of what real pumpernickel should taste like.


As much as I love the HB Pumpernickel, it's impossible to make a decent size sandwich with it so I used that as an excuse to make the Country Rye Bread from Tartine Bread a few days later. It's really just a Pane de Campagne but with an 81.8% hydration including leaven. Robertson indicates that you can vary the proportion of rye to suit your taste, and as the formula calls for only 17% , I increased it to 20% but keeping the water at the original weight. Other than that the procedure is the same as for his Basic Country Bread that I posted on last week.

http://www.thefreshloaf.com/node/20515/tartine-country-bread-same-dough-two-different-baking-methods

The dough had a cool 70F bulk ferment for 3hrs then placed in the fridge overnight till the next afternoon, (about 19hours). It sat at room temp for an hour, then divided, rounded lightly, and rested for 45 minutes. I shaped one for an oblong brotform and the other as a boule to go in a banneton. The dough was very slack and tacky so I dusted the brotform quite heavily, not wanting any sticking problems on unmolding, which left the finished loaf with a little more flour on it than I would have liked . The oval loaf was baked under a dutch oven, but on the stone as the lid of the dutch oven is concave and wouldn't have worked with this shape of loaf. The boule was baked entirely in the dutch oven. Both loaves turned out quite similar to the Basic Country (BC) loaves, with a nice dark colour and sheen to them. The loaf is quite a bit denser than the BC because of the rye, but with a slightly open crumb, if a little irregular in spots. The dough really needed a warmer bulk ferment during the initial stage, which I'll try to be more careful with next time around. I found this to be a pretty easy dough to make despite it's high hydration simply because you do all the workup on it in the bowl until it's time to divide and shape. Then it's just a matter of using a little flour to keep it from sticking to the counter and your hands. The flavour is very good , even better than previous versions of Pane de Campagne I've made that I thought were quite tasty, and this has a beautiful chewy crust that I prefer to the others.

Here on Vancouver Island we're well into storm season, with a cold wet winter fast approaching. Either of these breads will be fine accompaniments with some of my favourite slow simmered stews and braises to help see me through the worst of it.


Best Wishes,

Franko

highmtnpam's picture
highmtnpam

For the second proof, i cover my bannetons with clear shower caps from the motel. They don't last very and my stash is gone.  Think how happy I was to find this new product (at least I've never seen it before).  It has 10 covers. They are medium, large and x-large and they will cover round or oblong. THey seem to be pretty good quality.  Doing the happy dance :)  I'm sure people in King Souper's though I was crazy.   Pam

GSnyde's picture
GSnyde

Much excitement.  Kind of a busy weekend.  But late last night after getting home from a friend's birthday party, I mixed the levain for baguettes.  Today I tried to do a bit more baking than I should have.  I wanted to make Lahmajouns for lunch while the baguette dough fermented.  So I mixed the baguette dough first thing, with my first cof of cuppee.  It's a wonder I didn't put sugar and milk in the mixing bowl (I'm not much good first thing in the morning especially after a late night).

Once the baguette dough was mixed--using a variation on proth5's 65% hydration formula, which my spouse adores--I started the lahmajoun dough.  I followed the recipe that Xaipete had posted last year (http://www.thefreshloaf.com/node/12631/lahmejun-lahmacun-lahmajoun-armenian-or-turkish-pizza), hoping it was something like the lahmajouns of my Fresno boyhood.  

What I hadn't really figured was that the various steps in the baguette process and the various steps in the lahmajoun process would make the day just a tad impossible.  The lahmajouns are easy to make, but the topping takes some time, and they bake two at a time for 12 minutes each.  So the oven was tied up when it needed to be preheating for the baguette.  And I couldn't fit the baking stone, cast iron pan and sheet pan for lahmajouns in there all at once.  I was afraid the baguette dough would over-proof, but it all worked out.  I didn't really have a leisurely Sunday, though.

Here are the lahmajouns.  The dough was a bit too elastic, so I couldn't roll it out thin enough.  Besides being a bit too thick, they were excellent.  Thanks, Pamela.

IMG_1778

IMG_1779 

The baguettes, as I said, were a slight variation from Pat's formula.  I used KAF European-Style Flour instead of AP.  They sprung up good, but no big ears.  Totally delicious, with thin crispy crust and moist crumb.  Thanks, Pat.

IMG_1781

IMG_1784

After dinner (Lahmajoun Encore], we went to hear Rosanne Cash, a great modern Country singer and her incredible band.  Rosanne Cash is the daughter of Johnny Cash and June Carter Cash (of the Carter Family).  So, yes, she has a Mama June and we had a Lahmajoun.  It was meant to be.

All in all, a very exciting day.  Of course, Tasha slept through the whole thing.

IMG_1777

Glenn 

Ryan Sandler's picture
Ryan Sandler

Staying home and looking after my wife and new baby has given me all kinds of time to bake, which includes my weekly batch of baguettes.  This week was intended to be the same as last week but without the errors imposed by my wife going into labor, but let me take this opportunity to reiterate my formula and process:

Poolish

  • 5.3 oz. bread flour
  • 5.3 oz. water
  • 1/16 tsp yeast

Final Dough

  • 10.7 oz. bread flour
  • 5.3 oz. water
  • 5/8 tsp yeast
  • 0.3 oz. salt

Process:

  1. Mix Poolish night before, let sit ~10 -1/2 hours 
  2. Mix all ingredients with wooden spoon, let sit 5 minutes  
  3. Mix in mixer ~2 minutes until the dough windowpanes
  4. 30 folds in the bowl with a rubber spatula
  5. Ferment 1 hour, stretch and fold
  6. Ferment 1 hour more, divide into 9 oz. pieces, pre-shape oblong (I do a modified version of Hamelman's pre-shaping technique for boules--fold in half, then tuck the dough into itself with the fingers.  For an oblong, on the last tuck I twist my wrists inward such that it turns into a stubby torpedo shape)  
  7. Rest 10-20 minutes
  8. Shape as baguettes--I've been doing the "fold over the thumb and press" technique, twice in one direction and then once in the other, sealing the last against the work surface.
  9. Place on couche, cover with the folds  
  10. Proof 1 hour, 15 minutes  
  11. Pre-heat oven and stone to 535 degrees at least 45 minutes before baking. Place two metal loaf pans in the oven on a rack below the stone.
  12. Transfer baguettes to parchment on a sheet pan, score.  
  13. Pull the loaf pans out of the oven.  Soak two towels in a bowl of very hot water (my tap water gets plenty hot), transfer to the loaf pans  
  14. Slide parchment onto stone, load steam pans, lower temp to 485.  
  15. Bake 26 minutes, removing the steam pans and turning the baguettes around after 10.

This week's results:

Exterior:


Crumb

From Food


Bottoms


I find this week's results puzzling.  The exterior had a good color, but burnt on the bottoms.  I had good placement on the slashes, but either not enough depth, or not enough angle, or a little overproofing.  Flavor was good, though last week's was better.  Crust was still a bit chewy, not like the lovely crisp crust I got in week 5.  Crumb was fairly tight (the section in the picture was as good as it got--most of the baguettes were tighter than this)  Linked to the quality of the slashes?

 I'm thinking that I overproofed just slightly this week, and possibly degassed a bit much when I was making my slashes.  Last week when I got such good results I didn't know for certain how long I'd proofed, but I think it may have been closer to 65-70 minutes rather than 75.  Or the baguettes just proofed faster this time.  I need to watch the dough, not the clock, I guess.  This would be consistent with my results in week 5 as well--burnt bottoms, hit-or-miss appearance of gringe.  But I don't really know what I'm talking about, so feel free to correct me.

Next week then, a slightly shorter/more sensitive proof, and I think I might experiment with alternate shaping methods, see if one of those gives me better results.

trailrunner's picture
trailrunner

I have never made this before. I looked up a number of different recipes and then made up my own. I used my old standby of a buttermilk crust. I doubled the crust recipe .  I sauteed 7 sliced Gala apples till tender and added cinnamon and sugar and flour and a pinch of salt. I rolled out the crust and piled on the apples and baked till golden and juicy. I was wonderful with vanilla Blue Bell ice cream. We have it here in the South I don't think everyone can get it ...it is still sold in real half gallons. 


 Single Crust recipe:

1 c AP flour and cut in 5 TB chilled unsalted butter and 1/4 tsp kosher salt till large crumbs. I use my Cusinart.  Place in freezer till ready to use. Remove from freezer and toss with chilled buttermilk till holds together. Roll out on floured counter w/ floured pin. Brush crust with beaten egg white and pile on apples leaving a 2 inch border. Turn up and pleat edges of crust. Brush w/ remaining egg white and sprinkle with Turbinado sugar. Bake at 375 till brown and juicy...about 40 minutes. I used a piece of parchment paper on a cookie sheet and it worked great . 

Photobucket

Alfie's picture
Alfie

I have buying Reynolds parchment paper and recently saw

http://www.webstaurantstore.com/sub434/products/parchment-paper-pan-liners.html

The pricing between Walmart and the above link is so different I am wondering if I am missing something.

The S&H for webstaurantstore was high so does anyone have suggestions?


TIA, al

wally's picture
wally

One downside to working as a baker is that it doesn't allow me time to bake during the week.  So now everything gets crammed into weekends.  And frankly, sometimes after a week at the bakery, I really don't feel like spending a day off baking more.  And yet, inevitably I find my two starters staring at me ruefully, and so on a beautiful Fall day when the temperatures felt more like September than mid-November, I decided to do a series of bakes.

Below, from the upper left moving clockwise: a 72% rye with soaker, Vermont Sourdough, a batard and a boule of Polish Country Rye.

On Saturday I got started by mixing and then retarding overnight Hamelman's Vermont Sourdough.  I've discovered that even with giving the bread an hour and a half proof before final retarding, it still needs an additional three hours the next day at room temperature to finish proofing.  But, the finished loaf rose nicely in the oven.


Here's a couple crumb shots of the Vermont sourdough:


Saturday evening I prepared the rye levains and soakers for the 72% rye and the Polish Country Rye.  I've become so fond of the added sweetness imparted by soakers, that they are now a routine part of my rye preparation.  However, a couple weeks back I had my first experience with the dreaded 'starch attack' and this has led me to now add either part of all of the salt in my rye formulas to the soakers as a preventative measure.

This morning while the Vermont sourdough finished its final proofing, I began with the 72% rye because I knew it would have the shortest floor time before final shaping and baking.  In using a high proportion of the water for the recipe in the levain and soaker I unintentionally created a problem I had not foreseen: my kitchen was cold this morning, and I found that the flour temperature and those of the levain and soaker were only about 68° F.  But there was so little water to be added to the final mix, that it was not possible to arrive at a DDT of around 80°.  This necessitated both extending the bulk fermentation from 30 minutes to 50 minutes, and setting the dough container on top of my then-warming oven to increase its internal temperature.  Note to self: it's important to retain a sufficient amount of water for the final mix to adequately adjust DDT!

In any event, the jury-rigged proofing worked, and once the loaf was air-shaped (the hydration was at 80%) and placed in a pyrex baking dish, it required a little under 50 minutes before it was ready for baking.  I baked if for 60 minutes, starting out at 450° and dropping the temperature by 25 degrees every 15 minutes, so that the oven temp at bakes end was 375°.

Here's the final result: it will sit for 24 hours to completely set and then I'll add some crumb shots.  But it's already got a pleasant sweetness about it.

The Polish Country rye I altered slightly by upping the percentage of rye from its usual 15% to 30%.  Even with that, this is a most agreeable dough to work with - it has the gluten development and consistency of wheat-based doughs, so there is very little of the stickiness associated with high percentage ryes.  Final proofing after shaping one into a boule and the other a bâtard was about two and a half hours and it baked at 440° for 45 minutes.  Here's some more shots of the final result - crumb shots to follow.

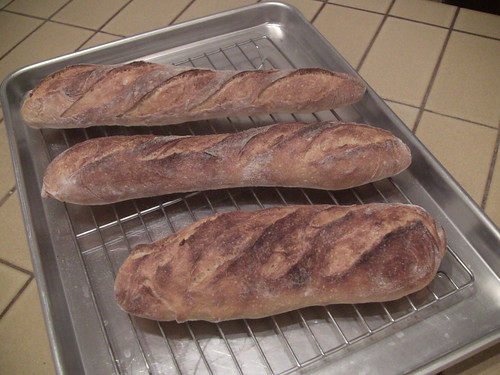
        All three breads were baked using a combination of SylviaH's wet-towel-in-a-dish method and my lava rocks in a cast iron frying pan to generate steam.  As the loaves and cuts indicate, I cannot say enough good things about Sylvia's simple yet effective work around for those who, like me, struggle to maintain steam in our steam-venting gas ovens.

So, at the end of a beautiful Fall day I sit at my kitchen table surrounded by a week's worth of wonderful and varied sandwich breads, along with a rich rye loaf that will accompany some good cheeses and spreads.

Not a bad way to unwind after all.

Larry

EDIT: crumb shots of 72% rye and Polish Country rye below.


mdunham21's picture
mdunham21

I am rather new at making homemade bread but it is something I am growing to love.  I come from a family of cooks and bakers, mostly from my mom's side of the family.  Her father was an excellent cook and baker; I recently stumbled upon one of his bread recipes for buttermilk loaf bread.  I have been making this loaf on the weekends for the past year or so.  However, he kept the majority of his recipes in his head and didn't write many of them down.  This has forced me to branch out on my own.  This weekend I prepared a biga pre-ferment for a pugliese from "The Bread Bible"

This recipe does not use Durum flour which is fine because I was unable to locate any at my local grocery.  The biga was prepared with a mixture of all purpose flour and coarse rye flour, a small amount of commercial yeast and water.  This mixture was allowed to ferment for about 18 hours at a cool temperature.  

I was pleased with the way the bread turned out, however I was hoping for a large sized boule compared to the one i was able to develop.  

The crust was soft and the crumb was chewy with a medium distribution of holes.

Overall I was satisfied with the results.  I currently have a sourdough starter in the making and cannot wait to make my first loaf in time for thanksgiving stuffing.

I look forward to any comments and suggestions

Cheers,

-M

breadsong's picture
breadsong

Hello, I have a group of people at work I wanted to bake bread for. I wanted to make them something special - this bread seemed to fit the bill!
It was such a pretty bread, as pictured in Advanced Bread and Pastry. With thanks to Mr. Michel Suas for a wonderful, if involved, formula - there are four separate preferments and I had to create a spreadsheet in order to figure out how to scale enough ingredients for 2000g of dough.
I divided into roughly 250g pieces to create as many loaves as I wanted to give (with one extra to keep, for tasting!). 
I sliced the one that achieved the least height & was surprised but happy to find an open crumb, so I hold out hope for the others. 
The caramelized hazelnuts are fantastically, wonderfully delicious in this bread!!!
Regards, breadsong

Pages

Subscribe to RSS - blogs