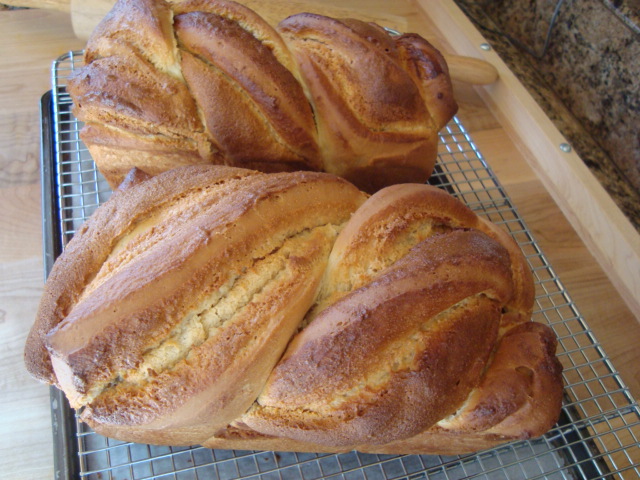
This is my first time making an Almond version or any version of a Russian Braided loaf and second attempt at posting it..a lot of writing today 'lol'..did better after going out to the movies! A recipe from 'Baking Artisan Pastries & Breads' Ciril Hitz forward by Peter Reinhart
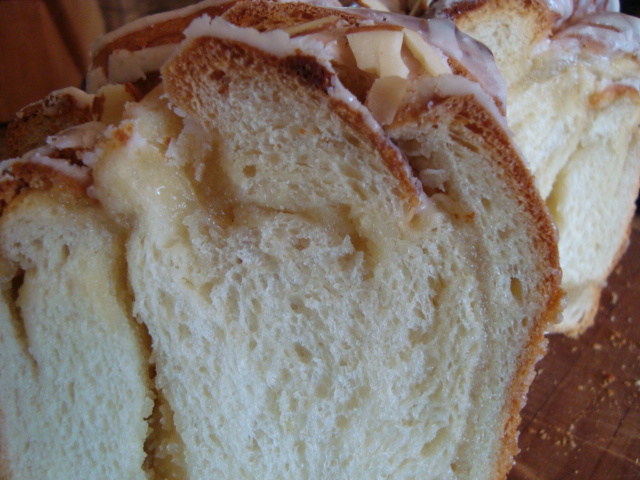
This bread is every bit delicious and rich as it looks...a real pleaser! What a lovely gift it makes too!
BASIC SWEET DOUGH
1. Whole Milk - I used 2% - 365g
2. Eggs - I used 1 large and one yolk for sealing seam - recipe calls for 50g for dough
3. Vanilla bean (optional) I used apx. 1 1/2 tsp. vanilla extract or to taste.
4. Bread flour - King Arthur All Purpose used -660g
5. Granulated sugar -70g- I used fine bakers sugar
6. Salt - 13g
7. Malt, diastatic - 7g
8. Lemon zest - from 1/2 of lemon
9. Unsalted butter - 70g
10. Instant yeast - preferably osmotolerant , I used the osmotolerant - 13g or 3 teaspoons
The Day Before Baking
1. Bring the milk and egg to room temperature...If you use a vanilla bean..split and remove, scrape out seeds. Add to milk. I added the vanilla extract to the ingredients.
2. Pour the liquids into a 5-quart stand mixer. I used my KAArtisan mixer and made pauses to keep the motor from overworking. Add the bread flour and instant yeast,sugar, salt, malt, and lemon zest. Mix on low speed until the dough comes together (cleanup stage). Scrape the dough down off the hook from time to time.
3. Soften the butter to a plastic stage. Increase the mixing speed to medium and slowly add the softened butter in stages. Make sure each addition is fully incorporated into the dough before adding the next.
4. When the dough is fully developed, check for a good window pane. Place into a plastic container sprayed with oil and ferment for 2 hours, room temperature.
5. After bulk fermentation, place on a sheet pan lined with parchment. I sprayed the parchment with a little oil. Cover with plastic and place into the refrigerator overnight.
BAKING DAY
Remove the dough from the refrigerator.
I rolled the dough out on a lightly floured board to apx. 16" by 1/4" thick, this gives you a nice width to your dough.
NUT FILLING - Can be repaired the night before
Nut Flour - I used Almond Flour - 125g
the recipe calls for corn syrup 25g or 1 1/2TBsp. I use Lyle's Golden Syrup 2 TBsp. apx.
Water - Up to 60g - 6 TBsp.
If you use pistachio paste you can add 1/2 tsp. lemon zest
Combine the ingredients except for the water, blend by hand and you also add 1/4 tsp. cinnamon. I didnot add cinnamon.
Slowly add water until you get a nice spreadable consistancy and can be used on the day of use to help desired spreading consistancy.
2. Spread a thin layer of filling over the entire surface of the dough, except leave 1 inch of a long end free of filling.
3. Brush the plain dough edge with a bit of egg wash. I make a wash with a pinch of salt and an egg yolk. Roll up the dough evenly into a long log and seal the edge to the roll.
4. For each pan cut the log 2 inches longer than the pan. I set my pan down next to log and cut it 2" longer on both sides.
5.Take a sharp knife and slice down the length of the rolls. Separate and twist two sections together two or three twists, keeping exposed layers facing up.
6. Place the twisted strands into the prepared loaf pans. Cover and let proof at room temperature until nearly doubled. at least 1 hour.
7. Preheat Oven 325F convection for 30min and bake for 40 -45 minutes until dark golden brown...Reduce temperature if they darken to fast.
SUGAR GLAZE:
Vanilla Bean (optional) I used 1 tsp of vanilla and 1 teaspoon of almond extracts.
Milk - Up to 35 g - 2 TBsp.
Powdered sugar 150g - 1 1/4 cups
Lyle's Golden syrup - or light corn syrup -1 TBsp.
I used 2 - 41/2 X 81/2 lightly oil loaf pans - This recipe is stated in the book to YIELD - 1 loaf 9 X 4 X 3 plus some extra for cinnamon buns.
INGREDIENTS
Nut Filling
Sugar Glaze
Egg Wash
Basic Sweet Dough
Chopped nuts for garnish

Proofing - Note: My new MacBook Pro above...it's all very new to me :) and I love it. I'm used to my old Windows XP ... so I'm still learning on this one.
I haven't quite figured out all about photo's yet, but getting there slowly but surely...nothing as fun as learning how to work a new PC for this grandma!
Back to the Russian Braid.

Submitted to Yeastspotting
Happy New Year!
Sylvia