The Fresh Loaf

A Community of Amateur Bakers and Artisan Bread Enthusiasts.

Blogs

wassisname's picture
wassisname


The goal:  A simple, 100% wholegrain, sourdough bread that I can make on an after-work weeknight schedule. 

I've tried a variety of approaches.  As is so often the case, simpler seems to be better.  On past attempts I was making things harder than they needed to be and the bread suffered.  This time I refrained from making any radical changes to the method and focused on a few details, trusting more to feel and less to thinking (and by thinking, I mean over-thinking... and over-thinking, and over-thinking).

Flour.  I switched from a WW bread flour that sounded good but just didn't feel right to a combination of Bob's Red Mill organic WW and Heartland Mills whole white wheat, about a 50/50 mix.  The dough felt better right from the start.

Hydration.  It needed more, so I gave it more.  I was resisting this earlier to keep the math simpler (I know, I know, but it seemed like a good idea at the time) and to keep the loaves from going flat, but the bread wants what the bread wants.

Salt.  Again, I ignored the math and reduced the salt because I was tasting too much of it in previous versions, even though the same amount worked fine using traditional methods.

Steam.  This method tends to produce a heavy crust so... less steam!

Fortune smiled on me and I managed to bake a couple nice loaves of bread.  It still isn't quite at the level of a one-day, Saturday sourdough, but it will certainly get me through when time is tight.  I plan to try this method again without any changes, and a result worth repeating must be a good sign.

The Method - for 2 loaves

Evening 1 - Starter Build - 335g WW flour, 250g water, 100g WW starter @ 75% hydration.  Mix 3-4 minutes.  Ferment @ room temp overnight, refrigerate the next morning.

Evening 2 - Final Dough - All starter, 500g Whole White Wheat flour, 200g WW, 2 tsp sea salt, 600g water.  Cut up starter and mix w/ dry ingredients.  Add water and mix until incorporated.  Knead 5-7 min wetting hands as needed.  Rest 5 min.  Knead 2-3 min.  Ball and refrigerate in closed container immediately.

Evening 3 - Proof and bake - Gently stretch dough into a rectangle 1 inch thick or less and place on floured board.  Cover with plastic wrap and let warm 1 hour.  Shape gently and proof 2 ½ hours.  My microwave functions as my proofing box.  It starts about 70F and will get to about 80F after 1 hour - this helps a lot.

Bake on preheated stone 500F for 5 min w/ steam.  Reduce heat to 460F and bake 45 min.  Place on cooling rack and go to bed.

Percentages (give or take, if you find fault with my math I don't want to hear about it, it's a work in progress [the math as well as the bread] =)) WW flour 52% / White WW flour 48% / Hydration 81% / Salt 1.6% / starter is approx. 35% of finished dough weight.

-Marcus


Sylviambt's picture
Sylviambt

Hi all. It's been quite a while since I contributed to this site. Lots of changes in last 18 months: bought a farm, began raising grass-fed/grass-finished beef, sold house, now building farm house, started hosting an FM radio show about sustainable farming and its links to sustainable local economies and community. I've been relying on my bread machine for months, but I'm itching to get back to "real" bread baking. I've signed up for a Hamelman challenge to push me along. A secondary challenge is that my bread books are in storage while the farm house is under construction. I'm relying on a copy from the local library to help me make it through.

Hope you're all staying warm this wild winter.

Sylvia

dstroy's picture
dstroy

not your ordinary "Ciabatta".


(image not mine - found online via reddit - shared for your amusement)

MadAboutB8's picture
MadAboutB8

I came across burghul (also known as bulghur) at the grocery section of Oasis Bakery. The name was really familiar and I remembered vaguely from the bread-making book that it was grain. So, I bought a one small tub hoping to try using it with the grain-bread, and the Jeffrey Hamelman's Five-Grain Levain is on my agenda. 

I did some research on Google about burghul in bread as well as flipping through my bread making cookbook (Reinhart's and Hamelman's). I didn't find much of useful information (must I say, it's almost ZERO information).

As it turned out, burghul is widely known more as bulghur than burghul. When I did searches on bulghur, it now returned a large amount of relevant and useful information. However, I only did this after I finished with my bake and was very curious about this grain.  Which, I will now refer to this grain as "bulghur". So, I baked with bulghur without having enough information on how to handle it correctly.  In fact, there are useful discussions about bulghur in The Fresh Loaf specifically for Hamelman's Five Grain Levain bread, the bread I was working on. Had I searched The Fresh Loaf about the bulghur (not burghul, sorry if this sounds confusing), I would have had enough valuable information to work with. Why didn't I do that, I will never know.

I substituted cracked rye in the recipe with bulghur and keep it as hot soaker (i.e. soaking grains and seeds by hot water for 12-16 hours) as I figured that I should treat bulghur as cracked wheat.  In fact, if you want to keep its slight crunchy texture, you should soak it in the cold water instead. And it's what I should have done. 

However, hot soaker also worked fine. But I just prefer the bulghur not to be mushy and blend into the bread like it was with the hot soaker.

Given that a lot of water was absorbed into bulghur (with hot soaker), the dough felt stiff, yet sticky. I had to add about 2 tablespoons more water to adjust the dough consistency. Again, I believe the stickiness might have come from mushy bulghur. If I am going to make bread with bulghur again, I would definitely soak it in cold water as I believe it will give a nicer texture and easier when it comes to dough handling.

The bread is very moist and a little dense. I found the crumb is also tighter than my previous  five-grain levain bake. I think that the cooked and mushy burghul played the part in the tighter crumbs. The grain flavour seems to be dominated by sunflower seeds in the grain mix. Its aroma came through every time I bit into the bread, which is really nice.  The bread also has nice texture from the flaxseeds and sunflower seeds. I couldn't taste the bulghur but it definitely added texture, moisture and chewiness to the bread.

All in all, this bread is my all-time favourite. It never disappoints. It is full of flavour an texture, not to mention its goodness from the wholegrain. Highly recommend for the multi-grain bread lover.


For more details and recipe you can follow the below link:

http://youcandoitathome.blogspot.com/2011/02/jeffrey-hamelmans-five-grains-sourdough.html

Sue

http://youcandoitathome.blogspot.com/


cranbo's picture
cranbo

So last night I set off on my first Pita adventure using the TFL recipe. 

I like weight/percentages, so I weighed out the measured ingredients to develop a formula by weight. This is my conversion technique pretty much for all baking now.

The original recipe was much too sticky for me as well (worked out to ~68% total  hydration for me); had to add 50g more flour to get a manageable dough, and even then it was a tad bit wet. Overall hydration of 59-61% seems to be in the right ballpark for pita. 

The below recipe is ~60% overall hydration:

Makes 8 balls @ 105g each

  • 346g AP flour
  • 148g whole wheat flour
  • 297g water
  • 28g olive oil
  • 22g honey
  • 11g salt
  • 7.1g instant yeast 

What I learned: 

  • Hot oven is a must, 500F worked best for me, baking stone on center rack
  • 2 to 2.5 minutes was perfect for me; I would go ~2 minutes, and flip for 30 seconds. 
  • The rolled-out pitas that I left to rise covered for 30 minutes gave the most even puff. It also could've been the 450F oven, though...at 20 minutes and 450F, only a few of them puffed up completely.
  • Next time, I will try the skillet/stove-top technique for better browning. Also much easier to place & turn than a 500F oven + baking stone! 
I'd post some photos of the tasty outcomes...but they're in my stomach right now. 
davidg618's picture
davidg618

I've been thinking about the Yukon Gold Rush miner. You'll recall, to preserve his sourdough mother--he called her Maude, after the first girl he'd ever kissed--and caught in a Yukon white-out, miles from camp, weak from having not eaten for four days--he'd boiled the last of his dogs, King, six weeks earlier--he'd kissed Maude one last time, placed her next to his heart, curled his emaciated body around her, and lay down in the lee of a a twelve foot drift. His last thought--really a final hallucination--he was lyin' in a tub, just like the one he'd had his last bath in, seven months past, in San Francisco, the night before he'd boarded the ship, Lily Longstockings, that brought him on the first leg of this, his final journey. The woman scrubbing his back was named Shirley. For a fleeting moment he'd considered changing Maude's name to Shirley, but in the next moment he'd berated himself for being so fickle. The tub, the one in his hallucination, was foaming with sourdough starter--only his knees poked above its writhing, bubbling surface. The  woman scrubbing his back this time, was...yep, Maude, but all growed up, an purty! He died a happy man. And, as we know, Maude survived --his starter, not the girl he'd kissed behind the one room school house they'd attended. She, was still in Kenosha, Wisconsin, the mother of seven children, four girls and three boys--and, rumor has it, Maude, the starter, is still alive today.

I fed my (unnamed) starter yesterday. I keep two versions. Once again I had about 200g of discard. My wife asked me to make biscuits with it. On my first attempt, http://www.thefreshloaf.com/node/21536/sourdough-biscuits-trying-real-thing ,  I felt the dough was a little dry, could stand more autolyse time, and would benefit from baking in a hotter oven. I tweaked my original recipe.

Here it is. The tweaks are in bold type.

Ingredients:

356g (12.5 oz.; 2 cups) sourdough starter; 100% hydration; refreshed 12 hours earlier, and left to develop in the refrigerator.

76g (2.7 oz.; 1/3 cup) 50/50 mixture butter and lard (yep, lard: probably Cookie's first (only?) choice). Cut in to 1/2" cubes and chilled in the freezer for 15 minutes

275g (9.7 oz; 2-1/4 cups) AP flour

14g (1 tbls) sugar

7g (1 tsp) salt

I mixed the flour, sugar, salt, and butter/lard cubes together with my hand, squeezing the fat cubes between my thumb and fingers until they were all flattened and well coated with flour. I added the sourdough starter, mixed it in, and kneaded the dough in the bowl, until it formed a ball. The dough felt a little dry, but I didn't add any additional liquid.

I rested the dough, covered and chilled in the refrigerator,  for 45 minutes.

I turned the ball out onto an unfloured dough board, and rolled it to about 1 inch thick, folded the dough in half, and rolled it out again. I repeated this three times more. Each time I rolled it out the dough got more flexible, and felt less dry. I was glad I hadn't added additonal liquid.

On the final roll-out I went to 1/2 inch thick, cut out 10, 2-5/8 in. biscuits, arranged them on a Silpat pad lined half-sheet pan, covered them with a dry tea towel, and put them into the proofing box (76°F).

They proofed for 2 and 1/2 hours. They had expanded, but not doubled.

Baked in a 425°F oven for 15 minutes (light golden brown). They more than doubled with oven spring. Lifting the first one to the cooling rack I knew, from its light feel, I had a success.

Reducing the flour amount slighty; caressing the dough, not mauling it; increasing the post-mix rest (autolyse?) three-fold, and baking at a hotter temperaure each contibuted to a lighter, tastier biscuit. I don't see a need to tweak further. I've named this recipe: Biscuts ala Cookie. Truth is however, with my  relience on chilled, shortening and dough, I've moved further away from "the real thing". That said, I'm sticking with this one. If Cookie had had a refrigerator/freezer he would have used them.

David G

An Update:

I've recently developed a new starter, and along with bread bakings decided to give it a try in Biscuits ala Cookie.

I followed my recipe to the letter with three exceptions in procedures.  I developed the levain and rested the dough (autolyse) at room temperature, and I hand-mixed the flour and butter/lard mixture into a finer mixture: sunflower-seed-sized bits. This resulted in less layering than in the earlier tries.

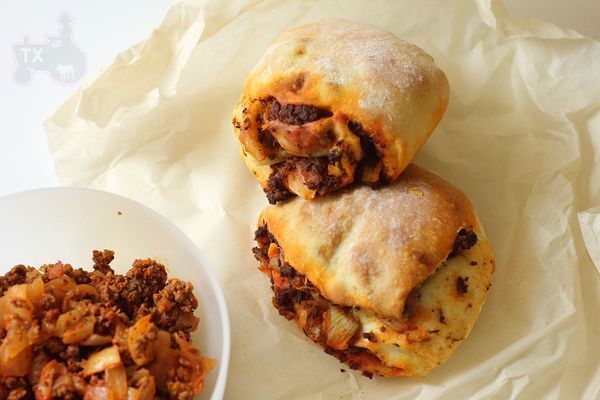
These are the best yet: light, and very flavorful

David

hanseata's picture
hanseata

When Andy/ananda posted his student Faye's success at the "Young Baker of the Year" competition, he mentioned that Faye was inspired by my trials to re-create the taste of blue fenugreek (not available in the US) with nettle. In German that kind of flattery is called: "he brushed my tummy". I felt very much "tummy brushed" and admired the creativity of the young winner from Newcastle College. (By the way, Andy, how was the final competition in November?)

This week I looked at the recipe again, worked out how to make the 60% hydration white levain with my 75% whole wheat mother starter (Andy's recipes do not allow for Dummies), and adjusted the recipe to best fit my schedule. Nettles thrive - and burn - in abundance in Germany and Scotland, but don't grow in Maine  (maybe one should introduce some to annoy pesky neighbors). So, instead of picking and home drying fresh ones, I used dried nettles from A & B Naturals, the friendly store that sell my breads. I also stretched and folded the dough (as in P. R.'s "Artisan Bread Every Day") and retarded the portioned dough overnight - something Faye most likely couldn't do under competition circumstances, anyway.

While I was preparing the dough, the house was filled with the appetizing smells of steeped nettle and toasted cumin. And the dough looked very promising. It was very smooth and elastic (I had added more water than in the original recipe), and handled very well.

 Nettle Bread dough after final S & F

The next morning the dough portions had doubled in size and looked like well stuffed, bouncy pillows. The rising time of the shaped boules at room temperature was, of course, much longer than in a commercial proofer. Before the breads were fully proofed in the bannetons I noticed that their seams (on top) started opening far too wide, so I took them out and placed them, seam side down, on a parchment lined baking sheet. I didn't want gaping holes on the bottom of the loaves.

The total baking time was 35 minutes, then another 10 minutes in the switched off oven with the door slightly ajar.

This is the result:

Speckled crumb from the nettles

Faye really deserved her award - THIS BREAD IS A WINNER! It tastes quite unusual, but very delicious. We served it to out dinner guests yesterday night, and they were absolutely delighted. I think I'm going to bake this for my customers, too.

WHITE STARTER
76 g whole wheat mother starter, 75% hydration
232 g bread flour
146 g water
 
FINAL DOUGH
all g starter, 454 g
550 g bread flour
16 g salt
4 g instant yeast
385 g water, more as needed
3 g cumin seed, toasted
4 g coriander, ground
4 g nettle, dried


DAY 1

In the morning, prepare white starter.

In the evening, boil 200 g of the water with dried nettles, and allow to cool. Mix with rest of the water (185 g).

Mix all ingredients for final dough on low speed for 1 - 2 minute. Let dough rest for 5 minutes. Switch to medium-low speed and knead for 2 min., adjusting with more water as needed, dough should be sticky. Knead for 4 more minutes (dough should be still somewhat sticky).

Transfer dough to lightly oiled work surface. With wet or oiled hands, stretch and fold dough, gather dough into a ball, place into slightly oiled bowl, and let rest for 10 minutes. Repeat S & F another 3 x, at 10 minute intervals, misting the stretched dough before folding with more water, as needed, to keep it slightly sticky.

After the last S & F, divide dough into 2 equal portions (ca. 700 g), place in lightly oiled containers, and refrigerate overnight.


DAY 2

Remove dough from refrigerator 2 hours before using (or shape cold and let proof longer).

Shape dough into tight boules, and place, seam-side down, on parchment lined baking sheet. Sprinkle with a little flour. Cover, and let rise for 60 - 90 minutes, or until almost doubled in size (finger poke test!).

Preheat oven to 450 F/230 C, including steam pan.

Score breads. Bake them for 20 minutes (with steam), rotate pan with loaves 180 degrees, remove steam pan, and continue baking for another 25 minutes - if the sides brown faster, check after 10 minutes and turn the loaves a bit around (internal temperature 205 - 210 F/96 - 99 C).

Let breads cool on wire rack.

Post updated (some ingredient amounts and baking procedure) 6/13/16


txfarmer's picture
txfarmer


Well, it's been 3 days of ice and below zero temperatures. I lived in Toronto for 5 years, this is nothing to northerners, but to Dallas, a city that has probably 2 sand trucks in total, this is "when the world stops" moment. Even my office closed for two days, which is jaw dropping since the boss is a hardy workaholic. And she's from Romania!Unexpected down time at home, what do I do? Bake breads of course! My starters are still aleep in the fridge, so I mixed up some olive oil dough from the book "Bourke St. Bakery", made two kinds of breads from it.


Olive Oil Dough (adapted from "Bourke St. Bakery")

- first dough (it's exactly the same as the main dough, so you just have to make one the first time you make this dough, after that, just reseve a portion from the final dough and use it as first dough for future loaves. it can be stored in fridge for a few days, and frozen for a lot longer.)

bread flour, 100g

salt, 2.5g, 1tsp

olive oil, 3/4tsp

milk, 1/2tsp

water, 70ml

instant yeast, 1g

1. Mix together into a dough, store in fridge for overnight.

-final dough

bread flour, 600g

instant yeast, 6.5g, 2tsp

water, 400g

olive oil, 20ML

milk, 20ML

salt, 15g

first dough, 180g

2. Mix everything togeter, autolyse, knead well.

3. Bulk rise at room temp (73F) for 1.5 hours, S&F every 30min. Dough is very smooth and soft, like silk.

4. Reserve some as preferments for later if desired, otherwise shape into focaccia. Rise for 15min, brush with olive oil, add toppings, rise for another 15min. I used two toppings: black olive+rosemary, and sliced meyer lemon+lavendar.

5. Bake at 350F for about 30min until golden.


Soft and fragrant, perfect to snack on.


The lemon+lavendar topping is my desperate calling for spring - or at least a break from "wintery mix" and "icy roads". Black olive+rosemary is just classic. Both are very delicious.


I only used half of the dough for facaccia, other other half for chorizo and thyme rolls - good thing that I had all the ingredients in the fridge, no way to get to the store!


The mixture of chorizo, onion and thyme was laminated into the dough as following:


Proof for 30 to 45min, cut into 4 parts before baking. If using the whole amount of dough, cut into 8 portions. Bake at 400F for about 20min.

Very rustic looking, very yummy.


Submitting to Yeastspotting.

Zeb's picture
Zeb

I've been talking to DrFugawe who has recently been baking a Nancy Silverton apple bread and this month I am going to bake the Hamelman Normandy Apple Bread.

I have come to realise, and it's probably been discussed here before, that cider in America is not the same thing as cider in England.

The confusion lies particularly with the term 'sweet cider'. To an English person, that means an alcoholic fermented and usually carbonated drink made from pressed apples which happens to be sweet. We have dry, sweet, semi-sweet, sparkling ciders, all alcoholic, and then there's scrumpy too, if you live in my part of the world. 

To an American, it means apple juice pure and simple. Now I know.  It's like corn flour and cornflour, again two different things, or american pumpernickel and Westphalian pumpernickel,  or American cheddar and English Cheddar. Same names, but a world of difference. 

So if anyone else from this side of the Atlantic (England)  is baking from 'Bread', be aware that JH doesn't intend for you to use your local organic cider, he just wants you to use some nice freshly pressed organic apple juice along with your home dried apple pieces.

Having said that is there any reason for not using some good English cider?  I was thinking that if I treated the cider in a similar way to the way Dan Lepard makes barm bread, that would be a good jumping off point for an excellent sourdough. Has anyone here tried doing that?


Happy Baking


Zeb

Yippee's picture
Yippee


Happy New Year of the Rabbit!  I wish you all a year of good health and many delightful surprises in your baking adventures.  I kicked off my baking in the (calendar) New Year with Mr. Hamelman's poolish baguette formula.  This was also the formula that concluded my baking last year.   Both bakes were full of uncertainties.  As usual, I had to figure out a fermentation process that would fit my schedule for this type of commercial yeast/poolish leavened dough, which I had rarely dealt with in the past years.   I managed to get it to work, but a few more experiments will probably provide further assurance that everything's under control.  


In these two bakes, I tried a different hold of the lame when scoring the baguettes; and employed my favorite 'exit strategy' to shape this baguette dough into a boule when I was desperately out of time.  The new way of scoring was awkward and did not work as well on the baguettes as the old one.   On the other hand, the boule turned out okay.  I got a better idea of what my future cold fermentation schedule for yeasted dough should be. Good news did not just stop there.  The most exciting moment came when I finally produced pictures that didn't seem to come from the underworld.  For the first time, I got pictures of bread that were hubby-approved.   I love looking at them now!   From now on, no more eyesores, I promise.


And here they are:

The eyesores

and the NOT


Some of you have asked about my setup and procedure, which are quite simple, as you'll see below:


Will be submitted to Susan's Yeastspotting!

Pages

Subscribe to RSS - blogs