The Fresh Loaf

A Community of Amateur Bakers and Artisan Bread Enthusiasts.

Blogs

pixielou55's picture
pixielou55

Hi

Just wanted to crow a little today. I've been a member of this wonderful group for quite a long time and have always made bread but in the normal way most people do, not really understanding what's going on and making the same mistakes. I'm still stuck when I see a recipe I want to make but it starts out with "200g starter" - I would like to figure out how to make that a "yeast, water, flour" portion since I don't make starter (at this point, I'm not a sour dough fan).

I have always had my dough quite firm when it's time to bake and it is always a dense bread - sometimes gooey. This weekend I followed a recipe for baguettes from this list - I'm sorry I don't know who submitted it. But it was wonderful. There was a lot less kneading and more letting it rest (including in the frig for 22 hours). I stopped with the flour before the dough got to the normal consistency I get it to (gloppy like the recipe said) and and a little sticky kneading, I started to let it rest like the recipe said, and fold it every 20 minutes. Then I put it in the frig until the next day.

This is the first time I have ever had a dough feel like a rubber band! It was wonderful. I let it get to room temp and shaped it into baguettes (next time I will put in just a smidgen more flour to let it form just a bit more). I scored it then (was afraid it would do something if I scored after letting it rise the last time). I could see those big holes developing!

It was wonderful. I ate one whole baguette (but I got some exercise getting up and down to get another piece each time!). It had great holes in it and the crust was crunchy buy thin. This is so different from my normal heavy, gooey loaves.

My breakthrough was letting not making the dough so dense and doing more of letting the dough rest and folding - not kneading for 20 minutes at a time! It was fun to see it change so much just by resting.

I don't have a digital camera and my remaining loaf is 1/2 eaten already at work today. Next time I'll turn the overn down just a bit but whoever posted that recipe - THANK YOU - I've had a breadthrough!

Now I need to go out and get a scale - what a difference that would make!

I still have to learn how to make good whole wheat bread - it is too dense and gooey. But I'll get there some day.

Nancy

Anonymous baker's picture
Anonymous baker (not verified)

Hi, I'm Craig

I'm new to this site but I LOVE making bread! Love it, Love it, Love it! 

Last night I made an attempt at a heart shaped loaf of bread, to give to my partner on Valentine's Day: I was up all night cutting out little hearts that I'd stuck in the cooked bread :D 


Love Loaf5


GSnyde's picture
GSnyde

IMG_2121


This week’s baking—and cooking-- were inspired by Fresh Loaf masters proth5, Wally, SylviaH, Hansjoakim, and AW.   There was duck confit, whole wheat bread, sandwich buns, and Pat’s “Getting the Bear” baguettes (aka “Bear-Gets”), including a Margueritte-shaped thing—"Le Fleur d’Ours".

First, let me tell you about the three-day duck.  After reading Hansjoakim’s blog post (http://www.thefreshloaf.com/node/21880/totally-not-bread-confit-de-canard), I tried to resist the temptation to make duck confit.  I could not.  I love duck, especially duck leg confit.  Han’s pictures and description started to wear down my resistance. Reading Michael Ruhlman’s blog post on the subject (http://ruhlman.com/2010/09/how-to-make-duck-confit-fall-is-here-time-to-preserve-duck.html) was the capper.

So I found a six-legged duck (Chernobyl brand).  Just kidding…actually I found a nice California-grown Muscovy duck and 4 extra duck legs (from a different duck…err…probably several).  I cut the legs off the duck so I’d have six for confit.  Friday morning, I rubbed the legs (the ducks’, not mine) with kosher salt, fresh ground pepper, crushed garlic, thyme and oregano, and put them in a zip-loc bag in the fridge for 24 hours.  Meanwhile, the excess fat from the duck and legs was rendered on the stove.  The legless duck was sprinkled with poultry seasoning, allspice, onion salt and garlic salt and roasted for dinner Friday (with yams and steamed snap peas…yummm!).  The fat drippings from the roasted legless duck was added to the other duck fat and refrigerated.

Saturday morning, I rinsed the cured legs, patted them dry and arranged them tightly in the bottom of our old Dutch oven, I melted the chilled duck fat in the microwave and poured it over the legs.  I added enough olive oil so that the legs were fully submerged.  Then I heated the Dutch oven slowly on the stove until just before the oil boiled, and put it in the oven at 180 degrees F. It stayed in that oven for 12 hours, except for an hour or so when I needed the oven for the sandwich buns described below; during that hour, I put the Dutch oven on the stove on low simmer.  I also made stock from the roasted duck bones.

Saturday evening, I pulled the Dutch oven out of the oven and let it cool for a couple hours, then put it in the fridge. 

They say the flavor of duck confit improves if you let it sit for days or weeks.  I’ m not sure this batch will last more than a couple days.  It made a splendid dinner Sunday.   I roasted two of the legs in a hot oven for 30 minutes, and served them over a bed of lentil ragout (French lentils, shallots, garlic, parsley, diced celery, diced carrot, duck stock and some good Syrah).

IMG_2139

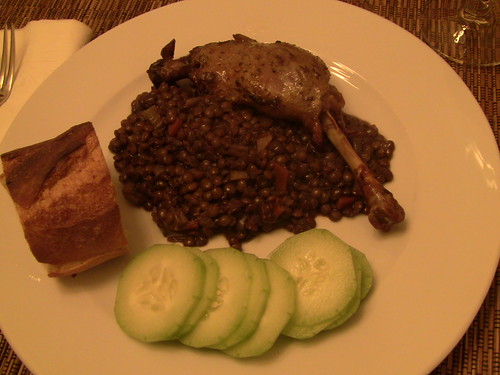
This confit recipe was not a difficult process (I skipped the stretch-and-folds with no apparent detriment to the texture), though it takes several days in elapsed time.  I have to say it is totally worth the effort.  The best possible preparation for a sexapedal waterfowl.   And the lentil ragout (my attempt to replicate a dish served at a wonderful local bistro called Fringale) was a great success.  Recipe provided on request.

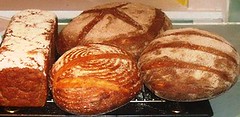
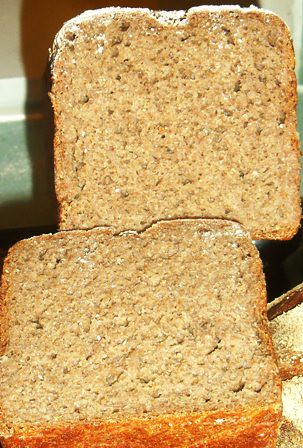
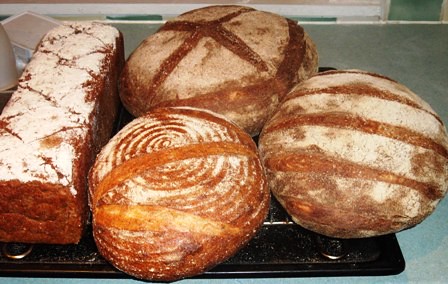
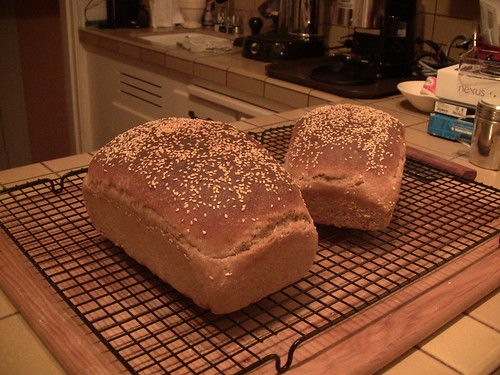
Now, about the breads…starting with a 37.5% whole wheat sandwich bread.

I hadn’t made a whole wheat sandwich loaf since I was a real beginner (back last September), and it was only so-so.  But my wife and I do love whole wheat bread, and I recently acquired some special whole wheat flour from Central Milling: the high-protein, fine ground organic whole wheat flour they sell to Acme Bread.   I searched TFL for a recipe and found AW’s post with her friend Ben’s formula, which has become very popular on TFL (http://www.thefreshloaf.com/node/16345/whole-wheat-sandwich-bread).

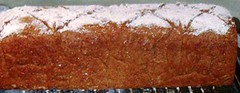
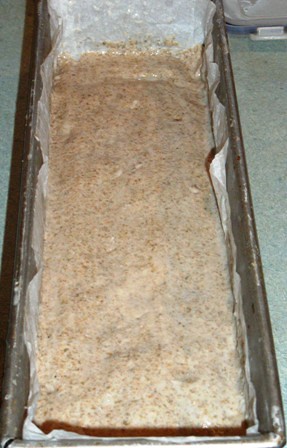
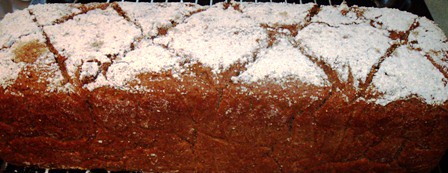
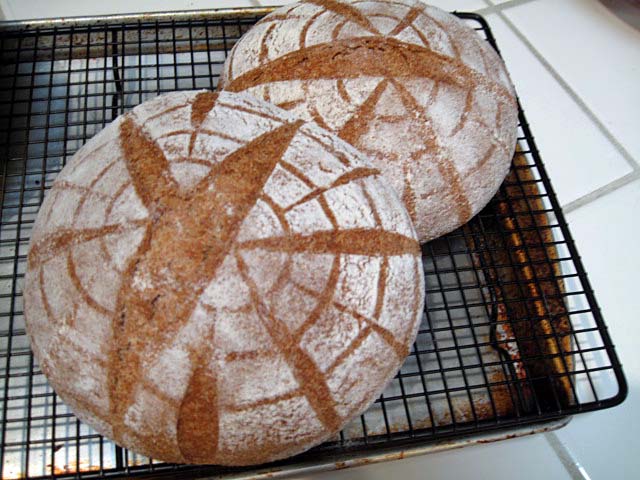
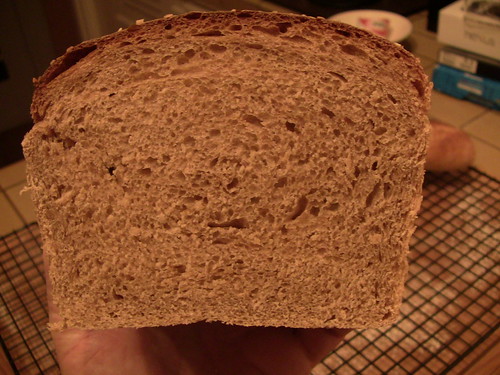
I followed AW’s formula, substituting vegetable oil for shortening and a combination of honey and molasses for brown sugar.  In an embarrassing lapse of baking sense, I forgot to reduce the water to compensate for the liquid sweeteners, so the bread took a while longer to bake than prescribed, and the crumb is very moist.  Not gummy or unpleasant, just very moist.  It is soft but holds together well when sliced.   I also under-proofed the loaves and they blew out.  It’s not the prettiest bread I ever baked, but the flavor is outstanding!  Wheaty and molasses-y, it tastes healthy, but it’s good.  It made good duck breast sandwiches.

IMG_2101

IMG_2123


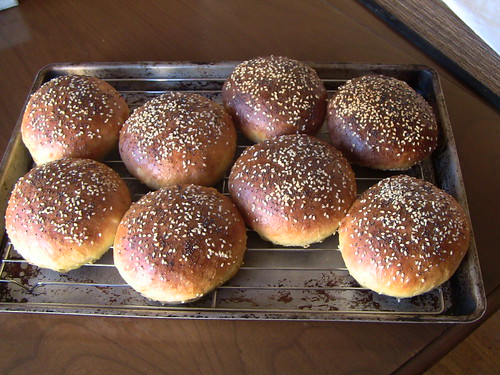
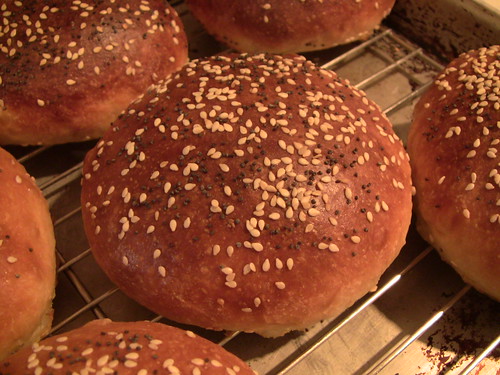
Then, about SylviaH’s buns!!

One of my great aspirations as a baker is to make good-tasting simple sandwich buns that hold up to sloppy sandwich ingredients like saucy barbecue beef.  I’d tried the Italian bread rolls (http://www.thefreshloaf.com/node/12485/sourdough-italian-bread-and-sandwich-rolls) and the sourdough potato rolls (http://www.thefreshloaf.com/node/3886/sourdough-potato-bread).  Both were good, but too heavy and too chewy for what I was after.  Brother David suggested I try SylviaH’s highly-enriched sandwich buns (http://www.thefreshloaf.com/node/17329/buns-sandwiches).  So, I did.

Having roasted a tri-tip (with Tony Cachere’s Cajun seasoning) during the week, I had a hankering for barbecue beef sandwiches.  I had half of bottle of the Firehouse No. 2 barbecue sauce in the fridge, so all I needed was buns.  Sylvia’s formula is easy and the results are excellent!  It’s basically a challah dough with some potato, and it tastes like delicious challah.  Eggy in a good way, tender crumb.  It held up well under barbecue beef.

IMG_2103

IMG_2105

IMG_2107

IMG_2109


And, finally, the “Bear-Gets”.

Proth5’s baguettes are legendary for good reason.  Brother David had recommended Pat’s prior formula, and I made them several times, and always loved them.  I’ve baked her new “Getting the Bear” baguette formula (http://www.thefreshloaf.com/node/20831/starting-get-bear) a couple times. It may or may not be better (which is better: magnifique or merveilleux?), but it’s real dang good.

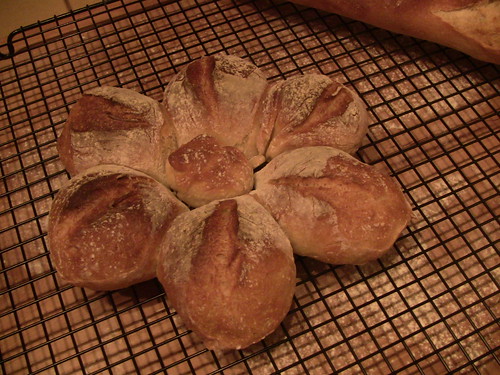
I followed the formula, using my favorite white flour, Central Milling’s Organic Artisan Baker’s Craft, enriched with malted barley flour.  I made enough for four 9.5- ounce mini-baguettes and two 13-ounce Marguerittes, inspired by Larry’s recent adventures (http://www.thefreshloaf.com/node/21929/little-baguette-fun).  I had to do three bakes because of the size of my stone.  I baked a Margueritte and a mini-baguette Saturday evening after a 6-hour retard; then two batches Sunday morning.

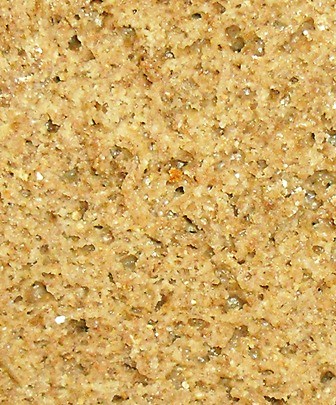
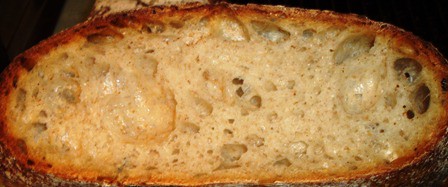
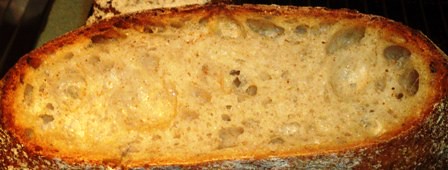
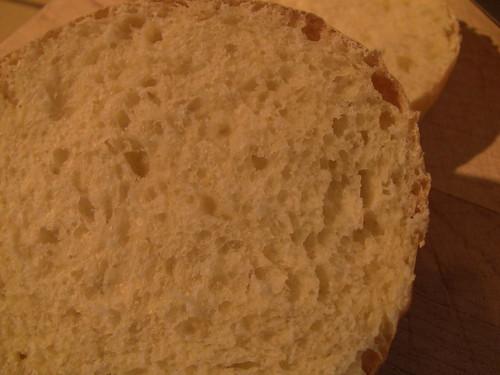
The dough was incredibly airy, but easy to handle.  The crumb is just about perfect.  Here’s a crumb shot of a baguette followed by a piece of La Margueritte.

IMG_2124

IMG_2137

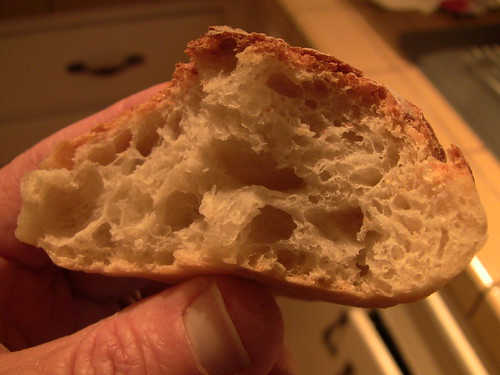
Making les marguerittes was fun.  This is the first time I’ve scissored dough, and it was a good experience.  I found the video linked in Larry’s post very helpful.  Nothing difficult about it, but there’s lots of room for improvement in the snipping and shaping.  The pull-away rolls from “le fleur d’ours” are delicious.

IMG_2133

Anyway…that was a long blog post.  The next one will be shorter.  Tasha’s learning to write.

IMG_2142

Glenn


Sylviambt's picture
Sylviambt

My first baguettes are in their second rise under a canopy of dusted linen and plastic. I'm glad they're under wraps. They are undeniably ugly. Instead of rolling out slender columns of dough, I created things that look like squat electric eels, large cucumbers, chubby rolling pins. I hadn't allowed the dough to rest long enough after pre-shaping. Darn.

Well, we'll see what I end up with in two hours.

Sylvia

Bronx-to-Barn Baker

Elagins's picture
Elagins

Actually, I posted this elsewhere, but am not sure how many have seen it, so I'm reposting under its own heading.

It's been a good while since I last chronicled our adventures and misadventures in the world of publishing, and a lot has happened in the interim.

Many of you know that our publisher wasn't entirely happy with our original title -- The New York Bakers Jewish Bakery Book -- and so after putting out several suggestions for informal feedback, we finally settled on Inside the Jewish Bakery: Recipes and Memories from the Golden Age of Jewish Baking. Looking back at it, Norm and I both agree (as does the publisher) that this title is much more indicative of the contents of the book and leaves a lot more room for Norm's stories and reminiscences of how it was back in the day.

It's also amazing how content inflation works: originally, our contract called for a 70,000 word book, which translates into about 250 pages. In September, when the manuscript was due, it came to about 90,000 words, but the publisher didn't make an issue of it. With additions -- more Norm stories and a whole section on Passover baking -- and revisions, we suddenly found that we had 100,000 words -- about 350 pages -- and the publisher freaked.

Someone once asked Ernest Hemingway to name toe most important quality of great writing, and he answered, "a willingness to murder your children." And so I murdered about 28,000 of my kids and got the book down to around 72,500 words -- which probably isn't a bad thing, since the discipline of self-editing made me think about what was really essential -- the must-includes versus the nice to includes. So basically, most of the background info in ingredients, techniques and equipment went bye-bye, along with redundant recipes and those that people can find elsewhere.

I expect that a lot of the cut material will end up on the NYB website at some point. Norm suggested that we try to sell it as Volume 2 -- The Lost Chapters. We'll see ....

Also, it looks at this point like the pub date will be more like July than the March-April timeframe Camino Books was thinking about before ... understandable, given the complexities of editing, design, marketing, etc etc.

And speaking of marketing, one of the things we're also learning is that being an author is different from being a writer. Writers write and get paid for it; authors become public personas and have to go out and do signings, shows, media, etc etc. More than that, if you're an unknown at a small publishing house, you have to pay for it yourself. Fortunately, we found this terrific publicist who not only has done a bunch of cookbook work, but whose father owned a Jewish bakery in West LA in the 50s and 60s. So not only did we get a great professional; we also got a member of the family, so to speak ... and we even got a great photo of her dad rolling bagels that's gonna appear in the book.

So that's what's been going on ... except for one more great thing.

We had to re-shoot a bunch of the photos, including rainbow slices and French cookies, and Norm was having some health issues (all resolved now), so it was up to me to do the baking. Unfortunately, I couldn't find glace cherries, needed for the French cookies, in quantities less than 30#, so I went to a local bakery and asked if I could buy some. The woman at the counter went in the back and came back out, telling me there was no problem with that. The baker himself followed, with 1/2 a pound of the cherries and told me "no charge."

I thanked him, introduced myself and told him what I was doing and we talked shop for a bit, then his wife came out. "Ooooh, rainbow slices, I love them. He made me a tray for my birthday!" Jerry, the baker, smiled. "A lot of work," he said. So cherries in hand, I went home and baked. You can see the results here: http://www.thefreshloaf.com/node/21485/some-recent-baking-and-book-update.

After the cookies were finished and photographed, I took a plate over to the bakery and got huge smiles and thank you's from both Jerry and his wife -- talk about positive reinforcement: I floated on air for days!

So okay, that's where we stand coming into Valentine's Day weekend. Stay tuned!

Stan Ginsberg
www.nybakers.com


ananda's picture
ananda


DSCF1700DSCF1705

I've had a heap of marking to do again this weekend now that my bakery students have successfully completed their exams for the unit in dough fermentation, and as I prepare for a visit from our External Verifier tomorrow.   I hope she is suitably impressed with their wonderful work.   So, I thought I'd make some bread at home to keep me on track as I wielded the red biro!

In case anybody's interested, the exam consists of a one hour written paper seeking to give credit to knowledge, and a 5 hour practical exam, in which students make a range of 3 fermented dough products.   I asked them to categorise these as 1] simple bread using either bulk fermentation, or a no-time dough; 2] an enriched dough with a ferment, or, a laminated dough; 3] something using complex fermentation such as biga, poolish or levain.   This tests practical skills, and understanding with 3 questions looking at dough production, temperature and fermentation.   So, quite a challenge!

Anyway, I ended up challenging myself in the end, with my chosen baking schedule, as I ran short of flour....again.   I live about 12 miles from a town, so this is not good!

I ran short of flour because I ended up making too much wheat leaven, and didn't want to waste it.   Originally, I planned to make just short of 2kg of the Pain au Levain dough, but ended up with over 3kg.   So my plan to make the 80% Rye Sourdough took a radical transformation, and became 100% Dark Rye instead!!

I have made thousands of All-Rye Sourdough breads like this, so I'm not sure why I'm using the exclamation marks?...100% Rye Sourdough with a Rye Flour Soaker

It's my formula, really, but with the inclusion of the rye flour soaker in Hamelman's recipe on pp. 213-4.   There are 2 elaborations on the sour, which I maintain at 1 part flour to 1.67 parts water, done on Friday evening and Saturday afternoon ready to make the paste early Sunday morning.   I made the soaker on Saturday afternoon at the same time as the second elaboration.   It's just one big loaf in a Pullman Pan, weighing in around 1860g of paste, and taking nearly 3 hours to bake!

Material

Formula [% of flour]

Recipe [grams]

1. Rye Sour Build One


Stock Rye Sour


80 [30 flour; 50 water]

Dark Rye


150

Water


250

TOTAL


480

2. Rye Sour Build Two


Sourdough [from above]


480

Dark Rye


200

Water


355

TOTAL


1015


80g saved for stock

935 used in the final paste

3. Soaker


Dark Rye


200

Boiling Water


200

TOTAL


400

4. Final Paste


Rye Sourdough [from 1 & 2]

35% flour; 58.5% water

935 [350 flour; 585 water]

Soaker [from 3]

20% flour; 20% water

400

Dark Rye Flour

45%

450

Salt

1.8%

18

Water [40*C]

6.5%

65

TOTAL

186.8%

1868

Total Pre-fermented Flour

35%


Overall Hydration

85%


Bake Profile 2¾ hours @ 170°C, with constant supply of steam from a "larva pan"

Method:

  • Let down the soaker with the warm water, add the salt, then combine the liquid sour
  • Add the flour and use wet hands to mix and form a paste
  • Ferment in bulk for 1 hour
  • Line the Pullman Pan with silicone paper, and use wet hands to mould the paste for the pan. Smooth the top and set to proof, covered, for about 3 hours.
  • Dust the top of the loaf with Dark Rye flour and cut the top with 4 "X" shapes down the loaf. Put the lid on and set in the pre-heated oven.
  • Bake as profile above
  • Cool on wires

DSCF1694DSCF1702DSCF1711DSCF1713


Pain au Levain

I aimed for 720g of levain, but ended up with 860g.   The excess of final dough meant I ran out of flour, hence the wonderful All-Rye loaf above!

Material

Formula [% of flour]

Recipe [grams]

1. Build One


Carrs Special CC Flour

7.4

133

Water

4.4

107

TOTAL [nb. Stock leaven included above at 80g]

11.8

240

Build Two


Leaven [above]

11.8

240

Carrs Special CC

22.6

407

Water

13.6

217

TOTAL

48

864


3. Final Dough


Leaven [from 1 & 2]

48

864

Carrs Special CC

55.6

1000

Dark Rye Flour

14.4

260

Salt

1.8

32

Water

50

900

TOTAL

169.8

3056

Total Pre-fermented Flour

30


Overall Hydration

68


Oven Profile: Pre-heat to 250°C, and bake on the bricks using steam.    Drop the heat to 225°C after 15 minutes, and to 215°C after 30 minutes.   Bake each loaf out, then move to the next!

Method:

  • Autolyse flour and water for 1 hour
  • Combine autolyse with leaven, mix by hand to start development, then rest 5 minutes
  • Add salt and mix further 5 - 10 minutes to develop. Rest 10 minutes
  • Mix a further 5 - 10 minutes to achieve window pane
  • Bulk ferment, covered, for 2 hours in a bowl lined with olive oil; "Stretch and Fold" after 1 hour
  • Scale and divide [I used 1400g, 950g and 700g banneton pieces]. Mould round and set to proof upside down. Refrigerate 2 of the pieces a short while to set a working production schedule. The first loaf should be ready after 3 hours final proof; bake to profile.
  • Cool on wires

DSCF1696DSCF1698DSCF1695DSCF1709DSCF1708DSCF1704


Nice looking breads; the house smells great; bread supply now sorted as we move to Confectionery in the student groups at College!

The weather, though wet, has turned mild, but the stove continues to blast out the heat.   It's outrageously warm, and the cat has been quite disgracefully indulgent in front of the fire!!!   Meanwhile, I gather you may be snowbound in parts of the US.   You are hopefully better equipped to deal with it all than the authorities are capable of back here in Blighty, that's for sure!

Best wishes to you all

Andy

dmsnyder's picture
dmsnyder

This weekend, I baked a couple of breads I have enjoyed, but both were made with variations.

I have made the 100% whole wheat bread from Peter Reinhart's Whole Grain Baking a couple of times before with fresh-milled flour (100% Whole Wheat Bread from WGB, made with fresh-milled flour). I think it makes a delicious bread. This weekend, I wanted to make it with finer-milled flour and with a whole wheat starter, rather than a yeasted "biga."

The flour was milled from hard red winter wheat using the KitchenAid grain mill attachment. I milled the berries once on a medium setting and then twice on the finest setting. The result was a fairly fine flour, but still not as fine as KAF Organic Whole Wheat flour, for example. The levain had a somewhat gritty consistency. It ripened quite a bit faster than the yeasted biga does for this bread. The dough was quite soft and very manageable, but while quite extensible, had little elasticity. It was difficult to judge the proofing because the dough never was really springy. The modest oven spring I got suggests I may have over-proofed somewhat. The crumb was quite a bit more open than I got with previous bakes of this bread. I attribute this partly to the finer-milled flour and partly to the levain.

100% Whole Wheat Sourdough Bread from WGB, made with fresh-milled flour

Loaf profile

Crumb close-up

My wife liked the flavor of this bread. It has a rather pronounced sourdough tang over a sweet, wheaty flavor. It confirmed my aversion to this combination of flavors, sadly. I will make this bread again, but I will stick to the yeasted version.

Franko's gorgeous 80% rye with rye flour soaker ( See 80% Sourdough Rye Bread- adapted from Jeffrey Hamelman's 'Bread') reminded me how much I loved this bread from Hamelman's Bread (See Sweet, Sour and Earthy: My new favorite rye bread). I had expected to make it again sooner, but got distracted by other baking projects. Franko's bake in a Pullman pan was so lovely, I thought I'd use mine, but, at the last minute, decided to bake it as one large, almost 2 kg boule.

For this bake, I omitted the instant yeast. The dough was raised by the rye sour only. Also, for this bake, I used fresh-milled rye, milled as described above.

80% Rye with Rye Flour Soaker from Hamelman's Bread, made with fresh-milled rye flour

After cooling, I wrapped the loaf in baker's linen to rest for 24 hours before slicing.

80% Rye crumb (Note: The uneven color is an artifact of the lighting.)

After unwrapping the loaf, the crust felt very hard, but it was delightfully crunchy. The crumb was soft and moist. The flavor had a nice caramelized tone from the crust. The crumb flavor was mildly sour, sweet and very earthy - just a good whole rye flavor. Delicious. I had some with dinner, without any topping. I have some cream cheese and smoked salmon to eat with this for breakfast. 

This remains my favorite high-percentage rye bread. I just love the flavor and the texture of the crumb.

David

louie brown's picture
louie brown

This dough behaved more like 65% than 75% in my bone-dry winter city kitchen. I do like the long autolyse and long bulk fermentation, and I understand why txfarmer has this as her regular baguette. There is plenty of opportunity to vary the formula, as she has demonstrated, and there is also plenty of opportunity to observe and try to understand fermentation. The refrigerator is a pretty safe place for this dough, but it does need watching once it's out. I gave this one two hours on the bench and it had almost two more hours with preshaping, resting, shaping and final proof, which was a bit too much, I think. The round loaf, although it looks fine, was on the verge of a starch attack.

I will admit to being skeptical about this dough at first for use as a baguette. It seemed almost like a parlor trick, taking something so wet and forcing it to be a baguette. But i am partial to a sourdough baguette and this one really is both challenging and fun to make. It is also delicious, thanks especially to those long cold intervals. I threw the last of a jar of wheat germ, toasted, into the dough, which is alwys good.

breadsong's picture
breadsong

Hello, 

PMcCool posted a Sweet Vanilla Challah, about this time, a couple of years ago (his post is here).
I thought his bread was just lovely - and wanted to make a Challah like his for Valentine's Day
(trying for heart shapes!):


These breads are made with Mr. Hamelman's Challah, substituting some of the water with pure vanilla extract and vanilla paste, and adding 15% finely chopped white chocolate after the dough was developed.

arlo suggested adding white chocolate to 'Pain au Levain a la Vanille', another beautiful bread I was quite taken with (thanks, inlovewbread and arlo!), and I thought white chocolate would be a good addition to this Vanilla Challah.

The breads were glazed with 1 egg yolk, ½ tsp sugar and 1 tsp pure vanilla extract before baking, as instructed in PMcCool's post.
I sprinkled a bit of pearl sugar over before baking.

Have you ever been to an ice cream shop when they've been making their own waffle cones?
Don't those waffle cones smell amazing as they are cooking?
That's exactly what the kitchen smelled like as these breads were baking!

To shape these, I divided 1250g of dough into 6 pieces, approximately 208g each.

For the larger heart,
Four strands were rolled out to 24" long each.
Mr. Hamelman's Two-strand braid, method two, looked like it could form half of a heart.
I tried braiding two separate  two-strand 'braids' and set them close together to form a 'heart'. 
I used this video to help me with the braiding: http://www.youtube.com/watch?v=3YyDkdwVje0

For the smaller heart,
Two strands were rolled out longer, 30'"-32" or so each (forgot to measure!).
I used Mr. Hamelman's Two-strand braid, method one, twisting the two strands of dough, then coiling each end in towards center.

I have no crumb shot yet...I'm going to give one of these breads to family...likely the big one!

Happy Valentine's Day and Happy Baking everyone!
From breadsong

proth5's picture
proth5

My grandmother cooked professionally. I may have mentioned this before on these pages. She was not the "trained in culinary school" type of cook, she was a professional in the sense that a poor woman would be paid to cook in the home of a wealthy woman. As part of the whole "American Dream" experience for my family (a belated American dream perhaps as my ancestors were in America before the War for Independence) she cooked for many years in the home of the president of the university from which my brother and I obtained our undergraduate degrees.

But as I have also said before, there are cooks and there are bakers and my grandmother was most definitely a baker. Curiously, she never baked bread during the time that I knew her. She may have spent her youth churning the stuff out and by the time I was inhabiting the planet she was pretty enthusiastic about the stuff that she could buy from the bread man. Interestingly, though, she did a lot of work with the 4-H and county extension office and was a well known judge for bread. In fact, when I was just a kid, every bread attempt I made was subjected to her expert judging. (I've discussed this with the doctors at "The Place" and they feel this explains a lot of things.) I always appreciated it.

 She was a stickler for measuring ingredients. I have a perfectly clear memory of making a simple frosting with her and she poured in a "smidge" of vanilla directly from the bottle. She warned me quite sternly that I was NOT to do that until I was as old as she. I am now that old.

 She also was the kind of person who enjoyed writing recipes. She wrote them to the very best of her ability to the standards of the day (at least the standards for writers for home cooks) so as my exploration of old recipes continues I realized that I had some long neglected recipes written by the very best source of all. No "butter the size of an egg" or "handful of flour" for her - these were all written with precise volumetric measurements and instructions that anyone with a reasonable grasp of basic baking skills could follow. The apple didn't fall from tree, eh? I cannot calculate a baker's percentage without wondering what she would think of the kid now. She enjoyed learning new things and I'm sure she would have embraced the whole thing as eagerly as I.

 When I retired her mixer (which is almost as old as my mother and which is still carefully stored in my house) about 20 years ago to buy the Kitchen Aide I couldn't help but think that she would have been pleased that I could go out and buy whatever mixer I wanted. I wonder what she would think of My Precioussss (which is the only mixer I have owned that can tackle her "Brown Christmas Cookie" dough) - I bet she would have gotten a big kick out of it.

 While "my teacher" is the voice in my head, she is the beat of my baking heart.

She died too young - a victim of the lingering effects of bovine tuberculosis. She never saw my brother or me graduate from that university whose president she fed. So all of you who judge me harsh when people speak with near religious fervor of the goodness of un pasteurized milk must grant me some leeway.  You now know what that stuff cost me.

 So I present one of her yeast based recipes. With volume measurements and no fancy modern techniques.  As she wrote it.

I'll give a warning though, this is real Pennsylvania Dutch cooking and has been condemned by the American Heart Association. But it is good...


Moravian Sugar Cake


2 pkgs. Active dry yeast

1 cup warm water (110 F. to 115 F.)

1 cup sugar

1 teaspoon salt

2 eggs (well beaten)

1 ½ cups melted butter (use ½ cup for top of cake)

1 cup hot mashed potatoes

5 to 6 cups sifted flour

1 ½ cups light brown sugar

3 teaspoons cinnamon (more or less)


Soften yeast in the warm water (my note: see, she even knew that you didn't need to "proof" the yeast - just dissolve it - remind you of anyone?), let stand 5 or 10 min. Mix together the sugar, salt, eggs and 1 cup of the melted butter. Gradually beat in the mashed potatoes, add 1 cup of the flour, beat until smooth.  Stir in the yeast and beat enough of the remaining flour to form a light dough. Cover. Let rise in a warm place until doubled. About 2 hours. Divide dough into 3 portions and press evenly into 3 9-inch square pans. Cover, let rise until doubled. Make indentations about 1 inch apart in dough in each pan and spoon sugar mixture into each depression. Drizzle remaining ½ cup butter over top of dough. Bake at 350 F. for about 20 minutes.


The picture below shows the finished cake. They do have a sort of "craters on the moon" look (which is how they are supposed to look.)  They taste best if one makes sure to get that extra butter in the holes filled with sugar.


The pans that I baked in were my grandmother's - still doing yeoman's work in my kitchen.

Happy Baking!


Pages

Subscribe to RSS - blogs