Updated: 3/31/2011
Aki san no Baguette
I want to introduce one of amazing Japanese home bakers Aki who makes great baguettes that I have been trying get the crumb like hers. I really thank Aki who let me post her great baguettes here. Here is her blog and baguette's formulas. And, Please leave a comment for her if you think that her baguettes are great. She will be happy to hear it from you, guys. :)
http://blog.goo.ne.jp/rinrinmaman01/e/359d5570d2dd2fb57929b74e58ed3153
Aki's strawberry yeast baguette:
Ingredients: (straight method) Lenth about 40cm
- Flour 100% -( About125-150g for 1 baguette)( she uses flour for French bread like Lys Dor, Maison Kayser Traditional and so on. )
- Water + Strawberry yeast water (10%)= 70-75%
- Salt less 2%
Method: 1. Mixing the ingredients. DDT: About 23℃ ( I mix the ingredients except the salt and take autolyze for 30 minutes then I add the salt in it. I am not sure how she does)
2.Bulk fermentation: Punch down every 20 minutes for 2 times at 23℃
3. Rest for 4 hours at 23℃
4. Transfer the dough at 15℃ , and rest for 16-18 hours. * She put the dough in a refrigerator to keep the dough temperature down. If she keeps the dough at 15℃, the dough will be ready in 12 hours.
5. Divide
6. Bench time ( It is vary depends on the room temperature and the wild yeast's strenth that you use)
7. Proof at 23℃ ( It is also vary depends on the room temperature and the wild yeast's strenth that you use.)
8 Bake at 230℃ for about 20 minutes ( She uses steam)
* She also uses instant dry yeast ( She has used SAF blue instant yeast ): About 0.04% instant yeast as to 100% flour
* She degas the dough very well before shaping
---------------------
I have tried her baguettes about 10 times so far. Although I am not successful yet. I hope that I am able to get close to her baguettes soon.
This is the one that is my best one so far. I made 2 baguttes.
KA Ap 180g / Rasin yeast water 36g/ Water 100g ( 16℃)/ Salt 3g


I bent the dough when I transfered it into the oven. You can see the black spots in the crumb because I used alcoholic raisin from the raisin yeast water. Aki doesn't use them. I just punched it down once before I put the dough in the place at 14℃。 And I divided it in two after 24 hours ( yes, it took for a long time until the dough was doubled that was actually tripled! I realized it after I found Juergen's exprement http://tfl.thefreshloaf.com/node/22228/test-tube-baking-2-bulk-fermentation-doubling-size Thank you, Juergen) Then I did a letter fold then took a bench time for 30 minutes, and I hit the dough onto the work bench twice and I did fold 1/3 from the bottome line, then I pinched the top and bottom sides and closed the seam very well, and I took 30 minutes for proof. Preheat 470F for 1 hour, using Syvia's steaming method and bake it at 470F for 7 minutes with the steam, and take the steaming towels and pan after that, decreased down to 450F and bake more 3 more minutes, then I took the baking sheets out of the baguettes then baked 10 more minutes at 450F. Shut off the oven then left them in the oven for 5 more minutes.
-----------------
Next : This hydration is75.8%
KA AP 120g / Raisin yeast water (20%)+ water = 91g / Salt 2g
I waited the dough until doubled. It came out denser than the above. I degased fliping the dough twice.


----------------------------------------------------------------------------------------------------------
In the same time, I have made my baguettes (http://www.thefreshloaf.com/node/19118 ) for updating. I updated it in Japanese version here: http://cookpad.com/recipe/1168515
2 baguettes:
Poolish
KA AP 125g / Water DDT 20℃ 93g / Active dry yeast 1~2g
Final dough
KA Ap 125g / Water DDT 23℃ 93g / Active dry yeast 1~2g
Salt 3.8g
Method:
1. Poolish ( Let it ferment until doubled) I preferment the yeast and the water for 15 -20 minutes before mixing all the ingredients.
2. Adding the yeast and water into the poolish-- Rest for 20 minutes --- Add the flour and salt
3. Knead for a few minutes --2 times Strech and fold every 20-30 minutes
4. Bulk fermentation at 25℃。
5. Continue to rest until 1.5 times in bulk at 25℃
6.Move the dough in the place at 14℃and rest until 2-2.5 times volume
7. Divide in two: 1) A letter fold or 2) Degas: hitting the dough on the work surface 2.3 times and make a rectangle shape.
8. Bench time 30 minutes at about 23℃.
9. Shape : 1)Degas like the above (2)-- 1/3 fold from the bottom.- Pinch the both side and close the seam very well. or
2) 1/3 fold from the bottom, if you can fold it again toward to the middle.--- Pinch the both side and close the seam very well.
10. Proof 25 - 30 minutes at 23℃
11.Bake : Preheat 470F for 1 hour : Bake at 470F with steam ( Sylvia's steaming method) for 7 minutes --- Take the steaming out-- decrease down to 450F and bake 3 more minutes - Take the parchment paper out --- bake more 10 minutes --- Shut off the oven and leave it in the oven for 5 minutes.


I am testing about degassing a lot or not :
These are that I didn't degas a lot, just little. Left: (2) version Right(1) version I took 30 minutes for proof. The taste was awesome.
---------------------------------
Today: I did degas a lot


But I took almost 1 hour for proof.. Left:Shorter one - (1) version / Right: Longer one - (2) version. These reminds me of Juergen's experiment: http://www.thefreshloaf.com/node/22065/test-tube-baking-1-continued-white-french-bread-overproof Yes, they are over proofed.. I also thank Eric who examine an excellent job on Juergen's post. They didn't taste good because of the over proofed. The bad thing was that I had to drag when I scored because the dough was really soft.
Now, I am going to test that the one is little degas and the other is degas a lot..
ーーーーーーーーーーーーーーーー
2/20/2011 I couldn't bake my 2 baguettes to compare the test above. But I baked Aki's baguette in the morning.
Here is the result:
Aki san no baguette 2/20/2011
Ingredients:
KA AP 120g
Raisin yeast water 18g ( 20%)
Water 71g( 16℃)
Salt 2g
2/18 6:30 am - Mix all the ingredients except the salt.-- Autolyze --
7:05 am- Added the salt--- mixing for 10 seconds by FP
8:00 am-- S&F ( 23℃) -- I forgot to do it in 30 minutes---
8:30 am -- S&F ( 23℃)
Rest---- 23℃
1:00pm -- Moved the dough in the basement at 14℃.
2/20 6:00am 3 folds ( a letter fold) -- bench time (The dough rose 2.5 times in bulk. )
7:05 am Shape Degas a lot ( Flipped over the dough twice and slapped the dough many times) and fold 1/3 from the bottom and pinch the both sides then close the seam very well.-- proof---
7:50 Bake
---------------------------------
Now I am thinking:
1. dough temp should be warmer before shaping to get the airy crumb or wait until the dough tripled.
2. Degas a lot or less
3. How to score it straightly without dragging. -------------- I used to put some shortening on the lame before scoring. I better try it again to see how it works.


-------------------------------------------------
Degas test:
After I wrote that I didn't bake the other my baguettes to compare the test of degassing, I changed my mind, then I started to bake them to test. Here is the result:
Poolish:
KAAP 125 g
Water (16℃) 100g ( I recommend to use less water around 94g water ) Now, I am testing to use 68% hydartion 3/2/2011 Because I want firm strong gluten in the dough as same as Aki's baguette. 68% hydaration is the same firmness as 74-75% high hydration baguettes with natural yeast in my opinion.
Active dry yeast 1/32 tsp ( I took 19 hours to ferment)
------------------------------------------
Final dough:
KAAP 70g / Pillsbury ( all flour ran out except this) 55g
Water (16℃) 100g ( I recommend to use less water around 94g maximum)
Active dry yeast 0.1g
Salt 3.8g
----------------------------
1. 2/19 Punch down every 30 minutes.
2. Rest : 1+2 =3 hours in total..( It was too short) at 23℃
3. Rest at 14-15℃
4. 2/22 Divide ( The actual dough weight was 408g I divided it 204g each. The dough rose doubled.
5. Bench 30 minutes 6. Shape and Proof for 30 minutes at 22℃
----------------------------------------------------------------


Left: Degas a lot : Flipping over twice and slapped the dough a lot.
Right Gentle degas : Just little pat to make a rectangle to shape.
---------------------------------------------------------------------------------
Today 2/21/2011


Left : Version 1 (started from a letter fold) with gentle degas
Right Version 2 (Started to make a rectangle shape to flatten) with gentle degas. * My lame was without the chop stick. I was holding it by my left hand. I didn't put shortening on it.
The actual weight was 425g I divided it 212.5g each. Yesterday, it was lighter because I used the other flour or today's dough took 2 days to ferment ?? I don't know...

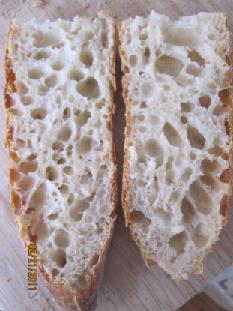
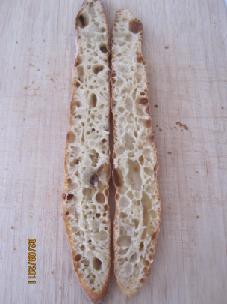
These are on the left one. I cut it when it was still hot. My husband and my dogs were eating it when I saw them.
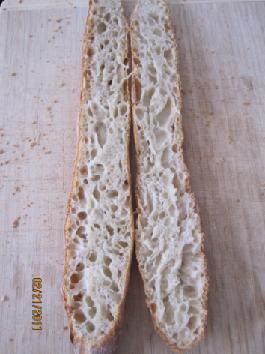
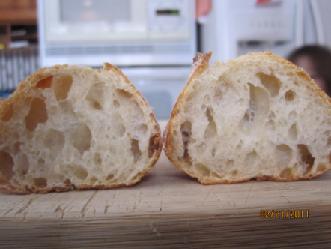
So, I cut the other one when it was still warm. My son and daguther wanted to eat, too.
Hmmmmm.... I will practice more...
Thank you for reading, everybody!
ーーーーーーーーーーーーーーーーーーーーーーーーーー
Updating 3/1/2011
I got a book that AKi learned how to make the amazing baguettes from yesterday. I can't tell everything of the method unfortunetely.
Here is the book.
http://www.amazon.co.jp/Coupe-Junkies%E3%81%AE%E3%83%91%E3%83%B3-%E3%83%90%E3%82%B2%E3%83%83%E3%83%88%E3%83%BB%E3%82%AB%E3%83%B3%E3%83%91%E3%83%BC%E3%83%8B%E3%83%A5%E3%83%BB%E5%B1%B1%E9%A3%9F-%EF%BD%9E%E3%83%93%E3%83%93%E3%82%A2%E3%83%B3-%E3%81%9D%E3%82%89%E3%83%9E%E3%83%9E%E3%80%82%E3%81%AE%E5%BD%A2%E3%81%8B%E3%82%89%E5%85%A5%E3%82%8B%E3%83%91%E3%83%B3%E3%81%A5%E3%81%8F%E3%82%8A%EF%BD%9E/dp/4839935726
As Eric mentioned, You can degas firmly that is the key. Flatten the dough - 3 folds -bench 30 minutes- shape - proof 30 minutes or so.- bake
Luckly, You are able to see how to shape the dough on the sample of the book!!
http://www.amazon.co.jp/Coupe-Junkies%E3%81%AE%E3%83%91%E3%83%B3-%E3%83%90%E3%82%B2%E3%83%83%E3%83%88%E3%83%BB%E3%82%AB%E3%83%B3%E3%83%91%E3%83%BC%E3%83%8B%E3%83%A5%E3%83%BB%E5%B1%B1%E9%A3%9F-%EF%BD%9E%E3%83%93%E3%83%93%E3%82%A2%E3%83%B3-%E3%81%9D%E3%82%89%E3%83%9E%E3%83%9E%E3%80%82%E3%81%AE%E5%BD%A2%E3%81%8B%E3%82%89%E5%85%A5%E3%82%8B%E3%83%91%E3%83%B3%E3%81%A5%E3%81%8F%E3%82%8A%EF%BD%9E/dp/4839935726
Completely flatten the dough!
I used
260g KAAP
52g Raisin yeast water ( from refrigerator)
143g Water 16℃
4g Salt ( 1.5-1.8% as to 100% four... As you like)
Mix except salt -- Autolize 30 mintues--- Fold interval 30 minutes x 2 times---- 5 hours buk fermentation at 75F until the dough rose 1.5times
-------Move the dough in a colder place around 13-14℃ for over night (12 hours)--- divide-- preshape--bench 30 minutes -- shape -- proof 30 minutes-- bake

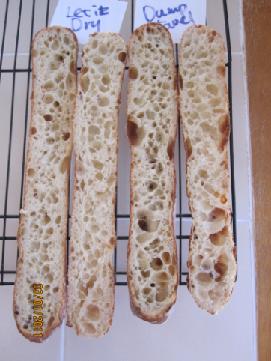 on the left crumb : I prooved at 21℃ without any dump towels. Right crumb: At 21℃ with dump towels
 I prooved at 26℃ with dump towels. I still test about this. But I think "With dump towel" make thin and crispy crust?


It have more big holes when I proof it at colder place? I don't know.. I just keep testing..
About taste: That is absolutely amazing.
----------------------------------------------------------------------------------------------------
Updated 3/2/2011
I made 68% hydration of my poolish baguette today.
Poolish
- KA AP 70g
- Water 48g ( 16℃)
- Active dry yeast 0.07g
Final dough
- KA AP 70g
- Water 48g ( 16℃)
- Active dry yeast 0.07g
- Salt ( I always use kosher sea salt) 2.3g ( I used 1.6% salt as to 100 % flour this time)
Method:
1. Mix the poolish ingredients ( DDT was 65F /18.3℃) Fermented at 76F/24.4℃ for about 15 hours.
2. Mix all the ingredients. After mixing ( folding?) for a few minutes with a dough cutter, The dough temperature (DT )was 65F/ 18.3℃
3. After 20 minutes: 1st S & F ( folding several times with a dough cutter) DT was 68F/20℃ The room temperature was 76F/24.4℃- I used a light to warm it up
4. After 20 minutes : 2nd S&F ( folding several times with a dough cutter) DT was 65F/18.3℃ The room temperature was 76F/24.4℃ ( I don't know why the DT went down.)
5.Bulk fermentation: 2.5 hours at 78.8F/26℃ until doubled ( If you want light and softer crumb, you better let it rise at 82F/28℃, the time will be shorten) DT was 70F/21℃ when it is doubled.
6.Put the dough in a refrigerator ( the temperature was 6℃)for 5 hours. DT was 48F/8.8℃ when I took it out of the refrigerator.
7.Preshape: Degassed and made a letter fold. I waited until the dough temp got to 50F/10℃ just a couple minutes or so.( I have been successful when the dough temperature was 50F/10℃)
8.Shape folding 1/3 fold from the top side, lift the other side to cover that I already feld. Pinched very well. DT was 65F/18.3℃ when I was about to shape.
9.Proof : 30 minutes at 70F/21℃. I put the dough in a gabage bag to avoid to get dry.
10.Bake : Preheat 470F/243.3℃ for 1 hour ( I can't use maximum temperature. If you can, you better use maximum temperature for better result)
Bake 7 minutes with steam (I used Sylvia's steaming method) at 470F/243.3℃-----> Take the steaming tool out and decreased down to 450F/232.2℃, bake 3 more minutes--
------------->Take the parchment paper and bake 10 more minutes-------> Shut off the oven left it in the oven for 3 minutes.


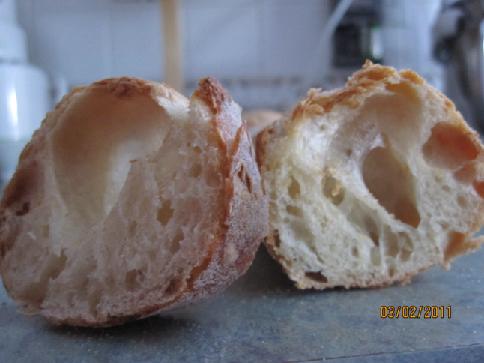

I am so glad that I had a lot of holes in the crumb, however, I am not a big fan of thick crust and too chewy texture. I should have let it rise at higher temperature until 1.5 times in bulk, then let it rest at 50-57.2F/10-14℃ for overnight, Or I better use more water in the dough around 70-74% hydration. I like the taste but it was sweet less than I usually get. Now, I realize that I don't want to let the dough rest below 50F/10℃ anymore。I tested it before...
3/3/2011 Next day: The crust and crumb are much better. The top's crumb is better texture than the bottom. The bottom's crumb was little wetter when I chewed it. I will make 68% hydration again, next time I will frement the dough at 28-30℃ around and let it rest at 10℃ for overnight or less.
-----------------------------------------------------
3/13/2011
I changed a little bit of Aki's method, but I finally could manage 10% raisin yeast baguette.
Ingredients:
KA AP 130g
Rasin yeast water 14g
Water 76g ( DDT 69F /20.5℃)
Salt 2.1g
-------------------------------------
Method: ( I always set up at 6pm around so I can bake at 6am next morning)
1.  I mixed all the ingredients except the salt for a minute, then add the salt, mix it again for a few minutes with my hands (Dough temperature(DT) 69F)
2.  S&F x2 every 30 minutes ( I did in the air with my hands) ( DT was 70F both after the S&F)--Rest at roomtemperature was 26-28℃ /78.8F-82F for 4.5 hours until the dough is little flat and the surface is slightly bumpy.
3.I moved the dough at room temperature around 18-19℃ for about 8 hours
4.
 The dough in the morning: I saw a lot of bubbles on the bottom. ( DT62.5F/16.9℃)
5. I put the dough on the floured wood board very gently. The bottom is face now.
 Strech the dough X way to make a rectangle around 35cm x11cm is better ( I streched too much this time I did 41cmx11cm)
6.
 Using a ruler, make a fold like the picture. Pat the dough gently and
 Put tightly squeezed dump kitchen towels on the dough and take a bench time for 15-20 minutes ( I took 15 minutes )
7. After the bench time,
8. Using your finger tips, pat the dough gently... ( I feel like that I can shape the air in the crumb at this time)
9. Puch the edge little harder and
  Pat the rest of the dough with your finger tips again. ( If I didn't do this process, the crumb was tight... I think that both sides dough need some space to have airy crumb when you roll. )
10. Brush off the excess flour and roll and pinch the seam very well.
 ( This picture is a different one. I just want show you how I pinch the dough)
11. Proof : I pust a tightly squeezed dump kitchen towels on the linen, then I put it on the top of the refregerator for 35-40 minutes at 70-71F /21-21.7℃
12 Prepare the steaming towels ( Sylvia's steaming method), Scroing, then bake.


 I practice to score baguettes a lot using playdough playing with my daughter because I am not good at it. I used to drag so much.. A couple of my Cookpad friends gave me g reat advices. I am still afraid of it....
1. Score the right angle on wet dough.. ( 80-90 degrees)
2. Slice the dough the same speed and depth ( This is difficult for me... because my scoring is always deeper in the middle, then the top and end is shallow.. I RE-score the top and end lines from the other direction where I score first.)

This is my way.. You can make up other ideas to score the same depth each lines.
I recommend you to use bamboo skewers to detamine the length ( probably 10-11.5cm?)and make a mark with a tooth pick or so. --This is from the book.
How do you slice when you score the dough?
 I found out that I can score very straight when I use No.1 way. My cookpad friend suggested me the way. That is very helpful.. I don't think that my way fit everybody but, It may help some TFL members.
---------------------------------------------------------------------------------------------------
3/28/2011
Here is the best crumb that I got on 27th.
Ingredients:
Raisin yeast water 14g
Water 14℃ 74g
KAAP 130g
Salt 2.1g
-------------------------
Method:
4:40pm: Mix all the ingredients except the salt--- Autolize for 10 minutes--- add the salt -- mixing by hand for 2 minutes.
4:55pm Bulk fermentation DDT 70F Room temperature 79F
5:40pm S & F in the air Room temperature 79F
6:00pm- S&F in the air Room temperature 79F
8:00pm Transfer the dough at the colder place ( 62.6F)-- Overnight
Next day
7:30am Transfer the dough in the basement ( 50F) until 3:20 PM
3:20pm Preshape ( Strech to make a rectangle shape, hold 2/3 )
Bench time 20 minutes
3:40pm Shape ( Roll it and close and pinch )
Proof
4:00PM Bake


Recently, I score the line differently. I used to slice very straight, now I make a curve to score like Tartine book's baguette. ( A crescent shape)
Best wishes,
Akiko