The Fresh Loaf

A Community of Amateur Bakers and Artisan Bread Enthusiasts.

Blogs

pmccool's picture
pmccool

Two weeks ago, we were nearing the end of a week's vacation along South Africa's southern coast.  We had stayed in Kenton on Sea, Port Elizabeth and Plettenberg Bay.  On our way back to Plett from a day trip to Knysna (who knew it would be in the middle of their Oyster Festival?!), we passed a clearing beside the road with a large banner proclaiming "Saturday Market".  Not knowing quite what to expect, we made plans to return the next morning to see what might be available.  As it happened, we arrived at the market slightly ahead of opening time, so we wandered around the various stalls to see what there was to see as the artisans finished setting up.  There were paintings, beaded work, wire crafts, wood work, clothing and lots of other items to drool over.

Let us not forget the food!  We bought a big chunk of some absolutely wonderful cheese; something in the Emmenthaler / Swiss vein.  There was a place that had the most wonderful apple strudel, studded with raisins, bits of green fig preserves, nuts, and I'm not sure what else.  And they piped whipped cream over it at no additional cost, if you please.  I was pleased.  There were purveyors of olive, avocado and grapeseed oils.  Fresh herbs. Preserves.  Confits.  Pates.  And breads!

Le Fournil, a bakery from Plettenberg Bay, was represented that day.  Their focus was more on pastries, although they had lovely breads, too.  We purchased pain au chocolat from them.  The lady behind the counter spoke more French than I and I spoke more English, American style at that, than she so our conversation was limited.  Still, we got along.  Here are some pictures of the Le Fournil stand:

Ile de Pain, a bakery located in Knysna, was just a few booths to the right.  They featured a broad range of breads, all levain-based.  That was impressive, especially since the brioche I purchased was not just buttery but somewhat sweet, as well.  The brioche also contained nuggets of orange peel and golden raisins, with a sprinkling of coarse sugar on the top crust.  Oh. My. Goodness.  It was delightful with a smear of butter but absolutely intoxicating when toasted.  Here is how their booth looked:

And a closer look at the breads:

Baguettes are on the left and ciabatta front-center.

From the left: Vollkornbrot, 100% rye, brioche and (I think) a pain de compagne.

If you wanted, you could also buy your breakfast by the slice:

I will definitely miss these small weekend markets that are so common in so many places in South Africa.  There really hasn't been anything quite like them in the various places I've lived in back in the U.S.  Maybe it's just as well.  My waistline couldn't take too many shopping expeditions like this!

Paul

varda's picture
varda

Last year, I built a WFO platform and hearth,  and a dome out of sandy dirt that I dug up from a pile in my yard.   I had hoped (and convinced myself) that there was enough clay in the dirt to make the dome hold together.   That was not the case.   The dome slowly crumbled over the course of the summer.   I patched it up and patched it up again and finally wrote it off in the fall.    Amazingly the platform survived intact through a very difficult winter.   This summer I decided to build a new dome using real instead of imagined clay.    So I bought fire clay from a potter's supply and with help from my husband mixed up 600 pounds or so of clay, sand and water and built a new dome.   Then my husband, who finally took pity on me taking on a project like this with no building skills whatsoever, decided to make me a good door.   He built an offset with the leftover clay/sand mix which perfectly fit a door made of thick plywood.   This morning after waiting forever for the oven to dry, it was time.   I fired it up (and up and up and up) and finally loaded it with a loaf of bread.   After 30 minutes, I checked it, and the loaf was pale, so I closed the door and let it bake for 15 more minutes.    

The loaf was still pale, but I checked the interior temperature and it was 210degF.    Then I paced around in the yard pulling weeds and thinking this over, and finally figured out that the door was so carefully fit that no steam was escaping from the oven at all (I didn't add steam but there is plenty of moisture in the dough) and the crust simply hadn't baked even though the bread had.   By that time I had opened the door so much that the heat was way down, so I took the loaf inside and baked it for 15 minutes at 450 to brown it up.    I certainly didn't have this problem last year, when the door was just a piece of plywood leaned up against the opening with plenty of room for steam (and heat) to leak out.   Fixing this isn't as easy as you would think - the door is fit so tightly (and the bottom beveled so that it's flush with the hearth) that you can't just move it over a bit.   Undoubtedly a precision venting system is now on the drawing board.

But anyhow, the bread.   I decided to go back to yeast water, since I didn't think I had much chance for success today, given that i was just getting to know the oven.   I continued reducing both the hydration of the yeast water based starter and decreasing yeast water as a percentage of total water.   I also interpreted an earlier post by Andy (on enzyme issues in high ash content flour bread) pointed out to me by Juergen Krauss and added salt with the first mix instead of autolyzing.  All this seemed to get the enzyme problems I've been having with yeast water doughs under control.   But perhaps not completely so, as you can see below.   But (as seems to be a feature of yeast water) this is a delicious bread and more successful than I expected under the circumstances. 

Syd's picture
Syd

This recipe is from The Bread Book by Linda Collister and Anthony Blake and it was the second serious bread book I bought about 17 years ago.  It was quite forward thinking for its time as all the recipes include weight measurements (metric and imperial).  It is still one of my favourite bread books and it is definitely worth a buy.  It has really good photographs. 

Starter

230g whole wheat

230g water

Ferment in a bowl at room temp for 3 days.  Keep bowl covered with a damp tea towel.  After 3 days, it should be smelly, grey and slightly bubbly.

Sponge

140g water

230g unbleached bread flour

Beat (using hand) together with starter until well incorporated.  Once again cover with damp tea towel and allow to ferment at room temp for 24 - 36 hours. (In practice, for me at any rate, this step only takes about 5 or 6 hours).  I let it sponge until it peaks, then I make the final dough.  Don't let the sponge collapse.  The bread will be dense if you do.

Dough

55g water

20g salt*

230g unbleached bread flour,

* I find this amount of salt to be too much.  It works out to be about 2.5%.  I prefer using 2% so I use 13 or 14g.

Mix water with sponge,  Add salt.  Beat well.  Add enough of remaining flour to make a soft dough.  Bulk ferment until almost doubled in size.  *Cut off 170 - 230g piece of dough to make the next starter.  Pre-shape.  Rest 15 mins.  Shape.  Place in cloth lined banetton.  Allow to final proof.    Preheat oven to 220C (425F).  Score.  Bake (with steam) for 20 mins.  Lower oven temp. to 190C (375F) and bake for another 35 - 55 mins longer.  I have always found 35 mins to be sufficient. 

*  Because this dough was removed after the salt was added, you now have salt in your starter.  It has its advantages.  It keeps for a long time in the fridge and slows down enzyme activity. 

Notes

This was the only way I made sourdough until the arrival of the internet and my discovery that  there were other ways of making it!

Remember the second time round your starter will have salt in it, so you need to subtract that from the total amount or just add 2% of flour added.

This makes a really good sourdough with a very mild (unless you retard) tang, but an excellent flavour.

Syd


JC1957's picture
JC1957

Hello All,  I am new to this site and have found it very informative.  I have been away from baking for a little while and returned this week to try the 1,2,3 formula I found here.  The dough ended up a littlte to loose for my liking but tasted great.  The pictures below of those loaves.  The pictures at the bottom are from my 2nd batch baked Saturday morning with a much better shape.

Saturdays Baking:

The one thing I've noticed is that I'm having no problem getting voluteers to take some of this bread off my hands.

Batch 3 is in the fridge now to bake in the morning.

GSnyde's picture
GSnyde

There was much discussion recently about TFL t-shirts and good logos and tag lines and the like (http://www.thefreshloaf.com/node/23436/interested-tfl-tshirt-ballcap).

I like the motto "Make Loaves, Not War".  Here's a couple pictures.  Maybe with some photoshop magic, this could be a t-shirt design.

These are also delicious loaves, Tartine BCB.

I think they'd be good with Peacetrami.

Oh, and here's a crumb shot.

Glenn


wassisname's picture
wassisname

     This is a bread that came from having too many different flours in the house at once.  I went to the freezer intending to make another bread altogether but saw these flours and thought, "beans and corn, classic!" Beans and corn and chiles?  Even more classic!  This was to be my sourdough salute to the American southwest, except... the bread never really worked like I wanted it to.  It's not a bad loaf, it just isn't making me as happy as I thought it would.  Hmmm... maybe therapy is what I need.  I could analyze this bread all day, but here are the highlights:


What I like about it - The color contrast between the yellow tinted crumb and the reddish paprika tinted crust gives it a nice look.  The flavor works for me - a nice "something different" - particularly good when very fresh with butter and honey.  It looks better in photos than it actually is... maybe that's not such a good thing.


What I don't like - Stales very quickly, though the up-side to this is it makes very tasty melba toast-style crisp bread.  The corn flour seems to wreck the structure of the dough, which leads to this problem:  as you reduce the corn flour and the structure improves, the flavor goes bland; when there's enough corn flour for a nice balance of flavors the crumb starts to go flat, weak and crumbly - and stale even faster.  The dough is slack, sticky and feels like it is broken down almost immediately after mixing.  Worst of all?  I keep thinking, "Maybe it's me...?"  But, no other dough I make behaves this way so I don't think it's just me.

 The Final Attempt

The formula - This is the final formula I used to try to improve the structure.  It is not the one that produced the best flavor.  For better flavor the corn flour should be about 15-17% and the garbanzo (potent stuff, by the way) should be about 8-9%.  The WW comes from my starter and would not otherwise be necessary.  I tried this with a little more WW but it just got in the way of the other flavors.

A retrospective:

     A promising start


Even when they looked good there was just something missing.

  The tendency to go flat.

     Pretty, but...


Where to go from here - In a word:  Polenta.  I have a good feeling about polenta.  Forget the fine corn flour.  Otherwise, this dough as it is could make a good roll, or flatbread, or even a full loaf if it will be eaten very fresh.

Marcus


ananda's picture
ananda

Pain de Mie with Wheat Levain, Exploding Mixed Leaven Pain de Campagne and a 90% Rye Sourdough made with the Three Stage Process


1.    Pain de Mie

I made 3 loaves in pans, varying sizes as noted below, using only a wheat levain to raise the bread.   There is a basic amount of enrichment in the formula.

I built the leaven in 3 stages, beginning with 40g of stock on Thursday lunchtime and ending up with over 1300g of ripe leaven for Saturday morning baking session.

Material

Formula [% of flour]

Recipe [grams]

1. Built Leaven


Carrs Special CC Flour

25

350

Water

15

210

TOTAL

40

560


2. Final Dough


Wheat Levain [from above]

40

560

Carrs Special CC Flour

70

980

Bacheldre Organic Dark Rye Flour

5

70

Salt

1.5

21

Milk Powder

2

28

Organic Butter – lightly salted

2

28

Water

50

700

TOTAL

170.5

2387

FACTOR

14

-

% pre-fermented flour

25

-

% overall hydration

65

-


Method:

  • See leaven build
  • To mix, combine all the ingredients slowly to form the dough.   Rest for 10 minutes, then develop for 10 minutes, rest a further 10 minutes, then develop a final 10 minutes.   DDT is 28°C.
  • Bulk proof in a covered and lightly oiled bowl for 2 hours.   Give one “stretch and fold” half way through.
  • Scale and divide as follows, moulding each piece round:

One Pullman Pan needs 4 pieces @ 285g each; total 1140g

Large Loaf Pan, 4 pieces @ 195g each; total 780g

Small Loaf Pan, single piece @ 467g

  • Pan the large loaves as “four pieces”, and use a single piece for the small tin.
  • Final proof 3 hours
  • Bake profile: I made the small loaf as a “Split Tin”, floured top with single cut along the top of the loaf.  Pullman is baked with the lid on throughout.   I set the bread in the oven at 220°C, with a reasonable amount of steam used for the first 10 minutes of the bake.   The small loaf baked in 25 minutes, larger loaf in 35 minutes, and the Pullman loaf was ready after 45 minutes.   Each loaf recorded a probe temperature reading of 96°C at the core.
  • As ever, cool on wires.


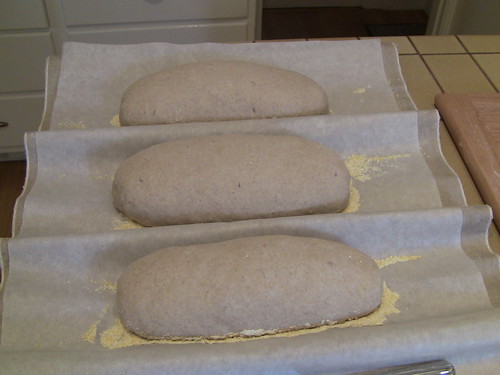
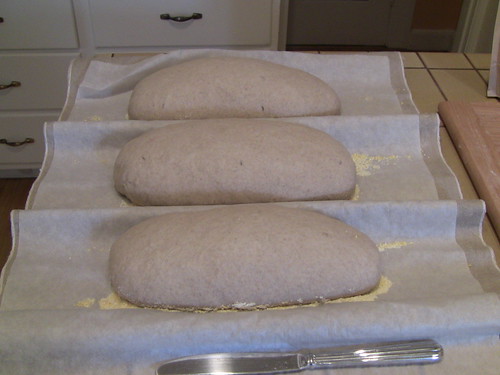
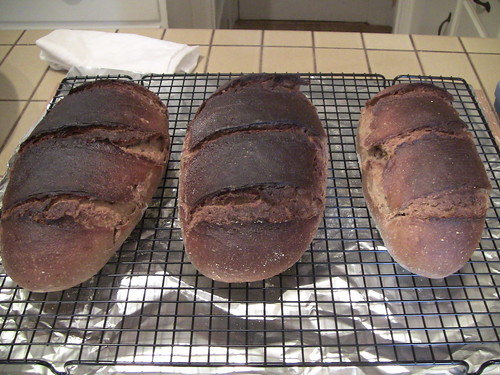
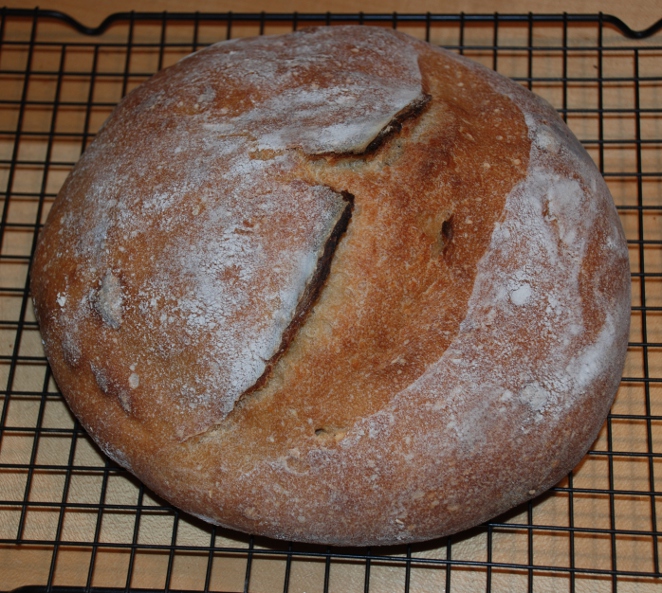
2.    Exploding Pain de Campagne

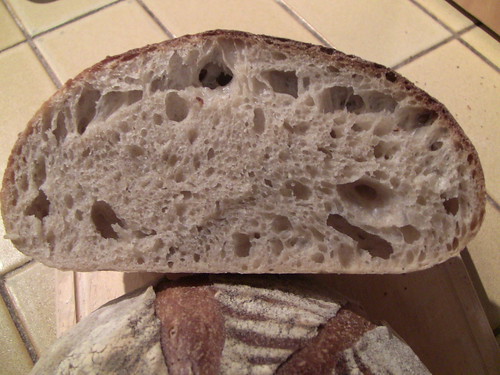
This only ever seems to happen to me in the following situation: baking at home using my Baumatic Fan Oven with dough pieces which have been retarded to any extent.   The reactions seem to kick in after 5 – 10 minutes in the oven and the spring is too great, so the dough explodes at the most convenient spot……here, at one of the cuts; just one, of course!   I cannot believe the dough has not been properly fermented, but I have not cracked this problem yet.   I ended up with 2 loaves proved in bannetons, scaled as described below.

The bread is raised with 2 leavens, both built with 3 refreshments.   The wheat levain is described above.   The rye sourdough was refreshed at the same times and I began with 40g stock and ended up with a kilo of built culture.

Material

Formula [% of flour]

Recipe [grams]

1. Wheat Levain


Carrs Special CC Flour

12.5

150

Water

7.5

90

TOTAL

20

240


2. Rye Sourdough


Bacheldre Organic Dark Rye Flour

7.5

90

Water

12.5

150

TOTAL

20

240


3. Final Dough


Wheat Levain [from above]

20

240

Rye Sourdough [from above]

20

240

Carrs Special CC Flour

80

960

Salt

1.75

21

Water

48

576

TOTAL

169.75

2037

FACTOR

12

-

% pre-fermented flour

20

-

% overall hydration

68

-


Method:

  • Build the leavens as above
  • Autolyse flour, water and rye sour for 1 hour
  • Add salt and wheat leaven and develop using slap and fold technique for half an hour with 2 rests of 5 minutes within that time.   DDT is 28°C.
  • Bulk ferment for 1½ hours ambient, then 1 hour chilled.
  • Scale and divide @ 1237g and 800g pieces.   Mould round, place in bannetons and proof in the chiller for 2 hours.
  • Tip out of the banneton, cut the loaf top and bake with plenty of steam in a hot oven.
  • Cool on wires.


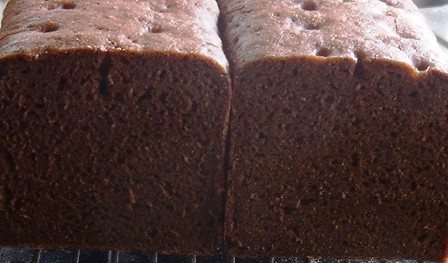
3.    90% Rye Sourdough made with the Three Stage Process

Building on the theme explored with Borodinsky in the previous post, this recipe uses the same 3 stage process, but the “scald” is very much a “mash”, as opposed to a “boil up”.   I have called this a “zavarka”, as this is the term we used at Village Bakery where we made a “boil up” as part of the Pane Toscano breads.   This is a “mash” much more akin to the techniques used by Peter Reinhart is his “Wholegrain Breads” book.   Where the “boil up” seeks to fully gelatinise the starch, and thereby encourage maximum water take up, the mash is seeking to create optimum amylase activity by holding the mix at the ideal temperature to expose the sugars, and to engender the enzyme reactions.   It is the process used in brewing beer/ale/lager, which I enjoyed experimenting with way back in the 1980s as a student.

For the rye sourdough, I used the mature culture from the previous bread giving it one more refreshment.   However, this time I refreshed in a way which altered the hydration level from 100:167 to 100: 113.   This was a means to achieve the lower hydration I plan to use in the final formula at 78% rather than 85%.

Material

Formula [% of flour]

Recipe [grams]

1a] Built Sour


Bacheldre Organic Dark Rye Flour

30

300

Water

43

430

TOTAL

73

730

1 b] Zavarka - mash


Red Malt

5

50

Bacheldre Organic Dark Rye Flour

20

200

Water

35

350

TOTAL

60

600


2. Sponge


Built Sour [from above]

73

730

Zavarka – mash [from above]

60

600

TOTAL

133

1330


3. Final Dough


Sponge [from above]

133

1330

Bacheldre Organic Dark Rye Flour

40

400

Carrs Special CC Flour

10

100

Salt

1.5

15

TOTAL

184.5

1845

FACTOR

10

-

% pre-fermented flour

30 + 20 = 50

-

% overall hydration

78

-


Method:

  • Prepare the final refreshment for the rye sour and set to one side for 5 hours.   Make the zavarka by combining the red malt and the dark rye flour with water @ 85°C to give a mix temperature of 65°C.   Hold the mash between 55°C and 65°C for 5 hours.
  • For stage 2, combine the rye sour and the zavarka and leave to ferment overnight.
  • Add the remaining flours and salt to the sponge to form the final paste.
  • Bulk ferment for 1 hour
  • Line a Pullman Pan and smooth the paste into it for final proof.
  • Final Proof 3 hours
  • Bake for 2 hours in an oven at 160°C with a steady source of steam.
  • Cool on wires.


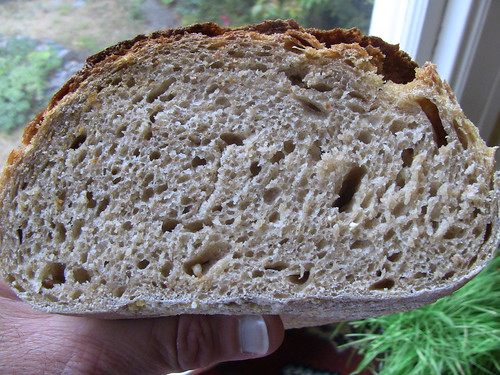
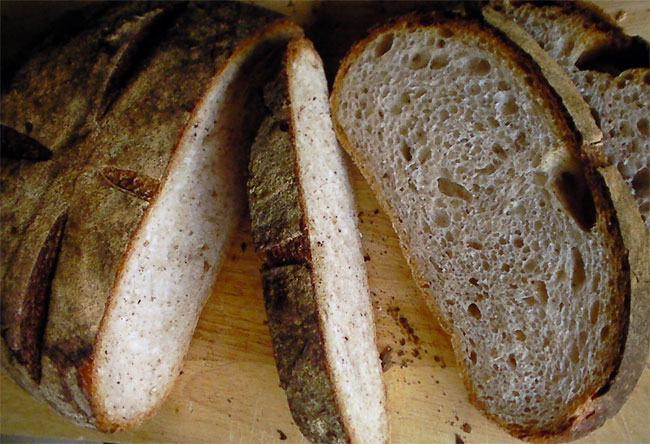
Sorry no crumb shots of the Pain de Mie; had to get the bread to the freezer whole for future projects.

Next week it’s the UK TFL Course in College on Tuesday and Wednesday; then, I’ll be on my way….

Best wishes to all

Andy

dmpiccolo's picture
dmpiccolo

Does any body have a hot dog bun recipe that I can use to make New England style buns? The one on the KA site is to rice and buttery for me. I'm looking for something simpler.

dmsnyder's picture
dmsnyder

The pizza I made two weeks ago (Pizza Napoletana) elicited many helpful comments and suggestions. That pizza had a cracker-crisp crust and minimalist toppings. This week, I was shooting for a more robust, chewy crust that would stand up to tomato sauce and cheese. (Heavier toppings yet await a future pizza-making session.

Based on the advice of several more experienced pizza makers, I chose to make my dough using Jeff Verasano's well-known method. His long and passionate treatise on pizza-making at home can be found on his website. (Jeff Verasano Pizza) His formula for dough is as follows: 

Jeff Verasano's Dough for one 13” pie

Ingredient

Wt. (g)

Baker's %

Water

110.5

65.5

Flour (12.7% protein)

168

100

Salt

6

3.5

Liquid levain

15

9

Instant yeast (optional)

0.5

0.25

Total

299.5


 This formula is scalable. For two pies, double the ingredients, etc.

Because of a variety of considerations (including whims), the dough I made was modified from Verasano's as follows:

dmsnyder Dough for five 11” pies

Ingredient

Wt. (g)

Baker's %

Water

440

65.5

Flour (12.7% protein)

672

100

Salt

14

2

Liquid levain

120

18

Instant yeast (optional)

2

0.3

Total

1248


As you can see, I quadrupled the formula for one pie, but divided it into 5 pieces. I decreased the salt and increased the levain. The effect of doubling the levain percentage was to raise the actual overall hydration of the dough to 68%.

Verasano's instructions for mixing and fermentation are very specific about some steps but leave out some other information which would be helpful. Here is my method, annotated:

Method

  1. In the bowl of a stand mixer, mix the water, salt, levain and 3/4 of the flour for 1-2 minutes at slow speed.

  2. Cover the bowl and let it rest (autolyse) for 20 minutes.

  3. Mix at low speed for 5 minutes. (Note: Verasano is using a DLX mixer. I have not altered his mix times for the KitchenAid.)

  4. Add remaining flour gradually (over 1-3 minutes).

  5. After 6-8 minutes, increase the mixer speed to medium (Speed 2-3 for a KitchenAid).

  6. Mix until the dough forms a ball, then for another minute. (Note: For me, the dough formed a ball very quickly and cleaned the sides of the bowl. However, it was extremely slack and left a large portion of the dough in the bottom. In hindsight, I had not compensated for the increase in water and dough hydration resulting from my doubling the percentage of 100% hydration levain. I mixed at medium speed for about 15 minutes, at which point I had a rough window pane.)

  7. Let the dough rest in the mixer bowl, covered, for 20 minutes.

  8. Transfer the dough to a lightly floured board, dust the dough and your hands with flour, and divide the dough into 4 or 5 equal pieces. Roll each piece into a ball. (Note: Verasano says that, after transferring the dough to the board, he kneads it for a few minutes before dividing it. I did two sets of stretch and folds, after which the dough had really good strength.)

  9. Place each ball into a lightly oiled container and either allow to ferment until increased in volume by 50% or refrigerate for 1-6 days to use during that time or freeze for future use. (Note: Verasano does not specifically say to divide the dough before bulk fermentation, but that is a common procedure, and I believe that is his intent. He also gives a huge range of estimates for fermentation time. He does not say whether these estimates are with or without the optional instant yeast. I suspect they are without the added yeast. I froze 3 balls and allowed 2 to ferment at room temperature. They were 50% expanded after about 2 hours, at which point I refrigerated them.)

  10. If the dough is expanded 50% before you are ready to use it, refrigerate it.

  11. If the dough was refrigerated, allow it to warm for 60-90 minutes while you pre-heat your oven for baking the pizzas. If the dough was frozen, I would thaw it in the refrigerator and then proceed.

I made two Pizza Margheritas. I made the crust quite thin. The sauce was that in Floyd's A Pizza Primer. I used a very soft fresh mozzarella. Fresh basel was added after the pizzas were baked.

Pizza, dressed for baking

Ready to slice

Slice crumb

This crust stood up to the sauce and cheese rather well. It was not soggy at all. It was very chewy under the toppings, but the corona was crisp. The flavor was good, but I bet it would have been better if the dough had been cold retarded for a day or two. That said, I covertly watched my wife eat her pizza slices. The truest test of pizza crust is whether she eats the rim. She generally doesn't eat the crust when we have pizza out. Tonight, she left not a crumb. I guess it was pretty good.

Personally, I'd like to split the difference between this crust and the one of two weeks ago. Maybe I'll try adding a little oil to soften this dough or use a lower gluten flour. I'm less tempted to try a much lower hydration dough, because I like the extensibility of this dough so much.

Thanks to all of you who contributed to my previous pizza blog. The quest continues! 

David


GSnyde's picture
GSnyde

I made Pastrami and Rye Bread today.  The Pastrami is going better (should be ready to slice soon).

The first time I made the Greenstein Sour Rye, back in May, it came out great.  Today, I tried to bake three big loaves at once and I think my old tired oven didn’t hold its heat with the overcrowding.  So it baked too slow, almost charring on top before it was done inside, over an hour.   The oven and stone were well pre-heated, but maybe not well enough).  The loaves also had some crust eruptions; not sure if that’s related to the oven problem.

It does taste good, nice and sour.  I hope The Snyder Clan enjoys it under my Pastrami… if and when we exhaust David’s much prettier (and more voluble) ryes.

Before proofing

After proofing

Baked

Crumb

Next time I'll make two at a time and pre-heat longer.  What I really need is a new oven.

Glenn

Pages

Subscribe to RSS - blogs