The Fresh Loaf

A Community of Amateur Bakers and Artisan Bread Enthusiasts.

Blogs

Juergen Krauss's picture
Juergen Krauss

Hi,

My Wife and I decided to reverse some of the effects than my good bread had on our waistline (nice bloom ...).

The diet of choice for my wife is the "Scarsdale Meical Diet", carried out after a book she got in a charity shop years ago (British edition of the "Scarsdale Medical Diet" by Tarnower, 1985).

This diet calls for "Protein Bread", which hasn't been available in the UK, so the editors provided a recipe.

Please take a look at my outcome first:

The original formula (tinned loaf on the left):

Wholewheat Flour 78%

Soya Bean Flour: 22%

Water: 72%

Vinegar: 0.8%

Sugar: 1.3%

Salt: 0.8%

Instant Yeast: 0.87%

I baked this bread according to the recipe, and it turned out edible, but quite dense with a strong soy bean taste which didn't integrate well with the wheat flavour (in my opinion). My wife's remark: Not quite your standard.

However, she was happy (only having 1 slice a day), but  I wasn't.

I researched the Internet and TFL about adding soya flour, and found that nobody recommends adding more than 10%. Hm.

I then thought I could use the original proportions, but do things I learned about here on TFL to improve the outcome:

My second approach to "Protein Bread" (bread on the right in photo above) was using a wholewheat sourdough and a soaker, and not use sugar and vinegar, and I added more salt.

Here the straight formula:

Wholewheat Flour: 78%

Soya Bean Flour: 22%

Water: 72%

Salt: 1.6%

Wholewheat flour from starter: 29%

Hydration of starter: 100%

I made the soaker from the remaining water and wheat and left it at ambient temperature for about 5 hours.

The starter matured for about 14 hours at 28C.

The dough had a nice feeling after I mixed soya flour, salt, soaker and starter, and id didn't need much development.

During the 2 hour bulk proof I folded twice. The final proof in a basket took about 90 minutes.

The result is very different from the yeasted loaf (I expected it to be): Not dense at all. And the wheat clearly dominated the taste in a nice way. Quite appealing, actually.

With the background taste of soya I can imagine this bread alongside Japanese dishes such as Miso-braised mackerel, or even with Natto on top (Do I hear a scream from the Japanese corner?) I'll try that after I finished my diet...

This experience reminded me of the cartoon Yakitate Japan ( I saw only the first episode), where a baker explains to the young baker-hero that good bread is made with the topping in mind. Does anyone know where I could get Yakitate Japan DVDs in the UK?

Juergen


longhorn's picture
longhorn

Wow! Five breads in one day. Anyone thinking about doing this class needs to be prepared for long, busy days! We were on our feet almost all day!

One of the real lessons from this class is prepping and planning. When you are baking four of five (or more) breads it is important to be time efficient.  All dry ingredients wer measured the afternoon before and our seed soaker for the multigrain was prepared the day before. This morning we began with the autolyse of the whole wheat flour, then mixed our egg dough, then back to the whole wheat...and so on, weaving back and forth as we mixed and divided and preformed and shaped and preformed and shaped and baked and shaped and so on.

Our mixer schedule was optimized to also avoid cleaninhg - until the final dough which was pan bread (homestyle white bread) which required a careful cleaning of the mixer to make sure all the seeds and rye and wholewheat doughs were removed.

Especially beneficial today was that we used many of the same skills we have been developing for baguettes in new ways - forming the "ropes" of egg dough for braiding, forming the multigrain batards, and learned a few new skills for boules. To be candid, after ten years of making boules I thought I had it down, and I pretty well did, but working with wet doughs all week has really helped me learn to use flour much more sparingly and wisely and my boule forming today was really nice. Also learnes some new techniques for pan breads which I NEVER do but probably will now! 

Here is a photo of yesterday's baguettes all bagged up and ready to give to the hotel staff!

Here is today's egg bread braid (the pan loaves are in the image also)

The rye!

The whole wheat...

And the multigrain...

I wish I had a shot of the multigrain crumb, but all the breads had crumb about like you would expect - fairly dense for the whole wheat and rye and a bit more open for the multigrain. 

Tomorrow we return to baguettes with preferments.

I am tired!

Jay


yy's picture
yy

 This is my version of something I ate growing up. I’m pretty sure it’s forbidden by Atkins, South Beach, and every other well-known diet, but sometimes you need food to feed the soul.

Recipe: (makes 5 thin pancakes about 9 inches in diameter)

Dough: 58% hydration 

300 g bread flour (12.7% protein)

174 g room temperature water

1 Tbsp sesame oil

10 g salt


Filling:

vegetable oil

scallions (about 1.5 to 2 cups chopped)


variations:

~AP flour will work if you don't have bread flour, though bread flour provides some additional strength and chew. High gluten flour is not ideal, because the finished dough won't be extensible enough to be rolled out thin in one of the later steps.

~You can decrease the amount of salt according to your own tastes and/or dietary needs. Salt is not necessary.

~If you don't like the flavor of sesame oil, you can replace it with vegetable oil. It's in the formula to make the finished product a little more tender.

~This is already a rich recipe, but if you're feeling extra indulgent, you can use room temperature pork fat or duck fat instead of oil in the filling


1. Combine all the ingredients at once and mix/knead for a minute or two until you have a uniform but still shaggy ball of dough. All of the flour should be hydrated. In Peter Reinhart parlance, the dough should be "tacky but not sticky"

2. Allow the dough to rest for 15 minutes, and then knead for a minute by hand. After kneading, give the dough another 15 minute rest, followed by another minute of kneading. You can repeat the resting and kneading procedure as many times as it will take to get a very smooth, satiny dough.  It took me three kneading sessions in all, including the initial kneading in step 1. Below, you can see how the dough develops. 

Just after step 1, the dough is still shaggy, and you can see a lot of tears on the surface due to lack of gluten development. After the first resting and kneading step, the dough is smoother, although not yet perfectly smooth (above, left). The tears on the surface have decreased but are still there. After the final resting and kneading step, the dough has no tears on the surface and is perfectly uniform.

During the resting periods, chop some scallion finely, like so:

Set the scallion aside for later.

3. Weigh the dough, and divide into 5 equal pieces by weight. They should be around 100 g each, probably a bit heavier.

4. Shape each piece into smooth ball, as if you're making dinner rolls, and let rest for 10 minutes.


5. Roll each ball into a flat pancake. Go as far as the dough will allow you. Let these intermediate pancakes rest for about 10 minutes. Use bench flour to prevent the dough from sticking to the board.


6. After resting, roll the dough out again. The goal is to get a sheet of dough that's less than 1/16 of an inch thick. You should be able to see your fingers through it, but it should not be so gossamer thin that it breaks easily. I usually finish this step by picking the dough up and draping it over my knuckles and tossing it a bit to let gravity stretch it.


7. Lay the sheet flat on a large surface. Pour as much oil onto the sheet as it will take to cover every square inch with a thin layer (as I said, this is not a low-fat recipe). Gently fold in corners of the dough to help spread the oil around.
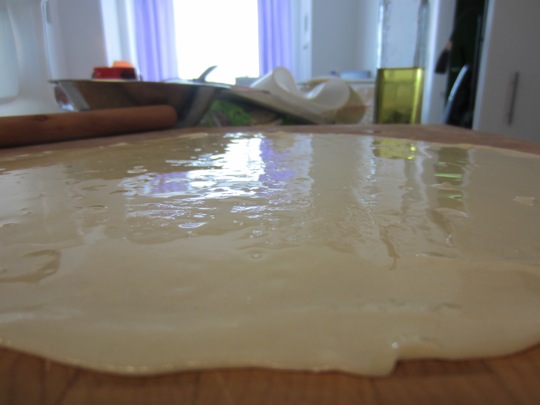
8. Sprinkle a handful of chopped scallion on the sheet, and roll the sheet up gently but somewhat tightly into a big cigar. Try to squeeze out the air as you roll.  


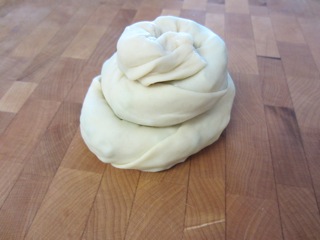
9. Pinch the ends to seal, then coil the cigar and flatten by pressing down with your palm. Coat the flattened coils generously in oil, and them rest for yet another 10 minutes. The photo below shows how the coil should look before flattening. 
10. Place each flattened coil on top of a sheet of plastic wrap. Roll them out until they are very, very thin – no more than  1/8 of an inch each. If the dough is resisting, give it another 5 minutes or so to rest before continuing. Don't worry about the dough breaking and the scallions peeking out. Toasted scallion never hurt anybody. The photo below shows how they look after rolling out with a rolling pin. The thickness in the photo is not the final thickness - I had to wait five minutes after this point to get them as thin as I wanted, because the dough was bouncing back on me


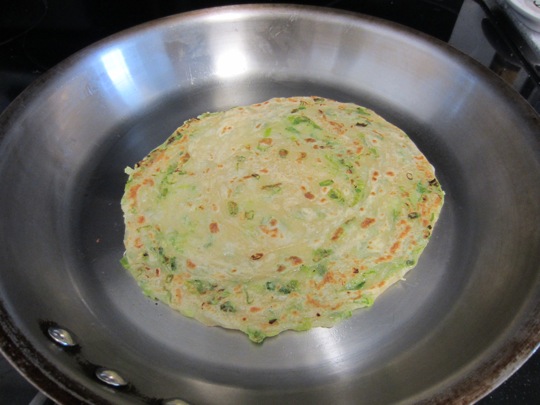
11. Now you're ready to cook them (finally). Use the sheet of plastic wrap to flip the pancakes onto your stretched palm and then onto a frying pan on medium heat. They're so flimsy that they’ll deform under their own weight if you don’t support them this way. Since the pancakes were already coated in oil in step 9, you should not have to put any oil in the pan.  You can reuse the same sheet of plastic for all the pancakes. Once both sides are toasted, the insides should be done as well, since the pancake is so thin. You’ll smell sauteed scallion in the air.
 

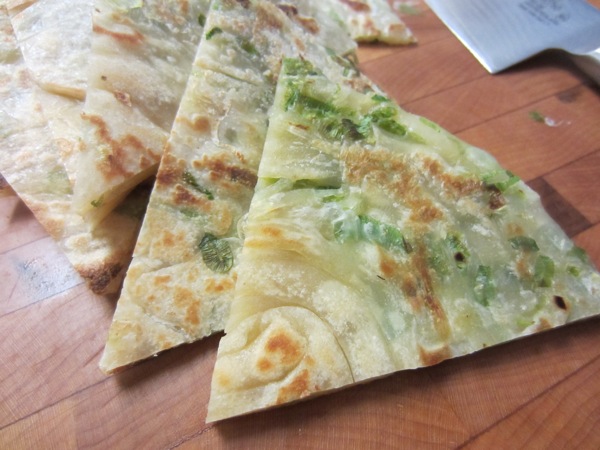
Once they're cool enough to handle, cut them into wedges and enjoy. You can eat them plain, with your favorite spread (mine is japanese mayo with sriracha and lime), or filled with whatever you want (I had them with barbecued pork). For a breakfast of champions, roll up a couple of fried eggs in a whole pancake for a variation on the "Rolex," a “chapati burrito” with egg that I ate while I was in Uganda for a month. 


codruta's picture
codruta

hello from Timisoara!

I baked recently "Roasted Hazelnut and Prune Bread" from Hamelman book, page 185. I removed the butter and the instant yeast, and I increased the hydration from 66% to 68%, and I left the dough in the fridge overnight for the final fermentation.

The bad: I didn't know what to expect of it, I ezitated when I slashed it, cause it's still not clear for me when I have to give a perpendicular slash (with a straight lame) or an "almost-parallel-with-the-surface" kind of slash (does the shape of bread dictate it, or the kind of bread -rye, whole-wheat, white). The bread didn't have a spectacular oven spring. I think I incorporated a little raw flour in the dough when I shaped it (or else why do some prunes have a dry layer around them?). I think I could have roasted the hazelnuts for a longer time. I wish the prunes were more even distributed.

The good: I like the crumb, the contrast of textures and colours. I loved the combination of sweet, sour and nutty. Lovely for breakfast, with a cup of coffee aside. Lovely with goat cheese, or other kinds of cheese. Excellent with butter. I regret I didn't try to toast it...

For those who haven't tried it yet, I absolutely recomend it.

I decided to make this bread, because food-bloggers from Romania make a dish every month, with a chosen theme; and for august the theme was the plum. (They accepted me with prunes.) The challenge is called "Sweet Romania" and I was glad that I could participated with this lovely bread.

The recipe and details can be found here on my romanian blog Apa.Faina.Sare.

txfarmer's picture
txfarmer

Sending this to Yeastspotting.

Click here for my blog index.

Or not. Because my laminating obsession is resulting in all kinds of delicious breads. This one is inspired by a blog post I came across sometime ago, whiich has interesting backstory and detailed shaping instruction. The filling is laminated into the dough rather than directly kneaded in. My previous fourgasse(see here) was airy and crispy all around, this one is crispy on the outside, soft/slightly chewy on the inside - a different kind of yummy.

I used the Rustic Bread recipe from "Bread" for the dough, and two kinds of fillings.

Laminated Fougasse (inspired by "Bread" and this post)
Note: Makes two one pound loaves

--Poolish
Bread Flour, 267g
Water, 267g
instant yeast, 1/8tsp, i.e. a very small pinch

1. Mix and let rise at room temp for 12-16hours.

-Final Dough
Bread Flour, 267g
Water, 102g
Salt, 2tsp
Instant Yeast, 2.8g, a scant tsp
Poolish

- Fillings
Savory Filling: black olive, ham, cheese, 115g, chop finely and mix well
Sweet Filling: cranberries, almonds, pistachios, sugar, cinnamon, 115g, chop finely and mix well

2. Mix poolish, flour, and water, autolyse for 30min. Add salt and yeast, mix at medium speed for 3-4 min until gluten starts to develope.
3. Let rise at room temp until double (about 70min at 75F), S&F at minute 25 and 50.
4. Shape as this blog instucts. One with savory filling, and the other with sweet filling.
5. No proofing, bake right away at 425F for about 25min.

I like how the filling color shows through


Crispy on the outside, soft and chewy with intense filling flavor on the inside, whats not to love

I think it's the best eaten warm from oven

Mebake's picture
Mebake

In reference to the comment of TFL member : subfuscpersona, here, where SF thankfully shared his idea of Freezing a yeasted BIGA for future use; i have finally done the proposed method, with little deviations of my own.

The recipe was adapted from Peter Reinhart's (Transitional Multigrain Hearth bread).

Ingredients:

Soaker:       223g    Bran + coarse whole Wheat middlings

          (sifted remains of milled Wholewheat flour)

                   4g (1/2 tsp)    Salt

                   173g              water

-----------------------------------------

Total:          400 grams


Biga:      227g               Bread flour                                      50 % wholewheat

                  1g (1/4tsp)      Instant Dry Yeast                    50% Prefermented Flour

                   142g                     water                                             Total Hydration: 70%

------------------------------------------                                        Bulk Fermentation: 45 min.

Total:        370 grams                                                             Final Fermentation: 30-45 min @ 25c


Final Dough:

                 400g                     All Soaker

                 370g                     All Biga

                 9g  (2 ¼ tsp)          Instant Dry Yeast    

                8g  (1 tsp)              Salt

------------------------------------------

Total:       787 grams

Deviations where in mixing the White Biga , fermenting it at room temperature for 4 Hours until it doubled, then immediately freezing it. biga was frozen for three days, and thawed slowly in the refrigerator for another 24 hrs prior to baking day. Amusing, how convenient these Yeasted Bigas are!

Yesterday, 2 hours before mixing, i removed the thawed Biga from the refrigerator to allow it to come to room temperature. Mixing proceeded, and i did not notice any adverse effects of the freezing on the structure of the Biga. Mind you, it was a White Biga, I'am sure the same would apply for a wholewheat biga, too.

The Final dough developed very quickly, and was bulkfermented, preshped, shaped, and fermented in a banneton. I wanted to try Franko's recent scoring style: here, Nice!

Thanks to Subfuscpersona, for his Ideas...! my Freezer shall be packed with Bigas from now on... :)

khalid

longhorn's picture
longhorn

Today was similar to yesterday in that we mixed dough for three types of baguettes. It was very similar to David's Day 3 except I interpret we did different doughs but I am not certain. Once again the scoring fairy visited and our loaves were better. Not what I want yet, but...getting there.

As in David's class we discussed flour - types, milling, characteristics, additives, oxidants, agers, etc. But the hands on experience was the highlight. And we began much more actively participating in mixing, baking, etc.

Our three doughs today were improved mix (our standard reference), an improved mix with a short autolyse, and a high gluten dough made by the improved mix formula (70 % hydration). Each person made five baguettes using each dough. The improved mix is becoming familiar as this is the third time we have made it. Shape and slashes are improving but the flavor and open crumb are now what we expect as is the dough handling.

The improved mix with autolyse combined all of the flour and almost all the water for 30 minutes autolyse before mixing in the yeast and salt (remaining water added to the salt at the start of the autlyze to aid in mixing. The autolyse jump starts the enzymes which means there is more sugar when the yeast is mixed in. The mixing and processing were similar to the improved mix baguette dough but with a shorter second mix since the autolyse allowed for good gluten development. The window test after the autolyse and short mix was "amazing". The best I think we have gotten. And the dough is a bit softer and more extensible. 

The high gluten baguette dough was exactly the improved mix but with higher protein dough. So it was arguably underhydrated relative to the improved mix. And more elastic. Most of the loaves took two shaping passes to get them long enough.

There is little reason to show photos. They aren't remarkable and take me a good bit of time to upload so I will concentrate on flavor.

The high gluten dough yielded a baguette somewhat similar to the intense mix from yesterday. No bad tastes, but insipid, and familiar as the loaf you pick up from the local Mega Mart. It did have better (more open) crumb and the cell walls were much prettier but...not a loaf to lust after. But easy to handle, easy to shape and score (except for the elasticity), and good for large production schedules.

The improved mix reference was very good. A bit more challenging to handle but repetition pays and my handling of dough was clearly improved today. Wonderful, open structure, good flavor. Nice!

The star of the show, however was the improved mix with autolyse. A bit more challenging to handle and a bit gassy (like the short mix). A bit harder to get a good, taut loaf but it was the last of the day and I thought I did pretty well. Wonderful crumb, darker crust due to the additional sugar in the dough and crust. Flavor was slightly sweeter, with more acid both acetic (just a touch of bite) and lactic (slight buttery flavor). This was a real star and is to be repeated. The technique of beginnn a straight dough with a short autolyse is straightforward and is guaranteed to give your straight yeasted breads more flavor.

Like David's class we will make five different breads tomorrow - none baguettes. It will be a busy, hectic day!  But a pleasant change of pace. Then, Friday we will make four different baguette doughs, a hand mix dough and three using preferments (poolish sponge, and dough).

Now for dinner and sleep!

Jay

HokeyPokey's picture
HokeyPokey

There are a lot of posts on activating a starter on this wonderful website and I thought I’d add my two pennies worth and get a chance to show off my hubby’s wonderful photos :)

My starter is taking over the world, well, taking overUKat least and I thought I’d share my feeding schedule with the rest of you and open a forum for questions / comments.


Also, I would like to know why would you keep waters (raisin water, apple water, etc.) that started popping up in a lot of recipes on this side AS WELL as a starter – whats the difference, advantages of one over another?

 Full post and lots of photos on my blog here

HokeyPokey's picture
HokeyPokey

An emergency bake,  supplies of bread are running low, Mexican chilli on the go for dinner and I have nothing to go with it. To me all of that calls for a soft and buttery corn bread – I wanted to use starter as it was bubbling away nicely but due to time constrains I had to use some commercial yeast as well.

I am very very happy with the result – lovely and crumbly corn bread with whole corn kernels and a touch of chilli. It only lasted a day, and I haven’t even had a chance to try it toasted – I can imagine it would toast really well.


Full recipe and lots of photos (including in-progress ones) on my blog here

iPhone quality photos this time, didn't have time to get the big camera out

longhorn's picture
longhorn

David's photos from Day 2 tell the story well. Except it was really busy and crazy. Having four teams of bakers making 15 baguettes each (5 each of short mix, improved mix, and intensive mix) was almost crazy! By the third bake we pretty much had our act together and it went pretty well, but...it felt really busy!

What SFBI calls the "short mix" is a minimally mixed dough that has a shaggy window and requires a long ferment to develop gluten and about three folds to develop the dough. It is effectively the "hand mixed dough" of olden times. The intensive mix is the "high energy" mixer approach that is so typical of commercial, large scale bakeries and the "grocery store baguette". It is intensely mixed, a bit oxidized, and bland by comparison. The improved mix is a dough mixed to an intermediate level with a nice but not clear windowpane and needs an intermediate level of fermentation and one fold. It yields a loaf that is quite similar in crumb to the short mix but with less labor and is therefore appealing to commercial operations. 

Mac didn't cut any of my loaves so I didn't get a comparative crumb shot but the short and intermediate loaves had very similar crumb and similar to the crumb photo from day one. The intense mix dough yielded the familiar fine crumb of "conventional" baguettes. 

The photos below are the improved mix, intense, and short mix loaves. More comments on the loaves will follow the photos.

Good news was the scoring fairy showed up today and all of us seemed to score better! 

The smell of the intense baguette was a bit strange. Not much aroma and a bit of a chemical smell - not sure where that came from. Decent crumb and texture but relatively bland due to the high yeast, and fast fermentation.  A long proof is necessary to compensate for the high development and relax the bread...but the lack of flavor tends to support the logic that flavor doesn't develop in small loaves (or it leaks out??).

The improved mix at the top and the short mix were surprisingly similar. Some preferred the short, others the improved. The short seemed a bit sweeter (less oxidation from mixing?) and a bit fresher to me. The improved seemed to have a bit more acidity (which it arguably should not but...). In any event they were remarkably similar and good.

Handling wise the intense dough was easy. We were using 11.8% protein flour and those loaves were 65% hydration. Our improved mix dough was 70% and our short mix was 71%. They were both a bit sticky but the short was clearly more of a handling challenge. I described it as reminiscent of Peter Reinhart's Pain l'Ancienne but better behaved - to the point that it could be formed and scored. 

I am really tired! 

Tomorrow we will make another 15 baguettes. Our reference improved, improved with autolyse, and high gluten with autolyse.

Time to have a beer! More tomorrow!

Jay

Pages

Subscribe to RSS - blogs