The Fresh Loaf

A Community of Amateur Bakers and Artisan Bread Enthusiasts.

Blogs

varda's picture
varda

Last night we returned from two weeks on vacation to an empty refrigerator and no bread whatsoever.   While traveling, I did not rush around looking at bakeries, sampling the fine local breads, searching for flour, or any other such thing.   The only homage to bread I inflicted on my family was a wee bit of shopping for baskets.   First I bought a basket which I had a vague notion I would proof bread in.   Yet as soon as I made my purchase, I realized that I would never, never pollute it with flour and wet dough and suchlike:

Which meant that I needed another basket for proofing.  This eventually manifested as:

which when purchased I immediately started to question.   Yet basket and no bread means:

and

and finally a bit of bread to eat:

The bread was loosely based on Pan de Horiadaki, but I wasn't much in the mood for following directions after a long trip home.  So let's call it Pan Tipo de Horiadaki or Sorta Horiadaki.  Anyhow, it was nice to have bread in the house again.  And the basket isn't too messed up.

And incidentally - in neither of the two stores where I bought the baskets did the sales people know what they were - i.e., who made them, where they came from, etc.   In the second store they said their Indian crafts vendor showed up in the middle of the night and placed his merchandise in the store and only barked at them if they asked him any questions.   So, does anyone out there have any idea what type of baskets these are?   First bought in Estes Park, CO, second in Boulder. 

I'll close with a little Rocky Mountain splendor:

yozzause's picture
yozzause

Hi folks just recently i was fortunate to be given some flour samples, one in particular that i hve enjoyed using is a course ryemeal. 

I have used it in a sour dough that is based on the rye meal being 500g (16.6%)  i have in the last two batches brought the rye meal and 2 litres of water to the boil  and allowed to cool. in this last batch i also added the chia seed to the boil up

to this is added bakers flour @2.5kgs and sourdough starter coming in at 1 kg, salt at 60g and butter or olive oil at 70g.

Unfortunately the chef that did the boil up for me didn't measure the water precisely and was about 2litres (It is hard to get good help these days) I have been trying to keep my sour dough as 3 parts flour 2 parts water and 1 part starter for the sake of simplicity  and ease of following for the people at work who are getting interested in trying sour dough making. To this i added 500g of cashew nuts, i didnt bother chopping them as i quite like the idea of a decent piece of nut in my slice of bread, and some were going to break up during the final few turns in the mixer.

The dough was then turned out and went through a series of stretch and folds i managed to do it half hourly this time as i took the dough back with me to my office rather than a long walk back to the restaurant bakery area. normally i'd would do the stretch and folds hourly, on this occasion it was over a 3 hour period with the final shaping and placement on boards i use the linen table clothes that are laundered for the resturant and they work well dusted with sharps ,also donated(semolina) and place them in the retarder .

The next morning Friday i come into work early and turn on the combi oven that heats up in 5 or 6 minutes whilst i place my dough pieces onto trays wash and  top with seed and score before placing in the oven with the steam added until the loaf has set

and then baked out i usually start the temperature high as the injection of water vapour shields the dough from the high heat and turn back to 200 degrees C

bread is usually out before the student chefs arrive to take over the kitchen at 8.00am


 other variants that i have tried with the dough remaining basicly the same have been sundried tomatoes at various rates and olives too last wee was pistacchio and pumpkin seed and now this week was cashew and chia we are starting to develop a bit of a theme.

some of the other bakes from a couple of weeks back

my list of taste testers has outstripped supply, but some very intersting trades are being made,

The plumbers cut and folded the trays for the new oven  and the carpenters provide me with ply boards for the  retardation time, and as i said the chefs will prep stuff too, leaving me to do my bit of play time!

It seems it is the time of the return of the TFL lurkers, we have just been in the background, kind regards to all Yozza 

ananda's picture
ananda

Gilchesters Miche and Borodinsky Bread

I made these loaves at home in my new SMEG oven at the end of August.

I have a new job, starting very soon, back on the “Lecturing Circuit”…the best of news!   Even better, the work is exciting, challenging and specific to my specialist area of baking.   The pay is improved too, and the terms of service.   The down side?   It means I have to travel even further…to Leeds, a good 100 miles away, and 2.5 hours on the train!   This means staying in Leeds through the middle part of the week…ho hum!

Still, I will be at home in Northumberland at the weekends, indeed, 5 nights of the week.   I hope to have the wood-fired oven working better very soon, so there should be plenty for me to post on moving forward.

In the meantime, a re-visit to 2 of the breads I am most pleased with producing in the months gone by.

  1. 1.    Gilchesters Miche

Material

Formula [% of flour]

Recipe [grams]

1. Refreshed Leaven


Total Flour [Carrs Special CC]

27

480

Total Water

16

286

TOTAL

43

768


2. Final Dough


Leaven

43 [27 flour, 16, water]

768

Gilchesters Organic Farmhouse Flour

73

1320

Salt

1.78

32

Water

62

1116

TOTAL

179.78

3236

% pre-fermented flour

27

-

% overall hydration

78

-

FACTOR

18

-

Method:

  • I began with 40g of levain from stock, which was given 3 refreshments the day before use to end up with 800g mature culture.   I retained 32g for stock and used the remaining 768g in the final dough.
  • Firstly, autolyse the Gilchester flour 1320g] with the water [1116g] required for the final dough, for 1 hour.
  • Combine the autolyse, levain and salt [32g] and mix gently to a developed dough over 20 minutes.
  • Rest covered for a bulk proof of 3 hours.   One S&F after 1¾ hours.
  • Scale and divide into 2 x 1.6kg pieces.   Mould round and set upside down in prepared bannetons.
  • Final proof for 3 hours.
  • Bake  profile as follows: Pre-heat the oven for 1¼ hours; take up to 280°C, then allow to sit at 250°C until 15 minutes before baking commences.   Take back up to 280°C.   Tip the proofed dough piece onto a pre-heated baking sheet dusted with semolina, and cut the top.   Use boiling water in a pan filled with stones as a steam source and set the tray and bread onto the pre-heated baking stone.   Turn the heat setting to 250°C, and bake for 15 minutes with the fan turned off.   Mist the loaf after 8 minutes, and top up the boiling water in the pan of stones to keep the steam supply going.   Turn the heat to 235°C.   Then drop the loaf directly onto the baking brick, remove the steam source, and switch over to convection baking.   Bake a further 25 minutes.   Turn the heat down to 200°C and bake for another 10 – 15 minutes.   Turn off the oven, but leave the loaf inside, with the oven door ajar for 10 more minutes.   Cool on wires.


  1. 2.    Borodinsky

Material

Formula [% of flour]

Recipe [grams]

1. Rye Sour Refreshment One


From Stock


63 [23 flour, 40 water]

Bacheldre Organic Dark Rye Flour


90

Water


150

TOTAL


303


2. Full Sour


Rye Sour from above


303

Bacheldre Organic Dark Rye Flour


210

Water


350

TOTAL


863 [63 retained as stock]

TOTAL used

80 [30 flour, 50 water]

800 [300 flour, 500 water]


3. “Scald”


Bacheldre Organic Dark Rye Flour

20

200

Red Malt

5

50

Organic Blackstrap Molasses

6

60

Coriander, freshly ground

1

10

Salt

1

10

Boiling Water

35

350

TOTAL

68

680


4. “Sponge”

23:30, Friday 08.07.2011


Rye Sourdough [from 2]

80 [30 flour, 50 water]

800 [300 flour, 500 water]

Scald [from 3]

68

680

TOTAL

148

1480


5. Final Paste


Sponge [from 4]

148

1480

Bacheldre Organic Dark Rye Flour

30

300

Carrs Special CC Flour

20

200

TOTAL

198

1980

% pre-fermented flour

50

[30 from sour + 20 from scald to make “sponge”]

% overall hydration

85

-

FACTOR

10


Method:

  • Rye sourdough utilised 2 refreshments beginning with 63g stock and ending up with 863g finished culture.   63g retained for stock and 800g used in the final paste.
  • Make the scald at the same time as the final refreshment of the sour: weigh the red malt [sift as necessary] and dark rye flour into a bowl, add the salt, and coriander, which should be freshly ground using a mortar and pestle.   Weigh the molasses into a pan, and pour boiling water onto this to the specified weight.   Bring this to a rolling boil on the cooker hob top.   Pour onto the dry ingredients and combine well with a stout plastic or wooden spatula.   Add any extra boiling water required first by checking the weight of the contents to allow for any evaporation.   Cover and cool.
  • Make the sponge by combining the sour and scald.   Cover and hold at 28°C for 4½ hours.
  • Add the final portion of flours to form the final paste.   Cover and bulk prove for one hour.
  • Scale and divide; 500g for a small loaf, and the remainder for a Pullman Pan, just short of 1.5kg.
  • Final proof of 3 hours.
  • Bake with a regular supply of steam in a convection oven at 190°C.   The small loaf bakes in 50 minutes, and the Pullman Pan in just over 2hours.
  • De-pan and cool on wires.


All good wishes

Andy

wally's picture
wally

It's been a long time since I've participated in TFL.  It seems that baking for a living has become nearly all-consuming, and while I lurk around here looking at the wonderful breads being baked, I haven't had the time or inclination to even comment on what I see.

Back in April our bakery, located in a restaurant on the Georgetown waterfront in Washington, DC ,was flooded when the Potomac River overtopped a levee that had (for reasons no one has yet explained) been only partially raised.  The results were devastating: our restaurant and two others were destroyed.  At the time we were supplying bread for our restaurant, a sister restaurant and one of the restaurants on the waterfront that was flooded.  We were working with close to 700 lbs of dough a day when the disaster struck.

In the aftermath, our sister restaurant - Founding Farmers - was forced to purchase nearly all their breads for several months.  The exception was the production of English muffins, which a couple of us did from midnight until 6am each morning in the cramped kitchen at Founding Farmers which was simultaneously being cleaned and awash in water and suds.  It was an unpleasant couple months, but we were lucky to still have jobs, so that trumped our discomfort.

Eventually we were able to lease space at a commercial cake bakery while a new bakery is constructed for us.  Life has returned to normal - I now begin my day at 4am (bankers hours by bakers' standards), and we work in a well-equipped kitchen with  a 4 deck hearth oven and double stack of convection ovens.  Below is a rack of freshly baked ciabatta awaiting delivery to Founding Farmers.

During this time I've continued my own baking adventures at home, mainly involving pain au levain, ryes and a memorable fougasse consumed on the lawn at Wolf Trap National Park for the Performing Arts while listening to kd lang.

But lately, I've focused more on ryes, and last week I returned to a favorite of mine: a 72% rye with a rye soaker and seeds.  It's a 100% hydration dough, due to the seeds (in this case, equal weights of sesame and sunflower), which means that you pretty much pour the dough/batter into pans.  There is no shaping or bench resting with this dough.

Below is the formula I constructed.  This produces 3 x 1.5# loaves.

I mix the dough for about 10 minutes on speed 1.  What makes this dough particularly interesting,  I think, is that there is no water in the final mix: All the water is used in the levain and the rye soaker.

This dough has a short fermentation period and only slightly longer proof before it is baked.  I fermented it for 35 minutes, and then poured it into the pans, where it proofed for 55 minutes.  I docked the tops of the loaves using a fork.


They went into a pre-steamed oven at 475 ° F oven.  After 15 minutes I reduced the temperature by 25 °, and continued to do so until the loaves had baked for 75 minutes (so the final bake temp was 375 ° ).

Loaves were cooled on wire racks, and once cooled wrapped in linen for 48 hours before I cut into them.

I'm quite happy with the result.  The crumb has a nice openness for a high percentage rye, and the combination of the seeds enhances the flavor - especially if the bread is lightly toasted.

Still being a goat cheese aficiando, I enjoy it with this tasty rye in the afternoon - often with a nice glass of rye whiskey!

Larry


loydb's picture
loydb

I haven't been baking for a bit, and apparently the starter that I thought was frozen in my freezer, wasn't, so time to make some new. This is on day #4 using the BBA starter recipe. Glad I put a plate under it :)

txfarmer's picture
txfarmer

Sending this to Yeastspotting.

Click here for my blog index.


It's another variation for my favorite sourdough sandwich breads. This time there are 30% rye in the flour, 15% of which in levain, the rest in final dough. Before this loaf, I tried other rye ratios, 30% seems to be the sweet spot - enough rye flavor yet the dough is still strong enough to be soft, bouncy, and fluffy. The total flour amount is 280g for my Chinese pullman tin, which is 30g more than an all white flour sandwich dough. I knew I would need more dough to compensate for the rye, but 30 is much less than I anticipated, just shows that a bit of rye won't hurt the dough strength that much.

30% rye sourdough sandwich loaf
Note: 15% of the flour is in levain
Note: total flour is 280g, fit my Chinese small-ish pullman pan. For 8X4 US loaf tin, I suggest to use about 302g of total flour. For KAF 13X4X4 pullman pan, I would suggest using about 481g of total flour.

- levain
rye starter (100%), 12g
water, 19g
medium rye flour, 36g

1. Mix and let fermentation at room temp (73F) for 12 hours.

- final dough
bread flour, 196g (I used half KAF bread flour and half KAF AP flour for a balance of chewiness and volume)
medium rye, 42g
brown sugar, 28g
oil, 28g, softened
milk, 143g
salt, 6g
egg, 34g

1. Mix everything until stage 3 of windowpane (-30sec), see this post for details.

2. Rise at room temp for 1 hours, punch down, put in fridge overnight.
3. Takeout, divide, round, rest for 1 hour. shape as instructed here for sandwich loaf.

4. rise at room temp for about 5 hours. For my pullman pan, it should be about 80% full; for US 8x4inch pan, it should be about one inch above the edge. The dough would have tripled by then, if it can't, your kneading is not enough or over.

5. for sandwich loaf, bake at 400F for 15min, then 375 for 25-30min, brush with butter when warm.


To counter the effect of rye flour, there needs to be enough tenderizing ingredients in the dough: oil, sugar, egg, milk all serve this purpose. The slices were extremely soft and fluffy, yet full of flavor.


Used brown sugar rather than white sugar, oil rather than butter, to better complement the rye flavor

codruta's picture
codruta

I baked Pain au Levain (page 158 from Hamelman's book) a while ago, and I wrote about it here.

Soon after that, I made another pain au levain, this time the formula with mixed sourdough starters (page 162). I didn't achieve the big-holes-in-the-crumb I was looking for, but the bread was good, it had a good oven spring, and the crust was delicious. I used whole-spelt flour instead of whole-wheat flour and I mixed the dough by hand. I kept the hydration at 68% and retard the dough overnight in the fridge. This bread was a guest post, and the formula is given here. Here are some pictures:

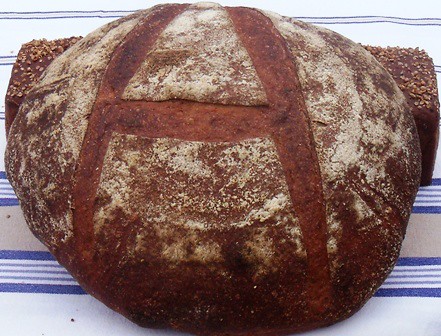
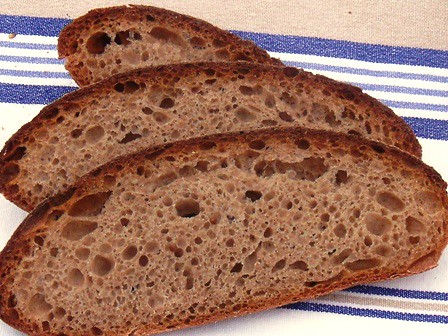
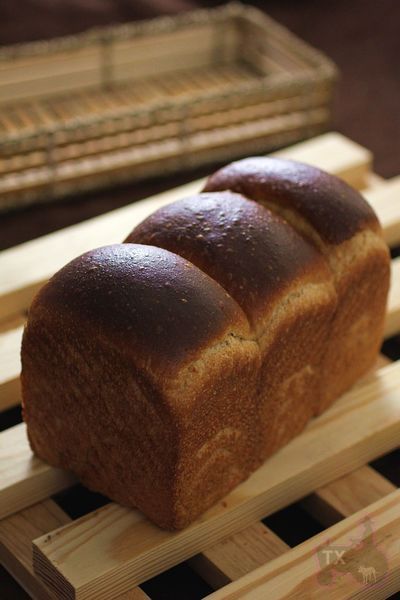
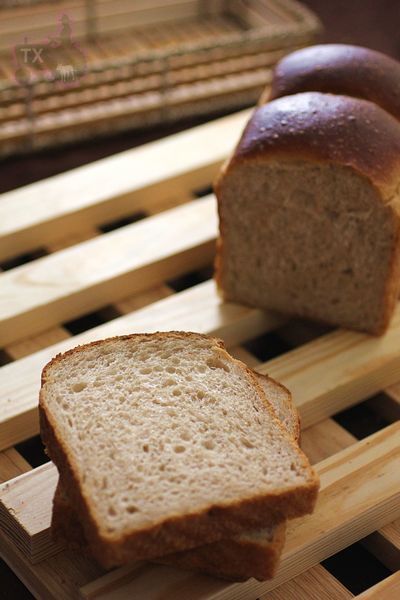
After that, I made another pain au levain, this time a combination of Whole-Wheat Multigrain and Whole-Wheat Levain. I used 31% whole wheat flour and a soaker of roasted black sesame seeds (for colour and texture), oat bran and (old fashioned) rolled oats. The hydration was 79.8%, but a lot of water is absorbed by oats. I liked working with this dough: is so pretty, smells so nice and I could shape it without problem.

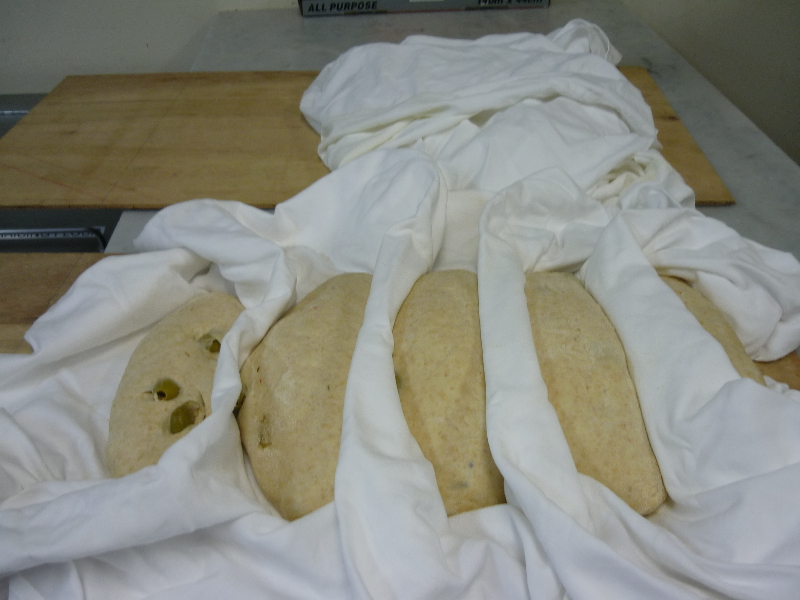
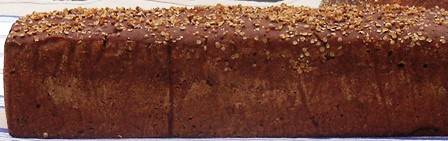
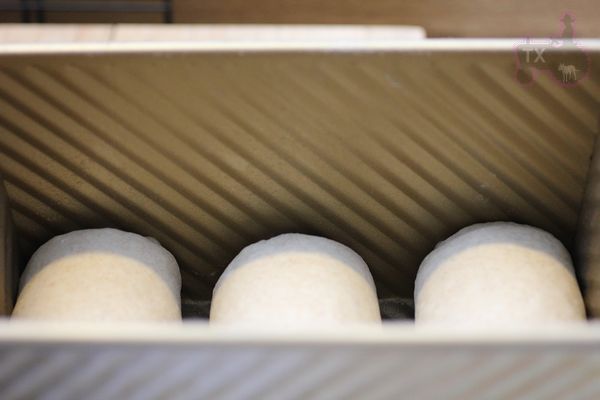
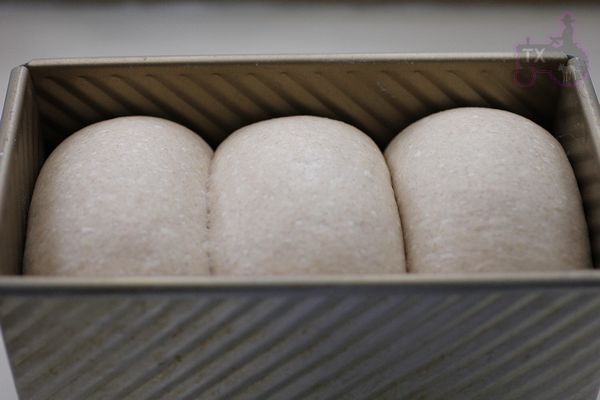
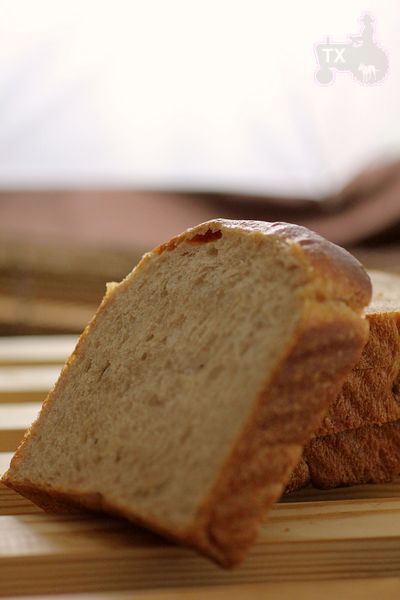
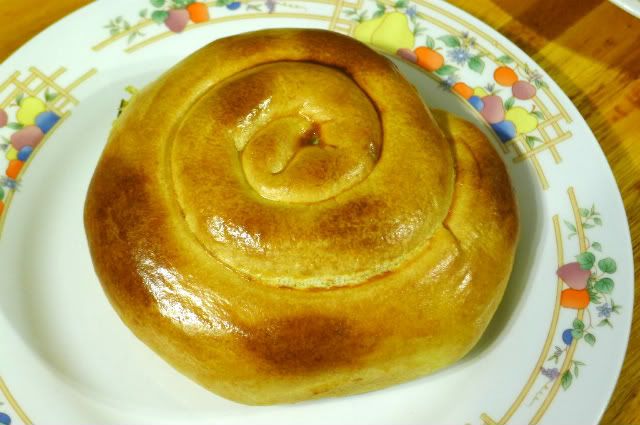
My boyfriend's sister, who lives in Paris, and her husband, who has an italian origin, they were visiting us the next day I baked this bread. They both eat a couple of slices with evident pleasure, and they comment that my breads are getting better and better (we only get to meet each other twice, maybe three times a year, so they don't taste my breads very often. Their comments were welcomed and appreciated). Here are the pictures from the beggining

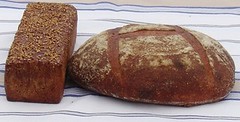
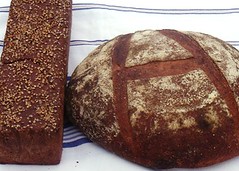
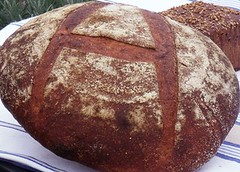
and the final product:

I have the complete formula on my romanian blog Apa.Faina.Sare. The automatic translation is very bad, but if anyone is interested, I can translate it for you.

UPDATE:

Overall  formula:
- Bread Flour: 310 g ………………………………....... 69.4%
- Whole-Wheat Flour: 17 g …………………………… 30.6%
- Water: 357 g …………………………………………….. 79.8%
- Rolled oats: 45 g ……………………………………… 10%
- Oat bran: 22 g …………………………………………… 5%
- (black) Sesame Seeds, roasted: 13 g ……………. 3%
- Salt: 9 g ……………………………………………………. 2%
dough: 893 g ………………………………………………. 199.8%Liquid levain build:
- Whole-Wheat Flour: 64 g
- Water: 81 g
- Sourdough starter (100%): 6 g
  = 151 g liquid levain 125%For soaker
- Rolled oats: 45 g
- Oat Bran: 22 g
- (black) Sesame Seeds: 13 g – roasted
- Water: 100 g
  = 180 g soakerFor the final dough:
- Bread Flour: 307 g
- Whole-Wheat Flour: 73 g
- Water: 173 g
- Liquid Levain: 151 g (all of the above)
- Soaker: 180 g (all of the above)
- Salt: 9 g

I followed Hamelman instructions (from page 168), but I let the dough autolyse for 40 min (all the ingredients except salt). After the final shaping, I retarded the dough overnight, and I baked it next morning, directly fom the fridge.

Codruta

rossnroller's picture
rossnroller

Not bread, but still baked and yummo!

This is a derivation of the Greek classic, spanakopita. The filling is the same, but instead of using filo pastry I make a basic flour/water/olive oil dough and roll it out in long rectangles to fashion these spirals (just lay the spinach/feta filling along the strip of dough, and roll up like sushi, then roll the dough tube of filling side-on to form the spirals). Simple, and one of my favourites, especially with a green mixed salad picked straight from the garden and dressed up with EVO, seeded mustard, balsamic vinegar, fresh squeeze of lemon, a little sugar, marjoram, seasoning, and a bit of feta crumbled in. We are lucky enough to have an unseasonal tomato crop in the backyard at the moment, so I chopped one of those precious treats in as well.

Cheers all!
Ross

PS: Forgot the main point of the post! This meal was about as locavore as it gets for an urban dweller. The filling included some bread crumbs from a home-baked sourdough loaf, and a large proportion of the ingredients came from our garden: the spinach (actually rainbow silver beet), lemon, marjoram, mixed lettuce leaves and tomatoes. As anyone who grows their own veges and herbs knows, it's immensely satisfying to compile a meal using so much of your own produce. Pathetic, I guess, but I'm really proud of our backyard organic garden. It's even more of a buzz than raising the illicit backyard plant or two way back when...and this time, good for you!


JoeVa's picture
JoeVa

(Wood Fired Oven - First Pizzata)

Va bene, non potevo resistere ancora molto e ... mi sono preso il forno a legna. Niente di troppo grande o impegnativo, giusto un piccolo forno per pizza. Per il momento collocazione temporanea su cavalletti.

Ok, I couldn't resist more and ... I bought my wood fired oven. Nothing too large or difficult to work with, just a small oven for my pizza. For now in a temporary location on two supports.

Per la prima volta non vi aspettate foto dettagliate, le ho fatte al volo nel casino generale. Tutti in giro e nessuno ad aiutarmi. C'era chi giocava col gatto, chi chiaccherava rilassato, chi rincorreva le zanzare ed io da solo a correre dietro a forno ed impasto.

For the first time do not expect detailed photos, I took them on the fly in the general caos. All around e no one helping me. One was playing with the cat, one was chatting very relaxed, one other was running after a mosquitos and I was there running between the oven and the dough.

Impasto con Farina Caputo Rossa (tipo 00 rinforzata) e tecnica del freddo per un totale di 48h di cui 42h di puntata a 4-6°C e 6h di appretto a temperatura ambiente. Cottura a 400°C in 60-90 secondi.

A grandi linee l'impasto è questo:

  • [100%] Farina
  • [66%] Acqua
  • [2.8%] Sale
  • [0.12%] Lievito di birra fresco

Dough made with Caputo Red Bag Flour (Type 00 reinforced) and cold technique for a 48h process, 42h bulk rise at 4-6°C and 6h proof at room temperature. Baked at 400°C in 60-90 seconds.

The dough was made with:

  • [100%] Flour
  • [66%] Water
  • [2.8%] Salt
  • [0.12%] Fresh Yeast

I panetti erano belli morbidi ed hanno prodotto una pizza soffice e fragrante con un bel cornicione vuoto e leopardato ... ho infornato con una pala di legno di fortuna, senza palino, ma la prossima volta sarò più organizzato.

The pizza balls were beautifull and soft and the resulting pizza was soft and fragrant with a great empty blistered cornicione ... I put the pizza into the oven with an emergency wood peel, without the small round metal peel for turning, but next time a will be more organized.


Dopo pochi secondi (After few seconds)

Conclusioni: va in temperatura velocemente (40 minuti), consuma poca legna, ha una volta bassa in acciaio che simula la volta del forno napoletano, ci si può fare un pizza napoletana a patto di tenere la fiamma sempre bella viva ed alta su tutta la volta. Aspetti negativi quasi nessuno, tranne la necessità di cuocere le ultime pizze sul palino perchè la temperatura del fondo rimane bella alta. Per il resto, con un buon impasto e curando qualche dettaglio in cottura, si ottiene un ottimo prodotto.

Conclusions: it reaches the optimal temperature really fast (40 minutes), doesn't need too much wood, has a low top profile in iron that simulates the classic neapolitan oven design, can be used to bake neapolitan style pizza if you take care to have a good live flame all over the top. Very few bad points, you need to bake the last pizza oven the metal peel because the bottom temperature may get a bit to high. For the rest, with a good dough and paying attention to few baking details you'll have a very good product.

belle's picture
belle

Hi friends..


Well - I purchased the starter from breadtopia.com.  I was very faithful feeding it daily for about 2 weeks.  Then it went to once a week..Then - hurricane Irene hit CT..I lost power for 4 days.  I now have power and the refridgerator is humming along ...Here are my questions:

1.  Is the starter still alive?

2.  What if there is about 1/4 inch of water on top?

3.  How often should I be feeding it?

Anything else I need to be aware of?

Thanks you brilliant people...I am always in awe of what you are creating..

Pages

Subscribe to RSS - blogs