The Fresh Loaf

A Community of Amateur Bakers and Artisan Bread Enthusiasts.

Blogs

Szanter5339's picture
Szanter5339

The creative loaves white bread almost midíg make.
The leaven before baking in a day or two doing it.
All material kneading dough a little harder. When smooth and shiny, it's good. Double the size of ulcer I am lost. Dumps and the board smooths out a bit, then screw the oblong shape. Add to pots and pattern cutter blade on it, or make a thin batter ellapítva sample.
A little bread megvizezem the top of the sample rátapadjon. Let rise for 20 minutes, then lekenem I put the pots with water and cover. 220-degree oven 50 minutes in hot oven.
When you take out of the oven, even lekenem water.
So I bake these lovely loaves. I put some photos up.
I'm glad to be here, but the problem is that I do not understand the language and machine translators. A little heavy.
A lot of my photos here, and especially to show you. I'm glad you like my work and it inspires me in the future.

http://szanter.blogspot.com/2011/03/kenyersutesfazisfotokkal.html

http://kreativkenyerek.wordpress.com/


700 ml of water
6 tablespoons of oil
2 tablespoons vinegar (20%)
6 teaspoons of salt
2 tablespoons powdered sugar
1600 gram flour
40 grams of yeast
In yeast +

Preparation of yeast, 1-2 days before cooking.

yeast:
140 ml of water
150 grams of flour
1 tablespoon oil
½ teaspoon salt
20 grams of yeast

loydb's picture
loydb

A few weeks ago I made a Sourdough with Candied Orange that was a huge hit around here. The arrival of a pullman pan coincided with my wife's demands to make something like that again. This is based on PR's BBA Panettone with the following changes:

  • 33% of the flour was home-milled hard red and white wheat in a 50/50 mix
  • I used more dried fruit -- 2 oz each of dried golden raisins, cranberries and cherries soaked overnight in Kraken rum with Mandarin Orange and Vanilla extracts.
  • I used more nuts -- 2 oz each of pecans, walnuts and almond slivers that I toasted beforehand.
  • Even after extended rising time, the loaf wasn't filling the large (13" x 4.5" x 4.5") pullman pan, so I put it into an unheated oven, turned to 325, and left for 1 hour 45 mins. I will go longer next time, but I was worried about burning it. As you can see, it rose perfectly.
  • For the candied fruit, I used 1.5 cups of candied tangerine peel. I was happier with the orange peel, I'll use it next time. The tangerine peel was thinner and a little more bitter.

We'll be eating breakfast (and probably dessert) off of this for awhile. I may try making french toast with the last bits.


OldWoodenSpoon's picture
OldWoodenSpoon

My schedule cleared up enough that I could sneak in another test bake of this recipe last night.  Based on yesterday's exchanges with Eric Hanner and MiniOven I made only a couple of adjustments from the previous bake, and in particular changed the rack and tile setup in my oven at Eric's suggestion.  Here is a brief summary of this bake:

1.  Continue with KAF All Purpose flour (11.7% protein)
2.  Continue to exclude malt (don't have the proper malt required)
3.  Continue dough development to just short of full gluten development
4.  Add about 8-10 grams of additional water to bring "apparent" hydration to more acceptable level.
5.  Continue two rises with thorough degassing between for bulk fermentation
6.  Attempt to more carefully and evenly shape the dough
6.  Remove upper tier of tiles from the oven and raise baking rack up (1 slot) to middle of oven
7.  Continue to preheat to 375F then back down to bake at 350F after loading

Part of my original plan was to also implement MiniOven's suggestion for dark baking pans, but alas, I did not find them locally and had to order them.

In summary, there is both good news and less than good news in this bake.  Eric's suggestion to remove the top tiles did pay off well, and the oven spring was much more even and controlled in this bake, where my shaping held up.  That is the good news.  The additional water in the mix returned this dough to a manageable hydration level that was much easier to work with.  I turned out one good loaf and one where the "bottom" seam gave way and the loaf blew up.  That part is my fault.  The basic problem I have been trying to resolve, though, persists.  Despite the changes and improvements in this bake I still have sides caving in.  That is the less than good news.  It is not quite as dramatic this time, but it is clearly still an issue.  Here is a short pictorial review:


The loaf on the left is the one where I got sloppy in the shaping.  I failed to pay attention to where the seam ended up, and so it ended up around to the right side in this picture.  Because of a taper I allowed in that edge I could not readily rotate that seam to the bottom without ending up with a double crease in the top.  I decided to let it be and take the consequences.  I knew this seam would not hold, but it actually came out a little better than I imagined.  I probably should have rested it and re-rolled it, but I did not.  I did a better job shaping the other loaf, and I did center the loaves better in the pans prior to proofing.

Here the loaves are fully proofed, ready for the egg wash, slash and loading.

Here you can see how well the proofed dough fills the pans.  That side seam in the left loaf never did proof out to touch the pan, but the oven spring filled that gap quickly.  Nonetheless it remained the weak spot that failed.

It took 36 minutes to get the internal temperature up to 206F.  You can see above that the loaf on the left has suffered a shaping failure and burst up on the inner edge where that side seam failed to hold.  The above shot also shows the setup for this bake.  No top rack or tiles, and the baking rack is up one level from before, leaving about 1 1/2" more space between the pans and the bottom tiles than in previous bakes.  If that proximity to the bottom tiles was a deciding factor in the problem of the loaf bottoms caving in this should have resolved it, but in the end it made no difference.

The crosscut above shows the quite open crumb, the clear hourglass figure, and the doughy patches against the side walls of the loaf where internal pressures have compressed dough layers up against the side walls.  Again.  Note that this shot is of the better shaped of the two loaves.  Also note that the oven spring is more orderly and the slash stayed reasonably well centered, indicating the spring in this loaf was pretty much straight up rather than distorting off to one side or the other as has been the norm in all my previous bakes.  This was the main thrust of this particular test bake, and it was a success for certain.  It is pretty conclusive that if I can properly shape the loaves, removing the top tiles will allow them to spring normally.  Thank you Eric!

Since I was not able to bake one of these loaves in a dark pan I still don't have much new insight into the cave-in problem.  I feel like the answer is right in front of me, but because I tend to suffer from tunnel vision when problem solving I am missing it.  I plan to leave this and go on to other baking until my dark loaf pans come in and I have some non-diastatic malt on hand.  At that point I will hopefully have achieved some distance from this issue so I can open the book and try this again from a standing start, by the book, doing my best to approach it as my very first encounter with this bread.   That's todays thought anyway.

Thanks for stopping by
OldWoodenSpoon

CaptainBatard's picture
CaptainBatard

Pierre Nury’s Rustic Light Rye or Who Stole My Bubbles


Now I think it’s time to roll up my sleeves and dive into this rustic Bougnat from Daniel Leader’s Local Breads. This is another bread from the prestigious Meilleur Ouvrier de France award winner Pierre Nury who hails from the Auvergne region of France. The only characteristics of this bread that actually resembles a French style, is the stiff levain that is used — and, of course, its award winner baker!   All the other nuances I have gotten accustomed to in making French bread, the tight shaping, timing of the rises, scoring of the loaves… have been thrown out the window.

I have to admit to being a little intimidated when reading the description of this French rustic rye, a loaf that looks quite a bit like Italian ciabatta…especially the author’s caveat that “the high proportion of water in this dough makes it difficult to knead by hand.”  But I was not going to let a little wet dough scare me off.  It actually felt good to get loose, and play with some slack dough! While things are being turned upside down with this recipe, I might as well throw something else into the mix (no pun intended) and continue my experimentation with the autolyse process.  Until now I have not been adding the levain to the initial mix of the flour and water. After reading Teresa’s second experiment in the autolyse process, I thought it could only give the dough a better structure, stronger development and maybe make it easier to incorporate the stiff levain into such wet dough. The hand mixing was a little sloppy to start…but after a short time the dough developed into a silky, smooth wet dough…and passed the window pane test with flying colors.  The rest of the process went along smoothly with no other real predicaments… so after a couple of folds and a rise, it went into the regenerator for its long, slow overnight ferment.

The next day I was eager to see what became of the dough… but I thought I’d give it the full twelve hours before I looked in.  So, the hour approached, the timer went off for the moment of truth and I opened the refrigerator; I could not believe my eyes! The once little boule…had more than quadrupled in size, had reached the top of the bowl and was filled with lots of big gas bubbles. I gently turned out the dough, divided it and slipped it into the hot steamy oven. I really thought I had hit this one on the head!  But this was not to be the case. The bread had a great creamy crumb, a subtle, slightly sour rye taste, a chewy crumb with a nice mouth feel and crackling crust … but where were those “long glossy tunnels” described by the author?  I am not really sure what happened to all the gas pocket so evident when I turned it out…was the gluten structure not developed enough?…was it over proofed?… was it the Type 130 rye flour that I used?…. or maybe the Type 65 with its gluten additive was not strong enough to hold the gas?  I have a sneaking suspicion that it was the coarse, heavy rye flour might have cut the glutens and causing the “long glossy tunnels” to collapse.  The jury is still out on this one.

If you made it through to the end of this post…congratulations and thanks for reading!  Now…seriously…Do you have any ideas on who stole my bubbles?  Please leave me a comment. I would be very interested to hear your thoughts.

To see more pictures and recipe come to Weekendloafer.com

Thanks.....Captain Batard

yozzause's picture
yozzause

yesterday I took the opportunity to knock up a batch of bread using the sour dough culture that i maintain here at work.

I have had some luck getting one of the chefs to do the sourdough crackers  over the last couple of weeks that appeared here  a short while ago.

I must say they turned out really good and loved by all those that tried them. Anyway it must have stirred me into  some action.

I started my dough just before 8.00 am and after mixing took it back to my office  where it was stretched and folded every hour

the dough was

 1KG STARTER

2KG WATER

3KGS FLOUR

35g SALT 

100g BUTTER

100g  of THE CONTENTS OF A BREW KIT (mostly malt extract with the infusion of hops)

AT 12.00 lunch time the dough went back to the bakery  area was scaled lightly handed up and shaped put onto couched boards and retarded  until 12.00 the following day and and after placing onto trays and washing with a boiled cornflour wash seeding and scoring just waited till i got the nod that the combi oven was free and no longer being used for the lunch time  service put the trays in with some steam for 5 minutes and allowed to bake for about 35 to 40 minutes time for a few quick photos and slice into one of the breads for a look inside  and there we have it a nice little rememberance day and my eldest grand daughters birthday loaf (lest we forget). The dark malt seems to have added some colour to the crumb

Many thanks to all our service personell past and present for your sacrifice for our well being

 regards Yozza

laron's picture
laron

Is there anyone out there that has a great recipie for a cut out cookie, either butter or sugar.  I had a really good butter cookie recipie but misplaced it and I don't feel like going through the trial baking again.  I promised my daughter that I would make cookies for her wedding favors and need about 300.  I want to make snowflake cookies for a December wedding.  Any suggestions greatly appreciated.


MickiColl's picture
MickiColl

some of the recipes here call for "old bread" ? is that old "cooked/baked" bread ? or it simply old uncooked dough (discard)

txfarmer's picture
txfarmer

Sending this to Yeastspotting.

Click here for my blog index.

It's that time of the year again -- when I sacrafice sleep in honor of holiday spirit. Starting early this year since I am moving soon, and sourdough panettone makes a great goodbye gift. This recipe is from here: 53% butter, 36% sugar, and 50% egg yolks (that's 16 yolks for 2 loaves my friends, as I was seperating them, I was praying the breads would work out, I really would like NOT waste a whole case of eggs for nothing!)! It's rich, it's light as air, it's melt in your mouth, I am pretty sure my friends will remember me for a looooong time! I follow the recipe closely with the following notes:

- Yes, the link is in Italian, this is where we put Google Translate in good use.
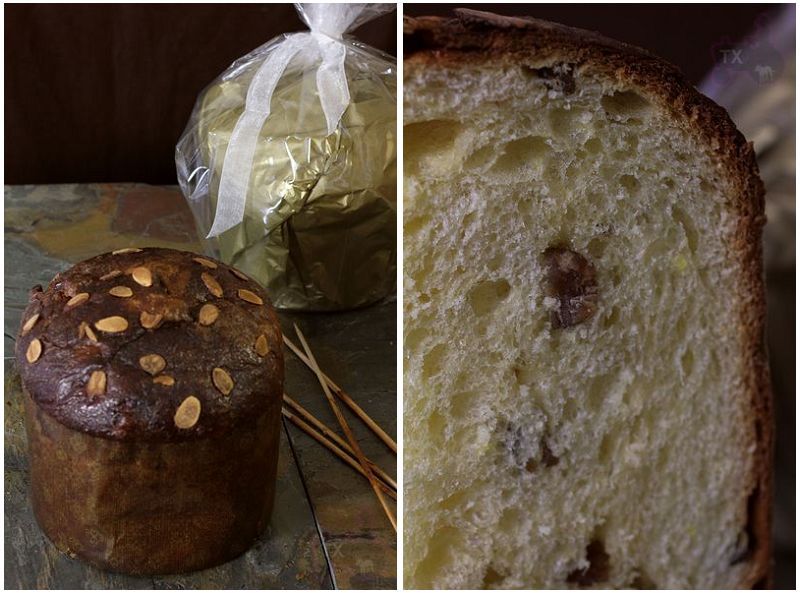
- Instead of sultanas and candied fruits, I got inspired and add candied chestnuts. Recipe can be found here. Yes, it takes 4+ days to make, but hey, with this sourdough panettone thing, one should just ignore time spent, money spent, or fat/cholesterol content. :P I didn't make quite enough, so my add-in ingredients was 87.5% of what the formula specified for both sultanas and candied fruits, making the final loaves slightly lighter (but definitely not smaller, see below).
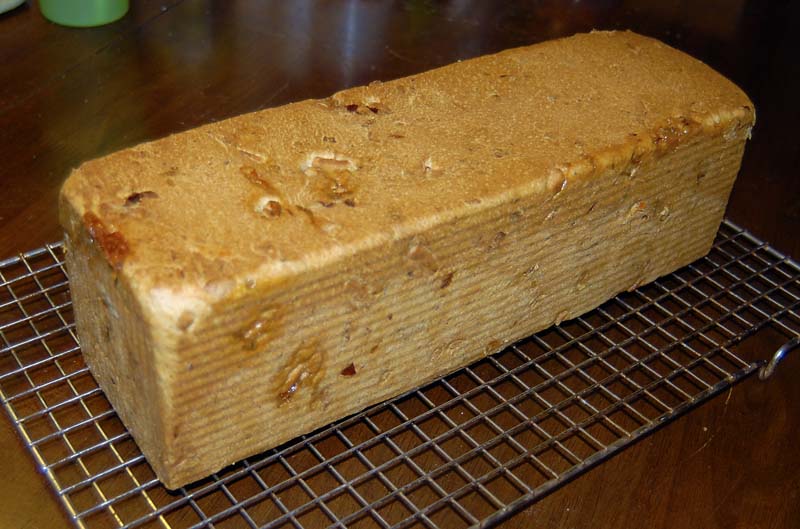
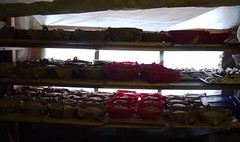
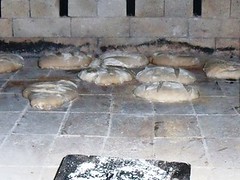
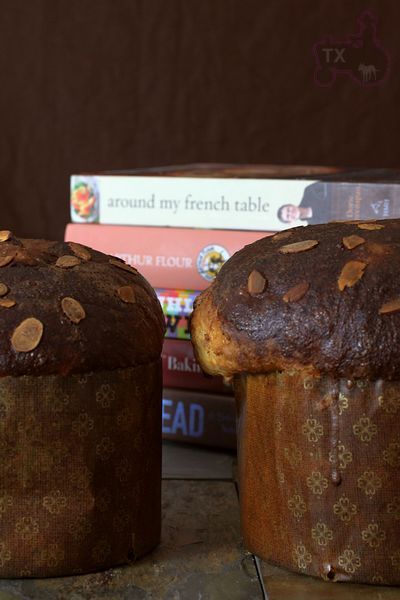
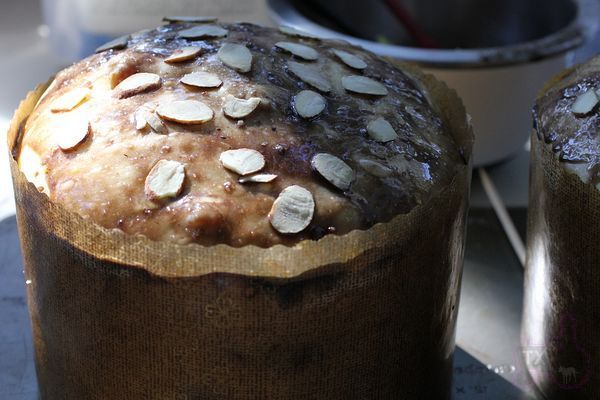
- I made 2/5 of the formla, which means I got 2 big loaves. If I had divided the dough evenly, each should be 1040g, perfect for the paper case. However, one loaf was a gift, the other was for ourselves, so I put 1100g in the gift case, only 980g in the other. From last years experience, I thought 1100g would fit, but OMG, this formula is much richer, which means the dough rose much higher. As you can see below, the 980g looks perfect, the 1100g one was threatening to spill over! Oh well, my friend had no objection with some extra yummy bread.

-Key #1 for a successful sourdough panettone, especially such a rich one, is an active Italian mother starter. I first kept my 100% liquid starter at room temp for 2 days (feeding everything 12 hours), then converted to 50% firm starter (20g 100% starter +20g Bread Flour+5g water), then keep it at 85F and feed it every 4 hours with following ratio: (starter: flour: water = 1:1:0.5). Did this for 48 hours, the starter more than tripled between each feeding.
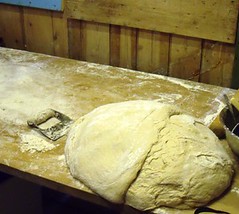
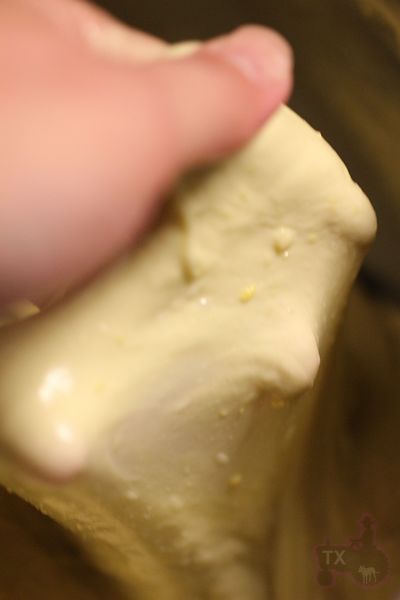
-Key #2 for a successful sourdough panettone is a thorogh kneading. For the first dough, butter must be added little by little after the dough as come together, then I kneaded until the dough came together again and cleared most of the mixing bowl (no need for windowpane). Be careful not to overknead, with so much yolks and butter, it's easy to overknead. However, be sure not to underknead, otherwise, the 2nd dough would be much harder to knead. The following is first dough after kneading:

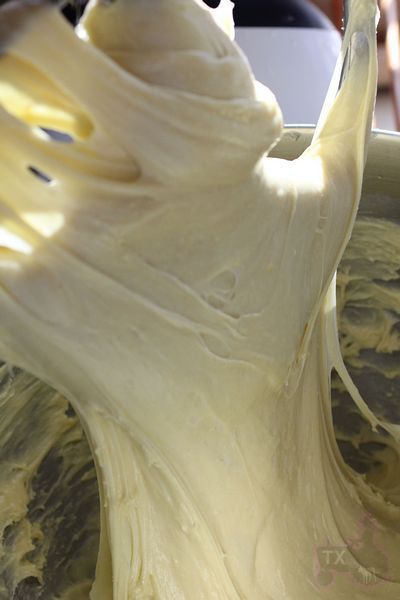
For 2nd dough, butter must be added little by little AFTER the dough has come together and clear the bowl. After butter is added, the dough must be kneaded until you can get a thin but strong windowpane. The dough literally felt like liquid silk, draping down from my hands.

-Unlike last year, the dough rose right on schedule this time, indicating an active starter and good kneading. After 5 hours at 30C, the dough came to the rim of the case. The chocolate glaze recipe I used was from AB&P.

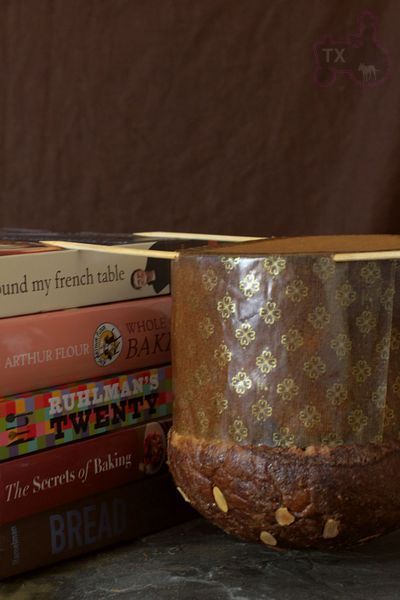
- I hung the loaves upside down between stacks of books for 5 hours after baking.

- For my last years panettone post please click here, it also includes info on the paper case.

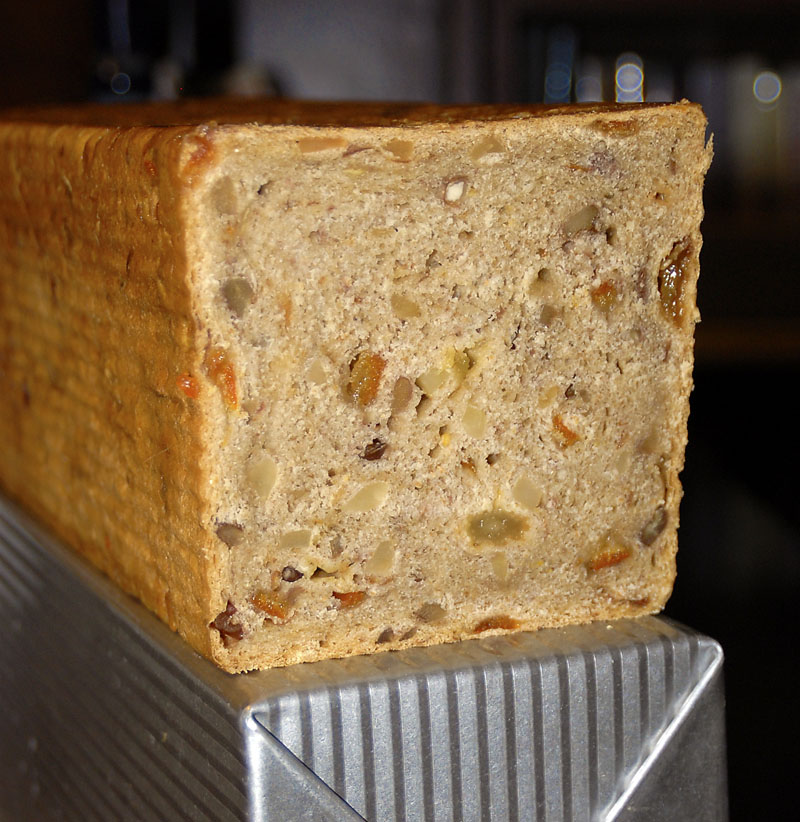
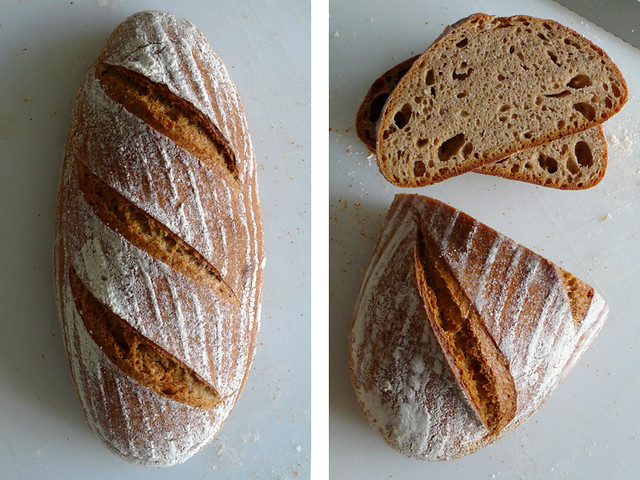
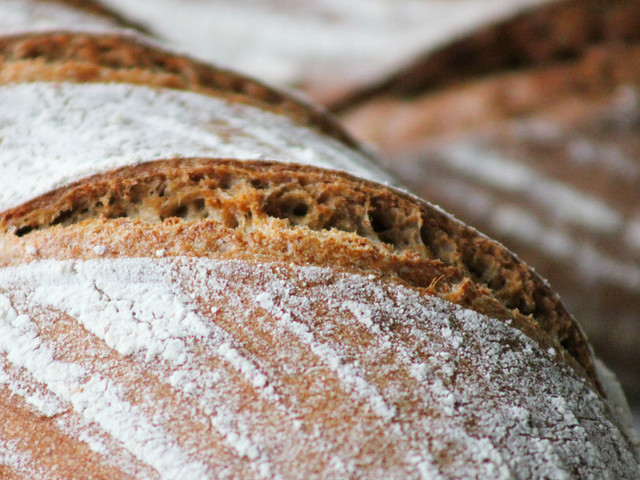
Definitely richer and lighter than last year's version

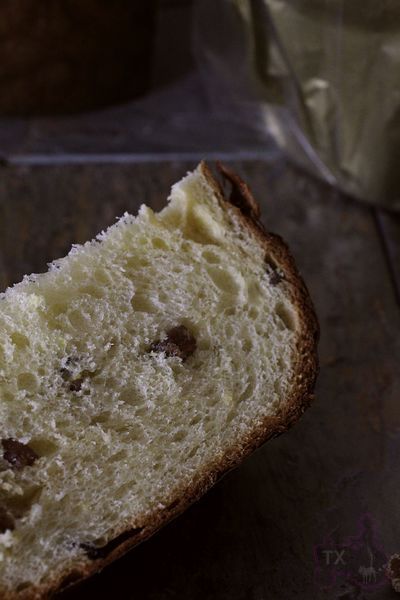
Shredding...the texture is literally like air, the flavor on the other hand, hits like a rock! If I can get my new kitchen in order before Christmas, I am sure I will make more of these.

PiPs's picture
PiPs

Formula

Overview

Weight

%

Total dough weight

1600g


Total flour

969g

100%

Total water

630g

65%

Total salt

19g

2%

Prefermented flour

242g

25%


Starter build – 8 hrs 27°C


Rye starter @ 100% hydration

50g

20%

Sifted Wheat

242g

100%

Water

121g

50%


Final dough 25°C


Starter

363g

50%

 Sifted fresh milled Spelt

727g

100%

Water

510g

70%

Salt

19g

2%


Method

  1. Autolyse 45 mins
  2. Knead 5-10 mins
  3. Bulk ferment 1.5 hours with stretch and fold at 45 mins
  4. Preshape and bench rest for 15 mins
  5. Shape and proof for 45 mins
  6. Bake in steamed oven for 10 mins at 250°C then 30 mins at 200°C

I have come to the realisation that I don’t enjoy working with large proportions of spelt flour in dough.  The flavour of the bread was ok, but considering it contained 75% sifted spelt flour I found it rather bland, left me wanting more from it. As the temperatures continue to climb here (yesterday was a hot and humid 32°C) I am finding the spelt breads ferment way too fast for my liking even when using cooler water.

I think I will stick with wheat breads and smaller proportions of spelt (30% is a favourite of mine)

… also looks like a busy weekend of baking coming up … and with Christmas fast approaching it seems just about all of our upcoming weekends have social events hopefully requiring bread :)

Cheers, Phil

ananda's picture
ananda

Two Leavens, Some Wholegrain and a Commercial Mixer


I wanted to use my new [very old!] 20 Quart Hobart dough mixer as soon as possible, so made a dough from the flour I had available today, after building both my rye sourdough and wheat levain over a couple of good feeds.

I only had around 40g of each culture in stock, but built each one with a feed Tuesday and Wednesday evenings to give me a working amount to build a great final dough today, Thursday.

Details are given below:


Material

Formula [% flour]

Recipe [grams]

1 a. Wheat Levain


Marriage’s Organic Strong White Flour

16.67

400

Water

10

240

TOTAL

26.67

640


1b. Rye Sourdough


Bacheldre Organic Dark Rye Flour

8.75

210

Water

14.58

350

TOTAL

23.33

560


2. Final Dough


Wheat Levain [from 1a.]

26.67

640

Rye Sourdough [from 1b.]

23.33

560

Marriage’s Organic Strong White Flour

12.5

300

Carrs Special CC Flour

16.67

400

Allinson’s Strong Wholemeal

18.75

450

Gilchester’s Organic Pizza Flour

25

600

Bacheldre Organic Dark Rye Flour

1.66

40

Salt

1.83

44

Water

44.17

1060

TOTAL

170.58

4094


% pre-fermented flour

25.42

-

% overall hydration

68.75

-

% wholegrain flour

29.16

-

FACTOR

24

-


Method:


    • Build the 2 leavens as described above
    • Firstly deposit the rye sourdough into the mixing bowl.   Add weighed and tempered water to this, then add all the remaining flours.   Leave out the salt and wheat levain, and mix for 3 minutes on first speed, using the hook attachment.   Scrape down the bowl half way through the mixing time.   Allow to autolyse for 1 hour.
    • Add the wheat levain and salt and mix for 1 minute on slow speed.   Scrape down the bowl, add a pinch of flour as needed, and mix on 2nd speed for 5 minutes.   DDT 24°C
    • Bulk ferment for 2½ hours, with one set of bold S&Fs after 2 hours.
    • Scale and divide as follows: 2 @ 480g, 1 @ 960g, 1 @ 700g and the remaining piece, just short of 1500g.   Mould round.   Rest and prepare 5 bannetons.   Re-mould and set upside down in the bannetons for bulk proof.
    • Bulk proof time between 3 and 6 hours to fit schedule
    • Bake in an electric oven with steam and on a stone.   Cut the dough surface just prior to loading.   I loaded each loaf to an oven pre-heated for 1 hour to 280°C.   I used steam by misting the dough surface with water, and adding boiling water to a pan of hot stones on the base of the oven.   The first 10 minutes the oven setting was 250°C, with the fan off.   After that I lowered the heat to 215°C  and switched over to fan convection on full power, and baked out each loaf.   The 2 small loaves were baked simultaneously.
    • Cool on wires


No wood in stock, which was a bit of a pain, given I had 5 loaves to bake off the same dough.   Some loaves were proved in front of the fire, and some were held in the fridge for an hour to ensure smooth production schedule…that worked.

The dough was splendid!   The mixer is a joy, and, the even fermentation at 24°C with gentle, but excellent development and generous hydration produced results as good as I could have hoped for.

Plenty wholegrain too!  


The taste?   I really rate this bread very highly.   Let’s see what other local people think now…


Nigel's November Baking Day

On Saturday I managed to get up early for a change, so I could pay a visit to my friend and long time baking colleague, Nigel.   It is actually all down to him that I ever got involved in the food industry, and baking in particular.   Both of us were founder-members of the Red Herring Worker's Co-op in Newcastle, a business which Nigel had pioneered single-handedly for a few years already before we came together to create it as a formal business entity.   That was way back in 1987!

Fast forward to our current situations, and we both seem to have wood-fired ovens built at our homes, and ready to use as an integral part to our imagined future destiny.   Nigel, thank you so much for helping me to get my oven built in the first place.   Apologies for not getting on board to help build your own monster; at the time I seem to remember having to defer my MSc for a year as teaching commitments at Newcastle College just about pulled me under a very big wave indeed.

Nigel's oven is a very big beast indeed.   It gave me several big lessons when I went to help out on Saturday morning.   Firstly there was well in excess of 100 loaves to bake.   We also made a range of sweet and savoury pasties.   Nigel had fired the oven hard the previous evening, and again from early Saturday morning [05:00]   I arrived at 09:00 [he lives over 40 miles south from my home], and the oven was sitting happily at just under 350*C.   We started baking at 11:00, just as we finished off most of the pasties, and moulded up a second batch of unbleached white loaves.

Well, it was a great chance to catch up with a lot of old friends.   Some folks I hadn't seen for around 20 years.   Other fellow "Herrings" came along, so too, Katie [of "Stout and Flax Seed Bread" fame] along with her Dad.   It was a lovely sunny day, and I managed to grab some photos of Nigel's burgeoning bakery den, and he kindly took some snaps as I had a chance to set his lovely loaves, and to pull them, baked, from his wonderful oven.

Here's a few photos; you can see more on my flickr site, here:

http://www.flickr.com/photos/24731237@N03/sets/72157627995705763/


Very best wishes to you all


Andy

Pages

Subscribe to RSS - blogs