The Fresh Loaf

A Community of Amateur Bakers and Artisan Bread Enthusiasts.

texasbakerdad's blog

texasbakerdad's picture
texasbakerdad

The wife has tasked me to come up with a sandwich bread recipe our family can bake at least once a weak to completely replace our regularly purchased box store sandwich bread.

Requirements

  • Soft and light
  • 100% whole wheat
  • Recipe must be easily repeatable and easy to execute.
  • Recipe must be designed for a covered pullman loaf pan.
    (https://shop.kingarthurbaking.com/items/pain-de-mie-pan-pullman-loaf-pan-13)
  • My 12 year old daughter must be able to bake the bread from start to finish
  • Sourdough leavening only.
  • From start to finish, the bread must be completable in 1 day.
  • Process must exist to enable the baker to know with reasonable certainty that the loaf is perfectly proofed.
  • Dough needs to contain a few softened chewy seeds, grain berries, etc. for texture and flavor. 

Plan

I am going to start with a txfarmer's recipe (http://www.thefreshloaf.com/node/21575/sourdough-100-whole-wheat-oatmeal-sandwich-bread-whole-grain-breads-can-be-soft-too) and modify from there. I imagine it is going to take me somewhere between 5 to 10 bake days to hammer out the base recipe. To help perfect the proofing, I am going to use an aliquot jar.

At first, I am going to leave out any interesting seeds, nuts, and berries until the base recipe is sorted out.

My goal at first will be to get an optimal texture, hydration level, and rise.

To keep the process as simple as possible, I am going to at least at first, try to get away without any folding of the dough during the bulk rise.

First Attempt

Ingredients

  • 30g (6%) sourdough starter (50:50 hard red)
  • 50g rolled outs
  • 30g (6%) honey
  • 10g (2%) non-iodized salt
  • 30g (6%) virgin olive oil
  • 450g (90% if you include rolled oats) well water
  • 450g hard white wheat (sifted to remove bran)
  • sifted bran to be used as topping

Process

  • 0:00: In large mixing bowl, add: 450g of boiling water, 50g rolled oats, 30g honey, 10g salt. Mix and let sit for 10 minutes.
  • 0:10: Mix in 30g olive oil
  • 0:11: Without kneading, mix the 450g of hard white wheat to combine into a shaggy mess. Let autolyze for 10 minutes
  • 0:21: Smear 30g starter over the top of the dough mess. Use mixer or hand to knead at medium speed for 5 minutes.
  • 0:26: Transfer dough to proofing container with lid. Siphon off 50g of dough to aliquot jar.
  • Estimate a 2 hour rise time, but will move to next step when aliquot jar shows 2x rise.
  • 2:26: Preshape dough into ball, let sit for 10 min.
  • 2:36: Shape dough into log and place into prepared pullpan pan, cover with plastic wrap.
  • Estimate a 1.5 hour rise time, but will move to next step when aliquot jar shows 3.5x rise.
  • 3:36: Preheat oven 375dF
  • 4:06: Assuming aliquot jar shows 3.5x rise, sprinkle bran on top of loaf, put lid on pullman and stick in oven for 45 minutes.
  • 4:56: Pull from oven, transfer loaf to rack. Let rest until cool, probably 1 hour.
  • 5:56: Slice using slicer then put loaf in plastic bread bag to keep it soft.

I am going to get my butt off the couch and try this out. I hope it all goes well.

texasbakerdad's picture
texasbakerdad

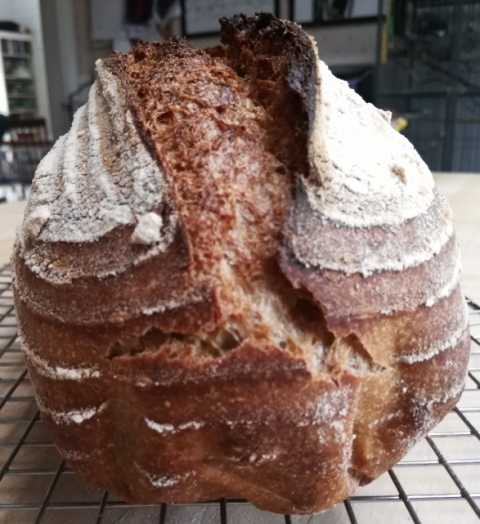
Another great baking day. The crust was crunchy, crisp, and super flavorful. Too many good bakes in a row, I am due for a disaster :-)

We were having a friend over and decided we wanted to make pizza. We are making pizza at least twice a month now, but usually we throw the pizza together at the last minute, which enables a tasty pizza but just not as good as one where the dough is started the day before.

But, this time, I had enough fore warning and I had a guest to cater to, so I got to put in the extra effort. I really wanted to use commercial flour, but unfortunately, all we had were unground white and red hard wheat berries. Which I knew were not ideal for making pizza dough. However, my wife loves anytime I can make whole wheat work and I enjoy the challenge.

I went on the hunt for an (a) overnight, (b) 100% whole wheat, (c) high hydration, and (d) sourdough pizza dough recipe. I couldn't find any recipes that had all 4 desired traits, so I ended up combing 2 recipes and 1 youtube video into my own recipe.

My biggest concerns for this bake were:

  • The whole wheat dough breaking down during the night in the fridge.
  • Getting the timing wrong with regards to warming up the dough early enough to get a good rise by bake time
  • Getting the hydration wrong, I didn't want dense and chewy dough

I had no issues with the dough, except for the hydration. I should have increased it even more. I chose 80% hydration based on this video:

https://www.youtube.com/watch?v=tTas4Fn9xk4

But, Mr. Iacopelli was using refined and fine flour. So, I realized pretty early on that I should have chosen a hydration between 90% and 110% for my freshly milled hard white wheat. I was able to improve the situation substantially by adding water while working the dough during bulk ferment, but I probably only upped the hydration to 85%. In the end, the crust was fantastic, but shaping the pies was difficult and I think the crust could have been much more supple and easier to shape had I had a higher hydration.

The other two recipes I consulted in coming up with my recipe were:

https://www.melskitchencafe.com/whole-wheat-pizza-dough/
https://www.thursdaynightpizza.com/no-yeast-sourdough-pizza-dough/

Recipe:

  • 6% starter (50:50 hard red wheat:water) (100g)
  • Hard White Wheat (I chose white because it has a milder flavor than red) (1500g)
  • 80% Water (1200g)
  • 2% salt (30g)
  • 2% oil (30g)
  • 2% molasses (any sugar would suffice) (30g)
  • 5% Ooopsie Water (trying to correct for less than ideal hydration level) (75g)

Process:

  • 9p night before: By hand, mix all ingredients except for the oopsie water into a shaggy mess. The goal here is to get the flour to absorb the water for 15 minutes before spending too much time trying to build any gluten.
  • 9:15p: Knead dough by hand for about 5 minutes, basically to get the ingredients to be evenly distributed and start some gluten developing. I really didn't work the dough very hard, just folded it over about 10 to 20 times until the the dark molasses spots in the dough disappeared. In hindsight, I should have mixed the salt, water, and molasses together first, before added it to the rest of the ingredients. No negative side effects to the end product, it only meant I had to work a bit harder to evenly distribute everything.
  • 9:20p: When done kneading, transfer to a clean container, cover and throw in fridge.
  • 9a next morning: Pull dough out of fridge and set on counter to slowly warm up and let the sourdough start to do its job. At this point, the top of the dough was kind of dried out from being in the fridge. The top of my plastic container wasn't tightly sealed enough. I added about 10g of oopsie water at this point and worked it into the dough. Did about 5 folds.
  • 10a: Added another 20g of water, folded about 10 more times to work the water in. Dough was still cold at this point and the sourdough hadn't really done anything.
  • 11a: Added another 20g of water, folded about 10 more times. Dough was almost room temp, no signs of sourdough activity yet.
  • 12a: Added rest of oopsie water (25g), folded about 10 more time. Dough might have been showing signs of life, but nothing terribly noticable.
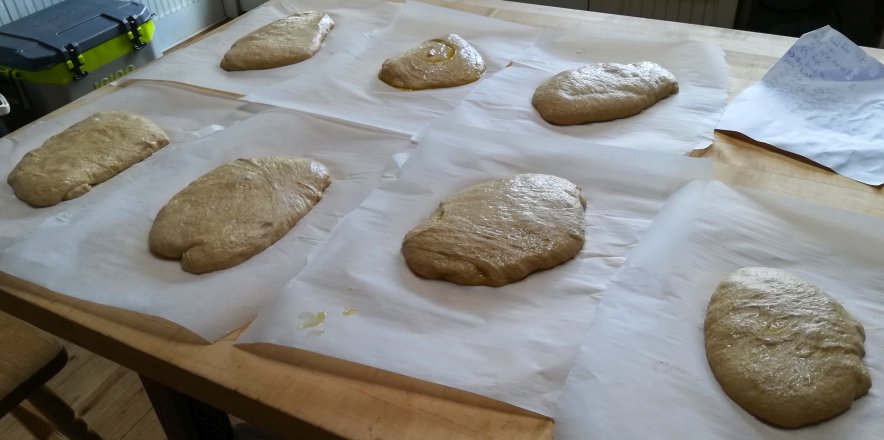
  • 4p: Dough had more than doubled and looked good. Using a scale, I divided the dough into 9 equally weighted pieces. Did my best to preshape  into a ball, but the dough was  a bit hard to work with because of the low hydration, so I did my best. Let the preshaped balls rest or 15 minutes.
  • 4:15p: Put preshaped balls on to pizza peal sized sheets of parchment paper. Tried to shape the dough into pizza pies. The gluten was strong with this dough, the dough kept trying to go back to its original form. I overworked the first pie by forcing it into shape... I was too firm with my insistent pushing a prodding. That pie didn't come out as beautifully as the other. For the rest, I decided to shape the dough in two steps. The end result needed to be a pie with a 14" diameter, so for the first step I gently worked the dough into a 9" diameter pie, then let it rest for 10 minutes. In the second step, after the gluten had relaxed, I worked the dough the rest of the way to 14". This worked well.
  • 4:30p: gently worked dough a second time to get it to 14". (If anyone other than me actually reads this, when I write gently worked dough, I mean, gently pull and push the dough in your hands, never nearing the point of tearing the dough or squishing the life out of it, and absolutely never use a rolling pin. If you overwork the dough, you will squish out all of the air bubbles and won't get a nice airy crust.)
  • 4:30p: Preheat oven to convection 550dF. The hotter the better, 500dF is as high as my oven goes.
  • 5:00p: One at a time cook pies on pizza stone. 4 minutes, then rotate 180 degrees and cook another 3 minutes.

Toppings:

  • Pizza sauce: Crushed tomatoes (uncooked) mixed with olive oil, dried oregano, dried basil, fresh minced garlic, and salt
  • Ground pork mixed with dried oregano, thyme, basil, and salt
  • pickled jalapenos
  • mozzarella cheese 
  • Take it easy on the cheese and sauce, too much and it will make the dough soggy.

texasbakerdad's picture
texasbakerdad

Had an excellent bake yesterday. Excellent, because I pushed a lot of boundaries and broke some of my bread baking rules and was still rewarded with excellent bread! I love when that happens, because I get to learn a lot when that happens. As a baseline, I tried to keep the recipe similar to first attempt at Sourdough Focaccia.

http://www.thefreshloaf.com/node/66162/first-attempt-sourdough-focaccia-79-hydration

Rules I Broke:

  • Don't rush sourdough: I needed to have the bread finished before dinner. We feed a small starter twice a day, so it is very vigorous, but the starter is only 1/4 cup. So, I used what I had on a 2.75kg loaf, and my sourdough starter kicked some butt!
  • Don't use old sourdough, it can ruin the integrity of the dough: Because I didn't want to risk not having a fast enough rise, I also threw in some extra sourdough discard that had been in the fridge for 12 hours (long enough to have the liquid on top).
  • Don't just throw stuff together, be scientific:  I didn't have any bread flour. I also didn't have enough home milled hard red wheat (What I usually use). So, I used what I had, HEB brand all purpose flour, and home milled hard white wheat.
  • Don't change too much in between bakes, it will never come out right: I changed a lot of stuff compared to my first attempt at Focaccia from a few weeks ago. Oil amount, flour type, bake time, skipped the poolish, etc...

Recipe:

  • 747g HEB Brand All Purpose Flour
  • 447g home milled hard white wheat
  • 526g sourdough discard, a mixture of 10 hours to 2 days old, from fridge
  • 50g sourdough starter (didn't actually measure the weight of this)
  • 980g water
  • 100g extra virgin olive oil
  • 13g dark molasses
  • 30g salt

Process:

  • 9:30a: Mix flour and water together (sans sourdough starter and discard), let autolyse for 15 min.
  • 9:45a: Add rest of ingredients to autolyse mixture. Mix/knead by hand until evenly combined with even texture. The dough was very very wet at this point. But, with the 447g of home milled hard white wheat, I was hopeful it would suck up some of the water, it did.
  • 9:45a: Let rest for 30 min and absorb the water. Transfer to a clean bowl and cover.
  • 10:15a, 10:45a, 11:15a: Gently fold inside bowl 3 or 4 times.
  • 11:45a: Transfer to container for bulk ferment
  • 4:00p: Pour onto counter, cut into 10 sections of various sizes, put each section on parchment for loading onto pizza stone. As gently as possible try to make dough into a square shape. Then, dimpled the dough (I should have waited until just before baking to dimple it, but i forgot, ended up doing it again later).
  • 4:45p: Dimple (again, but should have only done it once.), add desired toppings (copious amounts of olive oil) and started loading into the oven. Had to play with temps quite a bit to get things right. 500dF convection was too hot, top burned before inside was able to get cooked enough. 450dF convection for 15 min ended up work out well.
  • Keep baking in batches until all 10 loaves are complete. Set to cool on rack before consuming.

texasbakerdad's picture
texasbakerdad

For years I have wanted to try making focaccia, but since I am a bit obsessive about researching new things before I try them, I kept putting it off. Finally, my wife forced my hand... she made focaccia, and halfway through her bake (After bulk ferment) wanted me to step in and finish off the bake. Well, that bake went terrible, the dough had already way over-proofed and the focaccia came out quite dense. My wife likes to follow recipes as close to exact as possible and this often gets her in trouble with bread recipes because we live in Texas and our house is usually hotter than average (76dF to 80dF), so our dough typically rises faster than what most recipes suggest.

I was determined to recover from the previous focaccia disaster. I think I watched 5 youtube videos and read 10 websites with focaccia recipes. Finally went with bwraith's sourdough focaccia recipe here, as a base recipe, but made lots of changes:

http://www.thefreshloaf.com//node/5025/two-sourdough-focaccias-raisin-and-savory

Changes

  • 100% sourdough leavening, no commercial yeast
  • Cooked on pizza stone, no pans
  • Molasses instead of malt syrup (I don't own any malt syrup)
  • Zero folding after initial mixing and kneading
  • Added toppings to focaccia right before loading into oven vs. adding toppings and allowing to proof more.
  • Other small changes

Highlights from the Bake

  • My sourdough is a beast! The dough rose 2.5x and was still going strong in bulk. Kept rising during proofing. For years, I was a terrible sourdough maintainer, now I have it figured out!
  • There are sooooo many different ways people make focaccia... (Pour water brine on top before baking, add toppings before proofing, no-knead, knead, zero folding, folding, in a pan, not in a pan, lots of dimples, a few dimples, stretch out the dough, let the dough stretch itself, etc., etc., etc.)
  • I watched an episode of "The Chef Show" on netflix titled "Tartine", where Jon Favreau goes to the Tartine bakery and they bake focaccia pizzas. After seeing that, I said, I want my focaccia to look like that. I think I got pretty close for my first try, except that I didn't make pizzas with the focaccia.
  • I really wanted to push the proofing... I overproofed the dough a bit, but the loaves that had more dimpling don't show the overproofing because the heavy dimpling acted like a "punchdown and rerise".
  • I want to try less proofing next time to see if I would have been rewarded with an even more open crumb.
  • I think the recipe needs a bit more oil in the dough to get that silky smooth dough texture that many people talk about with focaccia dough.
  • I put too much effort into my kneading... I could have stopped after 5 minutes, but I kept going for 15 minutes thinking the dough would develop further, it never did. I don't think this had any negative side effects other than just wasting my time.

Biga/Leaven/Poolish

  • 14g Sourdough Starter (50:50 water, hard red wheat)
  • 196g Water
  • 215g Bread Flour (HEB Brand)

Dough

  • Poolish
  • 1008g Bread Flour (HEB Brand)
  • 200g Hard Red Wheat (Home Milled)
  • 24g Salt
  • 13g Dark Molasses
  • 73g Extra Virgin Olive Oil
  • 1021g Water

Process

  • 10p night before: mix poolish and put in fridge for 1 hour. My house is 76dF and I didn't want the poolish to overproof during the night. So I stick it in the fridge for an hour to slow things down just a tad.
  • 11p night before: pull poolish out of fridge and put on counter.
  • 7a (Autolyse): mix all dough ingredients EXCEPT for the poolish into shaggy ball, let sit for 20 min.
  • 7:20a: Spread poolish over the top of the dough, then start kneading. I knead by folding and stretching inside the bowl. Similar to what this guy does: https://www.youtube.com/watch?v=1DEKlBYimlQ
  • After Knead: Add 1/8 cup of olive oil to clear tub and spread it around. Transfer dough to tub for bulk ferment and mark dough level.
  • At this point, I went outside and working on installing some cross fencing on my farm with the plan to come back in at noon and shape then final proof. Unfortunately, I ran into some snags with my fencing work and didn't get back into the house until 2pm. When I finally got back inside, the dough had risen 2.5x above the initial dough mark.
  • 2pm: Pour dough onto counter (I floured the counter, but that turned out to be unnecessary). Using dough scraper, split dough into 7 semi-evenly sized loaves. Cut 7 sheets of parchment that fit nicely on my pizza peel. Gently pick up each of the 7 loaves and without very much manipulation try to center them on the sheets of parchment in a squarish shape.
  • 4pm: Preheat oven with pizza stone (I tried out a few different temps while I worked through baking all 7 loaves, until I finally found one that worked best)
  • 5pm: Dimple dough, add olive oil, add flakey sea salt, oregano, cracked rosemary, add more oil
  • 5pm: Bake

Bake

  • Ideal baking: 500dF (non-convection) for 10 min, 450dF (non-convection) for last 10 min.
  • First Loaf: 550dF convection for 10 min. Too dark on the outside and not dry enough on the inside.
  • Second Loaf: 500dF convection for 10 min, 500dF non-convection for 4 min, A little less dark, better but not best
  • Rest of loaves: 500dF for 10 min, 450dF for last 10 min, dough got dark and crust was dry and chewy, this was just right.

Right After Shaping:

First loaf, after seasoning and dimpling, about to load into oven

First Loaf, a bit dark

First Loaf Crumb, large bubbles at top indicate overproofing

The Rest of the Loaves

texasbakerdad's picture
texasbakerdad

This bake was new territory for me for 3 reasons...

  • Heaviest recipe I have ever made... 12.75 lbs of dough (5796g).
  • Recovered from 2 potential catastrophes during the bake
  • First time using Rye, even though it was just a little bit.

The almost catastrophes?

(a) I doubled the recipe on accident. I meant to bake 2 large loaves (12"x"4.5"x3.125" pans). I misread the king arthur recipe and made enough dough for 4 large loaves. I progressed 60% of the way through making the bread thinking... this seems like A LOT OF DOUGH. I loaded the shaped loaves into the pans and after looking at how full the pans were already, I thought I better double check my math. Sure enough... I made enough dough for 4 loaves. I dumped the dough back out of the pans, cut it all in half and reshaped everything. 1 last thing... I thought I was being smart before I realized my mistake with the recipe... I told myself... "This King Arthur recipe must be wrong, this is too much dough, I am going to make 3 loaves instead of 2." Then, when I realized my mistake, I just decided to keep my 3 loaf modification, so I ended up with 6 loaves (2 long pullman loaves, two 12x4.5x3.125, and two 9x5x3).

(b) Had to make an emergency run to the store and totally forgot the bread was already in the oven. Thank god my kids heard the timer go off and told my wife... otherwise, the bread would have burned.

Started with the 'Multigrain Sourdough Sandwich Bread' recipe from King Arthur. I had to make some small tweaks to the recipe and the process to fit my time schedule, the ingredients I had on hand, and my pan sizes.

https://www.kingarthurbaking.com/recipes/multigrain-sourdough-sandwich-bread-recipe

Recipe:

Changes from KA recipe: The original recipe was for 9x5x3 (135 square inches) pans. I increased all ingredients to fit two 12x4.5x3.125 (168.75 square inches) pans. Also, I didn't have time for an overnight levian and my sourdough is fast, so I took the levian quantities and combined them with the rest of the recipe. I also doubled the recipe. 

  • 1836g Hard Red Home Milled Wheat
  • 1076g HEB Brand Bread Flour
  • 150g Rye
  • 100g Sourdough Starter (50:50 hard red:water, fed the night before)
  • 10g Table Sugar
  • 60g Himalayan Pink Salt
  • 2564g Softened and Filtered Well Water

Process:

  • 9a: In one huge plastic tub, using my hand, combined the hard red wheat, bread flour and water. Smushed it together long enough to make a shaggy mess.
  • Let autolyse for 20 minutes
  • 9:20a: Rubbed sourdough starter onto top of autolyze mass. Then evenly sprinkled rye on top. Then added sugar and salt. Folded over and over again until I felt like there was an even consistency with all of the new ingredients.
  • 10a: Fold inside big tub about 4 or 5 times.
  • 10:30a: Fold inside big tub about 4 or 5 times.
  • 11a: Fold inside big tub about 4 or 5 times.
  • 11:30a: Fold inside big tub about 4 or 5 times.
  • 12a: Fold inside big tub about 4 or 5 times.
  • 12:30a: Fold inside big tub about 4 or 5 times.
  • 1p: Fold inside big tub about 4 or 5 times.
  • 1:30p: Fold inside big tub about 4 or 5 times.
  • At this point, the dough was starting to feel quite full of air. I decided it was a good time to shape the dough and drop it into the bread pans.
  • Weighed the dough and split into 3 balls. 1638g for the smaller pan (9x5x3) and two balls of 2048g for the larger pans (12x4.5x3.125). Let the balls rest for 10 minutes before final shaping.
  • Prepped 3 pans by brushing with melted butter and sprinkling melted butter with AP flour.
  • Shaped the loaves and dropped in the pans. The PANS WERE TOO FULL. So, I reread the KA recipe and realized my mistake... the recipe was already big enough for 2 loaves, when I doubled it messed up.
  • Dumped the dough back out. Cut the 3 loaves in half by eye, preshaped them and waited 10 minutes.
  • While waiting the 10 minutes I pulled out 2 long pullman loaf pans (didn't use the lids) and one more 9x5x3 pan.
  • 2:30p Shaped the dough and dropped in the 6 pans. Put all 6 loaves inside of turkey basting bags and filled with air to keep them from drying out.
  • 6:00p Dough nearing 2x and poke test seemed to indicate it was about right. Preheated the oven to 500dF.
  • 7:00p Scored loaves. Loaded pans in oven. Dropped temp to 475dF, set timer for 20 min.
  • 7:25p (kids alerted wife to beeping oven). Looked pretty dark, wife covered with foil. Dropped temp to 450dF, set timer for 15 min.
  • 7:40p dropped temp to 425dF, set timer for 8 min.
  • Pulled out and set on racks to cool.

Take aways...

  • The crust was a bit overcooked on some parts. Not sure if that was the recipe's mistake or something else.
  • The 1024g in the log pullman loaf would have been the perfect size for a pullman loaf with the lid on. The pullman would have trapped the moisture and the bread would have just barely filled the size of the container. I am going to try that next time.

texasbakerdad's picture
texasbakerdad

Round 3 of the same recipe with mostly hydration changes.

Recipe:

  • 346g HEB brand bread flour
  • 346g Home milled hard red wheat
  • 585g water
  • 48g sourdough starter (50% home milled hard red, 50% water)
  • 1 heaping TBS of salt

Original Recipe: https://www.kingarthurflour.com/recipes/no-knead-sourdough-bread-recipe

Problem 1: Just like the previous bake. Baked this loaf in 1 day. Had a major hiccup though, had to take the kids to swim team at right after I shaped my loaf. So, to play it safe, I popped the loaf in the refrigerator. I think? this had a negative impact on my crumb, because it seems like the faster warming outside of the loaf had bigger holes in crumb, than the inner parts of the crust which would have taken longer to warm.

Problem 2: My loaf was slightly too big for my romertopf, when I tried to close the lid, I couldn't avoid pinching some of the dough with the lid.

Compared to the 55% and 75% hydration loaves, this loaf rose a lot more. Also, the dough was finally supple and extensible. Now... I am debating in my head whether or not the 55% and 75% loaves were underproofed. Even this loaf might have been underproofed, but the emergency trip to the refrigerator is complicating the analysis.

Process:

  • 30 min autolyse
  • fold in the bowl every 30 minutes or so for about 6 hours
  • preshape, wait 20 minutes, shape and drop in to long banneton
  • 30 minutes on counter, then into fridge while we were at swim team for 2 hours.
  • Out of fridge and back on counter for 2 hours
  • Preheated oven with romertopf to 550df
  • dropped dough into romertopf with aid of parchment paper
  • reduced oven to 450df stuck in oven and topped, cooked for 45 min
  • Took top off and cooked for another 10 min.
  • Cooled on wire rack for 8 hours before slicing.

  •  
texasbakerdad's picture
texasbakerdad

My last bake went so well that I thought I would do it again and try to tweak 2 things about the bake. Here is the link to my blog entry for the last bake:
http://www.thefreshloaf.com/node/64738/55-hydration-sourdough-4753-hard-red-wwheb-bread-flour

My 3 complaints about that bake:

  1. The dough was too dry, I wanted a supple and extensible dough.
  2. The crumb wasn't the super open. It was a great crumb, but not that super open tartine crumb and I want to try and get there.
  3. The top might have gotten a bit too dark. Honestly though, it looked and smelt a bit 'singed' when it came out of the oven, but after letting it rest overnight, I think it was perfect.

#1 and #2 are related. I need to raise the hydration, the dough was just too stiff. So, I bumped my hydration to 75%. The bread came out almost exactly the same as the 55% hydration. It was a great loaf, but the dough still felt a bit dry. The crumb was great too, just not open tartine style crumb.

The only major difference in this loaf compared to the previous other than the bump in hydration, was that I did the loaf in 1 day, instead of an overnight bulk ferment. Also, I used even less starter.

Recipe:

  • 338g Home milled hard red wheat
  • 338g HEB brand bread flour
  • 80g 50:50 sourdough starter
  • 1 TBS Salt

Process:

  • 30 minute autolyse (recipe minus salt and starter)
  • folded the dough every 30 minutes until the dough had some bulk to it (about 8 hours)
  • preshaped, then waited 30 minutes, and shaped and dropped into long banneton
  • preheat oven to 550dF with long romertopf in oven
  • let rise for about 2 hours
  • transferred into hot romertopf bottom from banneton using parchment paper and cut off the excess parchment. Scored with razor blade. Covered with top of romertopf and stuck in oven.
  • Reduced oven to 450dF, baked for 45 min with top on. Then, 15 min with top off.
  • Let cool on wire rack overnight.
  • The whole bake minus the cooling started at 9am and finished at 11pm.  

Problems with this bake:

  • Still seemed a bit dark coming out of the oven, but then was perfect after it cooled overnight.
  • Crumb wasn't as open as I am striving for.
  • I think, maybe, I could have let the dough rise for another 30 min to an hour... I am thinking I will keep tweaking the recipe until I get the hydration right, and then, I will bake the same loaf over and over again, trying to get the proofing just right.

As I type this, I am working on a 3rd loaf, this time with 85% hydration. The dough, this time, finally feels wet enough. I think it will turn out great.

texasbakerdad's picture
texasbakerdad

Ingredients:

  • 100g Sourdough Starter (50/50 Hard Red Wheat)
  • 286g Whole Red Wheat (Home Milled)
  • 376g HEB Bread Flour
  • 18g Salt

This recipe was derived from the following King Arthur recipe:
https://www.kingarthurflour.com/recipes/no-knead-sourdough-bread-recipe

With the following modifications:

  • Swapped out 286g of bread flour for home milled hard red wheat.
  • Reduced starter from 227g to 100g (since I didn't have 227g available)
  • 20 minute autolyse before adding salt and starter.
  • Ignored time recommendations since I had less starter and my starter is very active. Instead, judged the progress of the dough by feel/size. 5 folds in the bowl every hour, then shaped the dough after about 8 hours.
  • Used a banneton and a long romertopf

texasbakerdad's picture
texasbakerdad

550 dF convection bake with Pizza Stone.

  • 15% half whole wheat sourdough starter
  • 5% whole wheat
  • 80% all purpose flour
  • 70% hydration

Bulk ferment for 2 hours in fridge and 2 hours at room temp. 

used parchment paper to make sliding pizza onto stone easy. 

texasbakerdad's picture
texasbakerdad

franbaker and I are going to be baking the same recipes and comparing the results. My bake yesterday is the first of our cooperative bakes. We both attempted PiPs' "Home with Bread/Fighting Gravity" recipe. I am looking forward to see Fran's post about her bake day results.

franbaker's post about her bake:

100% WW Cooperative Baking with Texasbakerdad


Recipe (thank you PiPs!):

Home with bread / Fighting gravity


Cool things about this bake:

  • Proofing in my clay baker and cooking the dough without an oven preheat worked out quite well:
    • Pro - Saved electricity (No need to time the oven preheat with proofing completion)
    • Pro - Zero risk of deflating dough when transferring to final cooking vessel
    • Pro - No loading of dangerously hot vessels
    • Pro - The oven steam production was impressive
    • Pro/Con - The crumb was softer and the crust was softer and chewier, I think I can change my baking temps, times, and top removal to achieve a crisper crust and a dryer crumb.
    • Pro/Con - The Romertopf retained so much moisture that even after baking for 40 minutes with the top on, the dough's surface was still wet looking. This could be adjusted by soaking the romertopf lid less, or pulling the lid off earlier, or cracking the lid open earlier.
    • Con - You have to use parchment paper to keep the dough from sticking to the vessels. Not having to use parchment paper would be a perk.
  • Breaking the dough hydration into multiple stages seems to do wonders for gluten development.
    • This is the 3rd or 4th recipe I have made in which the water is added in multiple steps to the flour. It seems like gluten development happens on its own pretty much when you have just enough water but not too much. Once you have the developed the gluten structure, you can add more water while retaining the initial gluten mesh.
    • I don't understand why this recipe called for french folds, after the 1 hour autolyse, the dough was pretty well developed. A french fold at this point seems like it would have done more harm than good.
    • I need to play with multiple stage hydration some more and develop some confidence that it 'always' works.

For convenience reasons, my plan was to make the following tweaks to the recipe:

  1. Halve the recipe and bake entire 2kg in my large Romertopf clay baker.
  2. Use my Ankarsrum mixer instead of doing the recommended french folds.
  3. Do the final proof in the clay baker and load clay baker into cold oven with dough inside. Adjusting cooking times to compensate.
  4. Skip the fridge retard

What actually happened

  1. 2kg seemed like too much for my Romertopf, so I split it into two, 1kg went to the romertopf and 1kg went to a dutch oven.
  2. After the 1 hour autolyse, the dough felt great, and I questioned the need for additional kneading. After adding the leaven and salt water, the dough still felt great. So... I decided the Ankarsrum was overkill for this dough and ended up doing about 10 stretch and folds over 1.5 hours to get to window pane dough.
  3. I proofed half the dough in the Romertopf, the other half was proofed in a boule banneton and then carefully loaded into a cold dutch oven.
  4. I tried to skip the fridge retard, but I had to go run some errands and ended up retarding the bulk ferment for about 1 hour.

The Bake:

Hard Red Wheat Starter (4 hours):

I started the sourdough 24 hours prior to usage, with a seed of 25g 100% hydration hard red wheat. I added 25g hard read wheat and 25g water. 8 hours later, added 50g hard red wheat and 50g water. Then, stole 46 g of that starter as a new seed for my final starter build. 46 g seed, 93 g hard white wheat, 60 g water. Waited 4 hours until usage.

46 g seed 100% hydration hard red wheat
93 g hard white wheat freshly milled
60 g water

Autolyse (1 hour):

950 g hard white wheat freshly milled
800 g water

Mix 1:

1750 g Autolyse (84% hydration)
199 g Starter  (71% hydration)

4 Stretch and Folds, then, wait 10 minutes...

Mix 2:

1949 g Mix 1 (81% hydration)
55 g Water
44 g Salt

Final Hydration: 88%

Bulk Ferment/Shaping/Final Proof:

  1. 4 Stretch and Fold, then, wait 30 minutes
  2. 4 Stretch and Fold, then, wait 1 hour
  3. 4 Stretch and Fold
  4. Bulk Ferment for 1.5 hours
  5. Retard for 1 hour
  6. Bulk Ferment for 2 hours until dough felt airy, but not bubbly
  7. Divided into 2, preshaped, bench rested for 10 minutes.
  8. Shaped 1 batard and put into parchment lined romertopf, Shaped 1 boule and put into rice floured banneton.
  9. Filled inverted romertopf lid with water.
  10. Proofed for 4 hours until poke test went from firm to a little bit bouncy
  11. Transferred boule into parchment lined dutch oven.

Bake:

  1. Drained romertopf lid and wiped off excess water.
  2. Using double oven, put one vessel in each oven and set temperature to 550 dF.
  3. At 35 minutes, reduced temperature to 460 dF.
  4. At 45 minutes, removed tops.
  5. At 65 minutes, removed bread from oven.
  6. Waited 6 hours before slicing.

Final Comments

  • The loaf cooked in the romertopf held onto its moisture much longer, I think that was due to soaking the lid. I am assuming why the romertopf loaf had about 20% more oven bloom than the dutch oven loaf.
  • The bread tasted great! Sort of a salty coffee flavor with a soft crumb and a chewy crust, it was really quite flavorful.
  • I like this loaf a lot. I would like to try this loaf with a harder crust and a dryer crumb. I would also love to achieve a lacy crumb at some point, because I want to know that I have learned to skills to do so.

Above: Dutch Oven Crust

Above: Dutch Oven Crumb.

Above: Romertopf Crust

Above: Romertopf Crumb

Above: Up close romertopf crumb

Pages

Subscribe to RSS - texasbakerdad's blog