The Fresh Loaf

A Community of Amateur Bakers and Artisan Bread Enthusiasts.

pmccool's blog

pmccool's picture
pmccool

The Culinary Center of Kansas City was rocking in the rye this past Friday, when I had the privilege of teaching another full-day class on rye breads.  It was a lot of fun to work with a group of students who were eager to learn and had lots of great questions about everything from flour to techniques.  We made three different breads: the Rustic Pumpernickel from ITJB, Eric’s Fave Rye, and a Vort Limpa that I customized from various on-line sources. 

However, before the class, there was preparation.  And before preparation, there was shopping.

Based on early registrations, it was apparent that this was going to be a large class.  Consequently, I decided to order 50 pounds of Great River Milling’s whole rye flour, via Amazon.  The rest of the need was made up with Hodgson Mills rye flour which is available in local supermarkets.  And, since the need was there, I also ordered 50 pounds of Great River Milling’s Unbleached Wheat Bread Flour.  The GRM rye flour is a whole rye, very finely milled, and light tan in color.  It contrasts with the HM rye flour, which is also whole rye, but coarsely ground with particle sizes ranging from dust to large flecks of bran and slightly gray in color.  The GRM rye works very well in deli rye breads (such as Eric’s Fave Rye) or others that call for medium rye while the HM rye works well in pumpernickels.  The GRM Unbleached Wheat Bread Flour turned out to be unlike anything that I have used previously and I mean that in a good way.  It contains the endosperm, the germ, and 20% of the bran.  It is a pale tan color and also very finely milled.  At 14% protein content, I thought it would make a good stand-in for first clear flour and it worked admirably in that context.  While I doubt that I will buy more, the decision is driven entirely by price.  At $1.20/pound, it’s over-priced in my estimation, especially when I can get Wheat Montana flours locally that are of comparable quality for less.

Since two of the breads require a rye sour, each at a different hydration level, both of those had to be built in the days preceding the class.  The Rustic Pumpernickel also requires a scald.  Combined, the scald + sour for the pumpernickel were nearly 50 pounds for this class.  That’s a lot of prep work to do, not to mention material to tote, so I may need to offer different breads for the next class.

If you saw my guest post on Stan’s blog, you already know that I made a world-class blunder with the pumpernickel that I prepared ahead of class.  You can read about it here.

This class was held in the ‘big’ kitchen at CCKC, which was my first time to utilize that part of the facility.  That brought a few challenges, simply because things were in different places.  We got through it just fine, though, with a lot more laughter than frustration.  There were a couple of things that could be done better, now that I know the flow of the room, such as placement of ingredient stations for easy access, so we’ll do those better next time.  Oven management presented some challenges, too, but more from the perspective of understanding each one’s behavior.  Again, now I know, so I can adjust in the future.

The students were a fun bunch.  They were eager to get their hands in the goop and I made sure that they did.  They had some great questions, too, which helped bring out more information and a better understanding of things than would have occurred to me to mention.  Fuzzy Whiskers, a TFLer, and her daughter both attended.  I hadn’t seen either of them since the KC TFL meet-up in early 2012 that Postal Grunt engineered.  We wound up having a lovely visit as we waited for the last of the breads (theirs, coincidentally) to come out of the oven.

Based on some informal polling during lunch, the hands-down favorite (volumetrically speaking) was Eric’s Fave Rye, in no small part because of its sandwich-friendly characteristics.  The Vort Limpa was a hit for most because of its flavor.  The thing has beer, orange zest and juice, molasses, anise, fennel, and cardamom in it.  That’s a flavor bomb by any definition.  The pumpernickel was much enjoyed but I think its popularity suffered in part because of most Americans’ preference for lighter breads.

All in all, it was a very satisfying and enjoyable day.  The only thing remaining was to pack up my things, put them in the truck, and head back to the house for a few hours rest before picking up our youngest daughter and her children at the airport.  Which tells you why I haven’t posted sooner.

Next up: a scones class on August 3.

pmccool's picture
pmccool

In the month since our trip to Scotland and Ireland, baking around here has been rather hit or miss.  No, scratch that, baking around here has been hit and miss.  Consequently, this post is sort of a catch-all for the this's and that's going on in my kitchen.

One bake was the honey oatmeal loaf from the KAF Whole Grains Cookbook.  I love that stuff; it's hearty and moist and hefty and just a little bit sweet.  Makes a great sandwich, too.

For the 4th of July weekend, I baked a batch of Mark Sinclair's Portugese Sweet Bread as hamburger rolls.  While soft, they are sturdy enough to stand up to a big burger with all the toppings, instead of dissolving as the store-bought buns do.  My wife also made Dilly Bread, also shaped as hamburger rolls, so we had our choice of sweet and mild, or dilly and oniony to go with the burgers.  Both worked wonderfully.  And some happy guests went home with the extras of each.

I'm in the process of tuning up a recipe to use for a Swedish Cardamom Bread class that I will be teaching at the Culinary Center of Kansas City in September.  It's such a lovely dough to work with, luxurious with milk and butter and redolent of cardamom.  There's just the tiniest hit of sweetness, which makes it a perfect foil for coffee (says my coffee-drinking spouse) or tea (says me).  I've found that blooming the cardamom in the warm milk really helps distribute the flavor through every bite.  It should be a fun class, with lots and lots of shaping options.

Not all has been sweetness and light, however.  In the spirit of full disclosure, I present you with an epic fail:

That is a sprouted wheat bread.  As in: no flour whatsoever, just ground up sprouted wheat.  (I did cheat and add approximately half a cup of bread flour because I could see that it was going to be far too wet without.)  As you can see from the knife, it is very sticky; this nearly a week after it was baked.  You should have seen how wet and gummy the core was the first day!  And the crust!  I might have been able to interest the Pentagon in a new body armor material if any of their buyers had been around that day.  I suspect that the sprouts were a few hours past their prime for this style bread.  There is supposed to be no more than a little white nub at one end of the kernel; mine were also starting to push out rootlets.  So, probably way too much enzyme activity and starch degradation.  But I persevered.  The next problem was that I allowed it to over proof, not being exactly sure what I should be looking for.  Then the sucker just would not bake out.  It was in the oven for at least half an hour longer than the recommended bake time and the core temperature was only grudgingly getting toward 190F.  I even took it out of the pan for the last 15 minutes or so, hoping that might hasten the finish.  

And the reward for all of this effort?  Meh.  The bread wasn't bad.  It just wasn't especially good.  I can make a good whole-wheat loaf for a lot less fuss and more reliably.  The recipe was reputed to have come from the Laurel's Kitchen Bread Book.  I don't know whether to take that as a slander, or as a caution.  Maybe heavy bricks were really groovy bread back in the day.  It would certainly stick to your ribs.  And your bread knife.  And your teeth.  And...

This weekend I will bake Eric's Fave Rye, Rustic Pumpernickle from ITJB, and a Vort Limpa.  All of those are the subjects of an all-day rye breads class that I will teach at CCKC next Friday.  There are still 5 openings, if any KC-area Loafers (or your friends) are interested.  The loaves will serve as a preview for the students' own finished breads and as the foundation for our lunch.  Also in preparation for next week's class:

Yep, that's 100 pounds of flour sitting in my kitchen; 50 each of Great River's stoneground whole rye and unbleached wheat flour.  I'm particularly interested in seeing how the latter performs.  It's described as having 80% of the bran removed, while retaining all of the germ.  Plus it has 14% protein.  That's not a first clear flour by any means but I hope that it may work in a similar way with the rye.  

So, things are happening around here, even if my postings are sporadic.

Paul

pmccool's picture
pmccool

Since I had Friday off last weekend, and since the weather on Friday and Saturday was rainy, it seemed like a golden opportunity for baking some bread.  While perusing Hamelman's Bread, the Whole Wheat Levain was the one that I kept coming back to as I weighed the alternatives.  

The first step was to build the levain.  Since my kitchen temperature was several degrees cooler than Hamelman's reference temperature, I elected to increase the inoculation by about 20%. I also allowed the levain a longer time to develop, by perhaps 4 hours or so.  What greeted me on Saturday morning was a fully domed levain that was showing just the earliest hints of an impending collapse.  

The next step was to build the dough.  The formula directions are based on machine mixing; I did all mixing and kneading by hand.  It appears that the whole wheat flour that I used (Great River Milling) may have a higher protein content than Chef Hamelman's.  Now that I say that, it seems somewhat improbable, given that his formula is probably based on King Arthur flours.  Regardless, for the same hydration, my dough seemed a bit firmer than his description.  While soft, it was never "loose" and no bench flour was required during kneading.  

The dough was then set to bulk ferment at room temperature, with stretch and folds at the recommended intervals.  After the bulk ferment, I shaped the loaves into boules and put them in floured bannetons for the final fermentation, with plastic wrap shielding the exposed surfaces, also at room temperature.  When the loaves were perhaps 75% expanded, my wife suggested we run some errands, so I put the bannetons into the refrigerator to hold until we returned home.  That turned out to be 3 or 4 hours later, so it is very good that I didn't leave the loaves at room temperature in anticipation of an earlier return!

Upon returning, I set the loaves out on the counter to finish their final ferment.  When they appeared to be doubled, but before they felt wobbly, I preheated the oven and stone.  When all was up to temperature, the oven was steamed, the loaves were tipped from the bannetons and scored, then into the oven they went.  The dough was still cool enough that the steam immediately condensed on the loaves' surface, leaving them glistening for the first minute or two.  A peek throught the window a few minutes later revealed a healthy oven spring in progress.

I checked for doneness at the end of the recommended bake time and pulled the loaves from the oven.  This is how they looked:

Although not readily visible in this shot, there was a small amount of tearing at one slash on each loaf, suggesting that I could have allowed even further fermentation.

The crumb, while acceptable, seconds the notion that additional fermentation would have been optimal.  The bulge at the one slash is more evident:

That, or I should have kneaded less, allowing a more open crumb.  Or some of each.

The other thing that could have been done was to allow the loaves to stay in the oven a few minutes more.  While fully baked, more baking would have deepened the color (and flavor!) and dried the crumb somewhat.

But these are small matters, the difference between a good bread and a really good bread.  The crumb is moist, but not soggy; firm, but with a pleasing softness; and eminently suited for its primary role as sandwich material.  No spilled mustard from those holes!  The flavor is primarily wheat, with distant notes of hazelnut and caramel.  There's only the smallest hint of a sourdough tang; quite suprising, considering the extended fermentation of both levain and dough.  The fragrance tells you immediately that this is the real deal, not a tricked up wannabe.  

By contrast, when my wife and I were at the supermarket (one of the errands), we happened to walk down the bread aisle and it smelled disgusting.   That's never really struck me before, even though I've baked most of our bread for 30-mumble years.  I'm not sure which thing(s) in that "bread" I was smelling but it almost turned my stomach.  And no, it had nothing to do with a lack of cleanliness in the store; this was coming entirely from the product.  Yuck!

So, color me happy with my bread and thanks to Chef Hamelman for this specific bread.

Paul

pmccool's picture
pmccool

Oven Steam Venting


Many of us get rather, well, steamed, about our inability to produce steam in our home ovens.  Some good techniques have been posted here on TFL.  While I doubt that any of us will be able to produce anything close to the blast of steam that commercial ovens can provide, we may be able to do better than we think we can.

The few seconds of video, above, show steam venting from my electric oven.  From all appearances, nothing much was going on inside the oven.  From the outside, it is evident that quite a bit of steam is present as it hits the room-temperature air, cools, condenses, and becomes visible.  Despite the apparent velocity of the steam exiting the vent, the oven fan is not turned on.  The background noise is the fan in the vent hood above the oven, which has no effect on the rate of steam production or egress from the oven.

My steaming set-up is extremely low tech: a broiler pan on a shelf below the baking stone.  It is preheated along with the oven and stone.  When I'm ready to load the bread, I pour a cup of boiling water into the pan.  A lot of the water flashes instantly to steam.  (I stay well out of the way of the erupting steam!)  The bread is loaded as quickly as possible and the oven door is closed.  Within seconds, I start seeing the steam wafting out of the oven vent.  Needless to say, I won't be blocking the vent; I don't want that steam finding its way into the electronics.

So, nothing new here, really; just an observation that confirms both steam generation and steam venting.  

Paul

pmccool's picture
pmccool

I've begun fiddling with Scottish Oat Cakes.  They are a bit of a departure from my usual yeasted bread baking.  What makes it tricky is that I really don't know what my target is; I suppose I may have to wait for our trip to Scotland and Ireland this summer to see whether I'm on the right track.

There are probably several thousand "traditional" Scottish oat cakes recipes.  That doesn't include all the Canadian variations on the theme, nor the more pancake-like versions.  At it's simplest, an oatcake is a mixture of oatmeal (ground, not flaked), water, and fat that is baked on a baking stone or "girdle" over an open fire.  It is sturdy, hearty fare that can underpin savory or sweet foods.  Having sampled them, I wonder if this was the inspiration for Tolkien's lembas, the Elfen waybread that was so sustaining.  Literary musings aside, the oatcake is the precursor to the scone, which was also orginally baked on a girdle (I'm going to switch to the American "griddle" for the rest of this post).  Nowadays there are recipes for both oatcakes and scones that are oven-baked instead of griddled.

Here in the States, the stone-ground variety of oatmeal is very hard to come by and ridiculously expensive.  We are very accustomed to calling rolled oats "oatmeal".  I chose to exercise two different options for this first go-around.  First, I ground some hulled oats, using the KitchenAide grain mill attachment.  (My wife had found one back in February at a kitchen shop that was going out of business for a price that was substantially less than list price.)  Second, I used our food processor to grind some rolled oats into a faux meal.  I thought that would give me a good idea of both the handling and flavor characteristics of each.

The recipe I worked from is as follows:

  • 1 cup medium oatmeal
  • 2 pinches baking soda
  • Pinch of salt
  • 2 teaspoons melted fat (bacon fat, if available)
  • 3/4 tablespoon hot water
  • Additional oatmeal for rolling

Let me say right up front that I believe there is a typographical error in the formula.  It seems to me that the 3/4 tablespoon of water should be 3-4 tablespoons of water.  I know that I had to use substantially more than the recipe quantity to achieve a workable consistency.  The process is simple: combine the dry ingredients, then add the fat and water and mix until a stiff paste results.  You want to work quickly with this so that the dough doesn't cool significantly, which makes handling more difficult.  Roll the dough to approximately 1/4 inch thickness on an oatmeal-covered surface.  Cut into 3-inch rounds with a biscuit cutter.  Re-roll the scraps and repeat until all dough is used.  Cook on a griddle over medium heat, 3 minutes per side.  Each batch made 6 oatcakes.

Here's the finished product, ground rolled oat version on the left, oatmeal version on the right:


As prepared, the cakes were soft (in an authoritative way), rather than crisp.  They want plenty of liquid to wash them down; a large bite tends to stick to the teeth while chewing.  The oatmeal version was a hands-down winner over the rolled oats version in the flavor category.  That may not be entirely fair, since I was already won over by the fragrance of the freshly-ground oatmeal as it came out of the mill.  I've tried them with fruit preserves and they are delicious.  I haven't yet tried them with savory accompaniments but can see how they would play very nicely with cheese or smoked meats.  It's difficult to say what, if anything, the baking powder contributed.  There's no acid component for it to react with, so these are not light little puffs.  They are rib-sticking food that can fuel some hard work.  

If anyone with first-hand experience with oatcakes wants to weigh in, I'd love to hear your input.  That help me gauge what I have so far and what might need to change.

Paul

pmccool's picture
pmccool

The past two weeks have been rather more demanding than usual.  We had gone to Colorado Springs to visit our youngest daughter's family for the Easter weekend.  We were just a few minutes away from their house when my brother-in-law called to let us know that he had taken my mother-in-law to ER; her cancer that had been diagnosed a year and a half previously was causing new complications.  We decided to cut our visit short and drive back to Kansas on Easter Sunday.  The following morning, April 1, my wife flew to Traverse City, MI, to be with her mother.  On Tuesday evening, April 2, my wife called to let me know that her mother had just died.  While we knew it was coming, the circumstances made it a surprise; even for, or perhaps especially for, her physicians.  I drove from KC to TC in a little more than 15 hours on Wednesday, April 3, to be with my wife and other members of her family.  The funeral was Saturday, April 6.

We had planned to be in Michigan this week to help my brother and sister clear out the family farmhouse / garage / shop to make the place ready for renters, since my dad moved into an assisted living facility at the beginning of the year.  Since I was already there, I stayed put to help with that process last week instead of making another trip home and back again.  Meanwhile, my wife and her family were working to close up her mother's apartment.  I flew back to KC on Saturday, leaving the car in Michigan for my wife.  She intends to stay until her mother's interment.  For those of you not acquainted with Michigan winters, sometimes the snow is too deep and the ground too frozen to permit the opening of a grave.  This is one of those years.

Today has been a catching up kind of day: laundry, ironing, yard work, and so on.  Thankfully, I needed bread.  The therapeutic value of the making is every bit as great as the nutritional value of the eating.

Since my starter was in need of some therapy of its own, and since time didn't really allow for extended pre-ferments, I wanted a yeasted, straight dough style bread that would fit in with the other tasks of the day.  That put me in mind of Bernard Clayton's The Complete Book of Breads, which has oodles of breads like that.  And since I wanted something with plenty of whole grains, I thumbed through the multi-grain breads section of the book until I happened upon Sennecbec Hill bread.  It's a bread I've made a number of times before, but probably not in the past 3-4 years.  It contains rolled oats, corn meal, rye flour, and whole wheat flour; along with enough bread flour to tie everything together.  It is fragrant with molasses, which also contributes to a rich brown crust and crumb.  It makes a dandy sandwich bread or toast.

The recipe in the book, and at this site, is written with volumetric measures.  Don't go bad-mouthing Mr. Clayton; at the time he wrote the book, American cooks and bakers weren't acquainted with the notion of using scales to weigh their ingredients.  For those of you who are still on the fence about transitioning from volume measurements to weight measurements, here's a gentle nudge.  All of the measurement items in the photo below were required for the recipe, as written.  All of them had to be washed afterward.  If the recipe was in weight measurements, you wouldn't have to use, or wash, any of them.  That's right, scales save dishwashing!  Even if you don't believe that using weight measurements will improve your baking experience (it will!), cutting down on the number of dishes to wash up should be a motivation to switch.


The process for this bread is dead simple: stir ingredients together as directed.  Mix in bread flour until you have a "firm" (Clayton's word) dough.  Knead.  That's the tricky part with this bread.  The molasses, oats, rye and whole wheat flours make for a sticky dough.  There's a tendency to want to keep adding flour until the stickies go away.  Don't.  Do.  That.  Leave it somewhat sticky.  Better to have gloopy hands while kneading (assuming that you hand knead) than a dry, crumbly brick of a loaf.  I switched from a traditional push-turn-fold-push form of kneading to slap and folds as a means of continuing kneading when I gauged that more flour would be too much but the dough was still sticking to the countertop.  The dough was a bit stiff for this method but wound up responding well.  The aforesaid rolled oats, rye, and cornmeal mean that you want to have the gluten structure well established in the dough so that it can stand up to those unhelpful constituents.

Park the kneaded dough in a greased and covered bowl until it doubles in volume; sort of like this:


Then tip the dough out of the bowl onto the countertop and gently degas it.  Shape into two loaves and place them in greased loaf pans.  I weighed the loaves to make sure that they were equally sized.  They each weighed 1 pound 13.5 ounces, which makes for a nice, full pan with 9x5 loaf pans.  This is how they looked at this stage:


After covering them with plastic wrap, I was off to mow the yard.  When I checked back in later, they were ready to bake:


The critical reviewer will no doubt notice that those loaves are more than doubled in volume; probably closer to tripled.  This is a sturdy dough and is able to stand up to that kind of expansion without collapsing.  Nevertheless, I was very gentle while placing the pans in the preheated oven.  The finished loaves did not exhibit any signifiicant oven spring; no surprise there.  Neither did they show any sign of collapse, which means that they hadn't gone across the line to overproofing.


Pictures of the crumb will have to wait until tomorrow.  The house smells wonderful and I anticipate tasty sandwiches for this week's lunches.

Paul

Update: Crumb pic.  Fairly open, considering the rolled oats, corn meal, whole wheat, and rye flour.  At the same time, a nice, even crumb that's great for sandwiches.

pmccool's picture
pmccool

Most of my bread for the past couple of weeks has come from the freezer, rather than from the oven.  That's a good thing in that the freezer needs to be cleared out but not so satisfying as baking.  It also means that I've had a pretty steady diet of rye bread.  Again, that's a good thing but it was time for a change of pace and taste.

What I wanted was something wheaty, something sourdough.  I turned to Hamelman's Bread and came across the formula for his Vermont Sourdough with Wheat.  That didn't quite do it for me, since it simply swaps out the small amount of rye flour in the standard Vermont Sourdough for an equally small quantity of whole wheat flour.  After a second scan of the ingredients, it occurred to me that I could use equal quantities of bread flour and whole wheat flour, along with 1 ounce of rye flour, to make up the flour bill for the bread.  That would let me keep most of the qualities that have made Vermont Sourdough so beloved by many while satisfying my craving for a thoroughly wheaty bread.

The rest of the process was very much by the book, with two exceptions.  First, everything was mixed by hand, so as to avoid straining my KitchenAide mixer (and because I really, really like to have my hands in the dough).  Second, the whole wheat flour in the bread is from the Great River Milling Company.  It is a very fine-textured flour and it has a high protein content; a bit north of 14%, if memory serves.  I very much enjoy the Great River flour and hope that Costco continues to carry it.  As written, the formula is 65% hydration.  My first guess was that I would have to bump that up to 70% to accomodate the flour's  moisture absorption.  As it turned out, hydration had to be increased to 72% just to moisten all of the flour for the autolyze.  While kneading the final dough, still more water was added, bringing the final hydration closer to 75%.  It could have handled even more water without getting gloppy but I had enough to make a manageable dough that wasn't too stiff.

Since the temperature in my kitchen was around 65F and since I didn't want to be baking at 2 a.m., I used my Brod & Taylor proofer to keep everything at a comfy 75F for both the bulk and final ferments.  That resulted in the dough doubling in volume in just 3-4 hours, which fit very nicely around the errands that had to be run on Friday.

More for appearance than anything else, I rolled the shaped dough in bran before the final ferment.  Chef Hamelman's baking instructions produce a boldly baked loaf.  The bran made a nice highlight against the deep mahogany color of the crust.


Given the 15 minutes of kneading, and the not-massive hydration level, the crumb is fairly even and smooth but not tight.  Since the intended use is for sandwiches, it works better than a very open crumb that allows condiments to drip all over one's clothing.

The flavor is exactly what I was jonesing for: wheat!  The dark crust contributes plenty of caramel and toffee notes, with a hint of chocolate in the background.  The crumb is firm and chewy, while remaining moist and cool.  No squishy marshmallow bread, this.  It is robust and makes a substantial base for sandwiches.  

It's back to the freezer after this disappears but for now, life is very good.

Paul

pmccool's picture
pmccool

Today was, well, not your ordinary Saturday.

Instead, the morning was spent in the company of 9 beginning bakers, ages 5-9 (and their adult "assistants").  Off-hand, I'd estimate more of the bakers were closer to the age 5 end of scale.  There were three dad/daughter combos, a couple of grandmothers with grandson or granddaughter, and the rest were mom and child.  All in all, some really nice kids.  We baked two different breads; one a cheese and onion scone (some opted not to use the onions) and the other a Cape Seed Loaf.  

One of the things we talked about was the importance of bubbles, and how those make the difference between a risen bread and a flatbread.  We talked about how sometimes we make bubbles in bread using a reaction between baking powder or baking soda and some kind of acid (a la the scones), and how we let growing plants (yeast) make the bubbles for us (as in the Cape Seed Loaf).  And we covered a lot of other territory, too.  Like, "What do you do when you make a mistake?"  Luckily, I had a real-life mistake to point to: someone, probably the assistant I have yet to hire, had forgotten to include the onions in the scones that were baked for demonstration and snacking purposes.  That gave us the chance to talk about how mistakes can often be corrected or, if they can't, that they usually taste good anyway.  And it gave a good segue to talk about mise en place.  Lots and lots of teachable moments.

After I demonstrated the scones, including the kind of textures that they should be looking for, the chef/assistant teams took their places at their work stations.  The kids had fun cutting the butter into the dry ingredients for the scones.  Some also plunged hands-first into mixing in the buttermilk/egg mixture with nary a thought of "Ooh!  Icky!"  And no, that wasn't just the boys.  One young chef said she would prefer not to cut up the dough into scones, so we baked hers as a bannock.  Once we bundled all of the scones into the ovens, we took a breather to talk about what we had just done and to answer some questions.  Someone asked about oven temperatures and their effects.  Once again, we drew on a real life example (not a mistake!) to show how the scones that were baked on the bottom shelf of the oven were darker than the scones baked on the middle and top shelves of the oven, indicating that that specific oven was hotter at the lower level than it was in the upper levels. 

From that, we moved to a demonstration of the Cape Seed Loaf, which is simplicity in itself.  Though yeasted, it is a batter bread.  All one has to do is mix everything together, scrape it into a greased baking pan, let it rise 20-30 minutes, then bake it.  Because of time restraints, the young chefs needed to bake the bread at home.  Two who weren't able to do so simply mixed all of the dry ingredients together and bagged them for later final mixing and baking.  For the others, we made sure to mix the batter with ice water to slow the yeast growth, which, I hope, gave them time enough to get home to bake the bread before it over-proofed.

It was a very busy, active morning.  I'm interested to see if the hockey game we will go to with friends this evening will be as stimulating.

Paul

pmccool's picture
pmccool

This past Friday, I taught a class on rye breads at the Culinary Center of Kansas City.  The class was scheduled to run from 10:00 a.m. to 3:00 p.m.  Three different breads were featured: the rustic pumpernickel from ITJB, Eric's fav rye (compliments of the late Eric Hanner), and a vort limpa.  That gave a nice sampling of the diversity of rye breads.  We were able to bake both the pumpernickel and the vort limpa during class; students then took the dough for Eric's fav rye with them to bake at home.

I had had some concerns about the drawing power of a full-day class on a week day.  As it turned out, all 20 slots were taken, with a waiting list in case of any cancellations.  So, yes, there is enough interest, in spite of the schedule.  No doubt the inclusion of a $20 gift certificate for Pryde's of Westport, a local kitchen supply store, figured favorably, too.

A number of the students were familiar to me from previous classes, which makes for a pleasant time.  Based on what I saw and heard, and what came through on the feedback forms, it was a fun day for the students as well as for me.  Most were new to rye breads and to sourdough, so they were pleased to gain some new experience and to receive some starter to take home to use for future baking.

One of the Center's requirements is that the instructor provide food for the students.  In the case of an evening or half-day class, that is typically something to snack on; usually whatever is being made in the class.  In the case of an all-day class like this one, it is lunch.  It was a no-brainer to plan lunch around the three breads being taught.  That led to cold cuts and condiments and pickles/olives/peppers, with fresh fruit for dessert.  

Consequently, I needed to bake bread ahead of time to have it ready for the lunch of Friday.  That worked well, since it also did double duty as object lesson so that people could see the finished product, too.

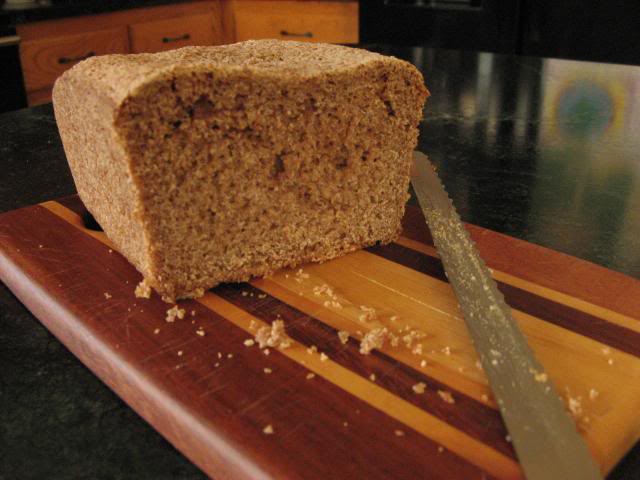
If you have baked the rustic pumpernickel from ITJB, you know that it is dark and dense and fragrant with rye.  There's no molasses, coffee, cocoa, or caramel color in it, nor does it have a prolonged bake.  My belief is that the scald contributes strongly to the dark coloring and the moistness of the finished bread.  Then, too, all I can find in local supermarkets is Hodgson Mills stone-ground rye flour, which is pretty hearty stuff in its own right.  Even with heavy steam, the loaf experienced some cracking but no blowouts.

The vort limpa is a party in a compact loaf.  It is redolent of molasses, orange zest/juice, anise, fennel, cardamom, and beer.  With a smear of sweet butter, it's practically dessert.  And it still makes for some darn good sandwiches and toast, too.

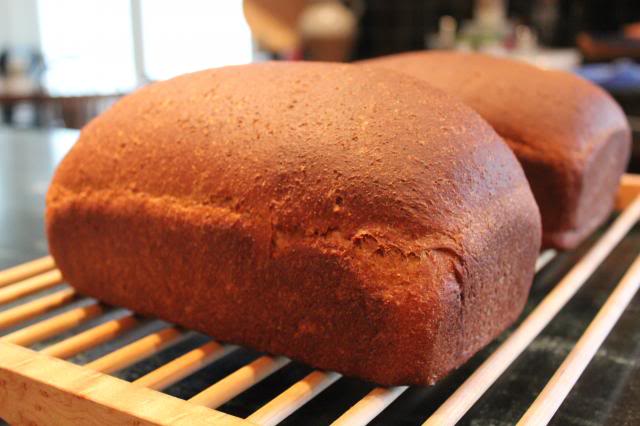
Many, many of you have made Eric's fav rye and know that it is a stellar example of a deli-style rye bread.  It makes a magnificent base for a wide range of sandwiches.  While I enjoy the bite of the caraway, my wife often prefers it when I substitute either fennel seeds or dill seeds for the caraway.  No matter how you tweak it, this is a seriously good bread.

With those out of the way, I needed to build up my starter to have sufficient for 21 batches (20 students + 1 instructor demo) of the pumpernickel and Eric's fav rye, plus enough to give away.  That turns out to be a lot of starter.  Really, really, a lot.  Keep in mind that this class was initially planned last summer.  At that time, I was focused more on pulling together the bread descriptions for inclusion in the advertising and the formulae to go into the student's class booklets.  There should have been some thought given to the amount of prep.  I know that now.  Yes, I do.

For instance, this is what all of the scald for the pumpernickel looks like with half of the sponge incorporated.  You can see that it occupies most of one end of my kitchen's island:

The lighting isn't very good; it's all down light from the ceiling and island light fixtures.  There isn't a lot of ambient light at 6 a.m. in January here in Kansas.

This is the second half of the pumpernickel's sponge, ready to mix in with the scald; nothing but rye flour and water, and it smells wonderful!:

Sponge and scald, ready for the final mix (I could have used a big spiral mixer right about now).  Note that the sponge is lighter in color than the scald, even though both are made with the same flour:

Needless to say, it took a number of trips to schlep all of the ingredients from my kitchen to the car, and then again from the car into the teaching kitchen.  I suspect that we will rerun this class at some future date but there may be a change in the lineup that reduces the amount of prep I have to do.

There aren't any photos of the actual class.  I didn't think to grab my camera on the way out the door and there wasn't time to use it, anyway.  

My students were an interesting group.  The youngest may have been in their late 20s or early 30s.  The oldest were, well, older than me and I'm 57.  One couple took a day off from work to attend.  All were alert and inquisitive, with lots of good questions.  We had a lively discussion about how to begin and maintain a starter, which would have been shorter if I hadn't misunderstood a key part of one inquiry.  ;0  During the course of the day, there were a lot of questions about dough consistency and how it was affected by the amount of flour or water people worked into their doughs.  I had talked at length about how sticky some of the doughs would be and not to try to kill the stickiness with flour.  A few still wound up with some stiff doughs that needed more water.  Some students were almost completely new to bread making while others had some good skills.  Tips on shaping and docking and slashing led to another flurry of questions.  These are all areas where the hands-on aspect is hugely valuable, since a book just cannot provide that tactile feedback.

It was very satisfying to share these breads with such an eager group of learners.  And it was a very full day.  I was happy to climb into bed that evening.

Since one student was a no-show, and since I had intentionally made more starter than I expected to use, I wound up making a double batch of Eric's fav rye on Saturday and a double batch of Hamelman's sourdough walnut raisin rye on Sunday.  We have happy friends.

Paul

pmccool's picture
pmccool

More than a little irony in that title...

Let's talk about the new, first.  That would include the second edition of Hamelman's Bread and the pain de mie formula found in it.  It would also include some new Pullman pans that I picked up recently.  The book is remarkable, as many before me have said.  I don't see this one getting shoved aside by future books, as has happened with some that I own.  Yes, there are a few nits (why weren't the home formulae in metric units instead of English units?) but they are rather trivial compared to the quantity and quality of information residing between the covers.  The Pullman pans figure as a long-delayed gratification.  When faced with that much "new", why not put all of them together?  And then, to really put it over the top, why not employ a previously unused shaping technique?

That takes us to the "could be improved" part of the tale.  Not the formula, mind you, nor the pans, either.  The dough was a real treat to work with, especially since I usually work with breads having a significant percentage of whole grains.  It was smooth, silky, satiny; embodying all of those lush descriptors that cookbook authors love to employ.  The new (to me) shaping technique even worked nicely, thanks to txfarmer and others who like assemble their loaves from smaller components.  And the finished bread tastes wonderful, too.  

Everything appeared to be going well in the early stages:

There's just one niggling little problem.  Someone (I need to get an assistant, if only to serve as whipping boy) miscued on the dough quantity calculations.  It wasn't a fat-finger mistake, either.  More like a fat head mistake.  I shouldn't be so negative.  This bread actually achieved something that many home bakers want to emulate in their breads: ears.   No, no, no, not that kind of ears, this kind:

Maybe I should call them eaves, instead of ears.

Anyway, the loaves have a beautiful fluffy core, perhaps 2.5 inches across, with an approximately .75 inch wide perimeter band that is dense and firm.  Quite firm.  Oh, okay, it requires some serious chewing!  Not your Momma's Wonder Bread by any stretch of the imagination.  The crust is lovely, though.

Just guessing, but I probably had about 15% too much dough for the pans.  Thank goodness for a non-stick lining and some generous greasing before putting the dough in the pans.  The lids were somewhat reluctant to release but came off without requiring excessive force or causing harm to anything.  

I think I want to try this bread again, albeit with the right amount of dough in the pans.  If that works as I expect it can, the next step will be to experiment with some of Hamelman's ryes, baked in the Pullman pans.  If I get really brave, I may even try the Horst Bandel pumpernickel.

Despite my frustration with myself, it was a fun experience to play with a new bread, new pans, and a new technique.  And I've only scratched the surface with this book!

Paul

Pages

Subscribe to RSS - pmccool's blog