January has been a busy month already and there is nothing to indicate that it will slow down anytime soon. Consequently, I haven't posted much recently but I have been busy with baking.
I taught two classes at the Culinary Center of Kansas City this month. Last weekend was a Breadmaking 101 class and this weekend had an advanced course on formula design utilizing the BBGA spreadsheet format, which I think is unique to the area. Each went well, with 17 in attendance for the Breadmaking 101 class and 5 in attendance for the formula design class. We would usually cancel a class if only 5 people sign up for it, since it isn't profitable for the Center to deal with a group that small. However, we felt that it was important to hold this first-ever class so we made some adjustments and rolled with it. The small attendance may have been a real advantage, since it gave me much more time with each student than would have been possible in a larger group.
As the name implies, the Breadmaking 101 class was geared to people who are new to baking bread. The focus was on introducing the basics that are so important, and often so daunting, to new bakers. We only dealt with two breads during the 5-hour class so that students would have an opportunity to learn about ingredients, mixing, kneading, and fermentation first-hand. While I had wanted to have the students bake at least one of the breads while they were in class, circumstances just didn't allow that to happen so they took the dough that they had prepared to bake at home. They did get to see the bake for one of the doughs that I had made while setting up for class, which gave them an idea of how the finished product should look, as shown below:

I'm not sure what point I was making but it was obviously an important one! The bread in question is a simple Italian-style white loaf. Here's a picture of what I baked from the demonstration dough:

Interestingly, the adjoining classroom had an all-day Italian cooking class going on. From talking to that instructor before our classes started, I learned that her father had owned S&A Italian Bakery, one of the larger bakeries in the Kansas City area dating back to the early 1900's. Apparently the old bakery building in downtown KC has been converted into condominiums and one of those condos still houses the old brick oven, though it is not in use. Her comment was "Someday, I'm going to buy that condo!" When we took a break for lunch, I carried one of the loaves into her classroom, making her a very happy camper.
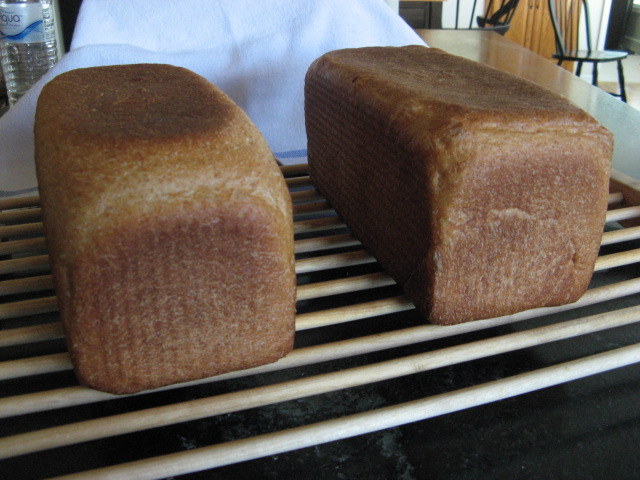
The other bread featured in class was a honey whole wheat, which gave the students a panned bread to work with, too. As usual, I stressed the importance of measuring by weight, instead of by volume. This was the first class in which I had the students do all of their measurements by weight, using new scales that the Center has recently acquired. That presented some mental shifting of gears for a few of the students but all got through it in good shape. One student commented that the whole idea of hydration, and how it could be controlled, was an important new understanding for her. All in all, a tiring but enjoyable day.
This Saturday's class was the polar opposite. It was structured to have the students develop and make a bread of their choosing (within some parameters that I set to keep things simple) so that they could familiarize themselves with the thought processes that go into formula development. I had set up a spreadsheet with three different templates, all based on the BBGA format, that was emailed to the students in advance of class. They were encouraged to bring a computer, or tablet, or other device that would allow them to manipulate the templates in class to produce their formula. Before getting to the spreadsheet proper, we covered the importance of measuring by weight and how to use Baker's Math, since those two concepts are at the core of the BBGA format. As part of that discussion, we mixed three series of hydration experiments, one each of bread flour, whole wheat flour, and rye flour, with hydration levels from 50% to 90%. Each sample used 50g of flour and the students did all of the mixing by hand so that they could see how the flours behaved across the range of hydration levels and how they changed from one flour to the next. That turned out to be an eye-opener for them, since they gained a visual and tactile understanding of what the hydration numbers meant. Each student's packet included two worksheets with a series of questions that prompted them to think about what they wanted in the finished bread, with regard to intended use, flavor, shape, texture, crust, and other factors. With that background, each one put together a draft formula for their new bread. I also let them use some bread books as references, not so they could copy formulae but so they could get a sense of how different ingredients were combined, and in what percentages, for various styles of bread.
After mixing, kneading and setting their doughs to ferment, we regrouped for a discussion and demonstration of various techniques. From there we broke for lunch, with occasional interruptions for stretch and folds by a couple of the students. The menu included sandwiches made with Italian bread and German Farmer's Bread, the latter from Hamelman's bread. It's absolutely lovely stuff, very flavorful with a small inclusion of rye and yogurt, moist, and chewy. A loaf is shown in the headline photo and sang quietly while its picture was being made. Some slices showing the crumb are pictured, below:

After the students shaped their breads, we spent some time discussing various ingredients that can be used in breads and what kinds of effects they have. Then the students went to work on designing a second bread. By the time they were ready to mix and knead their second bread, the first set of loaves were ready to bake. After their second doughs were prepared, we cleaned up our area and had a discussion to answer any questions that hadn't been adequately covered earlier in the day. Eventually, the breads came out of the oven and the students went their separate ways with one baked loaf and some dough to bake at home, plus a headful of new understanding.
Considering that it was the first-ever presentation and radically different than any of my other classes, I'm very pleased with how the class went. There are things that can be improved, certainly, but it was a definite success.
A bake from earlier in January featured Hamelman's Tarte Flambee, which is a kind of pizza in much the same way that a Bugatti Veyron is a kind of automobile. Luxe, in other words. Bacon, onions, creme fraiche (I substituted Mexican crema), a hint of nutmeg, plus some mushrooms that I threw in just because; all combining to produce an artery-clogging rapture. This is seriously good stuff and should probably not be indulged in more than once a year. The picture, below, was taken with my cell phone and seems to have emphasized the red end of the spectrum, leaving the bacon appearing much more pink than it actually was.

The other thing that I've been playing with is King Cake for Mardi Gras, since I've been invited by Slow Food Kansas City to teach a class at their February meeting. The dough itself is where I want it to be and I've worked out a shaping technique. The only thing that I'm still fiddling with is the filling. The one that I have used tastes great but it has a tendency to liquefy and ooze out of the cake while baking, so that needs a bit more work. The second iteration, unadorned, is shown below:

That about catches me up, I think.
Paul