The Fresh Loaf

A Community of Amateur Bakers and Artisan Bread Enthusiasts.

Mini Oven's blog

Mini Oven's picture
Mini Oven

The No Stir Sourdough Starter

This last week I started a vigorous rye starter by simply pouring water over rye flour and leaving it alone, covering it.  No stir, no mixing, just stand alone at 75°F and watch.  

This time I want to avoid, skip over the stinky bacterial population growth in the starter so I'm pouring sauerkraut juice over flour to see what happens.  Same 74°F to 75°F  temperature.    

Instructions:  

  1. Spoon rye flour into clean tall narrow jar.   About one inch or 2.5 to 3 cm. deep.  (I used 30g Rogers whole rye flour)
  2. Pour strained sauerkraut juice gently over the flour.  Should make a top layer of about half an inch or 1.5cm deep.    (I used 40g strained Bick's Wine Sauerkraut)   Do not stir.
  3. Mark the level, time and date with a permanent marker pen.  Cover loosely with lid or plastic wrap and loose rubber band. 
  4. Stand in warm spot 75°F (23.8°C)  out of drafts and danger.  Do nothing but observe but this includes daily removal of cover and noting aromas before recovering.  

That is it.   Just for information my culture growing glass is about 2" in diameter, 5" tall and weighs 178g empty.  The sauerkraut contains sodium as well as vitamin C, wine and sulphites.  The last of which may or may not interfere with yeast activation.  It is not raw sauerkraut juice which might be preferable.  When the starter takes on a beer aroma, it will be fed more flour.

Anyone wishing to participate is welcome.  

Options might include other flours, other sauerkraut juices, other temperatures.  As sauerkraut is fermented around 60°F it might be interesting if a 60°F sourdough starter could be developed (might take more time?)

Mini Oven's picture
Mini Oven

It's a Spelt & wheat loaf, with rye, chia, and fluffy hemp hearts.  It speaks Italian.

Cranked out a sourdough loaf with a rather slow starter based on the famous 1,2,3 ratio recipe.  Letting the dough retard in the fridge overnight gave it an edge and I didn't have to worry about it.  Set it out to warm up, gave it another fold and rested it in a make-shift banneton lined with a large paper napkin.  Baked it around noon.

The loaf is decorated with a slurry of rye, water, lemon juice, active malt, salt.  A small coffee cup transferred the "rings" from the plate of slurry to the flour dusted loaf.  Scoring could have been a bit deeper but I'll take it.  

RECIPE:

150g wheat starter (just peaked) 

285g water

 15g fresh lemon juice

13g or 1 Tbs olive oil


200g spelt flour

150g white wheat flour (I used Antimo Caputo 10% protein) (that's where the Italian comes in!) 

 55g dark rye (Rogers)

 25g hemp hearts

 20g chia seeds

10.5g salt  (2% of 525g total flour)

Mix dough by spoon adding the oil after the flour and seeds have been moistened.  Rest 30 minutes and lightly knead the dough one minute.  Let stand until the dough starts to puff up about a third.  In my case with a weakly yeasted starter, 4 hrs.  First firm stretch and fold followed by another in one hour.  Cover and place in the refrigerator.  

Next morning (about 12 hrs before baking) remove and let dough come to room temp and rise.  When almost doubled, turn out,  degas and fold to shape.  Place top side down in a basket lined with a large flour dusted paper napkin (wow, it works!)  (The dough had so nicely risen before I took notice that I think shaping sooner and letting double in the banneton or tin is also another way to go with this stiff dough.  Pretty easy to manage and not sticky.)

Heat oven to 230°C (450°F)  just before dough has risen enough.  Turn out onto parchment.

A slurry of 20g rye flour, 1/2 teaspoon of active malt (for a dark colour) lemon juice (for stretch) pinch of salt, and water( to make a thick paint) is mixed on a plate.  

Dip the rim of a glass or coffee cup into the slurry and then "print" it onto the dough. Easy!

These make the olympic Rings on the floured surface of the dough.  I got a little carried away adding more rings.

Slash and bake about 40 to 45 minutes turning down to 200°C (400°F) halfway into the bake.  

Inside temp measured 208°F (98°C)  


Mini Oven's picture
Mini Oven

Just an update, a study feeding those with irritable bowel syndrome ancient vs modern wheat.

http://freetheanimal.com/2014/02/william-wheat-belly.html

http://www.ncbi.nlm.nih.gov/pubmed/24521561

and this right next to it using Kamut vs whole wheat

http://www.ncbi.nlm.nih.gov/pubmed/23299714

Mini Oven's picture
Mini Oven

Putting on my traveling shoes and tossing the gear, sourdough, scale, spoon scale, probe & oven thermometer into my suitcase.  Destination: Canada near the east Washington state boarder.   Life is fun!  - Mini

Mini Oven's picture
Mini Oven


This rye recipe is my Chilean version of my favorite rye ratio recipe using a rye sourdough starter and the addition of chia seeds that increase the dough hydration yet maintain a nice shape.  Use a large Dutch oven for a free form shape. 

I designed this recipe for one narrow tapered loaf pan:   cm: 30 x 11 x 7.5   or   inches: 11 3/4 x 4 1/4 x 3 

It is my basic rye recipe (starter:water:flour) (1: 3.5 : 4.16) plus 6.1% chia (on total flour weight including flour in the starter) plus 4 times the chia weight in water added to the dough.  Also added nuts, seeds and 90g to 100g arbitrarily selected moist rye altus (day old bread.)


DARK RYE & CHIA BREAD

The wet:

  • 175g vigorous peaking rye starter  100% hydration
  •  90g  moist rye altus 
  • 812g  water  24°C   (75°F) 

        1077g

The dry:

  • 728g rye flour  (dark rye 14% protein)
  •  50g chia seeds
  •  17g salt   (2%)  
  •  17g bread spice  (2%)  (toasted crushed mix: coriander, fennel, caraway seed)
  •  17g toasted sesame seed  (2%)

         829g    (total dough so far 1906g) 

           (optional:)

  •     4g black pepper  (0.46%)
  • 100g broken walnuts
  • 150g chopped Araucaria Pine nuts   
  • sunflower seeds to line bottom and/or sides of buttered form 


Method:

Inoculate (1:5 to 1:10) sourdough starter soon enough to have a vigorous starter when ready to mix up dough.  

Plan to bake in 3 hours from the time you start combining liquids with the flour to make dough.  

Combine liquids and break apart floating altus.   Stir dry ingredients and add to liquids stirring until all dry flour is moistened.  Scrape down sides of bowl, cover, let stand 2 hours.  No kneading ever!  Dough will stiffen as it rests.   (Another order for combining is to add the chia and spices to the wet ingredients and allow to swell 15 minutes before adding flour, salt and nuts.  Not sure if it makes a difference but if you find you're getting a gummy crumb, let the chia soak in the water and swell before adding the flour.)

Smear bread pan with butter and dust/coat with raw seeds, crumbs or flour.  Spoon or plop dough (trying not to trap air) into form or floured banneton.  (The recipe lends itself well to free form in a large Dutch Oven.)  Use a wet spatula or wet fingers & hands to shape dough.  Pile the dough up higher in the center for a nice rising shape.  Sprinkle with seeds and press lightly into dough while making a nice dome shape.  

Let rise about an hour.  Meanwhile heat oven 200°C to turn down to 185°C (365°F) 15 minutes into the bake.  Make a cover for the loaf from a double layer of alufoil or flip an identical pan over the top.  Leave room for loaf expansion.  

When ready dock,  take a wet toothpick and poke about one hole every inch, all over, toothpick deep.  Wait a few minutes and smoothen over with a wet spatula.  Dough is ready to dock when you see the dough surface threatening to release trapped gasses under the surface.  One or two little pin hole bubbles is enough to start docking.

Spray or rinse the inside of foil or empty bread pan cover with water and cover the dough to trap steam during the bake.   Bake for about 40 minutes on the lowest rack, then rotate and remove the protective cover to brown the loaf top.  Finish the loaf in another 20-30 min for a rough total of one hour baking time.  Inside temp should reach 94°C, sound hollow, but I tend to shoot for 96°C or 205°F.   Cool on rack.   Wrap when cold.  

Here is the cold loaf (after 12 days, last 6 in the fridge) and you can see how much the dough rose. The shaped dough would have been rounded under the rim.   There are no nuts in this loaf other than what came from frozen stored altus.

Free form using floured rice sieve:           Oops, I spy a few docking holes!  

Have fun,  I do!    Really proud of that one!   


Mini Oven's picture
Mini Oven

Not being in the Avocado capital of the world but swimming in avocados, I decided to try an experiment using only avos (avocados) for my liquid.  Started with the basics and going from there.  I happened upon some watery thin skinned fruit that I am told are known as "Florida avocados" and thought at first interesting but then reality set in, sure enough... less fat, more carbs and more water.  Hmmm not exactly what I value in an avo but good enough for a cracker experiment and maybe a bread.  

Peeled the avo and diced it into a bowl on the scales.  Added equal weight of rye for a reference point and began to squish it all together.  Went much faster than I thought, and they weren't even mushy avos!  Let that sit for a while to soak and soften lumps wondering about the dough turning brown, should I add lemon or sourdough?  Does one even add leavening to crackers?  Nibbling on the dough, well, it needed something.  2% salt would be about 4.4g on my 220g flour and I had black olives calling out from the fridge.  Half dried chili peppers would be colorful (threads?) and crushed garlic would also be good,  black pepper?  Bread spice?  Cumin?  Curry?  Petunias?  Had to start somewhere.  What makes them puffy? Resting time and hot baking the water in the dough.  

First Run:

220g Florida Avocado     (the watery kind)

220g medium rye flour

2 garlic cloves

10 black olives       (cut from pits, salty)

1 chili pepper         (mine was thumb size and medium spiced)


flour/raw seeds for rolling

oil for 3 sheets of parchment    (1 tsp each sheet, flavoured or not)

salt


Remove seed and skin from avocado and cut into pieces, weigh.  Add equal weight rye flour.  Pinch and mix with hands until it becomes a firm dough and lumps of avocado are well blended into the dough.  Autolyse or allow to rest covered for 30 minutes.  Then arrange on a nice plate photographic piles of pressed garlic, finely chopped olives and a rounded tablespoon more or less finely chopped fresh chili pepper.  Add to dough, forget to make a photo, check moisture, it should be a bit sticky now but still firm enough to roll out, yet soft enough to do so easily.   Rest another 30 minutes.


Divide dough in half,  shape into a rectangle hamberger shape and roll into a mixture of flour and sesame seeds to coat, this helps with the rolling out of dough.   Wrap up one to prevent drying.  Roll out dough as thin as possible between two layers of lightly oiled parchment paper.  Anything squishing out can be cut off and stuck back on in a needy spot under the parchment.   Carefully peel back top sheet of parchment.   Sprinkle with seeds/salt.  Score if desired to facilitate breaking and transfer to baking sheet.


Bake middle of oven at 200°C or 400°F until medium brown, rotate to avoid burning back corners.  Allow to cool on rack.  Break apart.


Flavour tweaking needed.  I found it smelled and sort of tasted like teriyaki beef jerky, a little bitter (I did get it brown) without any sweetness.  I chrunched on half a sheet of the stuff trying to decide my next step.  Maybe brushing the rolled out cracker with honey water or using some sourdough or aging of the dough 24 hrs to bring out sweetness.  Lots of different directions to try.  Tempted to turn down heat a little bit to help dry while baking.


This is an open experiment, all comments and jumping in to experiment and post more than welcome!   

Mini Oven's picture
Mini Oven

Now with a fool proof non-sour sourdough starter...  

I got 240g of starter with just one heaping teaspoon of starter inoculation in 6 hrs!  Ten grams starter with 120g of water w/ 60g rye + 60g AP (10% protein wheat flour.)

It is a lot of fun having a sourdough that isn't sour for a change although I wonder if it still has the same health benefits as a sour one.  (?)  It is certainly better for cinnamon rolls and sweeter doughs and some plain breads.  (I have seen a very tall shiny spring-form pan in the market.)   I haven't had the courage to test this starter in an all rye recipe.  Maybe a double loaf experiment would be interesting.  I am keeping the young starter at about 75% hydration and refrigerated between feeds (after a 1/3 rise after feeding.)  I'm using it as mother, removing a heaping teaspoon to make more starter for baking.

The last 1-2-3 loaf was a mixed wheat/rye (40%)  (100g blend of toasted oats and chia) with a teaspoon of active malt,  60g dried old rye altus, bread made from the sour starter.  Today is it's second day but I'm yes, getting a trace of sour.  Very light but it is there.  How interesting...  The oats & malt make for a rather fluffy moist bread, bendably soft.  The dough was rather firm, I figure the oats and chia are responsible and they give lots of moisture up when baking so there wasn't much folding.  I worked altus crumbs along with sesame seed into the dough after an initial 30 minute rest.  The dough was retarded in the fridge overnight.  (But so was the last loaf and it didn't develop any sour tastes.) (Can't seem to download photos!)

I am curious if this starter gets more sour over time with just refrigeration storage or of it needs counter time to develop "sour."  Will chilling thwart San Fan lactobacteria?

Mini Oven's picture
Mini Oven

Been adding up some interesting thoughts lately.  Found a site that looks like lots of fun with the northern hemiphere snow on the way!  

http://www.theoldfoodie.com/2011/10/snow-bread.html

What do you think?  

Lots of room for experimentation... 

Mini Oven's picture
Mini Oven


Whipped egg whites are often used to leaven pancakes, light cakes, baked or steamed desserts.  I didn't have Chia seeds in 2009 when at the time I made the suggestion to Sharonk, and completely forgot about it until I stumbled across it today.  Egg whites work in that they are whipped until stiff making a protein foam and then ingredients (grated nuts, flour an the like) are folded in or it's folded into batter.  Either way.  If chia gel were strained so the seeds don't plug the nozzle, and placed in a pressure container for whip cream and charged with CO2 gas, the extruded chia foam (think unscented shaving cream) might be used to hold ingredients as they bake or are floated over boiling water.  Well folks, I've got Chia seeds thanks to Shiao Ping.  Sharon suggests  "To make chia seed gel, take 2 tablespoons of chia seed and mix it into 8 ounces of water.  Stir with a whisk or fork every 5-10 minutes for a half hour... let the chia seed gel sit for 12 hours before using." 

The Plan:  I could substitute it for stiff egg white in a regular gluten recipe and find a starting point.  As far as gluten free recipes go (you can see where this is going... gluten free, egg free, yeast free)  I wouldn't know what to add to the foam or even if it would work.  (Maybe when I get that far....)  I have acquired chia seeds and can make the gel, and do have the container and gas but have no idea what to do next.  (ok, no plan.)  I suppose if the gel keeps two weeks in the fridge, I have two weeks to play around with it.  I was just wondering if Sharonk or anyone had some suggestions where I might start...  (Hint hint) 

First I want to make seed free gel, then pressurize it and test the properties of chia gel foam.  Bake it, boil it, steam it, fry it.  Seeing what happens.  Sound like fun?

It is Carnival Tuesday, anything can happen!


Mini Oven's picture
Mini Oven

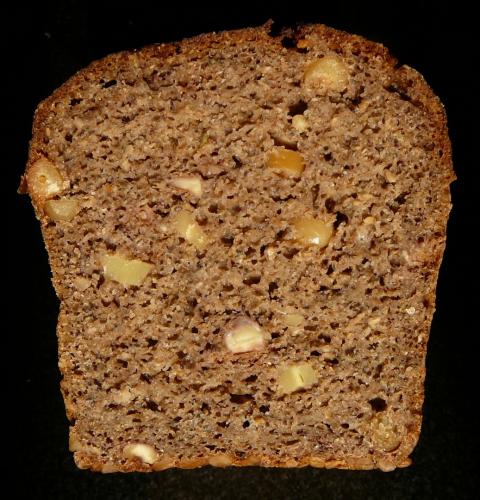
Seeds everywhere!  Lots of seeds!  Seeds in the dough seeds around the dough.  Seeds, seeds, seeds!  A few nuts too and my favorite flours, Rye and Spelt.   Lots of fibre! 

DOUGH    in order:

  • 170g rye sourdough starter 100% hydration
  • 600g water at about 20°C  (68°F)    Stir until starter is well dispersed
  • 70g dried walnut rye sourdough altus crumbs
  • 5g bread spices (blend of crushed coriander, caraway, fennel)
  • 100g spelt flour
  • 600g rye flour

       Mix until all flour is wet, cover and set aside for about 2 hours.  Then add:

  • 13.5g salt
  • 70g hemp seeds
  • 8g roasted sesame seeds (1 tbs)
  • good handful sunflower seeds
  • a good handful of crushed poppy seeds 

Work everything in well and let it rest covered 2 hours (22°C)

Here is where things got hung up... getting ready to shape the loaf... didn't like the last loaf shape in the last bake...  Had a couple of hours to think this out so I started debating with myself what other seeds variations I wanted in the loaf, what shape or form to use, banneton or no banneton, clay baker or free form.  I wanted seeds on the outside, liked the way chia seeds made a sort of support on the outside crust and then again, I wanted something interesting going on too.   Ready for a change...  approx. 1650g of dough or too much for a 9x5x4 bread tin.

Staring at a fresh bag of crushed flax and having just had potato flakes on my mind, what if?  What if I rolled the dough in mixed seeds?  What if I rolled them in seeds and piled them up inside my woks to bake?  Would the dough support itself better as smaller dough pieces?  Or would it go flat?  It likes to go flat.  Unmixed seeds?  Testing seed covers?  Little blobs of dough in different colors piled up on each other?  This was beginning to sound like a "monkey bread."  Then I could see rolling balls of rye dough (or dropping globs of wet cement) falling into bowls of various seeds, rolling around and stacking themselves up to make a loaf.  Might prove interesting...  or one big mess.   Will the bread balls separate or allow for slicing?  Mmmm.

Unlike the overly sweet sticky monkey bread, this is the savory version:  Seedy Nutty Monkey Rye

It is actually quite easy with two large wet soup spoons!  Once covered, the dough balls are easy to place and move around.

Drop large spoonfuls of dough (about the size of an egg) into soup bowls with about 1cm deep

  • crushed poppy seed (dark gray/black)
  • crushed flax seed (brown with shiny specks)
  • whole green pumpkin seeds (they turn a beautiful chestnut brown)
  • chia seeds (light gray)
  • potato flakes (turn dull brown) 

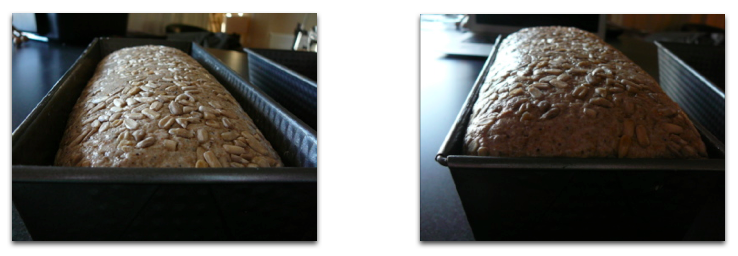
Arrange into a buttered bundt pan (or a pullman pan) cover and allow to rise 3-4 hours. 

I actually used a poke test!  Amazing!  I first steamed the bundt pan inside two woks, one inverted over the other.

Preheat the oven with one wok (2 cm of water inside) to 225°C using the fan setting. 

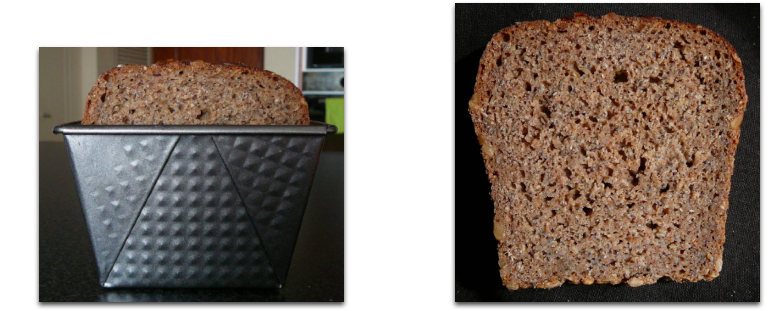
Place the filled bundt pan inside, cover and steam bake 30 minutes, then remove from oven, quickly take out bundt pan with loaf returning it to the oven to brown and finish baking at 200°C using upper & lower heat setting.  Done when inside loaf temp reaches 96°C and it has rich brown color.   Place rack onto bread and invert.  Remove pan and allow to cool.  Bag overnight.  Cut the next day.

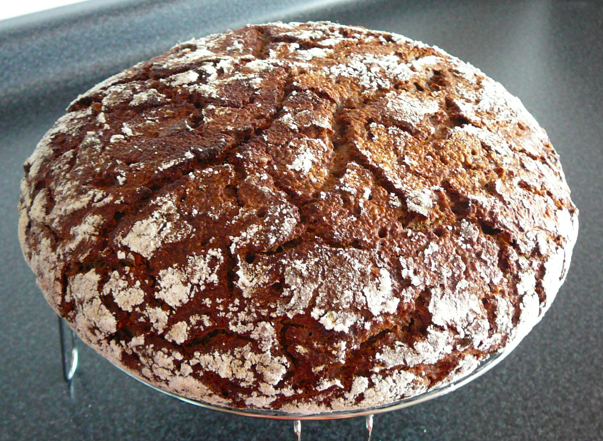
I don't know which side of the loaf should be up, the top or the bottom.  I started out calling it monkey bread.  When it landed on its rack it had mutated into turtle shell bread.


And now for the crumb shots.   An interesting thing happened and it shouldn't be of any surprise... but the coatings that absorb the most amount of water, tend to create the separating problems in the crumb.  The oil containing seeds seem to let the rye dough pass around them to join with neighboring dough balls.  Potato flakes and chia seeds seemed to create natural seams  .  This might be corrected if sprayed with water while arranging.  I could still cut off 1cm slices nicely but to cut .5cm  led some sections to separate. 

The bread tastes like a vollkorn should (yum!) and has an enjoyable bite and flavor that lingers.  We've been eating from it and have not yet spread anything on it.  It is not dry.  Still waiting on the sunshine but as the snow is beginning to fall again...  I'll post what I have.  I used a sharp knife to first cut the loaf in half and then the electric slicer.  Chia was a knife deterrent with its thin tight shell on the crust.

Not too patch work like inside.  Some interesting lines between the sections that run together.  Crumb looks very consistant.

Pages

Subscribe to RSS - Mini Oven's blog