The Fresh Loaf

A Community of Amateur Bakers and Artisan Bread Enthusiasts.

dmsnyder's blog

dmsnyder's picture
dmsnyder

My first bakes from Flour Water Salt Yeast, by Ken Forkish

David M. Snyder

July 20, 2013


I've been aware of Ken's Artisan Bakery in Portland, Oregon since shortly after it opened. I've driven by it a few times on my way to somewhere else, but, if I've ever had Ken's bread, it has been in Portland restaurants. And I'm pretty sure I have.

On our last visit to Portland, I browsed Ken Forkish's baking book, Flour Water Salt Yeast, at Powell's bookstore. I liked it immediately, and I ordered it as soon as I got home. Flour Water Salt Yeast won both the James Beard Award this year and also the very prestigious IACP award. It is certainly a great addition to my bread book library.

Forkish is clearly writing for the home baker who wants to bake the highest quality bread of a particular type: Crusty, open-crumbed, mixed flour hearth loaves. The book is short on bread science and focused rather than comprehensive. But it does a superb job of demystifying bread making. Forkish presents a set of techniques and very manageable equipment requirements that apply to essentially every formula in the book. The breads and pizza doughs vary in leavening (levain only, levain plus commercial yeast or commercial yeast only), flours used and their proportions and fermentation schedules. Forkish, encourages his readers to experiment with these variables but based on sound principles. The breads presented are ones produced in Ken's Artisan Bakery, with the formulas and procedures are modified somewhat to better fit the typical time demands of the working and/or parenting home baker. I really think this book will encourage its readers to want to make bread and feel confident that they can and will make great bread.

After reading Flour Water Salt Yeast pretty much from cover to cover, I decided to make the “Overnight Country Blonde” for my first bake from the book. This is a 90% white flour, 5% each whole rye and whole wheat, 78% hydration bread. It is a pure levain-raised bread. The prescribed schedule is to refresh the levain in the morning, mix the dough in the mid-afternoon and ferment it at room temperature until the next morning, when it is divided, shaped, proofed and baked by noon. That's a nice schedule. However, my dough was clearly fully fermented after 6 or 7 hours, rather than the 12 to 15 hours called for. This was not really a great surprise, given that my kitchen was at least 80ºF. So, I retarded the dough in the fridge overnight and proceeded from there the next morning. I decided to make one 1.8 Kg miche rather than two boules. This meant that I baked on a baking stone rather than cast iron dutch ovens. The loaf was pretty slack going into the oven, but there was great oven spring.


The resulting loaf had a thin, crisp crust that got chewy as the loaf cooled. The crumb was very open. In fact, there were huge holes, especially under the top crust, suggesting the dough had been over-fermented.

The crumb texture was otherwise marvelous. It was somewhat chewy but very tender. It had a quality for which I don't have a name, but it is very close to the sourdough bread I had in San Francisco as a child. I suspect it is partly the result of gentle mixing and partly of long, slow fermentation. The flavor was sweet, complex and moderately sour.

My wife and I both enjoyed this bread a lot, but I wanted to do it again without over-fermenting the dough, and I wanted a thicker, crunchier crust. For a second bake, I used the same levain which had been refrigerated for 2 days. I did not refresh it. I fermented the dough about 5 hours at which point it had expanded by 2.25 times. I divided into two 904 g pieces, shaped boules and retarded them overnight. The next morning, I let them proof another 90 minutes or so at room temperature and then baked in cast-iron dutch ovens. (At 475ºF, 30 minutes covered then 15 minutes uncovered.)

These loaves looked much more like those in the book. They had a thick, shiny crust that looked marvelous.


When sliced, the bread had a thinner crust than I expected. The bottom was crunchy but the rest of the crust was pretty chewy. The crumb was more evenly aerated, but there still were some pretty big holes near the top of the loaf. The crumb was chewier than that of the first bake. The flavor of the bread was pretty much the same - maybe a little less sour - but we will see how it develops over the next couple of days. Overall, this is a really nice, mostly white sourdough bread. I'm looking forward to fiddling with the flour mix and trying to slow down the fermentation.

There are many other breads in this book I really want to bake, not to mention the pizzas and focaccias. I very much like Forkish's approach to mixing and fermentation. He really emphasizes the value of a long, slow fermentation for flavor development. With the high Summer temperatures in my kitchen, to really slow things down, I need to try his formulas with a smaller amount of levain (or yeast) than he calls for.

David

dmsnyder's picture
dmsnyder

 July is the hottest month of the year in Central California. Today it was 99 ºF, the first day in 15 with a high temperature below 100 ºF. Tomorrow we expect it to be back above 100. Now, it's hotter in Phoenix (not to mention Death Valley), but still ….

For several years, my wife has talked about spending as much of July as possible in cooler climes. This year we've done pretty well so far with visits to Portland and the Oregon Coast, to San Francisco, where we attended the one game the Giants managed to win against the Dodgers and also the 50th reunion concert of Jim Kweskin's Jug Band with Maria Muldaur at the Freight and Salvage in Berkeley. Next week, we will go over to Carmel for a couple concerts at the Carmel Bach Festival.

While in Portland, I spent some time in Powell's bookstore and browsed through Ken Forkish's James Beard Award-nominated bread and pizza book, Flour Water Salt Yeast. I read enough to be convinced I did need yet another bread book, after all. <sigh> I ordered it when we got home, and I spent much of today reading it. I haven't gotten to the sourdough or pizza sections yet, and already I have a list of formulas I want to try. I haven't made any of them yet, but I did manage to squeeze in a couple loaves of Hamelman's “Pain au Levain with increased Whole Wheat” today.


I hope you all are having a great Summer (or Winter, for those in the Southern Hemisphere)!

David

dmsnyder's picture
dmsnyder

Peter Reinhart's Multigrain Struan Bread

Reinhart's Crust and Crumb was one of the first baking books I bought. It introduced me to the basic concepts of bread baking. It was the first cookbook I had encountered that dealt with the science underlying the techniques described. Never mind that some of what Reinhart wrote in that book was not exactly correct, and some of his terminology was idiosyncratic. I didn't know better at that time, and the book inspired me to learn more and make breads I wouldn't have attempted otherwise.

All of Reinhart's books are personal in part, and I learned something about his history, including the role played in his life by some of the breads in Crust and Crumb. Among these was “Struan Bread,” which he developed when he had Brother Juniper's Bakery in Northern California. It was a best seller, was somewhat unique, and it helped establish him as a significant player in the “bread revolution.” Those who have made Struan Bread seem to enjoy it a lot. Many have written it is the best bread for toast they have ever had.

Somehow, I never got around to making Struan. I'm pretty sure this is because, in the version I first encountered in Crust and Crumb, Reinhart made much of the role played by leftover brown rice in the wonderful texture and flavor of this bread. I am not a brown rice fan. If Struan Bread required brown rice, it wasn't going to happen in my kitchen. On the other hand, his 100% Whole Wheat Bread became a favorite of mine and my wife's, and I made it quite often.

By time Reinhart wrote Whole Grain Breads (WGB), he had developed a 100% whole wheat version of Struan that was almost the same as his contemporaneous version of 100% Whole Wheat Bread. The newer version was also much more “permissive” about what cooked grains could be used. This weekend, I found myself with a bowl of leftover bulgur, and it occurred to me I could use it rather than brown rice in Struan Bread. 

Now, Struan Bread is a multi-grain bread, but, in Reinhart's original formula, the main grain was bread flour. I have never made this version. I made the version in WGB which used all whole wheat flour. The other grains I used, besides bulgur, were polenta and rolled oats.

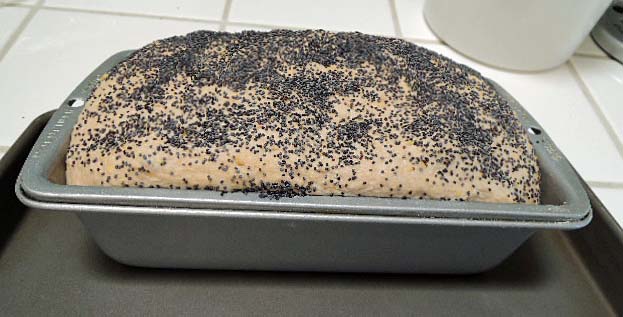
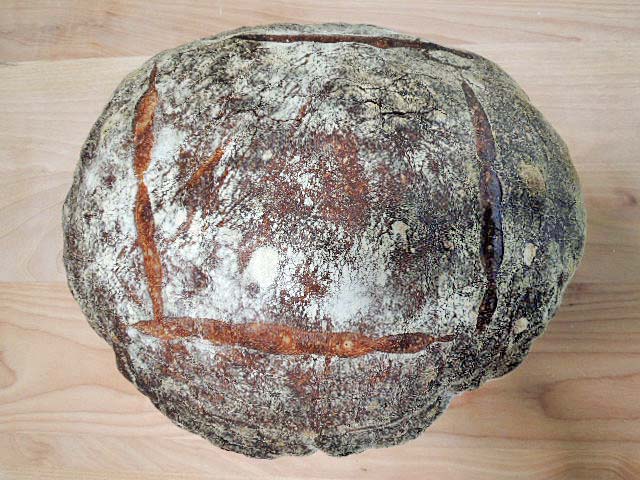
Struan, proofed and ready to score and bake 


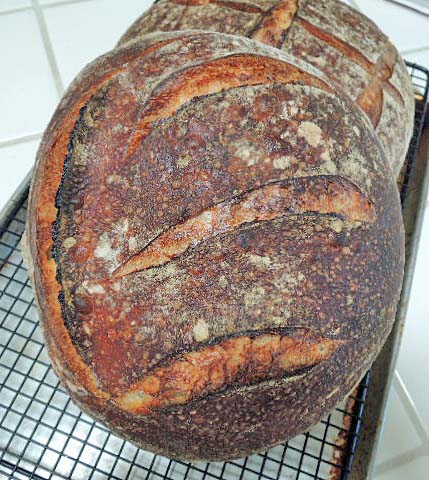
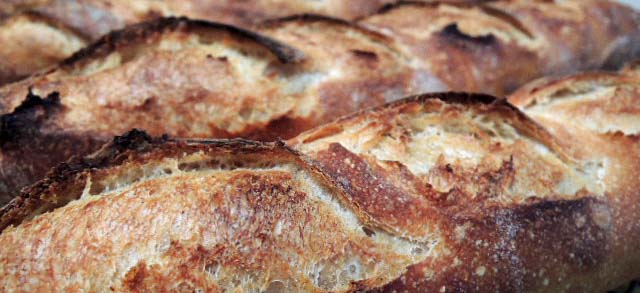
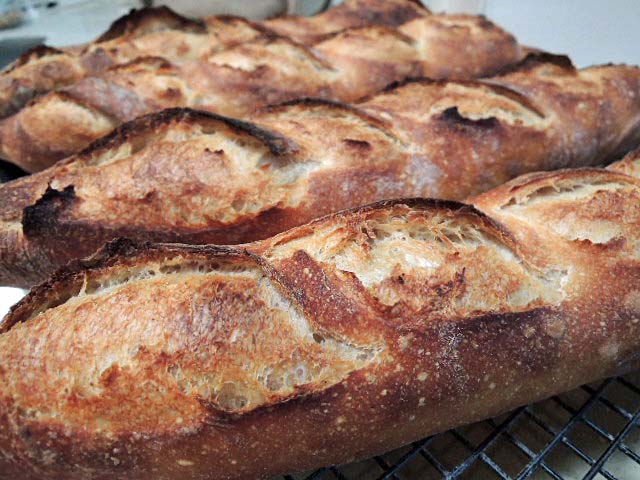
Struan baked and cooling


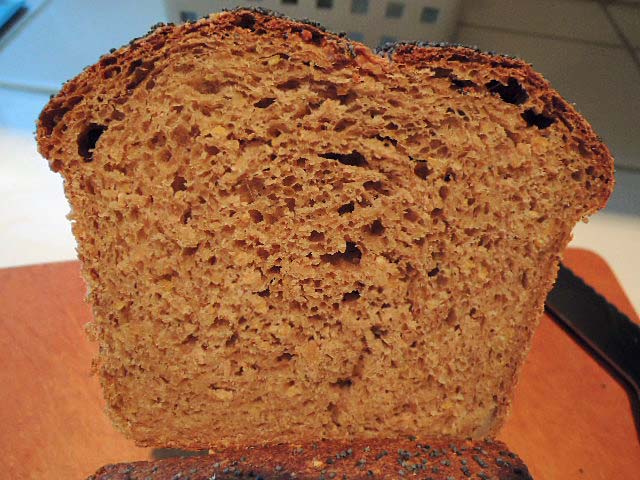
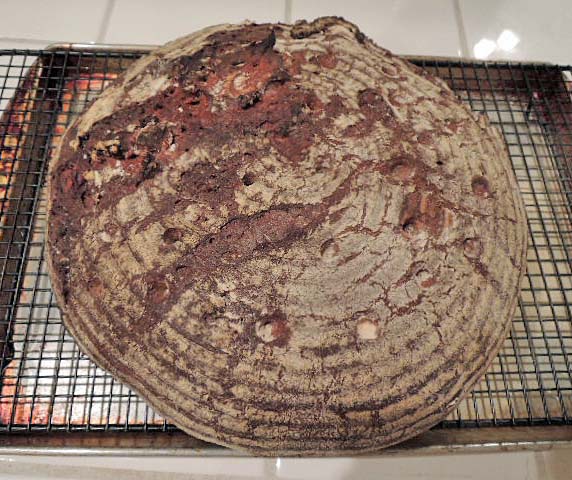
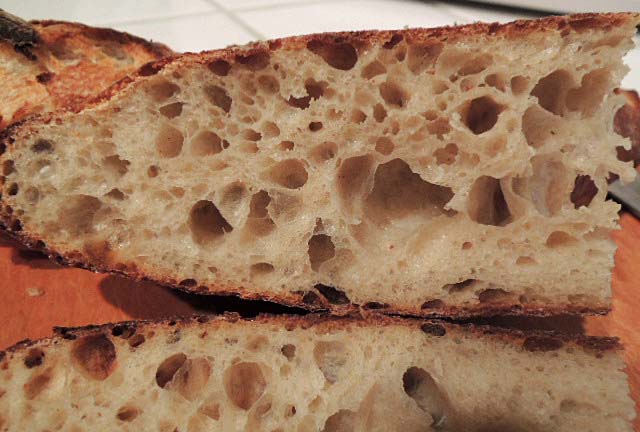
Struan cut profile & crumb


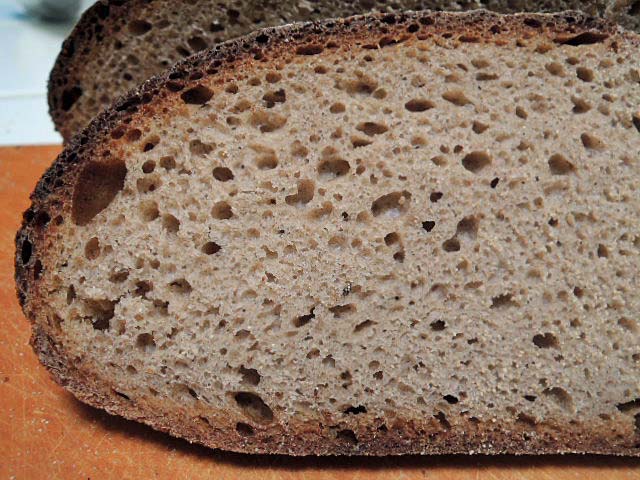
Struan crumb close-up

I followed Reinhart's instructions but found that the dough was very sloppy. I ended up adding about a quarter cup of flour during the mixing, and still ended up with a very loose, sticky dough – not what Reinhart described as slightly tacky. Rather than add yet more flour, I added a couple stretch and fold in the bowl episodes during bulk fermentation. By time the dough was ready to shape, it was still sticky, but easily managed with a light dusting of flour.

I searched TFL for members' blog entries on this bread after my loaf was out of the oven. I learned that the majority had baked earlier versions using bread flour, but several had baked the WGB version with whole wheat. Everyone who had, remarked on having to add significant amounts of flour to get a workable dough. I then went back and compared the versions of the Struan Bread formula in Crust and Crumb, The Bread Baker's Apprentice and Whole Grain Breads. I found that, in the earlier two books, Reinhart treated the cooked grain as a separate ingredient in the final dough, whereas in WGB it is included in the soaker. Reinhart's soaker consists of equal weights of water and grains, including the cooked grain. Thus, the cooked grain is, as it were, hydrated twice – once when it is cooked and again in the soaker. I think it is this change that accounts for the dough being so much wetter than the book says it should be. Why wasn't this caught in testing the recipes for the book? I don't know. If anyone else has a better and more complete explanation of this seemingly common issue with this formula, I would certainly like to hear it.

Reinhart's formula has a surprisingly high percentage of instant yeast, and I found that the dough expanded during bulk fermentation and proofing significantly faster than expected. In fact, by time I baked the loaf, it was so puffy, I was afraid I had over-proofed it, and it would collapse. So, I scored it very shallowly. Although it did not deflate, it had very little oven spring.

I sliced the loaf after it had cooled for about 2 hours. The crust was firm. The crumb was rather dense but reasonably well-aerated and moist. The flavor was complex and intense, with a strong whole wheat flavor and a strong honey background. My first impression was that this was a bread that one could make a meal out of, at least from a nutritional perspective. As expected, the flavors mellow and meld by the day after baking. It does make very good toast, but I believe I prefer Reinhart's “100% Whole Wheat Bread” to this whole wheat Struan. I plan on trying the “transitional” version of the Struan in WGB and, perhaps one of the earlier versions that got such wonderful reviews.

If I make this version again, I will 1) treat the cooked grains as Reinhart did in earlier versions of Struan, and 2) reduce the amount of instant yeast by a third to a half.

I think my wife would be perfectly happy if I just kept making this version. She loved it. This bread is so full of flavor and is so substantial, the versions with lesser proportions of whole grain flour may taste dull. We will see.

David

dmsnyder's picture
dmsnyder

Sourdough Honey Whole Wheat with Multi-grain Soaker 

May 17, 2013


This is my third version of a whole wheat, multi-grain bread based on my San Francisco-style Sourdough formula. I think this one is a keeper.

Compared to the last version:

  1. The soaker was hydrated at 100% rather than 125%. Also, it was soaked for less than an hour rather than overnight. This resulted in a very sticky, slack dough but not a goopy one. It behaved like a 75-80% hydration dough, generally.

  1. The soaker was mixed into the dough right after the autolyse, rather than being added after the gluten was well-developed. I had some concern that this might compromise the crumb structure, but I am quite happy with what I got. (See photos, below.)

  2. I reduced the percentage of honey slightly.

  3. I did not retard the dough in bulk but, rather, as formed loaves.

  4. I did not leave the loaves in the turned off oven but removed them to the cooling rack immediately after they were fully baked. This step is still a good option, if you want a drier, harder crust.


Total dough

Bakers' %

Wt (g)

AP flour

34

192

Bread flour

14

79

Medium Rye flour

2

14

WW Flour

50

281

Water

93

528

KAF “Harvest Grains”

18

100

Honey

3

17

Salt

1.9

11

Total

225.9

1222


Stiff levain

Bakers' %

Wt (g)

Bread flour

95

79

Medium rye flour

5

11

Water

50

45

Stiff starter

80

66

Total

230

201


  1. Dissolve the starter in the water. Add the flours and mix thoroughly until the flour has been completely incorporated and moistened.

  2. Ferment at room temperature for 16 hours.


Soaker

Bakers' %

Wt (g)

KAF “Harvest Grains”

100

100

Water (Boiling

100

100

Total

200

200

  1. Just before mixing the autolyse, put the “Harvest Grains” blend in a medium-sized bowl and pour the boiling water over it. Cover.

  2. Allow to soak during the autolyse (see below).


Final dough

Wt (g)

AP flour

169

WW Flour

274

Water

350

Salt

11

Honey

17

Soaker

200

Stiff levain

201

Total

1222

Method

  1. In a stand mixer, mix the flours and water at low speed until they form a shaggy mass.

  2. Cover and autolyse for 30 minutes

  3. Add the salt, honey, soaker and levain and mix at low speed for 2-3 minutes, then increase the speed to medium (Speed 2 in a KitchenAid) and mix for 6 minutes. Add flour and water as needed. The dough should be rather slack.

  4. Place the dough in a lightly oiled bowl and cover tightly.

  5. Ferment at 70º F for 2 1/2 to 3 hours with a stretch and folds in the bowl every 30 minutes for the fist 2 hours.

  6. Divide the dough into two equal pieces.

  7. Pre-shape as rounds and rest, covered, for 10 minutes.

  8. Shape as boules or bâtards and place in bannetons. Place bannetons in plastic bags.

  9. Proof at room temperature (68-70º F) for 1-2 hours.

  10. Cold retard the loaves overnight.

  11. The next morning, proof the loaves for 2-3 hours.

  12. 45-60 minutes before baking, pre-heat the oven to 480º F with a baking stone and steaming apparatus in place.

  13. Transfer the loaves to a peel. Score the loaves as desired, turn down the oven to 460º F, steam the oven, and transfer the loaves to the baking stone.

  14. After 15 minutes, remove the steaming apparatus, and turn down the oven to 435º F/Convection. (If you don't have a convection oven, leave the temperature at 460º F.)

  15. Bake for another 15 minutes.

  16. Transfer the loaves to a cooling rack, and cool thoroughly before slicing.


The crust was chewy. The crumb was not at all gummy but was very moist when the bread was first sliced the morning after baking. The flavor was that of good whole wheat. There was little noticeable sweetness. There was a moderately prominent sourdough tang. The bread was tasted plain and toasted with almond butter and jam. It was quite delicious. Probably because I was tasting it about 16 hours after it was baked, the flavor was more balanced than that of the last version which I first tasted just 2 to 3 hours after it was baked. 

I will be tasting this bread over the next few days. I expect it to stay moist for at least 3 or 4 days.

Yesterday, along with these breads, I also baked a San Joaquin Sourdough bâtard. 


And I used 400g of the SJSD dough to make a focaccia with garlic, fresh rosemary and zucchini.

Focaccia, readty to bake

David

Submitted to YeastSpotting

dmsnyder's picture
dmsnyder

Sourdough honey whole wheat multi-grain ciabatta rolls and boule

May 11, 2013

After last week's San Francisco-style Sourdough with 30% whole wheat, I considered a number of modifications of the formula. The leading candidates were 1) increasing the whole wheat to 50%; 2) adding some honey or other sweetener; 3) adding a mixed grain/seed soaker. In the background but not very far back was my wife's request that I make her some soft sandwich rolls that were low profile. When she gets a rather spherical roll, she cuts a horizontal section out of the middle.

 So, starting with the my San Francisco-style Sourdough formula, I attempted to accomplish all of the above in one swell foop.

I increased the whole wheat to 50% of the total flour. That was the easy part. I had bought a mix of grains and seeds called “Harvest Blend” from KAF and decided to use that as a multi-grain soaker. I planned to add this at 18% of the total flour weight. I had no clue as to the appropriate amount of water to use for the soaker, so I used 125% of the weight of the Harvest Blend, which is what some similar multi-grain soaker's in Hamelman's Bread calls for. I added 4% honey, on a similar basis.

This all seemed quite reasonable to me. I thought this new formula ought to make a pretty tasty loaf and also good sandwich rolls, if I could figure out how to make them as flat as my wife wanted.

What's the saying? “Nothing ventured, nothing gained.” Or is it, “No guts, no glory?” Or maybe it's Pat's, “Sometimes you gets the bear, and sometimes the bear gets you.” Well, there were times when I thought I felt the hot breath of that bear on the back of my neck.

After letting the levain ferment overnight and the soaker soak, they both looked very good in the morning. So I mixed the flours and water and let them autolyse for 30 minutes. I then added the salt and levain. I decided to hold back the soaker until the dough had pretty good gluten development. As I mixed, I thought the dough was on the dry side, so I added some water - maybe 30 cc's. After mixing for 6-7 minutes, I added the soaker. Yikes! There was 20 to 30 cc's of free water hiding underneath the soaked grains and seeds. When I turned the mixer back on, my dough was severely goopy. As I continued mixing, the dough was looking like 90+% hydration rather than the 78-80% hydration I had intended. So, my plans for the dough changed.

Rather than fermenting for 2-3 hours with a couple stretch and folds, then shaping and retarding to bake the next day, which is what I had planned, I treated the dough more like a San Joaquin Sourdough. I did S&F's in the bowl every 30 minutes for 2 hours then retarded the dough. The next day, I preheated the oven and divided the dough into one 500 g piece, which I shaped into a boule and retarded to bake the following day. The rest I scaled to 4 oz and “shaped” as ciabatta rolls, which is to say, by simply folding the pieces like envelopes.


Rolls proofing

I proofed the rolls for about 50 minutes, as the oven was heating. I then baked them at 480ºF with steam for 10 minutes and then for another 5 minutes at 455ºF/Convection bake in a dry oven.

After a night in the refrigerator, the boule was warmed at room temperature for a couple hours while my wife roasted some beets and my baking stone pre-heated. I baked the boule at 460ºF with steam for 15 minutes then for another 15 minutes at 435ºF/convection in a dry oven. The loaf remained on the baking stone with the oven off and the door ajar for another 20 minutes before transferring to a cooling rack. I let the loaf cool for several hours before slicing, thinking that this very wet dough need some “curing” time like a high-hydration, high-percentage rye bread does.


For both the rolls and the boule, the crust was soft and chewy. The crumb was very moist and almost gummy, but not really. The aroma and flavor were very assertive. Whole wheat predominated with very apparent poppy seed and less apparent sunflower seed flavors. There was a definite honey flavor to me, but my wife did not find it too strong. We made toscano salami sandwiches with the rolls and had slices of the boule with sweet butter with a dinner of salmon cakes and a salad.

The boule was placed in a plastic bakery bag, and slices were eaten both toasted and un-toasted over the following 4 days. The bread stayed moist but became less sticky. The flavor became more mellow and balanced, to my taste, over time. I enjoyed it more (un-toasted with Cotswold cheese) on day 4 than when “fresh.”

I thought both the rolls and bread were pretty good and improved after the first day – definitely worth making again with some modifications. The thing is, my wife thought they were fabulous. She absolutely loved the flavor.

The next steps will be to decrease the hydration and either eliminate the honey or substitute another sweetener.

David


dmsnyder's picture
dmsnyder

San Francisco-style Sourdough Bread with Increased Whole Wheat

by David M. Snyder

May 5, 2013


Sometimes another TFL member comments favorably on one of my breads, then goes on to say how they have modified my formula or methods. Sometimes these changes seem to be for the member's convenience or to substitute a preferred method for the one I used. Sometimes I feel the changes are of small consequence. The one alteration that consistently intrigues me is an increase in whole grains in a formula of mine that is basically a white bread.

Today, I baked a couple loaves of my San Francisco-style Sourdough Bread with two modifications: I increased the whole wheat content to 30% of the total flour, and I increased the hydration to 76%. I expected this increase in hydration to more than compensate for the increased water absorption of the whole wheat flour. I used a very finely milled organic whole wheat flour from Giusti's. I find this flour has much less cutting of gluten strands than most whole wheat flours. I can get a more open crumb using this flour.

I also made a couple loaves of the San Francisco-style Sourdough without the increased whole wheat.


Total dough

Bakers' %

Wt (g)

AP flour

54

304

Bread flour

14

79

Medium Rye flour

2

11

WW Flour

30

169

Water

76

428

Salt

1.9

11

Total

177.9

1002


Stiff levain

Bakers' %

Wt (g)

Bread flour

95

79

Medium rye flour

5

11

Water

50

45

Stiff starter

80

66

Total

230

201


  1. Dissolve the starter in the water. Add the flours and mix thoroughly until the flour has been completely incorporated and moistened.

  2. Ferment at room temperature 6-8 hours. (Until about tripled in volume, domed and very well aerated.)


Final dough

Wt (g)

AP flour

281

WW Flour

162

Water

350

Salt

11

Stiff levain

201

Total

1005


Method

  1. In a stand mixer, mix the flour and water at low speed until it forms a shaggy mass.

  2. Cover and autolyse for 30 minutes

  3. Add the salt and levain and mix at low speed for 1-2 minutes, then increase the speed to medium (Speed 2 in a KitchenAid) and mix for 5 minutes. Add flour and water as needed. The dough should be rather slack. It should clean the sides of the bowl but not the bottom.

  4. Transfer to a lightly floured board and do a stretch and fold and form a ball.

  5. Place the dough in a lightly oiled bowl and cover tightly.

  6. Ferment at 76º F for 21/2 to 3 hours with a stretch and fold at 50 and 100 minutes.

  7. Divide the dough into two equal pieces.

  8. Pre-shape as rounds and rest, covered, for 10 minutes.

  9. Shape as boules or bâtards and place in bannetons. Place bannetons in plastic bags.

  10. Proof at room temperature (68-70º F) for 1-2 hours.

  11. Cold retard the loaves overnight.

  12. The next morning, proof the loaves at 85º F for 2 to 3 hours. (If you can't create a moist, 85 degree F environment, at least try to create one warmer than “room temperature.”

  13. 45-60 minutes before baking, pre-heat the oven to 480º F with a baking stone and steaming apparatus in place.

  14. Transfer the loaves to a peel. Score the loaves as desired, turn down the oven to 460º F, steam the oven, and transfer the loaves to the baking stone.

  15. After 12 minutes, remove the steaming apparatus, and turn down the oven to 435º F/Convection. (If you don't have a convection oven, leave the temperature at 460º F.)

  16. Bake for another 15-18 minutes.

  17. Transfer the loaves to a cooling rack, and cool thoroughly before slicing.


After cooling, the loaves had a chewy crust and chewy crumb. The flavor was wheaty and moderately sour when first tasted. I am looking forward to trying this bread toasted tomorrow for breakfast.

At the moment, I am considering further modifications such as a bolder bake, adding a bit of honey and increasing the whole wheat to 50%.  

David

dmsnyder's picture
dmsnyder

Powerless Baguettes: Not pretty but quite tasty.

April 10, 2013

A couple days ago, my wife pointedly remarked that there were only two baguettes left in the freezer. This was a fair warning, so I built up a liquid levain and made a batch of SJ SD dough. This afternoon, I divided, pre-shaped, proofed, slashed and loaded 4 baguettes in the oven. The timing was perfect to have them out of the oven in time to get to the farmer's market when it opened and then to enjoy fresh-baked baguette with dinner.

Eight minutes into a planned 20-minute bake, our power went out. The oven is electric. What to do? Well, I removed the steaming skillet as usual at 10 minutes. At 20 minutes, the loaves were browned somewhat, but still pretty pale. I gave them another 7 minutes in the cooling oven, at which point they were still rather pale but had a nice hollow thump and were over 205ºF internally. So, I took them out and let them cool.


The oven spring seemed pretty normal. The bloom was a bit crazy, but I don't know whether that was my scoring or an effect of the cooling oven after the first 8 minutes. The crust was pale and kind of soft, but I can't say the crumb structure suffered.


The crust did have some crispness but was more chewy. The crumb was fully baked. It was chewier than usual. The flavor was excellent – about the same as the last SJ SD Baguette bake, currently featured on the home page. I ate half a loaf with dinner.

David

dmsnyder's picture
dmsnyder

Today's bake was the Pain au Levain from Hamelman's Bread. It is the "whitest" bread I bake - the opposite end of a spectrum from the 80% rye I recently posted - yet I also characterize it as a "real bread." 

For some reason, this 3-cut scoring of a bâtard is more challenging to me than the 5 to 7-cut scoring of a baguette. This is my best attempt yet.

These loaves sang long and loudly during cooling. The crust had some nice crackles.

A nice, open crumb, too.

The 1-cut loaf was gifted to friends, along with a big hunk of the 80% rye. We enjoyed the other pain au levain with our dinner of chicken fricasee and Swiss chard. The crust was crunchy, and the crumb was chewy. The flavor was nice, sweet, wheaty pain au levain with no perceptible sourness.

David

dmsnyder's picture
dmsnyder

It has been almost a year since I last baked this bread. (See Three-Stage 80% Sourdough Rye Bread from Hamelman's "Bread" for the formula and method.) It is very similar to the 70% rye in Bread and to "Hansjoakim's Favorite 70% Rye," both of which are delicious. I do believe that this bread, which uses the "3-stage Detmolder" technique for elaborating the rye sour, yields a slightly better flavor than any other high-percentage rye breads I have baked. The Brød and Taylor Proofing Box makes the necessary temperature control easy. 

I slightly over-proofed this loaf. By time I transferred it to the peel for loading, some of the dough stuck to the bottom of the brotform. The dough had a consistancy reminiscent of chocolate mouse. For fear it would stick to the peel, even with a heavy dusting of semolina, I transferred it to parchment paper. Miraculously, the loaf kept it's shape. It didn't have much oven spring, but it didn't collapse. I baked this 1800 g loaf at 490 dF for 10 minutes, the first 5 with steam. I then lowered the temperature to 410 dF and baked for another 60 minutes. This resulted in a darker crust than my previous bake and a better crust consistancy and flavor, to my taste. While the profile was lower than my previous bake, the end result was more than satisfactory.

After cooling for 4 hours, I wrapped the loaf in baker's linen and let it cure for about 40 hours before slicing it.

The crust was chewy and the crumb was tender and almost creamy. The flavor was sweet and earthy with the barest sour tang. It was just delicious plain and with a thin spread of sweet butter. I'm hoping I can get some cold smoked salmon to go with this tomorrow, if not, it's pretty darned good with pickled herring too.

I know the recipes for 3-stage Detmolder rye breads look rather formidable on first reading, but they are really not too demanding, if you plan the schedule of rye sour elaborations to fit other demands and you can get comfortable handling high-percentage rye doughs. (Shaping with a wet board and wet hands is highly recommended!) The results are certainly worth the challenge. If you asked for a few examples of "real bread" - the antithesis of supermarket, cotton wool, pre-sliced, packaged in plastic white bread - this would certainly be among them.

Happy baking!

David

dmsnyder's picture
dmsnyder

San Joaquin Sourdough Baguettes

April 1, 2013

My San Joaquin Sourdough originated in Anis Bouabsa's baguettes which had won the prize for the best baguette in Paris in 2008. Bouabsa's baguettes departed from convention in utilizing a 21 hour retardation after bulk fermentation and before dividing and shaping. Jane Stewart (Janedo on TFL) and I initially modified Bouabsa's formula by adding a bit of rye flour and some sourdough starter for flavor. I then omitted the commercial yeast altogether and began using the modified formula to shape as bâtards. Over time, I have tweaked the formula and method in various ways, but have settled on the current one as providing the best product.

Today's bake takes the San Joaquin Sourdough back to its roots, so to speak. I used my current formula and method to make San Joaquin Sourdough baguettes. I am very happy with the results.


Total ingredients

Wt (g)

Bakers %

AP Flour

479

89

WW Flour

33

6

Medium rye Flour

29

5

Water

392

72

Salt

10

1.8

Liquid starter

17

3

Total

960

176.8

9.2% of the flour is pre-fermented

Liquid Levain ingredients

Wt (g)

Bakers %

AP Flour

29

70

WW Flour

8

20

Medium rye Flour

4

10

Water

42

100

Liquid starter

17

40

Total

100

240


Final dough ingredients

Wt (g)

AP Flour

450

WW Flour

25

Medium rye Flour

25

Water

350

Salt

10

Liquid levain

100

Total

960


Method

  1. Mix the levain by dissolving the liquid starter in the water, then add the flours and mix well. Ferment at room temperature, covered tightly, until the surface is bubbly and wrinkled. (8-12 hours)

  2. Dissolve the levain in the water, add the flours and mix to a shaggy mass. Cover and autolyse for 30 minutes.

  3. Add the salt and mix to incorporate.

  4. Transfer to a clean, lightly oiled bowl and cover tightly.

  5. Bulk ferment for 3-4 hours with stretch and folds in the bowl every 30 minutes for the first 2 hours, then a stretch and fold on the board after 2.5 hours. The dough should have expanded by about 50% and be full of small bubbles.

  6. Refrigerate the dough for 18-24 hours.

  7. Take the dough out of the refrigerator and transfer it to a lightly floured board.

  8. Divide the dough into 4 equal pieces and pre-shape as logs or round.

  9. Cover the pieces and allow them to rest for 60 minutes.

  10. Shape as baguettes and proof for 45 minutes, covered.

  11. Pre-heat the oven to 500ºF with a baking stone and steaming apparatus in place.

  12. Transfer the baguettes to your peel. Turn down the oven to 480ºF. Score the loaves and load them onto your baking stone.

  13. Bake with steam for 10 minutes, then remove your steaming apparatus and continue to bake for another 10-12 minutes. (Note: After 10 minutes, I switched my oven to convection bake and turned the temperature down to 455ºF.)

  14. Remove the loaves to a cooling rack, and cool for at least 30 minutes before serving.


When tasted about 2 hours after baking, the crust was crunchy and the crumb was soft. The flavor was complex, with a caramelized nuttiness from the crust and a sweet, wheaty flavor from the crumb. There was some mild acidity but no discernible acetic acid tanginess. These are among the best-flavored sourdough baguettes I have ever tasted. Very yummy fresh baked and with great sandwich, crostini, toast and French toast potential.

David

Submitted to YeastSpotting

Pages

Subscribe to RSS - dmsnyder's blog