At SFBI, we did a 100% Spelt bread using dry instant yeast. To soften the bitterness taste of spelt flour, we did a poolish as the preferment for this bread. The result was very pleasing. Two things about that spelt bread I found worthy of a mention from my own perspective:
(1) The weak gluten in spelt flour is such that its mixing technique needs a bit of attention. Its protein may be high (14.2% according to the bag of my organic spelt wholemeal flour), but a lot of it is not gluten forming protein. However, while it is a weak flour, its gluten will happen fast (sounds counter-intuitive, doesn't it); and therefore, we need to mix faster when we are working on the spelt flour. Towards that end, at SFBI, we used the double hydration method to try to get the gluten developed at an early stage before all recipe water is added. (For a description of double hydration, please see my post on Chocolate Sourdough) Also note that to mix faster does not mean that we use a vigorous mixing or kneading motion because spelt is a fragile flour.
(2) The spelt poolish after it's been fermented shows a lot of foams on the surface. The froth resulted from the weak flour unable to trap in gasses produced by the yeasts as seen below:
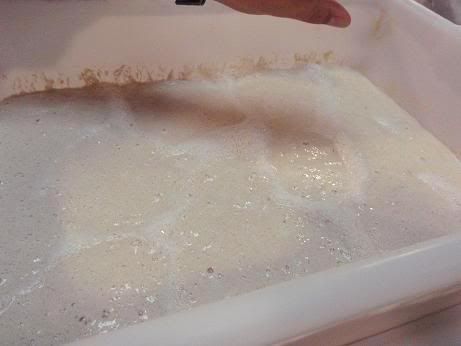
Didier Rosada's thumb, Artisan III at SFBI, August 2009
Theory aside, I have had no luck with the double hydration method using my bread machine. So, with this 100% Spelt Sourdough, I used my old trusted hand method. As well, I made another Pain le Levain with 20% Spelt flour that I posted yesterday to practice on my scoring and to see if I could get better grigne. I suspected that the scoring in that earlier bake was difficult because I inadvertently incorporated too much water into the dough when I was stretching & folding my doughs with wet hands (the dough ended up much higher hydration than Hamelman's 68%). I have found grigne almost not possible with wetter doughs.
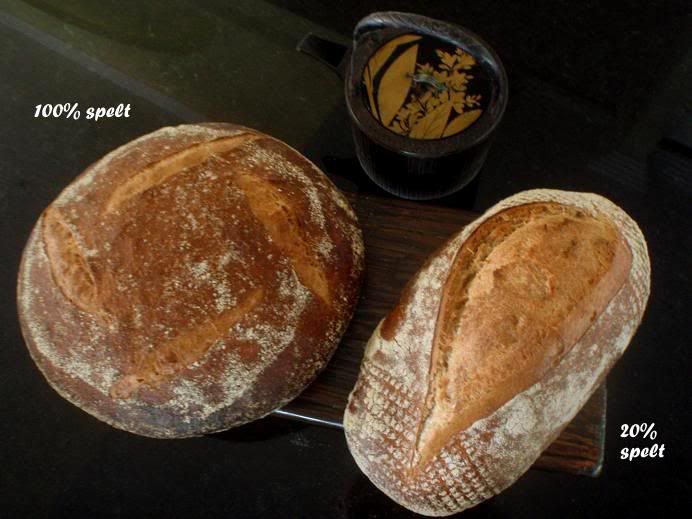
So, here are the two spelt sourdoughs:
My Formula for 100% Spelt Sourdough
First levain build - day 1, night or early evening
- 3 g starter (I used my usual white starter at 75% hydration, but at this quantity, any starter you have at any hydration will do.)
- 10 g spelt flour (I used 90% white spelt flour and 10% whole spelt flour)
- 11 g water
Second levain build - day 2, morning
- 24 g starter (all from the first levain build)
- 48 g spelt flour (I used 90% white spelt flour and 10% whole spelt flour)
- 48 g water
Final levain build - day 2, late night
- 120 g starter (all from the second levain build)
- 155 g spelt flour (I used 90% white spelt flour and 10% whole spelt flour)
- 155 g water
Note: as the ratio of flour to starter is less than 1. 5 times, if your room temperature is very warm, you'll need to do this levain built as late as possible for the next day's dough mixing.
Final dough - day 3, very early morning
- 430 g Spelt starter @ 100% hydration (all from the final levain build)
- 224 g water
- 387 g organic white spelt flour (90% of final dough flours)
- 43 g organic wholemeal spelt flour (10% of final dough flours)
- 12 g salt
- Extra spelt flour for dusting
Total dough weight 1.1 kg and dough hydration 68%
- In my big mixing bowl, I first put in the starter, then poured a little of the formula water, stirred to combine, then a little more of the water, stirred to combine, then a little more of the water, and stirred, until all water was thoroughly mixed into the starter. (I have found this way my starter works very well for me; it is as if all of the little microorganisms are woken up to do their morning aerobics.)
- I put in the rest of the ingredients and stirred them just until they were combined and no dry flour was visible; more work than that at this stage was not necessary.
- Autolyse 25 minutes
- First set of stretch & folds (I did 100 strokes, more than my usual, to try to build up dough strength. I wet my hands to do the S&F's so the dough doesn't stick to my fingers.)
- After 30 - 40 minutes, the 2nd set of S&F's was done (I did another 100 strokes. The dough felt silky and smooth, and quite elastic (there was good gluten development.)
- After another 30 - 40 minutes, I did the 3rd set of S&F's (100 strokes again).
- Dusted some spelt flour on the work bench.
- 30 minutes from the last S&F's, I pre-shaped the dough by way of a minimalist S&F's so that I could pick up the whole dough easily with one hand and dump it on the floured surface (right side was against the flour, ie, seam side was up). Cover.
- Rest for 15 - 20 minutes. In the mean time, a linen lined basket was dusted with flour.
- Shaped the dough first by gathering the edges of the dough to the centre, turned the dough over (so that the seam side was now down), then shaped it into a very tight ball. Placed it in the proofing basket. Up to this point, bulk fermentation had been about 2 and a 1/2 hours.
- Proof for another 2 hours (and in the mean time, I planned when the oven was to be turned on for pre-heating).
- Bake with steam at 230C / 450 F for 20 minutes and another 25 minutes at 220 - 210 C.
It was quite a cold morning (for a spring time) when the dough was bulk fermenting and proofing. While I was putting on a sweater to keep myself warm, it never entered into my mind that my dough might need extra flour time because of the low temperature. It was almost as if that I wanted to behave myself by sticking to a set formula - ie, bulk fermentation 2 and 1/2 hours and proofing 2 hours. This is the reason why formulas don't always work because there are a lot of details that are not spelled out but which are critical. A time-table of bulk fermentation of x number of hours and proofing of x number of hours is on the basis of a certain dough temperature and ambient temperature perimeter as well as the amount of the pre-fermented flour as a percentage of the total flours, etc. While we may know those base temperatures and percentages very well, we may not be quick enough to adjust for our scenarios, which incidentally is never exactly the same as the last one.
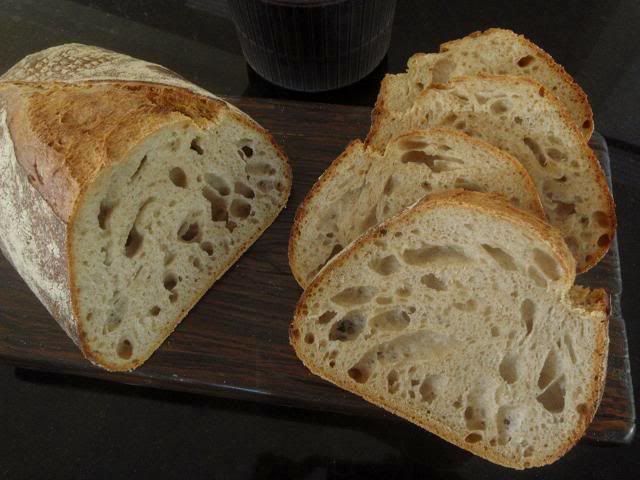
Because of the low temperature, the fermentation should have been at least 1/2 to one hour longer. The crumb could have been more open, I believe, if the yeasts in the levain had been given a longer time to work. The effect may be more apparent in the 20% spelt levain bread below (and I would like to come back to this point again).

Despite the above, this 100% spelt levain bread has a lovely crumb flavor. Because of the way the levain was built up and its hydration, the acidity is very well balanced with the nutty flavour of the spelt flour. I didn't taste the bitterness, very often associated with spelt. The sourness is less than medium strength to me.
My formula for the 20% Spelt levain bread - please refer to my post yesterday.
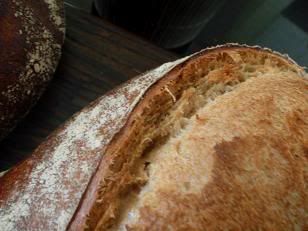
To adjust for the fact that I normally dip my hands in water before I stretch & fold the dough, I did 1% less hydration in this dough. As well, I did 100 strokes at each set of S & F's, trying to build up more dough strength for the "grigne" that I was looking for (but was unable to get in that last bake). These two being the only adjustments, see how different the profile and the crust of this bread look compared to those posted yesterday:
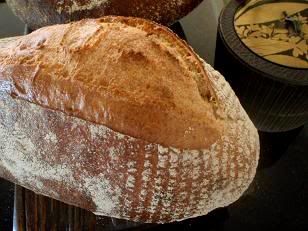
When the dough was loaded onto the baking stone, it was about 3 - 4 cm in height; it rose to about 12 - 13 cm in its oven spring. I think the 100 strokes of S&F's were doing the trick.
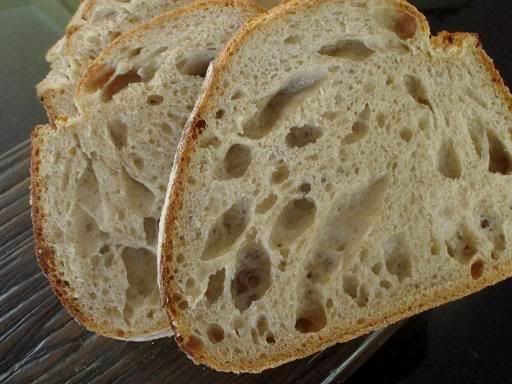
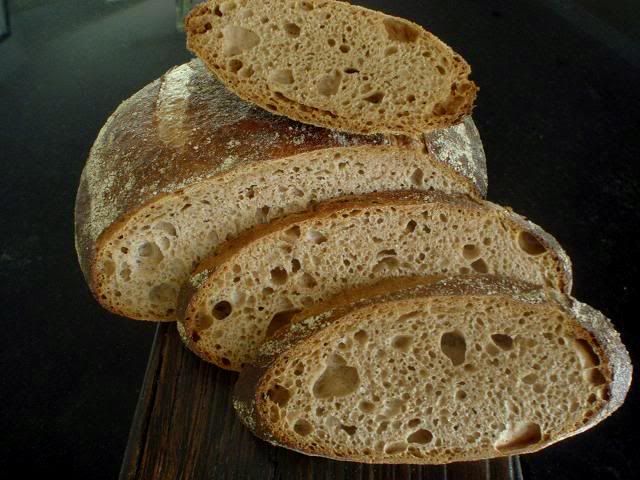
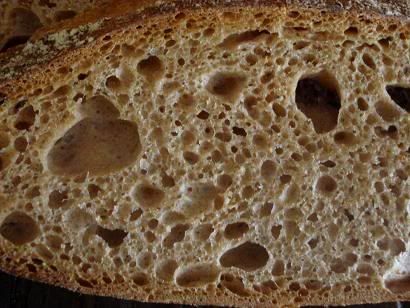
For signs of good fermentation, I look at the cell structure of the crumb, especially the area where there was no visible big holes - I think the parts where there are no holes tell more story about the fermentation than the area where there are a lot of holes. In the crumb shots above:
(1) where there are no holes (big or small), you see that the cell structure is quite dense; and
(2) where there are holes, they are not all there to register the presence of yeast fermentation, but they could possibly be there due to the way my hand stretch and folds the dough - it is possible that I had simply folded in too much air than I should have.
The somewhat dense cell structure (where there are no holes) tells me that the fermentation probably did not happen at the optimum temperature, given the time in which the levain had to work. From this I learned that, even with the same formula, each bread is a new situation to be assessed independently in terms of its action plans regarding dough strength and fermentation.
It is a flavorful bread just the same with very mild acidity. If I could get yesterday's cell structure with today's crust and grigne, it would be a near perfect world for me.
Shiao-Ping


