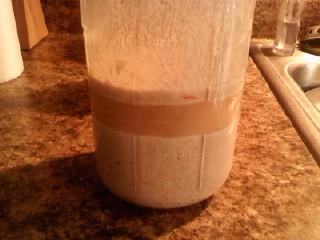
So first I should state that I am new to sour dough and starters. I had followed refrigerating instructions given to me by the friend who provided the mother to begin with. Upon removing the starter from the fridge I fed it whisked it and left if with a loose lid on the counter to rise and come to room temp. Is this normal? What do I do with the hooch? any advise or help would be great. I have attached a photo of the hooch production in a little over 10 hours.
Recently I experienced McGrath's Fish House sourdough bread and found it to have a very light crumb which I found to be very delightful. Does anyone have their recipe or a duplicate? I have Googled the net with no luck.
Yesterday was my first time attempting anything other than enriched sandwich breads, and I decided to just go ahead and try the French bread recipe from BBA. I made the pate fermentee the night before, and then took it out of the fridge to let it warm up for an hour.
Hi my name is Linda and I am new to this. I have been cooking and baking for years. But I real never got into the bread baking part of it. I now have the time my kids have moved out. I love this site I check on this site every day. My question is what are the best books for me to buy? Also what tools do I need to get started?
A while ago Debra Wink asked for information on English Muffins.
I attach details below, mostly from a Practical Class with my Foundation Degree students from last academic year.
The attached video is from very early days, and was prepared entirely by the students. You can hear me advising other students in the background; that's how I know I wasn't directly involved.
Recipe specifications are attached [many thanks to my baking mentor and tutor during my time studying for my bakery qualifications for letting me have a commercial recipe specification to use], and I will dig out some photos and attach manufacturing instructions below.
Here goes:
CRUMPETS
Material
Formula [% of flour]
Recipe [grammes]
Strong Flour
100
500
Salt
2
10
Yeast
6
30
Water
110
550
TOTAL
218
1090
Bicarbonate of Soda
0.3
1.5
Cold Water
28
140
TOTAL
246.3
1231.5
Yields 20
Set plate to Mk4. and pre-heat. The temperature of the hot-plate should be just below 200*C
Method:
Sieve together the flour and salt.
Dissolve the yeast in tempered water [30°C]
Combine these 2 in a mixer and beat on first speed for 2 minutes to form a batter
Beat on second speed for 6 minutes
Cover the batter and keep warm for 1 hour bulk fermentation
Dissolve the bicarb in the cold water and mix this solution well through the batter.
Use immediately, piping the mix into lightly-greased hoops, ready-placed onto the prepared griddle surface. Hot-plate should be clean and un-greased
English Muffins
Material
Formula [% of flour]
Recipe [grammes]
1. Sponge
Strong Flour
50
750
Water
30
450
Yeast
0.5
7.5
TOTAL
80.5
1207.5
2. Final Dough
Sponge
80.5
1207.5
Strong Flour
50
750
Salt
2
30
Milk Powder
8
120
Yeast
8
120
Butter
10
150
Water
30
450
TOTAL
188.5
2827.5
makes 40 muffins @ 65g
This is based on Rose Levy Barenbaum's recipe if I'm not mistaken; one of my Foundation Degree students was very keen to learn how to make these, so we did the developmental work together, and he had a go at making them; quite successfully I believe.
We made the sponge on an overnight basis. This would mean the sponge would be cool, so final dough water would need to be tempered accordingly to achieve a DDT of around 30*C. I would refer you to Walter T. Banfield's text "Manna; A Comprehensive Treatise on Bread Manufacture." London: Maclaren. 1947, which states one essential to success as warming the flour. Elizabeth David's English Bread and Yeast Cookery has some useful comments made over the years on English muffins too.
It is strange how we ended up basing our recipe on the work of a modern day American author, rather than on the works discussed above. I am pretty sure it is because we wanted to use a pre-ferment to make these, and all the recipes I came across used bulk fermentation. From my own studying time 6 years ago, working for my bakery quals, we definitely made these with a ferment. Given that my FdA students were working on complex fermentation methods, I specifically asked for English Muffins made using an Overnight sponge. this is what we came up with.
The dough should be soft, although hydration in the formula does not look alarmingly high. But, given you have plate-work, be wary of the dough being too soft; if this is the case, you will end up with crumpets, as shown in the first recipe. These are made from a batter which is piped onto the griddle: see video.
It is just a case of combining the sponge with all other ingredients and mixing to form a soft, warmish, and well-developed dough. I am aware American flours generally have a higher level of hydration, but please note the flour I used in this formula is strong, and one of the best commercial specs available over here. It is milled from 100% Strong Canadian Wheat.
Debra Wink indicated wanting to experiment with Wholegrain. I am sure this would work well, although I have only ever come across these goods made with all-white flour. The essence of the product is to have a soft and chewy "breadcake" like texture, where the dough rises substantially on the plate thanks to conduction. That is why we wanted to use a pre-ferment rather than a bulk-fermented straight dough. So, wholegrain flour: yes with the following provisos: the wholemeal would need to be strong, and finely milled. A brown flour, say of 85% extract would be excellent. Do not go above 50% brown flour in the flour "grist". The water content will need to be adjusted upwards to take account of extra absorption from the bran. Obviously, the formula can be adapted to use milk rather than the water/milk powder combination.
The dough should have a resting time of upto 30 minutes, then scale and divide, and mould each piece round. Dust the bench with rice cones, flatten slightly and rest the dough pieces on the rice dust, covered, for 45 minutes to an hour. Cook in batches on the griddle; they should take about 10 minutes, being flipped over half way through cooking. The gritty rice cones on the outside of the muffin are a wonderful contrast to the soft and chewy centre. The dough should rise slowly on the griddle as the muffin cooks; that was why we sought to use a pre-ferment in the formula.
A week ago, I bought my first rye and whole wheat flour, they were imported from Germany. I could not understand a word on the description, but I was determined to try my hand on these flour. Here I am trying my first rye and whole wheat bread. Honestly, I have no idea what it is suppose to look like or taste like, as I'm not a fan of rye bread usually, I'm a white loaf freak. Surprisingly, this recipe is easy, and the taste is really good. I still need to work on my shaping and proofing timing though.
It;s a wet dough to work with, I'm now aching all over from the kneading, 3 different types of kneading just to get dough ready. Wish I have a machine to help me with. I'm still waiting for my birthday present...
The taste is pretty good though, seems like the poolish had helped with this outcome. Is it suppose to look like that? Unfortunately, Barry's artisan did have any pictures of the dough he made, and I found many rye and whole wheat that are more dense. Am I getting this right?
I was given a 25 lb. sack of bleached bread flour. I always bake my bread using unbleached AP or Bread flour. My question, What will the difference in quality be if I use the bleached flour for my bread baking? koka2
Rubaud's bread is made with 3 very firm levain builds, the final being incorporated in his final dough. He uses a flour mix with 70% AP flour and the remaining 30% a mix of whole wheat, spelt and rye flours. Remarkably, he grinds the flours to feed his levain fresh for each build, and he uses the same flour proportions for each levain build as used in his final dough. Not having a grain mill, I used store-bought flours. I measured out each flour for each build. If I make this bread again, I would make one batch of mixed flour for all the builds and the final dough. This would save time and also be more precise, given the very small amounts of flour in the levain builds.
Note that MC's interviews also indicate Rubaud salts his levain builds at 1% of the flour weight, in order to control their speed of ripening. I did not do this.
My formula is taken from Shiao-Ping's calculations which were taken from MC's interviews. I divided her quantities in half and, rather than a miche, made two smaller (480 gm) bâtards. Rubaud mixes his dough by machine. Shiao-Ping mixed her dough entirely by hand. I started my mixing in a stand mixer, but continued developing the gluten by hand, as described below.
First build
Ingredient
Amount (gms)
Ripe levain (stiff)
3
AP flour
5
Whole wheat flour
1
Spelt flour
0.5
Rye flour
0.5
Water
4
Total
14
Second build
Ingredient
Amount (gms)
Ripe levain (stiff)
14
AP flour
10.5
Whole wheat flour
2.5
Spelt flour
1.5
Rye flour
0.5
Water
8
Total
37
Third build
Ingredient
Amount (gms)
Ripe levain (stiff)
37
AP flour
35
Whole wheat flour
9
Spelt flour
4.5
Rye flour
1.5
Water
28
Total
115
Notes for levain builds
The first levain was made with my usual firm sourdough starter which I feed 1:3:4 (starter:water:flour) with a flour mix of 70% AP, 20% Whole wheat and 10% Whole rye flours.
To mix each build, dissolve the firm starter in the water in a small bowl. (I use a small dough whisk.), then add the flours and mix thoroughly into a ball.
The first build was fermented for 10 hours, the second and third for about 8 hours each. This was in a cool kitchen, so your times my vary with the activity of your starter and the ambient temperature.
Final dough
Ingredient
Amount (gms)
Ripe levain (stiff)
115
AP flour
322
Whole wheat flour
82.5
Spelt flour
41.5
Rye flour
14
Water
377
Salt
10
Total
962
Method
Mix the flours and the water. Cover and let it sit to autolyse for 20-60 minutes.
Divide the starter into about 6 pieces and add them to the autolyse. Sprinkle the salt over all and mix thoroughly.
In a stand mixer, mix with the dough hook on Speed 2 for about 10 minutes. There should be some gluten development, but the dough will be very gloppy. It will not clean the sides of the bowl.
Transfer the dough to an oiled bowl. Cover the bowl tightly.
After 20 minutes, stretch and fold in the bowl for 30 strokes. Cover the bowl tightly.
Repeat Step 5. twice more.
Transfer the dough to the board and stretch it to a large rectangle and fold it like an envelope. Replace it in the bowl and cover.
After 45 minutes, transfer the dough to a floured board and do another stretch and fold.
After another 45 minutes, transfer the dough to the board and divide it into two equal pieces.
Pre-shape each piece into a round and let them rest, covered, for 15 minutes.
Shape each piece into a bâtard.
Proof en couche until expanded by 50-75%.
One hour before baking, pre-heat the oven to 500ºF with a baking stone and steaming apparatus in place.
When the loaves are ready to bake, pre-steam the oven.
Transfer the loaves to a peel. Score them, and then transfer them to the baking stone.
Steam the oven again. Turn down the oven to 450ºF.
Bake for about 30 minutes, until the internal temperature of the loaves is at least 205ºF, the bottom gives a hollow sound when thumped and the crust is nicely browned.
Transfer the loaves to a cooling rack.
Cool completely before slicing.
Although I got good gluten development, the dough remained very loose. This was expected, given its high degree of hydration. However, I did not expect how the loaves stuck to the “well-floured” couch and transfer peel. The loaves deflated significantly in the process of transferring them to the Super Peel ™. The latter handled the loaves beautifully in transferring to the stone. No additional sticking.
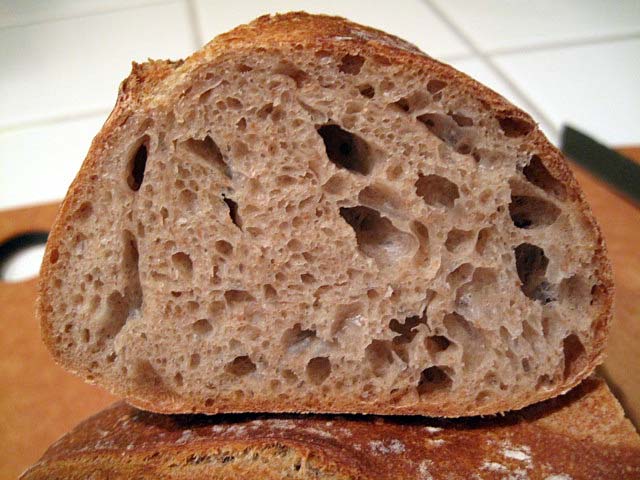
There was very good oven spring, and the cuts on the loaf which didn't stick to the transfer peel as much opened up reasonably well, suggesting that the loaves were not as over-proofed as their deflation on transferring had suggested.
By time the bread had cooled, the crust was chewy with just a bit of crunch. (I did not follow my customary practice of drying the loaves in the cooling oven for a few minutes after they are fully baked.) The crumb was very well aerated. It had an aroma that seemed whole-wheaty, yet different. The flavor was excellent – complex and wheaty with some sweetness and more sourdough tang than I expected.
Wonderful bread. I want to make it again, but next time I'll flour the couche more heavily.
I make some of the best white bread I have ever had and I use KA white bread flour. My recipe is simply KA flour, salt, sugar, yeast, 1 tbsp olive oil, water and I love it. However I am hearing more and more of the wicked ways of white bread and I am not sure if they are referring to commercial crap or good homemade. What are your thoughts on the health issues of this simple white bread recipe?