The Fresh Loaf

A Community of Amateur Bakers and Artisan Bread Enthusiasts.
turosdolci's picture
turosdolci

A lightly sweet taralli, made with a full-bodied red wine such as Cabernet, Merlot, Barolo, Zinfandel, and Primativo etc. Perfect for a wine tasting party.


http://turosdolci.wordpress.com/2010/05/23/double-dip-red-wine-taralli/


GloriouslyHomemade's picture

Sourdough Conversion - check math please?

May 22, 2010 - 8:26pm -- GloriouslyHomemade

Hi there!

I have a few recipes that call for 166% hydration starter and mine is 100%. I've done some math and logic. Could someone please check them both for me?


* 166% hydration starter = 100 units flour + 166 units water = 266 total units.

* Say I need A grams of 166% hydration starter in the recipe.

* A/266=X, with X being the weight per unit

* Since 100% starter has 100 units of flour and 100 of water, I'm short 66 water units. So, I need to add more water to the recipe as follows:

additional water needed = X * 66 units.

dmsnyder's picture
dmsnyder

Vermont Sourdough with Increased Whole Grain

I felt like baking something new this weekend, but I like the breads I make most often. That's why I bake them most often. So, I wanted something I would really like as much as those, but different. I settled on the Vermont Sourdough with Increased Whole Grain from Hamelman's “Bread.”

In the sidebar of this recipe, Hamelman talks about the “two small changes” in this formula compared to the “regular” Vermont Sourdough resulting in “surprisingly large” effects. The two changes are an increase in the whole grain flour from 10 to 15% and in the pre-fermented flour from 15 to 20%. These changes result in “a sharper tang and more or a whole-grain taste.” Well, that sounded terrific.

Then, I recalled the errata sheet for “Bread” that Paul (rainbowz) got from Jeff Hamelman and shared with us. I consulted it and found that the corrections decreased the pre-fermented flour which seemed in conflict with the description in the sidebar. Not having a clear sense of how to deal with this discrepancy, I ended up using the ingredient amounts as printed, resulting in a larger batch of dough than that printed in the book.

The Vermont Sourdough with Additional Whole Grain was made with KAF Bread Flour and 15% KAF Medium Rye Flour. It had 20% pre-fermented flour in the form of a 125% hydration starter fed with a mix of 70% AP, 20% WW and 10% whole rye flour. The total dough was 65% hydration. The loaves were scaled to 810 gms and shaped as boules.

The oven was pre-heated to 500ºF on convection bake for 60 minutes, with a baking stone on the middle shelf, pushed to the left, and a 7 inch cast iron skillet filled with lava rocks at the right front of the lower shelf. The oven was pre-steamed by pouring about 1/3 cup of boiling water over the lava rocks. The loaves were then transferred to a peel, scored and loaded onto the stone. Another ½ cup of water was poured over the lava rocks and the oven door quickly closed. The oven was immediately turned down to 460ºF, conventional bake. The skillet was removed after 15 minutes, and the oven was re-set to 435ºF, convection bake. The loaves were baked for an additional 25 minutes. Then, the oven was turned off, and the loaves were left on the stone with the oven door ajar for another 7 minutes before being transferred to a cooling rack.

I baked this bread as part of an experiment to see if I could reliably produce a crackly crust. My results were most satisfactory. (See Consistent Crackly Crust Conundrum Conquered?)

Crackly Crust

The crumb was fully aerated but without huge holes - good for a 65% hydration sourdough.

The crust was crunchy with a caramel-like nutty sweetness. The crumb was tender-chewy. The flavor had both a sweetness and a moderately assertive sourness. This is a bread that is quite sour, but there is a lot of complexity that also comes through. I'll have to make it again, but based on today's bake, I prefer it to the "regular" Vermont Sourdough.


David

Submitted to YeastSpotting


dmsnyder's picture
dmsnyder

Achieving a thin, crackled crust has been a frustrating pursuit for many, myself included. I have been able to get it, sometimes, but not consistently. There have been numerous discussions of how to get that crackly crust. I've been slowly digesting what's been written, and I think I may have arrived at a reliable method, at least for my breads, my dough handling and my oven.

The basic principles

The crust crackles during cooling because the interior of the bread contracts as it cools, and the crust is too dry to absorb water vapor which is trying to migrate outward and too rigid to contract with the crumb.

In order to optimize oven spring, bloom, crust shine and crust thickness when baking hearth breads, it is necessary to have a moist environment for the first part of the bake. Keeping the surface of the bread moist delays hardening of the crust, so it is extensible enough to expand with oven spring and permit a nice blooming of the scoring cuts.

Thus, it is desirable to have a humid oven for the first part of the bake but a dry oven for the last part of the bake.

Convection ovens, by increasing hot air circulation, tend to dry the surface of whatever is cooking. That's nice for crisping chicken skin, but it is counter-productive for keeping the bread surface moist early in the bake. On the other hand, convection baking helps dry the loaf surface, as is desirable during the last part of the bake. Convection ovens made for bakeries solve this problem by injecting steam under pressure over a time period under control by the baker. The home baker can achieve something like this by covering the loaves or using a cloche for the first part of the bake. The cover protects the loaf from excessive water evaporation, even in a convection oven. When the cover is removed, the crust can be dried, and a convection oven can presumably achieve this better than a conventional oven.

Allowing the loaf to sit on the baking stone with the oven turned off and the door ajar can achieve additional crust drying, but it may be that a less gradual cooling results in faster contraction of the cooling crumb and greater likelihood of crust crackling, according to some.

The protein content of the flour used and the inclusion of other ingredients that increase water retention, for example, potatoes or soakers, may also have an impact. These factors may impact both the degree to which the crumb contracts and the difficulty of drying the crust, and both of these would inhibit crackle development. If so, crackles should be easiest to achieve in a straight bread dough made with lower protein flour. Indeed, the bread most associated with a thin, crackly crust is baguette, which meets these conditions.

The principles applied

My oven is made by KitchenAid and has both convection and conventional baking options. This provides me with the opportunity to apply the principles discussed above.

I baked two breads yesterday and today with these principles in mind. The first was one I've baked dozens of times, my San Joaquin Sourdough. The second was one I had not baked before, the Vermont Sourdough with Increased Whole Grain from Hamelman's Bread. Both breads had 20% pre-fermented flour in the form of a 125% hydration starter fed with a mix of 70% AP, 20% WW and 10% whole rye flour.

The San Joaquin Sourdough was made with KAF AP and 10% KAF Medium Rye flours. The dough was 72% hydration. The loaves were scaled to 480 gms and shaped as bâtards. The Vermont Sourdough with Increased Whole Grain was made with KAF Bread Flour and 15% KAF Medium Rye Flour. The dough was 65% hydration. The loaves were scaled to 810 gms and shaped as boules.

For both bakes, the oven was pre-heated to 500ºF on convection bake for 60 minutes, with a baking stone on the middle shelf, pushed to the left, and a 7 inch cast iron skillet filled with lava rocks at the right front of the lower shelf. The oven was pre-steamed by pouring about 1/3 cup of boiling water over the lava rocks. The loaves were then transferred to a peel, scored and loaded onto the stone. Another ½ cup of water was poured over the lava rocks and the oven door quickly closed. The oven was immediately turned down to 460ºF, conventional bake.

San Joaquin Sourdough Bâtards

Vermont Sourdough with Increased Whole Grain from Hamelman's "Bread"

For the San Joaquin sourdough, the skillet was removed from the oven after 12 minutes, and the temperature was reset to 440ºF, convection bake. After another 18 minutes, the oven was turned off, and the loaves were left on the stone with the oven door ajar for another 7 minutes before being transferred to a cooling rack. The loaves commenced “singing” immediately and exceptionally loudly. By time they were cooled, they had developed many crust crackles, as pictured.

Crackly Crust on San Joaquin Sourdough

For the Vermont Sourdough with Increased Whole Grain, the skillet was removed after 15 minutes, and the oven was re-set to 435ºF, convection bake. The loaves were baked for an additional 25 minutes. Then, the oven was turned off, and the loaves were left on the stone with the oven door ajar for another 7 minutes before being transferred to a cooling rack. The loaves were already singing when I took them out of the oven, and, to my delight, there were already a few crackles. I had never before seen crackles develop before a loaf was cooled out of the oven. More lovely crackles appeared as the loaves cooled.

Crackles in crust of Vermont Sourdough with Increased Whole Grain, right out of the oven

More crackles appeared as the loaves cooled

And more ...

And yet more crackles

Conclusions

While two bakes is not sufficient to completely establish that the method described will reliably produce a crackled crust with all hearth breads, or even these, every time, this experience certainly supports my current understanding of the mechanisms involved and suggests the possibility that other bakes and other bakers might achieve similar results by applying these techniques.

I'd be happy if others would give this a try and share their experience.

David


sustainthebaker's picture

Hello Y'all

May 22, 2010 - 11:00am -- sustainthebaker

Hello, I am new to this site, but not new to baking. I have been teaching myself how to make delicious, healthy bread for almost three years now and can't find enough time to bake bread. I just finally got around to joinging this website. I just want to say hello to all out there.


Cheers!

Richie

jennyloh's picture
jennyloh

Baked 2 different breads, taking up the Hamelman's challenge, one quite successful and the other,  just had too many mistakes.  You will understand what I mean when you look at the pictures.


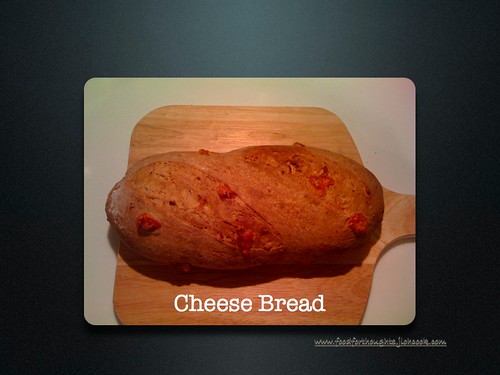
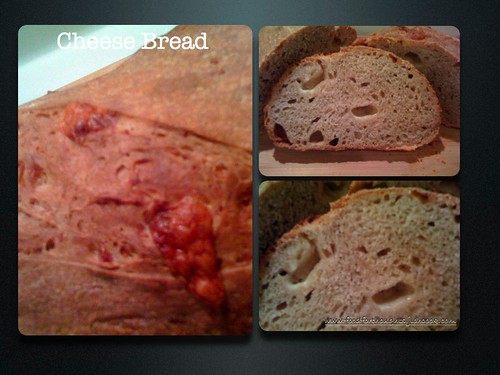
Cheese Bread with quite a bit of modification to the recipe.  Great oven spring, still learning to score to get the ears.  Not enough cheese,  quite an open crumb,  thin crust,  and 100% sourdough only.   check out the details here.


Flaxseed Bread - too many mistakes here,  and this didn't turn out well at all.  Taste was ok, but it was dense and it didn't have much oven spring.  


1.    This was my 3rd loaf (not counting my other bakes like muffins and flatbread) on a weekend,  and its one of the more difficult ones.   2.    Warm water for the flaxseed.  My water was still warm when I added into the flax seed.  I think that creates the gluey form more. 3.    Use of olive oil to handle the dough, the smell and taste doesn't seem to go together 4.    Brushing with butter - it made the rolls soft,  and not at all what I was hoping for. 5.    Shaping my rolls created a hole in the roll,  should have done better than that. 6.    Not allowing time for the dough to rise properly. 7.    I don't think I baked long enough or I didn't let it cool properly before I kept it,  as it turned moldy after 5 days.  

Well,  I still have  a lot to learn. 


Mebake's picture
Mebake

This is a sourdough version of Peter Reinhart's 100% Whole Wheat Sandwich Loaf from his book: Whole grain breads. I spiked it by 2.25 Teaspoons of instant yeast.

The crust was soft due to the presence of Milk, and butter, but the crumb was light soft, and even textured.

I used only Waitrose Organic Strong bread flour with 13.9g of protein. I also baked this bread under a pyrex cover in a grill oven, 30 min. covered, and 15 minutes uncovered.

The taste, well, it was somewhat salty (I HAVE TO STOP USEING SEA SALT! i can't figure out how much is enough in a formula(in this bread it was somewhat salty coz i doubled the amount of salt, knowing that sea salt isn't as efficient as refined salt.) It had a faint acidic taste from the levain (50% of the total dough weight), but was pleasant overall.

I learned something very important here: Always increase hydration with PR's wholegrain breads recipes, from 70% to 75%, as peter apparently prefers tighter crumbed wholegrain breads.

Another thing: Never take shortcuts with wholegrains, as this will adversely effect the resulting flavor. I didn't prepare a soaker with a pinch of salt (spong), so no sweetness to there to counteract the excess salt or the sourdough acid.

Here is the bread:

Mebake


tananaBrian's picture
tananaBrian

Ok, back from my business trip to beautiful San Antonio, Texas ...got more work done on the garden shed, and I'll be baking the whole wheat (pate fermentee?) from Bread for The Bread Challeng on Sunday.  Here's the lates on the garden shed ...and a tidbit or two on the shop that I'm having built at the same time.  My yard is a genuine construction zone!!!

Got all 4 walls in.  Notice the windows all along the near end and around each corner.  This end of the shed will be a seed-starting / pseudo-greenhouse for early-starting our Alaskan garden.  Why buy when you can grow?


Lifting the roof trusses into place ...alone!  I threaded them in in-between studs, raised one end on top of a wall as high as I could reach, then lifted the other end onto the opposite wall... and voila!  Trusses on top of the walls, upside down, ready to be flipped into place.


After getting the truss, upside down, on top of the walls, I raised it to a support that spanned the shed, then used a "picker upper thingy" that I made to flip the truss upright and lean it against the others.


Here we are with all 8 trusses on the top of the walls, leaning against each other and ready to be moved into position.  I'll get OSB onto the roof and some of the siding on before the weekend is out... and will be baking on Sunday, pate fermentee prepared on Saturday (wife's birthday ...wait until she sees the diamond earings that I bought her!!  A more wonderful women can't be found...)


And if a garden shed weren't enough ...I'm also having a builder build a shop for me ...so I can pursue my other hobby ...boat building!  Isn't my wife wonderful?  She agreed to buying this house with extra land and room for a shop, and agreed to building the shop too!


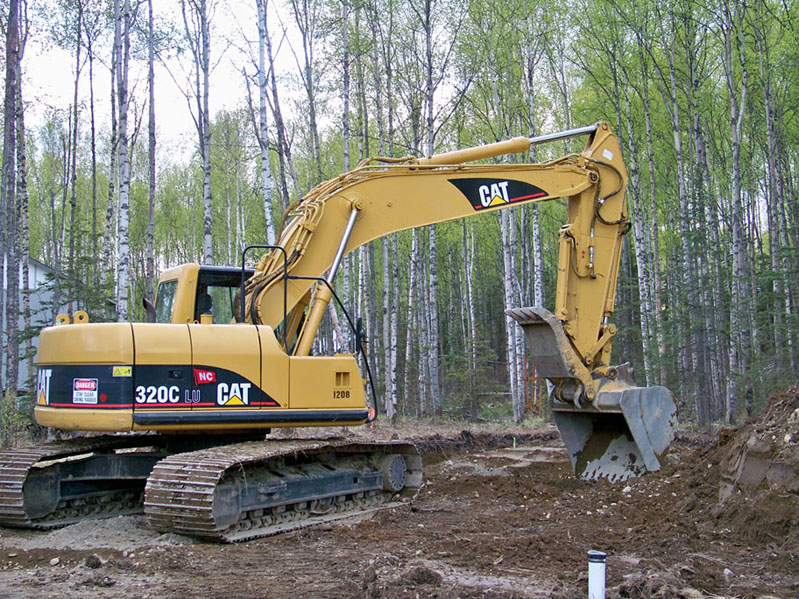
Please Mister ...Try not to make a mess of my back yard!  Right!  This guy doesn't know the meaing of the word "neat" or "clean" or "just as much as you need to and no more"!  We'll have some landscaping to do after he's done!


Got the foundation excavated and ready to form things up and pour concrete...


Foundation poured ...stem wall constructed, now need to level out the interior, fill with gravel, add 4" blue foam insulation and pour the slab!  The shop is 28' wide by 36' long ...hard to tell in the photo.  Garage door is 12' wide by 11' tall, interior ceiling 12'6" high, 12:12 roof with 36' long by 11.5' wide bonus room upstairs!

Oh yeah... Baking on Sunday!!!

Brian


jcamador's picture

Am I OK Here?

May 21, 2010 - 5:19pm -- jcamador

Here is one of my first sourdough boules (2nd), but it doesnt seem as dark as some of the other pictures I've seen here. It's a 2 lb boule baked for 28 minutes at 450 degrees. Baked with steam first 15 minutes with baking lid and finishing internal temp is 205 degrees. 28 minutes doesn't seem like a lot of time especially when certain recipes are calling for 45 minutes or so. I'm getting LOTS of blisters...which maybe is not a good thing? If you can't already tell...I'm new to baking and trying to find an accurate barometer of a good loaf.. Thanks!


Pages

Subscribe to The Fresh Loaf RSS