The Fresh Loaf

A Community of Amateur Bakers and Artisan Bread Enthusiasts.
Onceuponamac's picture
Onceuponamac

Still would like to get better oven spring - but happy with these nonetheless.

ananda's picture
ananda


Pain au Levain with Light Rye FlourDSCF1856

A wonderfully simple and balanced formula.   Yields one loaf scaled @ 680g and one scaled @ 1360g

Material

Formula [% of flour]

Recipe [grams]

1. Leaven Elaboration One


Leaven from stock


80

Special CC Flour


100

Water


60

TOTAL


240


2. Leaven Elaboration Two


Elaboration One


240

Special CC Flour


300

Water


180

TOTAL


720


53.3 [640g retained]

60g returned to stock

3. Final Dough


Leaven [from above]

53.3 [33.3 flour, 20 water]

640

Special CC Flour

50

600

Doves Farm Organic Light Rye Flour

16.7

200

Salt

1.8

21.6

Water

50

600

TOTAL

171.8

2061.6

% pre-fermented flour

33.3


% hydration

70


Method:

  • I built the leaven over 2 elaborations, allowing 12 hour proof time between refreshments, and prior to final dough mixing.
  • For the final dough, I broke the ripened leaven into pieces and deposited in the water. Then I added the flour in a large bowl and used a plastic scraper to combine sufficiently for a period of 40 minutes autolyse
  • I added the salt and worked up the dough for 10 minutes, then set to rest for 20 minutes. Then I worked up the dough a further 10 minutes.
  • I bulk proved the dough outside in the warmth and maintained a steady dough temperature of 26°C, covered for 2 hours. I used one S&F half way through bulk proof.
  • After 1 further S&F, then a 10 minute rest, I scaled and divided the dough as above. I moulded both pieces round, and set to final proof upside down in bannetons
  • Here's the rub: the small loaf had around 3 hours final proof, and I experienced "blow-out" from the bottom of the loaf; again! The larger loaf, I therefore gave 5 hours proof and it came out perfectly. I did use quite a bit of steam baking this loaf to try and avoid any further unsightliness.
  • After baking fully, I turned the oven off, and left the loaf inside the cooling oven with the door wedged ajar for 10 minutes. Then I set the loaves to cool on wires


DSCF1860

DSCF1857


DSCF1858

DSCF1864DSCF1865DSCF1868


Thoughts:

  • The longer proof time on the large boule is just right. I have utter confidence in the leavens I maintain, feed and elaborate; also in the quality of final dough produced. I've increased the proportion of pre-fermented flour in the formula, generally, now being around 33%. Also, I'm using longer proof times. Even though the weather is getting warmer, this is the proving conditions demanded by the dough, so I have responded.
  • The taste of this bread is superb. I tried a small piece about an hour ago, and the deep flavours from crust and crumb linger so subtly. It's not overtly sour, or, salty, yet still packs a great and complex flavour.
  • Alison was busy with our plant pot garden, and I helped out tidying the patio as the sun shone, and the dough underwent its magical transformations.
  • We have new daisies to brighten the patio, and I have wood chopped and prepared to fire up the oven later this week.
  • DSCF1853DSCF1855
  • We want to go to Sicily in October.
  • We are going to the far North of Scotland on Saturday for a week's holiday. Lochinver here we come!......And it looks a little bit like this!

images

Very best wishes to you all

Andy

varda's picture
varda

Matzo has two ingredients - flour and water.   It is supposed to be baked not more than a couple of minutes after adding the water to the flour.    It's not supposed to rise at all so it has to be pricked.   When you put all that together you get a very, very easy recipe.   And yet, I've never tried to make it before.   Passover starts tomorrow night.    Matzo has two identities.   One, it is supposed to be the extremely quick travel bread that the Jewish slaves slapped together for the road when they were in such a hurry that they didn't have time to let it rise.   But it is also referred to as the "bread of our affliction."   And if you look back at the ingredient list - exactly the same as for paste - you kind of get that point as well.   In other words it really doesn't taste very good.   Anyhow, after all these years, I decided to try it myself.   I specifically decided not to look up a recipe.   What's to look for?    It's flour and water.   It's made fast.   It's pricked.   End of story.

My approach:  

Preheat oven to 450F.   Then quickly mix 100g AP flour with 65g water, roll it out, prick with a fork all over, and put in the oven (I used a perforated pizza tray.)   Bake until slightly brown.  Show your kids.   My son is eating it now.   Delicious he tells me.   Right. 

pmccool's picture
pmccool

This is the second bread from this weekend's bake that is from the late Bernard Clayton Jr.'s New Complete Book of Breads, as both an expression of gratitude and a memorial of sorts.

Mr. Clayton's Pain Seigle is one that I have not previously made.  It is an interesting bread, from the standpoint that approximately 50% of the flour is in two preferments: a "starter" made with commercial yeast and a sponge.  It also has a high rye content, with 2 cups bread flour to approximately 5 cups of rye flour.  

Starter

1 cup rye flour [I used the only rye flour available to me, a finely milled whole rye]

1 teaspoon dry yeast

1 cup warm water (105º-115º)

Mr. Clayton recommends a fermentation period in a covered bowl running from a minimum of 6 hours up to 36 hours.  I let mine ferment from Friday evening to Saturday evening, about 26 hours.

Sponge

All of the starter

1-1/4 cups warm water (105º-115º)

1 cup bread or all purpose flour

1-1/2 cups rye flour

Blend the water with the starter, then blend in the flours.  Cover and allow to ferment 8 hours or more.  I let this ferment overnight, then mixed the final dough around 11:30 Sunday morning, a total of 14 hours.  The sponge ballooned, at least quadrupling its original volume.  Plan accordingly.

Final Dough

All of the sponge

1/2 cup hot water (120º-130º)

1 tablespoon salt

2-1/2 cups rye flour, approximately

1 cup bread or all purpose flour

Stir the hot water and salt into the sponge, then add 1 cup of each flour.  Mr. Clayton's instructions say to mix by hand or machine for 15 minutes, adding the remaining rye flour until the dough is a shaggy mass that can be kneaded.  Here's where I took a slightly different path.  Mr. Clayton's descriptions and directions, while acknowledging that the dough will be sticky enough to warrant kneading with a bench knife or bowl scraper, still reflect a wheat-flour-based mindset.  Kneading, if by hand, should be done on a floured surface; "it will gradually lose its stickiness and become soft and elastic."  With all due respect, no.  I found that the white flour in the sponge had developed a very strong gluten network from its overnight hydration.  Adding the last cup of bread flour increased that.  However, the more rye flour that was added, the more this became a rye dough insofar as its handling characteristics went.  Being mindful of rye's fragility, I did about 3 minutes of stretch and folds in the bowl (as opposed to 5 minutes of kneading), then turned the dough out onto a wet countertop so that I could shape it into a rough ball.  That also let me clean and oil the bowl for the next fermentation which, per instructions, was timed at 40 minutes.  No indications were given for the dough's expansion or appearance at the end of this bulk fermentation, so I watched the clock.

Mr. Clayton instructs to "punch down the dough" and "knead for a minute or two to press out the bubbles."  I didn't see a significant change in the dough at the end of 40 minutes, certainly nothing to warrant punching down or kneading.  Clayton recommends forming into 3 boules of about 1 pound each.  I elected to form 2 boules.  This was followed, per instructions, by a 30-minute final ferment on the baking sheet. 

Glaze

1 egg yolk

1 tablespoon milk

The egg yolk and milk are blended together and brushed on the loaves.  Mr. Clayton recommends glazing before slashing.

The bread is baked in a 400º dry oven for about 45 minutes, until a finger thump on the bottom crust produces a hollow sound.

Here's how it looked:

Clayton's Pain Seigle

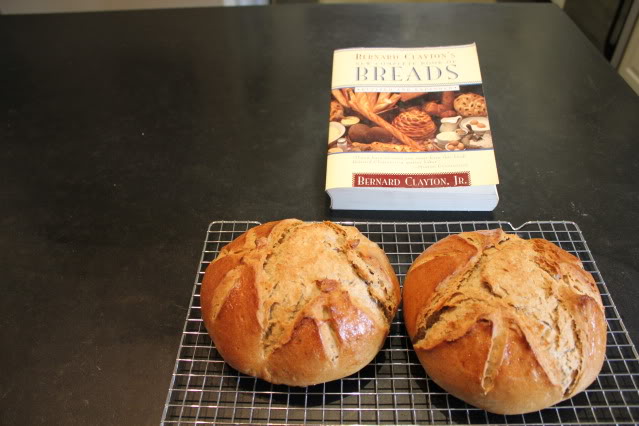
And a somewhat closer view:

Clayton's Pain Seigle

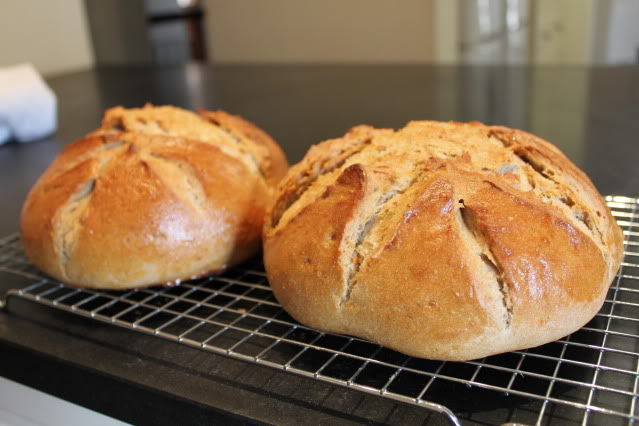
It is a handsome bread.  The glaze imparts a lovely sheen.  It is also obviously underproofed.  My kitchen temperature today was in the low 70's, perhaps not as warm as Mr. Clayton's "room temperature."

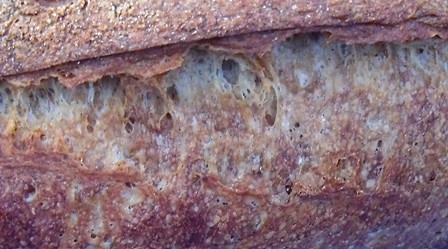
As noted in a previous post, my cup of flour probably weighs less than Mr. Clayton's cup of flour.  Therefore, it is likely that these are somewhat higher than his in hydration.  Now that I have this bake as a baseline, I would probably extend the bulk ferment and the final ferment to a point that I could see more obvious indications of inflation in the dough.  These may be somewhat dense and tight-grained when I get around to cutting into them.  That won't be until later this week, since they will go into the freezer once they have cooled thoroughly.  They don't feel like bricks, so I will keep my fingers crossed.  I can't remember whether I've made an unseeded rye before, so I'm looking forward to seeing how the rye tastes all on its own.

Paul

pmccool's picture
pmccool

Given Bernard Clayton Jr.'s influence on home bakers in the United States, it seemed fitting for me to bake some breads from his New Complete Book of Breads in observance of his recent death.

This post will be about his Italian Bread.  I needed a fairly simple bread that could fit into a compact time so that it would be available to give to acquaintances who have a surgery scheduled for this Tuesday.  Not knowing whether their children would be agreeable to a whole-grain bread, much less a sourdough, I opted for a crusty white bread that would go well with the soup that my wife was preparing for them.  

The formula, all in volume measurements, is fairly simple:

1 tablespoon salt

1 tablespoon malt syrup [having none on hand, I substituted agave nectar]

1/2 cup nonfat dry milk

2 packages dry yeast

3 cups warm water (105º-115º)

6 cups bread or unbleached flour, approximately

1 tablespoon vegetable oil [I used olive oil]

The process is nearly as simple.  Mix together the salt, water, malt syrup, and yeast.  Place 4 cups of flour in a mixing bowl, form a well in the flour, and pour in the liquid mixture.  If using a mixer, mix 10 minutes at medium speed (2 on a KitchenAide?).  If mixing by hand, mix for a similar time.  Then add remaining flour 1/2 cup at a time until a firm dough forms.  Knead for 10 minutes.  Place in a large, oiled bowl, cover tightly with plastic wrap, and allow to ferment until tripled in volume.  Deflate the dough and allow to rise an additional 30 minutes.  [I opted for a shorter hand mix and a shorter kneading time, performing one stretch and fold when the dough had nearly doubled, then allowing to triple the original volume.]  Clayton recommends preshaping the dough, about 4 pounds, into boules, batards, or baguettes, then allowing a 20 minute rest.  He also recommends brushing the loaves with water immediately before placing them in the oven.  I elected to form 4 batards in the final shaping and rolled them in sesame seeds before placing them on the baking sheets, skipping the water brushing step.  Allow to nearly double in volume again before baking (Mr. Clayton says "about 1 hour").  Bake in a 425º dry oven for 40-50 minutes until golden brown and the loaves sound hollow when tapped on the bottom.  Rotate the baking sheets about halfway through the bake to ensure even baking and coloring.

Since I used two baking sheets and had to position one fairly low in the oven and the other fairly high (it's a relatively small oven compared to U.S. ovens), I chose to use convection baking and lowered the temperature 40º, as suggested by Mr. Clayton.  At the 20 minute mark, I rotated the baking sheets and swapped their positions.

Other than some clumsy slashing, which is in no way attributable to Mr. Clayton, the loaves expanded very nicely in the oven, more than one might expect given the lack of steam.  Here is how they look:

Clayton's Pain Italien

And a slightly closer look:

Clayton's Pain Italien

We did keep a loaf for ourselves, so I will post the crumb shot once we cut into it.

When I next bake this bread (I have before and it is too good not to continue to use it), I will try steaming the oven.  I expect that it would enhance the blooming of the slashes as the ovenspring occurs.  It is possible that my decision to use the convection setting also had an effect on how much the slashes opened.  Given the oven capacity, the convection setting was the better choice in terms of promoting an even bake.  I will also probably skip the sesame seeds in future bakes, even though they seemed like a good idea at the time.  From Mr. Clayton's description of the dough, I suspect that I had a higher hydration than he would have used.  My impression is that he may have packed more flour into a cup than I do.  

Given that this formula came from a bakery in Monaco, one can argue about how "Italian" it really is.  Regardless of its pedigree, it is good bread.  Thank you, Mr. Clayton.

Paul

kah22's picture

Kevin Says Hello

April 17, 2011 - 3:55am -- kah22

This is my first post with you guys and I'd like introduce myself: I'm Kevin and I live in Ireland. Unmarried and in my early 60's.

While I've always been a reasonably decent cook it is only within the last two years that I've turned my attention to baking.  Started off with a breadmaker letting it do all the work, slowly changed to doing it all by hand. As you might expect from someone from Ireland I've become a dab hand at making Irish soda farles.

Breadandwine's picture

Using your oven and a cloche for a fast prove

April 17, 2011 - 3:18am -- Breadandwine
Forums: 

I needed some bread in a hurry yesterday, and turned out some decent rolls in just under the hour, using a combination of extra yeast, the undercover method and the oven for proving.

The story and pic are on my blog:

http://nobreadisanisland.blogspot.com/2011/04/using-oven-and-cloche-to-prove-your.html

Cheers, Paul

Pages

Subscribe to The Fresh Loaf RSS