The Fresh Loaf

A Community of Amateur Bakers and Artisan Bread Enthusiasts.
Isand66's picture
Isand66

I was bored the other day so while surfing the internet for bread sites I revisited Breadtopia.com and was pleasantly surprised with some of the different flours and grains they offered for sale.  I decided to buy one of the ancient grains Kamut and also so hard red winter wheat called Turkey Whole Wheat Flour.  Below is some information from their website if you are interested.

Turkey Red Wheat, once the dominant variety of hard red winter wheat planted throughout the central U.S., is back in production in Kansas.  “Turkey” variety hard red winter wheat was introduced to Kansas in 1873, carried by Mennonite immigrants from Crimea in the Ukraine, fleeing Russian forced military service. In the mid-1880s, grainsman Bernard Warkentin imported some 10,000 bushels of Turkey seed from the Ukraine, the first commercially available to the general public. That 10,000 bushels (600,000 pounds) would plant some 150 square miles (10,000 acres). By the beginning of the twentieth century, hard red winter wheat, virtually all of it Turkey, was planted on some five million acres in Kansas alone. In the meantime, it had become the primary wheat variety throughout the plains from the Texas panhandle to South Dakota. Without “Turkey” wheat there would be no “Breadbasket.”

The Kamut flour is very similar to durum flour and here is some more information from their website.

Kamut® is an ancient grain and the brand name for khorasan wheat, a large amber wheat grain closely related to durum. Kamut is appreciated for its smooth, buttery, nutty flavor, and its high protein and nutritional content.  It contains a high mineral concentration especially in selenium, zinc, and magnesium with 20-40% more protein compared to modern-day wheat. It has a higher lipid to carbohydrate ratio, which means the grain produces greater energy and has a natural sweetness to counterbalance the occasional bitterness present in traditional wheat.

I went this weekend with my wife to the outlet stores and discovered a new store that sells only New York State wines, beers and spirits.  I picked up a mixed 6 pack of ales, stouts and ciders and decided to use the Black Cherry Hard Cider in my next bake.

I made a levain using my AP starter and some of the Turkey flour and AP flour.

For the main dough I used the Kamut flour along with Turkey flour, some molasses and dried onions that I reconstituted in some water and the Black Cherry Cider.

I followed my normal procedure below for making a miche and I must say I was very happy with the results.  You can taste the nuttiness of the 2 flours along with the hint of cherry from the cider.  The crust was nice and thick but the crumb was a bit tight which was probably due to the high percentage of the Turkey flour along with the Kamut flour.

Levain Directions

Mix all the levain ingredients together for about 1 minute and cover with plastic wrap.  Let it sit at room temperature for around 7-8 hours or until the starter has doubled.  I usually do this the night before.

Either use in the main dough immediately or refrigerate for up to 1 day before using.

Main Dough Procedure

Mix the flours, and 275 grams of the cider together in your mixer or by hand until it just starts to come together, maybe about 1 minute.  Let it rest in your work bowl covered for 20-30 minutes.  Next add the salt, starter (cut into about 7-8 pieces), molasses, and rehydrated onions and mix on low for a minute.  Add the rest of the cider unless the dough is way too wet.   Mix on low-speed for another 3 minutes.  Remove the dough from your bowl and place it in a lightly oiled bowl or work surface and do several stretch and folds.  Let it rest covered for 10-15 minutes and then do another stretch and fold.  Let it rest another 10-15 minutes and do one additional stretch and fold.  After a total of 2 hours place your covered bowl in the refrigerator and let it rest for 12 to 24 hours.

When you are ready to bake remove the bowl from the refrigerator and let it set out at room temperature still covered for 1.5 to 2 hours.  Remove the dough and shape as desired.  I made 1 large miche but you can make 2 boules or other shapes.  Place your dough into your proofing basket(s) and cover with a moist tea towel or plastic wrap sprayed with cooking spray.  The dough will take 1.5 to 2 hours depending on your room temperature.  Let the dough dictate when it is read to bake not the clock.

Around 45 minutes before ready to bake, pre-heat your oven to 500 degrees F. and prepare it for steam.  I have a heavy-duty baking pan on the bottom rack of my oven with 1 baking stone on above the pan and one on the top shelf.  I pour 1 cup of boiling water in the pan right after I place the dough in the oven.

Right before you are ready to put them in the oven, score as desired and then add 1 cup of boiling water to your steam pan or follow your own steam procedure.

After 1 minute lower the temperature to 450 degrees.  Bake for 35-50 minutes until the crust is nice and brown and the internal temperature of the bread is 205 degrees.

Take the bread out of the oven when done and let it cool on a bakers rack before for at least 2 hours before eating.

varda's picture
varda

Ever since returning from the King Arthur Rye class, I've been itching to make the four breads that we baked there, but first I wanted to get my rye starter into better shape.   I put both my rye and wheat starters on a twice a day feeding regimen, and gave them time to become happy and well fed.   Yesterday I decided it was time, and decided to start with the Flax Seed bread.   I followed along with Mr. Hamelman's formula and instructions, and didn't allow myself so much as a tweak.    Since I have been keeping a tiny amount of starter (around 50g) to make the twice daily feeding easier, and also to avoid unnecessary wastage, I built it up to quantity yesterday in three stages.   While I never got the in your face pungent smell of the KA rye sour, I did remember JH had asked us to taste a bit before baking.    So I tasted a bit this morning, and it was pretty tart stuff.  

I made two other changes to my routine.   First, I recently purchased a cordierite stone to replace the block of granite I've been using for the last few years.   That was mostly because the granite was both two small and too heavy, but I think the cordierite is better as well.    Second I changed my steaming routine.    I have been using towels for the last few years and thought I was getting good results, but when I saw the crust colors at KA, I thought I would see if I could do better.    So I ended up doing a combination of the two cast iron pan methods PeterS and Yerffej discuss in this post and this post respectively, not neccesarily intentionally and I'm glad no one was watching as I was flinging hot water around and trying not to get burned.    More refinement to come, but I was pretty happy with the crust.

Now on to tasting.   This bread has a really nice tang to it, nicely complemented by the flax seed flavor.    Despite my inclination against it, given my no tweaks rule, I used a bit of old bread in the soaker.     I have no idea what impact that has but it didn't ruin it.  

So I'll call myself moderately pleased, and on to formulas 2, 3, and 4. 

3/3/2013


1st feed

2nd feed

Total

Percent

Rye sour


4:30 PM

10:00 PM


Seed

49


Whole Rye

27

50

140

217


Water

22

42

115

179

83%


396


Soaker

10:00 PM


Flax Seed

50


Old Bread

40


Water

150


3/4/2013

Final

Sour

Soaker

Total

Percent

KAAP

300


300

60%

Whole Rye


199


199

40%

Water

86

164

150

400

80%

Salt

10


10

2.0%

Instant Yeast

3


3

0.6%

Flax Seed


50

50


Old Bread


40

40


Rye Sour

363


1002


Starter factor

91.7%


Night before mix make final starter build, and soaker.   When starter is ripe, mix all ingredients.   DDT 76F.  Proof 1 hour.   Preshape, rest and shape.   Place in banneton.   Proof around 1 hour.   Bake at 440F with steam at beginning.   JH’s notes say 38-40 minutes.   I think we did longer than that in class, and today I baked for around 45 minutes.  


thihal123's picture

Sorghum flour, provides noticeable different flavour in wheat bread?

March 4, 2013 - 1:10pm -- thihal123
Forums: 

General question: does sorghum flour provide a noticeable different taste to wheat flour, like the way that rye flour added to wheat flour gives a different taste?

More details: I recently bought a small bag of sorghum flour with the intention of mixing it into my tried and true bread recipes just to give the wheat bread a different flavour. I'm not interested in making gluten-free breads, which is where sorghum flour seems to pop up most in this forum. Would the sorghum flour in the wheat/sorghum mixture provide a noticeably different flavour?

AdelK's picture
AdelK

Just baked my second loaf of sourdough bread yesterday. Turned out better than my first. The recipe was taken from the Weekend Bakery. I love the fact that they use a rye sourdough and some whole wheat flour to bump up the flavour. I must say I find bread baking extremely therapeutic (just as I do with baking pâtisseries, cakes etc) but despite being a newcomer to the world of bread baking I am finding myself enjoying the process more by the week. The smell of nicely fermented dough is so invigorating. In fact I'm slightly embarassed to say that I had actually tasted the raw dough of this bread yesterday while doing the third stretch and fold. I just couldn't resist it. :D

The oven spring was the best I've managed to achieve since I starting baking bread 2 months ago. I have also recently realised that it's important not to over-degass the dough prior to shaping to preserve a more open crumb structure. For me the best thing about being a home baker is the fact that I learn something every time I bake. It feels so much more of an achievement when one finds a new trick by him/herself rather than learning it through a professional lesson (nothing against the latter but being someone on a tight student budget it's probably not until a couple more years before I could afford one)

Do comment on my bread  and any constructive suggestions are more than welcome!

Cheerio

Kong

bastet469's picture

Hi from Newbie in Cleveland Suburbs; seeks advice and mentor

March 4, 2013 - 11:58am -- bastet469

Hi everyone,

My name is Wendy and I'm on an extended visit to my hometown of Cleveland. I'm new to bread making and anxious to learn. I was happy to find this site a few years ago and now I finally have the time to utilize it. I welcome any advice and ideally would love to have a mentor.

proth5's picture
proth5

To quote my university hymn “Time like an ever rolling stream” (well, and it originally went on to say “bears all her sons away” which made the whole thing problematic once those of us with the double X were finally allowed to roam the Dear Old Place’s hallowed halls – but that is another story…) and it has been quite a while since I posted part one of this saga. (The rocks and bumps over which the stream has rolled is yet another story – suffice it to say, a long one.)

Whole wheat bread in a bread machine seems to be a popular topic and I have been working on a formula, so it seems like a good time do to a full write-up.

Consulting the leaflet that came with the bread machine, it seemed that every whole wheat variation came with the ingredient of “vital wheat gluten.” Of course, upon reading that I could hear The Voice in My Head scornfully saying, “Well, Pat, if you want to use vital wheat gluten…”

To which I could only hang my head and reply, “No, I don’t, Sensei. I’ll aspire to better.”

(Oh, no – now I’ve gone and done it.  I’ve said negative things about the ingredient vital wheat gluten. Well, let me assure my small reading public that “The Voice in My Head” comes from actual conversations with a very real, and, as I like to put it “well qualified” baker. I will not intone “You do what you want” as I have no power to compel or prevent anyone from doing anything.  But as for me, I will deal with qualities of the grain as I find it and use technique to overcome any hardships.)

Of course, the tools were at hand.  A good intensive mix would make a fluffy whole wheat loaf, but no setting on the machine would mix long enough to deliver this – and I have been coming to the point where I love the “set it and forget it” aspect of the bread machine (at least for the sandwich bread to feed “the house” – I’m still hand crafting a lot of other stuff to satisfy my public…)

The other obvious tool in my arsenal was – you guessed it – a pre ferment. But not just any pre ferment, a firm levain.

“Why?” you ask.  Well, a firm pre ferment will tend to add strength (due to the acids that develop in a pre ferment and the lesser amount of protease action because the pre ferment is relatively dry) and a sourdough based pre ferment will add more acids because of the nature of the leavening.

As we wind on in this saga of me inexplicably becoming intrigued with this appliance, I make an observation: discussions on these pages pushed me to try the same formula with a firm commercially yeasted pre ferment.  Although the bread was certainly edible, it did not have the same texture nor did it rise as high as the sourdough version. If I were baking by hand, I would have to wonder if I had unconsciously done something differently – but with the machine, the cycle marches on.  So even though I “kinda” knew that sourdough would result in a stronger dough, I’m a lot more convinced of it now.

Other than that, the only thing I needed to do was up the hydration a bit and jigger the sweeteners and butter.  No long, drawn out story.

I did, however, avail myself of the “Sourdough starter” cycle on my machine (a Zojirushi Virtuoso) to mix the pre ferment.  This could just as easily have been done by hand in a bowl, but for those who don’t want that inconvenience; it turns out to be a good option.  I didn’t want the fast rise that would be engendered by the “rise” cycle – nor did I want to stay up way past my bedtime to wait for the thing.  So, I cancelled the cycle after the mix and then (had it fit into my proofer – or if my night time kitchen temperatures were warm enough) I could just cover the pan and let it proof overnight.

So, without further ado, here we go with a formula and some pictures.

Since this is a bread machine post, I will present the formula two ways, in the Bread Baker’s Guild of America format and in “recipe list” format.  For those of you just beginning to practice your baker’s math this is a good opportunity to see how the “list” format easily translates into what can be a perplexing little grid.

Bread Machine 100% Whole wheat

Firm Levain Pre Ferment (40% of the total flour pre fermented)

Whole Wheat Flour                                         228 g

Water                                                                   173 g

Seed (taken from storage starter)             5g

Mix the above ingredient (by hand or using a bread machine mix only cycle). Cover and allow to rise overnight until mature (doubled) – 8-12 hours at 76F.

The next day (or when the Pre Ferment is mature) Load the pan of the bread machine in this order:

Water (40F)                                        277 g

Agave Nectar                                     40 g

Molasses                                             24 g

Firm Levain                                         all of it, broken up into roughly 2 T chunks distributed over the bottom of the pan

Dry Milk                                               9 g

Salt                                                         11 g

Butter (room temperature)        46 g

Whole Wheat flour                         342 g

Instant Yeast

 (in small well on top of flour)     3 g

Use “Whole Wheat” cycle on the bread machine and bake per instructions.

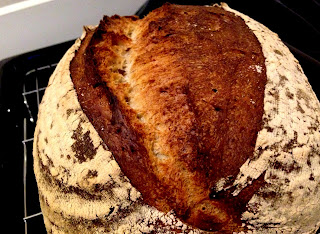
Is it a work of food art? Well, no.  But as I looked at it I thought “This is a nice, solid, bread.  Nothing wrong with it.” Not too shabby. No vital wheat gluten. Tastes good, too…

BrianOD's picture

Looking for feedback

March 4, 2013 - 7:03am -- BrianOD

Looking for feedback

I tried out Jeff Hamelman's Pain au Levain WW recipe last night and I was hoping someone could give me feedback on how to improve the texture and the flavor. I know it's tough to critique flavor here, but the loaf was lacking in any hint of sour. It was soft and moist. The crust was a little thick, but certainly in what I consider the success range.

My q's are:

What can I do to improve/generate sour?

How can I get the large "bubbles" to be created in the center of the loaf?

Pages

Subscribe to The Fresh Loaf RSS