The Fresh Loaf

A Community of Amateur Bakers and Artisan Bread Enthusiasts.
MaxQ's picture
MaxQ

We had some semolina left in the house that we needed to get rid of. We usually use it for making porridge (cream of wheat), but winter here is pretty much over with, and we had all this semolina lying around. Having just discovered this site and learned a panload of new techniques, I was eager to try something new. So why not semolina bread?

Well, because semolina isn't really supposed to be used for making bread, and I really should have known that.

I'm not one to be deterred from trying something just because most people don't do it. So I weighed my semolina and came up with a formula (first formula like this I've ever made!)

340 gr semolina               %85

60 gr all purpose flour   %15

1 cup water                       %60

1 Tbs yeast                        %0.03

1 tsp salt                            %0.015

I put the AP (is that a real acronym?) flour in with the water and the yeast to activate. I let the yeast do their thing for half an hour or so, then added the semolina and salt. I mixed by hand and that's when my first surprise came. In hindsight I should have known that this would happen, since I've seen how much milk semolina absorbs, but it still came as a surprise.

I was going for a pretty loose dough, hoping for some nice big crumb. Instead I got a lump of very dense dough.

Now, I should have added more water, but for some reason I didn't. I kneaded the dough, put it back in the bowl, covered it with plastic wrap and let it sit for an hour.

It did rise, so I figured what the hell. Let's roll with this.

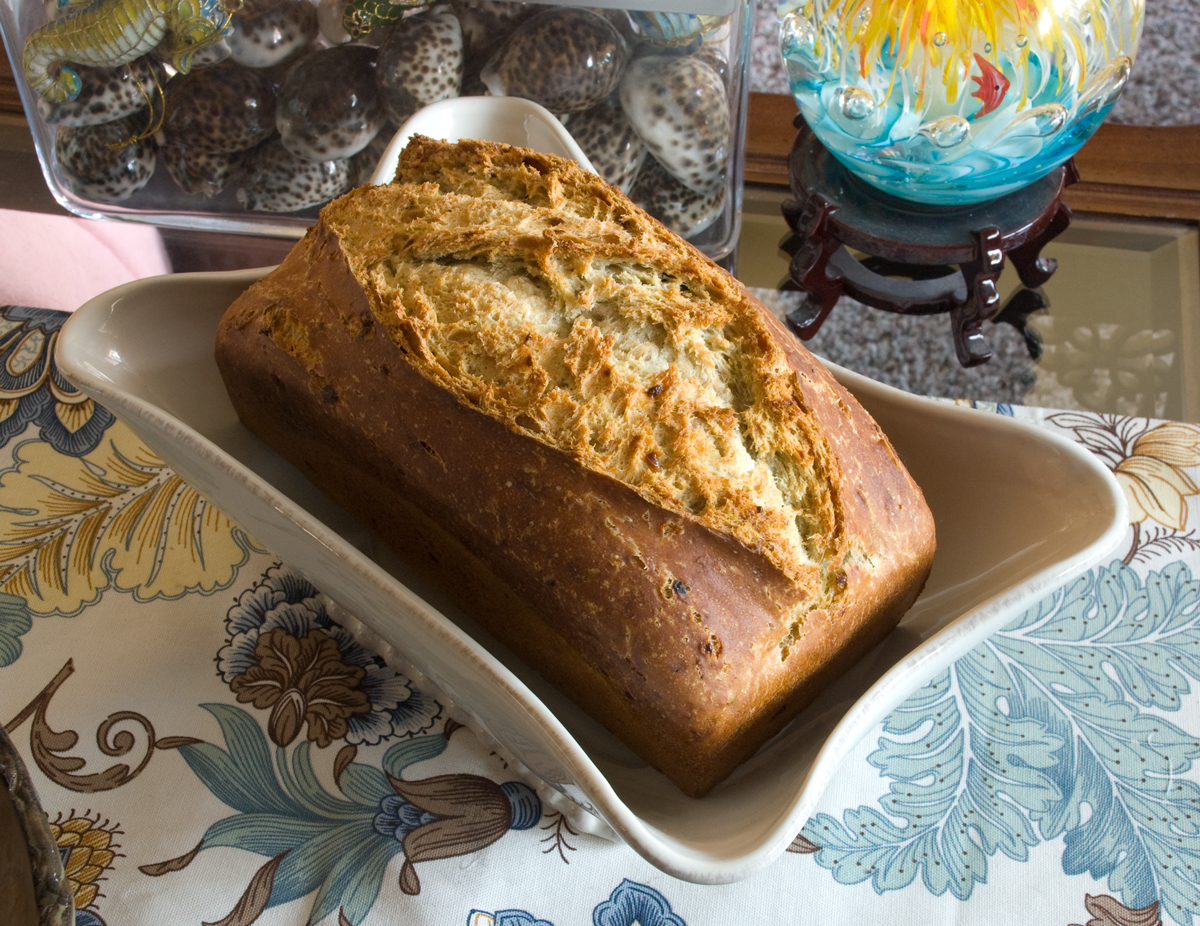
I shaped it into a nice little bâtard, and even got to try scoring it. I'm more proud of the first cut than the second, but this was my first try scoring bread after having actually learned how it was done, so in that regard this was a success.

My oven is brand new, and I'm not sure yet if I can steam in it, and I don't want to try on a 6 month old oven. So I just preheated it while the loaf proofed, put it in the oven and watched it. Or as my wife put it "worshipped it". It didn't spring very much, and when I took it out I understood why, it had the hardest crust of anything I've ever seen. This was more akin to dwarven battle-bread than anything edible.

I wish I'd thought to take a picture of it side-on, it split from the bottom a little bit.

Anyway, it smelled good, so I cut it and we ate it fresh from the oven, still warm.

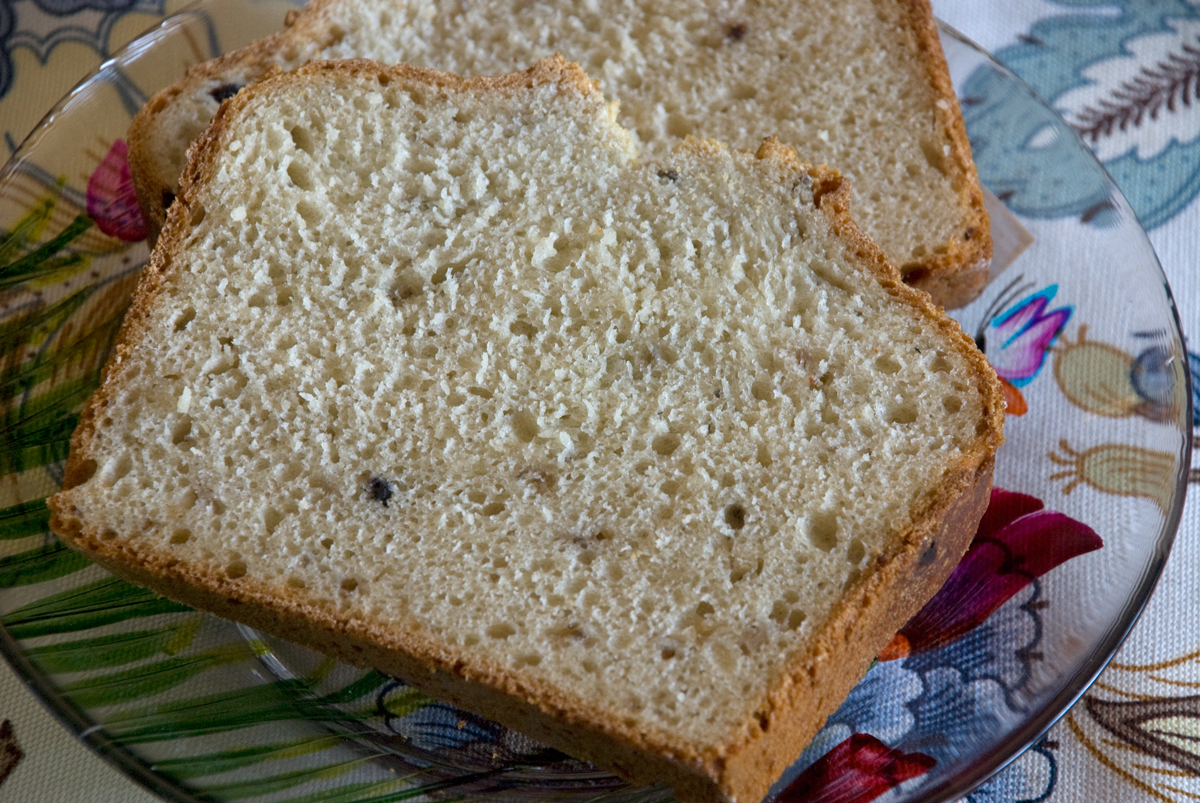
The crumb is.... nonexistent. It is a dense, heavy loaf.

(Sorry for the image quality (or lack thereof), old cellphone camera).

It was actually quite tasty, and the crust was crunchy and edible. We had it for lunch with butter, and some delicious cabbage soup.

Cabbage soup

  • 3 onions
  • some oil
  • 1.7 liter boiling water
  • half a white cabbage, minced
  • 3 carrots, chopped
  • 1 onion
  • tomato paste
  • salt
  • sugar
  • lemon juice
  • sweet paprika

Chop the three onions into slices from pole to pole, so you get nice onion strings. Saute them in oil. I do this in the pot I'm going to make the soup in, no lost flavors this way. You want the onions to start getting clear, but you don't want them to lose their texture too much, they should be just a bit crunchy.

Add the water, cabbage and carrots. Chop the remaining onion into eighths, add that in too. Put in some tomato paste, enough so that it adds color and flavor to the water. (The amount depends on the type of cabbage you use, the type of tomato paste and personal preference). Mix well. Add the remaining ingredients, I have no idea how much. Until it tastes right.

Bring to a boil, then let sit on a low flame, covered for a long time. Like 2 hours at least.


Things I am proud of

I made up the bread recipe (and cabbage soup recipe) by myself. It came out edible. Not as good as I would have liked, but still better than I would have thought.

I got a really nice seam on the bottom of this loaf. There is still room for improvement, but it's a step in the right direction.

I like the cuts I made. Previously I had just randomly poked at my bread with a knife. But after reading the scoring guide here, I knew what I was doing. I still have a ways to go, but for a first real attempt this was very good.

Things to improve for next time (if there will be one)

Change the flour ratios. Maybe go for 70-30.

More hydration. I don't know how much, but more.

In lieu of steam, maybe brush the bread with water before baking.

hungryscholar's picture
hungryscholar

This is so far my favorite of all the pumpernickels I have made. While I am now aware that there is another kind of pumpernickel bread that I have yet to bake, this my version of the kind of bread that I liked to have for my sandwiches growing up. I called it American pumpernickel in hopes of mollifying any pumpernickel purists. It's not quite as dark as I imagine I could get it with caramel color, but I can't quite bring myself to do that, even though I've added food coloring to plenty of deserts before. So I used two of the other often suggested options, cocoa powder and coffee. The coffee really seems to go well with the rye and fennel seeds which I also added. I used brewed coffee because I figured the rule about only cooking with wine you'd drink ought to apply to coffee. Or... there was enough coffee left over in the pot the next morning.

Ingredients350 g all-purpose flour150 g pumpernickel rye350 g coffee (brewed)1 T cocoa powder1 T fennel seeds100 g stiff levain (~50% hydration)10 g salt
As for method, I doubt I would do it the same way the next time, but this time it started out in my bread machine on the dough cycle, because lately I've been using it to knead the dough for my daughter's weekly sandwich loaf. So, I put everything into my bread machine but the salt(because I forgot about it). Once I remembered I paused the machine for about 20 min., added the salt and restarted it. I also paused it and did some S&F every 30-45 minutes through the machine's cycle, because I was afraid I was going to end up with glop instead of dough. When the dough cycle was done I let the dough proof in my oven with the light on at around 85 F for about 90 min to bring the total time from the start of mixing up to about 3 hours.
Then I took it out of the pan, preshaped as a boule and let it rest for 15 min. and then did a final shape and let it rise in a floured brotform for about 3 hours before slashing and baking on a stone with a bowl on top. I preheated the oven to 450 F or so and dropped the temperature to 400 F once the bread was in the oven. I left the bowl on for 20 min and then baked for an additional 20 after removing the bowl. This is about when I realized it was a lot harder to judge crust browning when it's already so brown at the start of the bake, so I decided to take it out after 40-45 min total.

Submitted to YeastSpotting

beakernz's picture

Best moment to harvest from established sourdough starter?

March 6, 2013 - 3:31am -- beakernz

A bit of a noobie question but I am wondering what the optimal time is to take material from an established starter.  If I feed my starter in the morning, by noon it has doubled and sometimes continues increasing for another hour or two.  Then it will begin to slowly reduce in volume.  Is it optimal to collect material when it hits the absolute peak or wait until it settles down again?  Any thoughts?  Thanks!

Isand66's picture
Isand66

My wife is not a big fan of my multi-grain breads and I'm always getting on her for not trying more of my breads.  For this reason I agreed to make her an English Muffin bread, which was simple and plain.  Well you know by now if you follow my posts that I don't know the meaning of the word simple so here is as close as I could bring myself to make a simple English Muffin style bread.

I used a similar recipe that I have used for my last batch of English Muffin and baked it in a loaf pan and the results were better than I expected.  It tastes like an English Muffin but you can taste the Durum flour I used in the starter and a hint of the cheese I added in.  I used a blueberry cheddar cheese to make it interesting but in hindsight I should have added more than I did to really get the flavor.

The bread came out with a nice English Muffin open crumb and makes great toast.

English Muffin Bread Main Dough

165 grams Durum Starter (you can use your regular Sourdough starter at 65% hydration instead if desired.  I had this left over from one of my previous bakes)

620 grams European Style Flour (KAF or use Bread Flour with a little Whole Wheat)

300 grams Greek Plain Yogurt (I used Fage 2%)

235 grams Water (85-90 degrees F.)

50 grams Cheese (I used grated Blueberry Cheddar.  Add in final mix)

26 grams Sugar

10 grams Salt

12 grams Baking Soda

Semolina or Cornmeal for Dusting

Directions

Mix flour, starter, water and yogurt in your mixing bowl and mix for 1-2 minutes to combine.  (Note: in my English Muffin recipe I did not add the water until the second day, but I forgot and mixed it up first and it didn't seem to hurt anything).

Cover the bowl and let it sit out at room temperature overnight or for at least 9-10 hours.

The next morning add the rest of the ingredients and mix for a minute.  Knead the dough either with your mixer or by hand for around 4 minutes, adding additional flour if necessary.  Next place the dough in a lightly greased bowl and let it rest covered for 1 hour at room temperature about 70 degrees F.  After the rest form it into a loaf shape and place it in a greased bread pan and let it rise covered with a moist towel or greased plastic wrap for another hour until the dough rises about even with the top of your baking pan which in my case was about a 50% rise.  This bread will get a huge lift in the oven so don't worry if it doesn't rise too much while resting.

Pre-heat the oven to 350 degrees F. and when ready to bake add your steam per your normal method and bake for around 45 minutes to an hour until the internal temperature reaches 200 degrees.

Let the bread rest on a rack for about 2 hours and then enjoy!


I don't know who's more excited about my KAF order...me or Mookie!

dabrownman's picture
dabrownman

With David Snyder recent post of his new take on SFSD with higher amounts of Semolina and Ian’s new bread with semolina, it was only natural that another semolina bread would fit in this week. This one had a small amount of Desert Semolina - 150g.  We wanted to see if the high gluten, not just protein, claims were true.


The bread has 35% whole grains that included millet, another yellow grain and Kamut a durum variety that has a yellow cast too.  We didn’t want the whole grains to take away from the yellow crumb color we were shooting for the Desert Durum.  The small amount of honey was there to sweeten the non yellow AP flour since the yellow ones are pretty sweet all by theselves.


This bread was leavened with combination yeast water and mainly whole grain SD starters.   For the liquid in the dough we used the left over soaker water from our last 100% whole grain pumpernickel bread.  We added some ricotta cheese in keeping with this Altamura shape and Italian leanings of this bread – plus we are growing to like cheese in bread and the moisture it imparts to the crumb.


Since the color of the dough was yellow we thought green add ins would be appropriate and included pumpkin seeds and pistachios along with some millet seeds.  This bread isn’t as complex as some of the others we bake but it wasn’t meant to be since this is about as white a bread as we usually get around to making and we were getting low on white …..eeerrrr….yellow bread.


The levains were built separately over two builds and 8 hours.  The SD portion has spent a few days in the fridge before the final build to get it nice and sour.  The method is similar to or recent bakes but only this time only a 1hour autolyse, with the salt, was used.  We did 10 minutes of slap and folds until the dough was silky smooth and the gluten well developed. 


We incorporated the add ins on the first of 3 S&F’s which were done 15 minutes apart.  After 1 hour of ferment on the counter, the dough was bulk retarded for 14 hours.  In the morning it was allowed to warm up o the heating pad for 2 hours.  It was then shaped Altamura style but once again, it came out too long for the 12” mini oven so we folded each end under to shorten the shaped dough without having to redo it all.


After a 2 hour final proof on the heating pad, we started up the mini oven for preheat with the bottom of the broiler pan 1/4 full of water.   The bread was baked at 450 F with (2) of Sylvia’s steaming cups on the top of the broiler pan with the dough.   After 12 minutes we removed all of the steam and turned the oven down to 425 F, convection this time.


After 5 minutes 3we flipped the bread over on its top  to brownnthe bottom since the bread had sprung well and the top was getting done before the bottom,  5 minutes later we turned the oven down to 400 F convection androtated the bread 180 degrees.  5 minutes later we flipped the bread over and continued to bake for another 5 minutes until the bread reached 205 F on the inside.  All total the bread baked 32 minutes 12 with steam.


The bread crust came out that usual durum color.  It was nicely brown, blistered  and crispy that went soft as it cooled.  The crumb was fairly open but not as much as we expected with the nice rise during proof and the spring in the oven under steam.  Still, it was very soft, moist and airy with the green and brown splotches of the pistachio and pumpkin and the yellow millet bits that stayed crunchy.

Can’t really makeout the ricotta cheese but the soft moistness of it was left behind.  This bread reminds me of bread with cream cheese in it.   We like the taste of this bread and it made a fine sandwich for a late lunch today.  We will be making a version of the bread again.

Formula 

Starter Build

Build 1

Build 2

Total

%

Whole Grain SD Starter

10


10

1.63%

Spelt

15

15

30

4.88%

Dark Rye

15

15

30

4.88%

AP

50


100

16.26%

Yeast Water

50


50

8.13%

Water

30


80

13.01%

Total

170

30

300

48.78%


SD Starter Totals


%


Flour

165

26.83%


Water

135

21.95%


Starter Hydration

81.82%


Levain % of Total

21.52%


Dough Flour


%


Kamut

78

12.68%


Semolina

125

20.33%


Millet

47

7.64%


AP

200

32.52%


Total Dough Flour

450

73.17%


Salt

9

1.46%


Dough Soaker Water

350

56.91%


Dough Hydration w/ Starter

77.78%


Add - Ins


%


Pumpkin Seeds

50

8.13%


Ricotta Cheese

130

21.14%


Pistachio

50

8.13%


Honey

5

0.81%


Millet

50

8.13%


Total

285

46.34%


Total Flour w/ Starter

615


Total Water w/ Starter

485


Hydration w/ Starter & Adds

79.27%


Total Weight

1,394


% Whole Grain

34.96%


Ricotta Cheese not included inhydration calculations.


KYHeirloomer's picture

100% Barley Pan de Cebada

March 5, 2013 - 2:44pm -- KYHeirloomer
Forums: 

Not sure if this is the right forum, but here goes.

I'm trying to find a proven recipe for Pan de Cebada. Modern versions combine the barley flour with whole wheat, and sometimes other grains. But the original was strictly barley flour.

I'm also wondering what the rising mechanism is, considering that barley has so little gluten.

Any help will be greatly appreciated

Floydm's picture
Floydm

I've just updated the sandbox (development) version of this site.  If you are so inclined, take a peek!  Username crust, password crumb to get to the site.

For a recap of changes, read my previous post.  Since then I've refreshed the database, worked on the side rail, and put considerable energy into making the mobile and tablet versions work right.  There are still adjustments to make, but it definitely is useable on Android and iOS devices now and a much better experience than what we have now.

Hey!  Check out the Maple Oatmeal Bread recipe featured on the sandbox homepage.  I am using a new module called Recipe that provides a more structured recipe format. It has some neat features like being able to scale the recipe up and down.  If you try it, let me know what you think.  In the past I've steered away from recipe organizers because I didn't want this site to become "just another recipe archive", but at this point our community is well enough established that it won't be threatened by having a section where people can quickly store or look up recipes.  The community will still be front and center.

Also, thank you to the folks who gave me feedback on the previous revision of the sandbox site.  It was very helpful.  What items I couldn't act on have still be noted and I still hope to address them. 

The timeline for the migration to the new version of the site remains unchanged: next week we're heading to Poland to visit my wife's family, so I won't be able to move this foward further until after Easter.  It is getting pretty close to ready though, I think, so I'm hopeful that a week or two after I get back I'll be able to port the site over.  I have a new, faster server with more memory all set up waiting for it.  

There are certain to be some bumps in the switch over, things I didn't think to test before hand, but the sooner we're over to the new version the sooner I can focus all of my attention on the same tool everyone else here is using. I'm looking forward to being responsive to your needs again rather than responding to feature requests with something like "Yeah, well... Uh... that'll be fixed in the next version." ;^)

Finally, the softest sell ever.  

This migration is a lot of work.  I've been turning down client work to carve out the time to work on it.  I think it is going to be really good and, after the initial suprises, folks here will really like it.  I know that today I prefer working on that version of the site to this one. 

In the past, folks here have mentioned that they'd be happy to pay for a membership to The Fresh Loaf or have some other way of making donations to support the site.  So when I started work on this redesign, I looked into various website membership models.  I also thought about a very-leaky paywall, something like "if you view more than 100 posts in a day, you get a little nag message that says "Wow, you really like this site!  Would you consider supporting it?"  Ultimately I wasn't happy with the dynamic either one would set up here, either "members vs. non-members" or "Floyd as the administrator who gets to decide how much access to content everyone gets."  Neither felt right.  So rather than impose a new funding/membership model, I simply set up a donation page on WePay and would gladly accept your support.  You can get to it here.  

I will pass the hat again later, perhaps after the new version of the site is live, so if you'd prefer to wait and see what we end up with before deciding whether you want to chip in, I totally understand.  As I said, this is intended to be a very soft sell, not a full blown pledge drive.  

Regardless, thanks for making this a great community to work for.  I hope the upgrade will bring the technology up to a level of usefulness and simplicity the community deserves!

Cheers,

-Floyd

Pages

Subscribe to The Fresh Loaf RSS