The Fresh Loaf

A Community of Amateur Bakers and Artisan Bread Enthusiasts.

sortachef's blog

sortachef's picture
sortachef

If you’re anything like me, you’ve got a few sourdough starters lurking in your fridge. One I made from organic California grapes lovingly teased into fruition over 10 days some years ago. Another from rye flour that naturally ferments. And last fall’s brainchild, made from mountain berries plucked at 3600 feet. That last one yielded 6 lovely loaves and then promptly went into a funk.

But I’m going to be honest here: I don’t use any of my starters in this recipe. Every one of those starters is finicky and unpredictable at best, and when it comes to making bread, reliability is the key. So I’ve come up with a method that yields great sourdough loaves in a 3-day process. Very little attention is necessary until the third day, and the results are amazing. If you don’t have a woodfired oven, instructions on baking in a conventional oven are included as well. Go on, relax and make some sourdough!


Woodfired Sourdough Bread


Make 3 loaves, 23 ounces each


For the Starter:

2/3 cup rye flour

2/3 cup unbleached all-purpose flour

¾ cup cold water

1 teaspoon active dry yeast

Mix these together in a large bread bowl with the handle of a wooden spoon, scraping the sides clean as you go. Cover with a clean dish cloth or a loose-fitting lid and let rise in a cool place (55-60° environment) for 12-14 hours until frothy. I do this step in the early evening and let it go overnight.


First replenishment:

½ cup rye flour

½ cup unbleached all-purpose flour

3/8 cup cold water

Add these to your starter to ‘feed’ it in the morning. Scrape the sides again, put on a loose-fitting lid or a piece of plastic wrap and let it sit in a cool place for another 10-12 hours.


Second replenishment:

1 cup unbleached all-purpose flour

½ cup cold water

Feed the starter again, this time with wheat flour only. Let sit covered in a cool place for 10 hours or overnight.


Make the dough:  By morning, the starter should be bubbly and somewhat risen. It will also smell sour, which is the smell of active lactobacillus fermenting in the mix. This is good. Now add to the starter

2 cups of water at 105°

½ teaspoon of active dry yeast

4 cups of unbleached white bread flour (I use Pendleton Mills ‘Morbread’ with 12% gluten)

3 teaspoons of salt

2 Tablespoons of flaxseed meal (optional)

Mix the dough well, scraping the sides of the bowl to incorporate all the ingredients, and then knead for 10 minutes on a lightly floured surface. Return the dough to a clean bread bowl, cover and let rise for 5 hours at room temperature (68-70°).

Deflate the dough, turning it over as best you can and leave to rest for a further 1 to 1½ hours before shaping into loaves.

For Baking in a Woodfired Oven: For best results, bake this bread in an oven that has been heated for 2½ hours by a medium-sized active fire. In the last hour, move the fire from side to side to allow even heating of the floor tiles. After this time, move the active but non-flaming coals to the back, throw on a fistful of hardwood twigs and sweep the floor clean of ashes. Once the twigs have finished burning, you’re ready to bake the bread.

For Baking in a conventional oven: Line the center rack with quarry tiles or a pizza stone and preheat at 450° for at least half an hour. When the loaves are ready for baking, drop the heat to 400°.

Form the loaves / final rise: Turn the dough out onto a lightly floured counter and divide the dough into 3 equal pieces. (note: if using a conventional oven, you can only bake 2 at a time; put one of the pieces back into the bread bowl for another hour.) Form a ball with each piece by stretching the longest skin of dough across the surface and tucking it underneath.

Line 3 baskets with cloth napkins or dish cloths, and sprinkle generously with flour. Plop the dough balls into these, toss on a bit more flour, cover with the corners of the cloth and let rise for 1¼ hours in a warm place.

Once risen, turn the unbaked loaves onto either a wooden peel or the back of a cookie sheet sprinkled with cornmeal. Brush loaves lightly with an eggwhite mixed with 1 Tablespoon of water and slash as desired.

For Baking in a Woodfired Oven: Slip the unbaked loaves into the oven in a semi-circle about 12” away from the coals. Close the door all the way and bake for 1 hour, turning several times to bake evenly. Loaves are ready when the crust is medium brown.

For Baking in a conventional oven: Slip loaves 2 at a time directly onto the tiles or pizza stone. Bake for 20 minutes at 400°, lower the heat to 350°, and bake for another 40 minutes, turning the loaves as necessary to ensure even baking. Loaves are ready when the crust is medium brown.

See original publication and more photos at http://www.woodfiredkitchen.com/?p=2289

Copyright 2011 by Don Hogeland 

sortachef's picture
sortachef

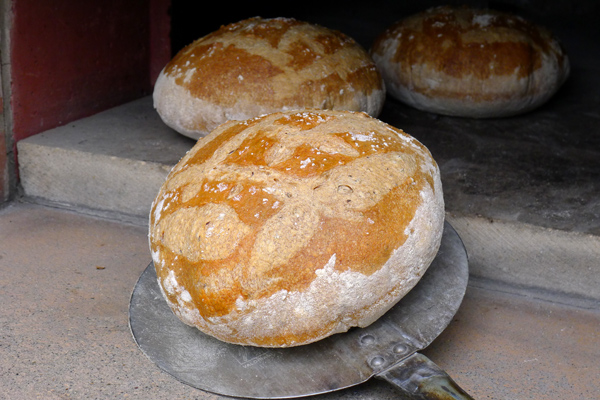
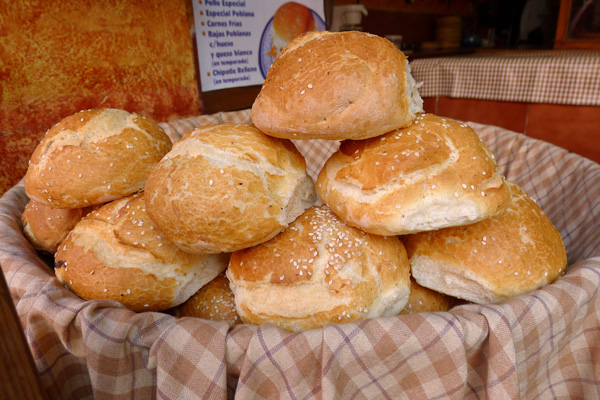
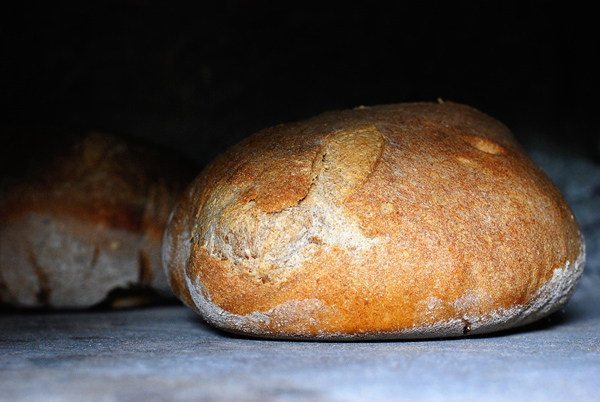
I baked some lovely loaves in my oven the other day, and as I slid that smoky, crusty bread out and onto cooling racks, I couldn't help thinking of those old European bakers, who've been baking with fire for hundreds of years. The limited size of my oven, however, has led me to adopt some measures that may or may not be part of that tradition. They work for me, and they might work for you too.  

To make it simple, I’ll break it down.

Overview: To bake 4 loaves in a 40” diameter woodfired oven, you'll need about 7 pounds of dough. The free-standing loaves will bake in a semi-circle around a hot but barely flaming mound of coals pushed to the back. Key to success in this kind of baking is to have the floor evenly heated before the loaves go in. I have a loose-fitting metal door for my oven, which acts as a damper and which I close when the loaves are baking.

The Dough: Unless you have a complicated steam-injection system as some French bakers have for their brick ovens, you won’t be able to get enough steam into your oven to make much of a difference in the bloom. Either the masonry will absorb the humidity almost at once, or you will be splashing on water, which can crack the hot base. Instead, in order to get a big round loaf, a good crust and a soft, well-textured crumb, you need to create a dough that is wetter than we Americans think is normal.

I’ve been working with wet doughs in the 65-70% range for longer than I’ve had a WFO, ever since I saw a Roman baker literally throw the dough out of a bucket and onto a long wooden peel at Forno in the Campo dei Fiori. While I don’t recommend a dough quite that wet (it had to be 80-85%), I do recommend bumping up the hydration a bit for woodfired baking.

Joe Ortiz in his book The Village Baker has some excellent tips (page 55) on how to do this. Making a sponge, letting the dough sit overnight, and using less yeast are all good advice. I would add to this letting the dough hydrate for an hour before kneading and having a good dough scraper handy for bench work. For one recipe that follows this technique, see Lago di Como Bread.

Slow Rising: Once you’ve made a wet dough, you need to let it rise for an ample time. I’m being deliberately vague, because temperature and time become fluid at this stage. With less yeast or a starter, at 50° the first doubling can take 5 hours or more. I let this part happen in its good time, and then slowly warm the dough for the next phase, because once the dough is active, it’s very important to have the oven heated to the right temperature at the right time.

Gradually raise the dough temperature to 70° in the second rise, giving the dough a fold after an hour or so. Now is the time to get your oven hot. In another hour, once the dough is showing springiness and a few big bubbles, you can make the loaves.

The Loaves:  Bannetons are lovely to work with but are expensive. Instead, I use plastic bread baskets lined with cloth napkins or dish cloths, with a coating of coarse flour rubbed into the fabric. These work beautifully as proofing baskets for my finished loaves.

Once the dough has nearly doubled in size again, turn it out onto a floured surface. Deflate about half of the gas out of it and cut it into 4 pieces. The perfect weight for me based on oven size is 27 ounces per loaf, which allows some leftover dough for another day. Form your loaves and put them into the cloth-lined baskets to rise. At 70° this will take 45 minutes.

When ready to bake, turn the loaves out onto floured peels.  Shape lightly, tucking edges under without deflating the dough and slash a design with a lame if desired. 

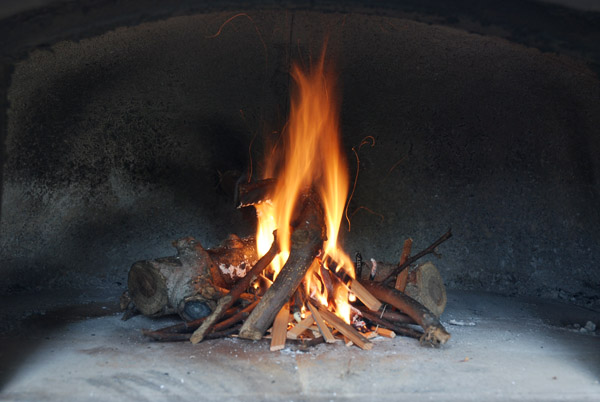
The Fire:  There are so many variables inherent in making a fire in a woodfired oven that I’m loath to give specific directions. Atmospheric conditions, the length of time since your oven was last fired, the type of wood you’re using and how it was cured all play a role. If your oven is outdoors, as most are, you’ll want to baby it when the weather is cold. See Moderating Heat in a Woodfired Oven for more on this.

Generally speaking, though, your fire should be at least 2 hours old with a good base of coals by the time you put in the bread. In the last hour, push the fire around from side to side to make sure the base of the oven gets heated evenly, adding small branches and an occasional wrist-thick log as necessary to keep a good fire going. During this time, using a set of bellows to fan the flames is optimal.

The Oven: As the fire pulses and flames, you should be paying attention to the oven walls, floor and door. I check the heat of the door handle, the amount of flame, the amount of whitening ash on the ceiling and walls and the floor temperature about every 10 minutes after the fire is going full force.

In the first hour, if the fire is raging and throwing flame on the oven ceiling, I slow it down by closing the door all but 2” to stop it ‘overfiring’. Otherwise, I leave the door off as the fire matures, and put it in place cocked about 4” open toward the end of the first hour. By then, the door handle should be warm to the touch but not hot, there should be a small amount of whitening on the ceiling, and near the doorway the floor of the oven should be warm to the touch.

In the second hour, move the fire side to side so that the floor heats evenly. Toward the end, the door handle should be quite hot, the ceiling of the oven should be half white and the floor of the oven near the doorway should be too hot to touch for more than a second. Now you’re ready to bake.

Push the mature coals to the back center of the oven, near the wall, and brush the ashes off of the floor.  There should be 6 to 8 fist-sized chunks of glowing hardwood coal and a good bed of embers, but little or no flame when the loaves go in.

The Baking Procedure: Make sure each finished loaf can ‘slip’ on its peel. Slip each loaf into the oven to have a long side parallel to and 10” from the coals. Close the door. Use this rough timeline for baking:

  • After 20 minutes, turn loaves so the other side faces the fire.
  • After 20 minutes, turn loaves so one end faces the fire.
  • After 10 minutes, turn loaves so the other end faces the fire.
  • After 15 minutes, remove loaves to a rack to cool.


Trouble-shooting: Besides the obvious problem of getting the oven and the dough ready at the same time, I’ve encountered two main difficulties in baking perfect loaves in my woodfired oven: a stubborn fire and a cold floor. Often they coincide.

When the atmosphere is damp and heavy, the fire is stubborn as a result. I counter this by keeping some ultra-dry wood on hand inside my house, adding it to give my fire the extra boost it needs. Even then, under certain conditions, it can be a real challenge to maintain a good fire.  

The other is when the oven hasn’t been used in a while and the floor is slow to heat. In dry conditions, you can usually overcome this with a bit of extra time. However, if this happens when you’re dealing with a slow fire as well, the floor may not get hot enough to put a firm base on your bread. Be very careful when turning your loaves in this condition. To counter, warm some quarry tiles or a pizza stone to 450° in your indoor oven to finish off the loaves for 10 minutes after WFO baking. It may not be the ‘purist’ thing to do, but it works!

Suggested reading:

The Village Baker by Joe Ortiz, Copyright 1993 by Ten Speed Press, Berkeley

The Italian Baker by Carol Field, Copyright 1985 by Harper Collins

Also see www.woodfiredkitchen.com for more tips, techniques and recipes. Flame On!

sortachef's picture
sortachef

Here's a sandwich roll that just might eclipse the Italian hoagie roll for best in show. It's got some egg in it which, along with the sesame seeds, adds a savory undertone that can hold its own against almost any filling -- no matter how wild you want your sandwich to be. And, because I've streamlined the process for home baking, this one's considerably easier to make.

Now if you've ever been to Paesano's in South Philly, you'll understand what I mean by wild. Grilled meatloaf, suckling pig or spicy chicken with broccoli rabe? Yep, they've got it. These rolls were created with sandwiches like that in mind. See Sandwich Spectacular: Paesano's and Sesame Seeded Sandwich Rolls for more on that.

Of course, if you want to make true east coast Italian hoagie rolls, my companion recipe will warm the cockles of a Philly boy's heart. Check that one out Here.

Cheers and happy baking!


Sesame Seeded Sandwich Rolls cooling on a rack


Sesame Seeded Sandwich Rolls


Makes 8 rolls, 5 ounces each


½ cup water at 100°

2¼ teaspoons instant dry yeast

15 ounces (3 cups) unbleached all-purpose flour + 5 ounces (1 cup) high gluten flour

-or-

10 ounces (2 cups) unbleached all-purpose flour + 10 ounces (2 cups) bread flour

4 teaspoons of sugar

2½ teaspoons of salt

1/8 teaspoon of ascorbic acid, or Fruit Fresh (optional)

1 cup water at 100°

1/3 cup milk, scalded and cooled

2 eggs

Additional flour for bench work

2 Tablespoons of sesame seeds


Recommended equipment:

2 pieces of parchment paper 11"x15"

6 quarry tiles or a large pizza stone (see note below)


Prepare yeast and milk: In a small bowl, whisk together ½ cup warm water and a packet of instant yeast. Let stand for 5 minutes, until blooms of exploding yeast rise to the surface. Meanwhile, scald 1/3 cup of milk in a small pan by bringing it to a bare simmer over medium heat and then let cool.


Make the dough: In a large bread bowl, dry mix the flour, sugar, salt and Fruit Fresh. Make a well in the center and add the yeast mixture, 1 cup of warm water and the cooled milk. Mix it all together with the handle of a wooden spoon until the flour mixture and liquids are incorporated. 

Lightly flour a work surface. Using a dough scraper or spatula, lift the raw dough out of the bowl onto it and knead for just a minute to lump dough together. Invert the bowl over the dough on the counter and leave to rest for 20 minutes or a half hour. This will make kneading much easier.


Kneading and first rise: Knead the dough for 7-10 minutes until smooth and supple, adding small amounts of flour to keep it from sticking to the counter and your hands.

Clean and dry the bowl and put the dough back into it; cover and let rise for 2 hours or more at room temperature, until dough doubles in size.


Egg addition and second rise: Separate 1 egg, reserving one egg white in a small bowl to be used later.  Add the egg yolk and 1 whole egg to the risen dough, mixing in ½ cup of flour to counter the stickiness (yes, it's kinda sticky at first). Knead for a few minutes until the egg is well worked in. Clean and dry the bowl again if necessary. Put the dough back in and let it rise for a further 1½  hours at room temperature.


Shaping, coating and third rise: Divide the dough into 8 equal pieces. For accuracy, use a scale; each piece will weigh just over 5 ounces. On a lightly floured work surface, shape each roll into a 9" long snake. For best results, stretch rolls gradually over a 10-minute period in order to avoid tears in the skin.

Whisk the reserved extra egg white with 1 teaspoon cold water. Lay the parchment paper out on the backs of two cookie sheets. Put the dough snakes onto the parchment paper, 4 to a sheet and brush the tops twice with egg wash. Sprinkle with sesame seeds. Let rise in a warm humid place for 1 hour or more until doubled in size again.


Bake the rolls: In a conventional oven, fit quarry tiles or a pizza stone on the center rack and preheat oven to 425° for 30 minutes.

Slip risen rolls directly onto the quarry tiles or pizza stone on their parchment paper, cooking 4 at a time. Spray a few squirts of water on the hot oven walls for a nice bloom, quickly close the door and bake for 11 minutes until the rolls are lightly browned on the top. Remove from the oven and let cool for 30 minutes on a rack before diving in.

Repeat as necessary with the other rolls.


To make an awesome Chicken and Broccoli Rabe sandwich: Split a Sesame Seeded Sandwich Roll and layer with field greens, hot chicken breast, steamed broccoli rabe and mature cheddar. Happy noshing!    


Quarry tile note: If you don't have quarry tiles or a pizza stone, don't worry; the rolls will be fine, just a bit flatter. Sprinkle cornmeal or semolina onto 2 cookie sheets and put the dough snakes onto it for their last rise. Coat as directed above and bake in the oven on cookie sheets. Quarry tiles are available here in Seattle at Tile for Less.


Here's a photo of a Sesame Seeded Sandwich Roll filled with Wild Greens, Chicken, Broccoli Rabe and Mature Cheddar. Go on, free your imagination!

Copyright 2011 by Don Hogeland and woodfiredkitchen.com


sortachef's picture
sortachef

Homemade Hoagie Rolls fresh from the Oven


Real Italian Hoagie Rolls


After a week in the Philly area rediscovering my local sandwich joints, I came back to Seattle with the fresh taste of hoagie rolls lingering in my mouth. Over the next few weeks, with some hints from the folks at the Conshohocken Italian Bakery, I managed to replicate them.

I'd had Conshohocken Bakery's rolls at Pudge's, famous for steaks and hoagies in Blue Bell, PA. My first attempts came out more like baguettes, and so I tweaked the humidity and the flour content, but once I got close the cross-section of my rolls were not super round, and the bite was still too dense.

One morning I called the people at Conshohocken Bakery (voted #1 Italian bakery in the region) and told them what I was doing. Their head baker listened to my techniques and sorted a few things out.  

So here you go, sandwich rolls that are as close to authentic East Coast sandwich rolls as you're ever likely to get in a home kitchen. Call them what you want: torpedos, hoagie rolls, subs or zeps. In any case, I think you'll agree they make the best sandwiches around!


Makes 6 rolls, 9" long

14 hours for overnight rise (8 hours for fast rise)


2 teaspoons dry yeast (+ 1 teaspoon for fast rise)

4 teaspoons sugar

½ cup water at 100°


14 ounces (2 ¾ cups) unbleached all purpose flour

6 ounces (1¼ cup) High Gluten flour

2½ teaspoons salt

¼ teaspoon ascorbic acid, available as Fruit Fresh

2/3 cup whey*

2/3 cup water at 100°


½ cup extra flour for bench work

2 Tablespoons of cornmeal or semolina to coat pans


Necessary for producing high-rising rolls:

2 heavyweight cookie sheets or jelly roll pans

6 quarry tiles to line oven rack, or a pizza stone

A good spray bottle to create steam in your oven

A humid 80° environment


*To make whey: 32 ounces of plain low-fat yogurt will yield 2/3 cup whey in about 2 hours. Line a strainer with paper towels or several layers of cheese cloth and set it over a pan or shallow bowl. Pour in the yogurt, cover lightly and set it to do its stuff in the refrigerator. The whey will drain from the yogurt and collect in the bowl. Measure carefully before adding.

(The resulting strained yogurt is great drizzled with honey for breakfast. You can also mix it with shredded cucumber, salt, garlic and thyme to make tatziki - our favorite Greek dip.)


Make the dough: In a large mixing bowl, stir together yeast, sugar and ½ cup of warm water. Let sit for 10 minutes until foam forms on the mixture. Add 20 ounces of flour, salt, ascorbic acid, whey and water and mix to form a cohesive mass, scraping down the sides of the mixing bowl as necessary.

Knead for 10 minutes, using as little extra flour as possible to keep the dough from sticking to your counter and hands. Clean out the mixing bowl.


First rise: You can start these rolls in the morning (using an extra teaspoon of yeast in the dough) and let rise, lightly covered, for 4 ½ hours at room temperature. In order to have the rolls ready for lunchtime, however, it's best to make your dough the evening before and let it rise, covered, in a 55° environment overnight. Set the dough at room temperature for an hour or two in the morning before continuing. By this time either method will yield dough that has roughly tripled in bulk.


Second rise: Punch down the dough and turn it out onto a lightly floured work surface. Push the dough into a fat snake and fold it into thirds. Gently push the dough into a fat snake shape again, letting it rest for a few minutes as it resists. This method will elongate the gluten, yielding the best rolls. Fold in thirds, put back in the mixing bowl, cover lightly and let sit at room temperature (70°) for 1½ hours, until nearly doubled in bulk.


Shape the rolls: Turn the dough out onto a lightly floured work surface. Gently shape into a snake again, tucking the long outer edge over itself and squeezing in to the bottom seam by using your fingers. Your emphasis from here on out is to create a gluten cloak, a continuous skin on the top and sides of the rolls.

When the snake of dough is about 2 feet long, cut it in half. Form each half into an 18" snake and cut it into three equal pieces. You will now have 6 portions of dough, each weighing between 6 and 6½ ounces. Tuck into cigar shapes and let them rest for 15 minutes.

Sprinkle cornmeal onto the cookie sheets or jellyroll pans and have them handy. Warm your 80° humid environment. (See Creating an 80° Environment at the bottom of Aunt Marie's Dinner Rolls.) Your environment should include a pan of hot water.

After your rolls have rested, flatten them somewhat to expel the largest gas bubbles, and then fold them gently into torpedoes of dough that are 9" long. Pull the gluten cloak over each roll evenly and tuck into one long seam. Put three rolls on each pan, seam-side down onto the cornmeal.


Third rise and preheat: Let finished rolls rise for 1 hour to 1 hours 10 minutes in an 80° humid environment. Line the center rack in your oven with a pizza stone or quarry tiles and preheat the oven to 450° a half hour into this rise. Have a good spray bottle with water in it beside the oven.


Bake with steam: Put a pan of the fully risen rolls directly on the quarry tiles or pizza stone and quickly spray the hot sides and bottom of the oven with 6 or 7 squirts of water. Clap the door shut to keep in the heat and the steam. Bake rolls for 10 minutes without opening the oven door. Turn oven off for 2 more minutes, and then remove rolls to a rack to cool. (As oven temperatures and spray bottles vary, your results may as well. Rolls are ready when the crust is medium brown.)


Repeat with the other pan of rolls.


When rolls have cooled, split them and pile on your favorite sandwich ingredients. My favorite Ham Hoagie is shown below. Enjoy!


Many thanks to the Conshohocken Italian Bakery for advice on this recipe. If you live nearby, run - don't walk - to their bakery.


Copyright © 2011 by Don Hogeland.  For original post, sandwich stories and more photos go to  http://www.woodfiredkitchen.com/?p=1657


Ham Hoagie made the a Real Italian Hoagie Roll

sortachef's picture
sortachef

A good sandwich deserves a good roll.  Enter the Cemita, a slightly sweet bun that gives its name to a whole style of street food in Puebla, Mexico. Crackly thin crust on the outside, with a lightly firm but airy center, and fresh! - made every morning in just one bakery, following a closely guarded recipe.

So what would a Philly boy find so enticing about a Cemita? A beaten pork and avocado sandwich, piled with sweet marinated peppers and topped with strands of panela cheese, is certainly different from the cheesesteaks of my youth. And yet, there's something similar enough there, in the way it has grown with the city into a culinary icon best eaten locally. And as with the cheesesteak, a Cemita really is one great handful of a sandwich!

For a variety of reasons, I've taken liberties with the sandwich filling. Some real ingredients are impossible to find while others (like the quarter pound of cheese) I can do without. I have, however, made the recipe for the rolls very much like the real one. If you follow it closely and bake on a pizza stone or quarry tiles, your sandwiches will be the envy of the neighborhood. Enjoy!

Pork and avocado Cemitas (Seattle style)

Visit Sortachef at www.woodfiredkitchen.com to see the original post

Cemitas: Great Sandwiches from Puebla, Mexico

Recipe yields enough dough for 8 sandwich rolls 


For the rolls:

12 ounces water at 100°

1½ teaspoons dry yeast

1½ teaspoons salt

2 teaspoons sugar

2 Tablespoons Spectrum shortening or lard

11 ounces (rounded 2 cups) unbleached all-purpose flour

1 egg

6 ounces flour (1¼ cup) flour for mixing

¾ cups flour for bench work

Water and sesame seeds to finish


For the filling (quantities per sandwich):

¼ ripe avocado

1 boneless pork chop, marinated in 1 teaspoon each vinegar and sugar, smashed with a hammer and coated with some masa harina or breadcrumbs

Oil for frying

Salt and pepper

A few sprigs of basil

2 marinated sweet cherry peppers

¼ cup shredded lettuce

White onion

Mozzarella cheese


Make the dough: Put 12 ounces warm water, the yeast, sugar, shortening, salt and 11 ounces of flour into the bowl of a stand mixer. Break in the egg. Whisk with a wire attachment for 5 minutes on medium speed until the dough is very smooth and has the consistency of a cake batter. Scrape down the sides of the mixing bowl as necessary.

Switch to the dough hook and add 6 more ounces of flour. Mix on low for a further 5 minutes or so to make a soft dough.

Turn the dough out onto a floured work surface and knead for 5 minutes or more. Put the dough into a big bread bowl and cover the bowl with plastic or a damp cloth.


First rise: 4½ hours at 65°. Punch down the dough, turn using a dough scraper, and let rise again.


Second rise: 3½ hours at 65°. I prefer at this point to put the dough in its bowl on ice packs overnight. Take away from the ice and punch the dough down early in the morning.


Shape the rolls: Shape the dough into a snake, and cut into 8 equal pieces, about 4.5 ounces each. Form into round doughballs, stretching the skin over the tops. Let rest for ½ hour, covered with a floured cloth.

Lightly butter a jelly roll pan or large cookie sheet. Flatten the dough pieces somewhat (to about 1" thick) and space them evenly on the tray. Let rest for a further ½ hour.


Preheat the oven: Turn oven to 450°. Use quarry tiles for best results. Set rack at the halfway point in the oven.


Finish and bake: Brush the top skin of the rolls with water, wait 2 minutes and then brush them again. Lightly sprinkle with sesame seeds.

Put the sheet pan directly on the hot quarry tiles and bake for 18 minutes, or until the skin on the rolls turns golden brown. Let rolls cool on a rack for an hour before filling.


To make the sandwiches: In a large frying pan fry the smashed pork chops one or two at a time in a Tablespoon of oil over medium high heat. Turned once, the chops will be cooked through in about 5 minutes or when browned on both sides. Salt and pepper to taste and leave chops to drain on paper towels.

Meanwhile, shred the lettuce and mix with some sliced onion and mozzarella cheese. Slice the avocado and sweet peppers.

Build sandwiches with (from the bottom up):

  • Sliced avocado
  • Smashed, breaded and fried pork chop
  • Sprigs of basil
  • Sliced sweet peppers
  • Shredded lettuce, onion and mozzarella cheese
  • Hot sauce, if desired


Final Note: At Cemitas Las Poblanitas, the cemitas café that takes up the whole northeast corner of the Mercado del Carmen in Puebla, more than 1000 cemitas are created every day. To sample an authentic cemita - in their case topped with about ¼ pound of cheese and finished with a slice of ham - do give them a shout if you're in the area. You'll be glad you did.

And if you happen to see my friends Alonzo and Lizbet sitting at one of the tables there, raise a beer to them. And tell them Sortachef says 'hi'!

Cemita Rolls in basket

Copyright 2010 by Don Hogeland. See original post at www.woodfiredkitchen.com

sortachef's picture
sortachef

Here's one of those quick bread recipes that pops out of my folder when I see burstingly fresh zucchini at the produce stand. It's adapted from a recipe that's been passed around in my family as 'Doris Fenton's Zucchini Bread' for donkey's years and so, when I lightened up the oil and tweaked the quantities to suit, it only seemed fair to carry on the name.

Doris Light Zucchini Bread in the pan

Makes 2 loaves 

3 large eggs

2 cups sugar

½ cup canola oil

½ cup apple juice

1½ teaspoons vanilla


2 ¾ cups all-purpose flour (see note)

1½ teaspoons cinnamon

2 ¼ teaspoons baking soda

1½ teaspoons salt

¼ teaspoons baking powder


3 cups grated fresh zucchini, loosely packed, about 1 pound (see note)


Note: If the zucchini is not fresh - either days old in the fridge or store bought - decrease the flour to 2 ½  cups.  Zucchini fresh off the vine has more moisture. To grate zucchini cut in thirds and put through the cheese grater of your food processor. 


  1. Set rack in center of oven and preheat oven to 375º.
  2. Using a flat beater, beat eggs until frothy.  Beat in the sugar. Add oil, apple juice and vanilla and beat until thick and lemon colored.
  3. Mix together the flour, cinnamon, baking soda, salt and baking powder in a bowl.  Add along with the zucchini to the egg and oil mixture and beat until blended.
  4. Pour evenly into 2 buttered and lightly floured glass loaf pans.
  5. Bake for 10 minutes at 375º. Lower heat to 350º degrees and bake for 1 hour longer.  The loaves should have a dark skin with splits along the top, and a toothpick inserted into one of the splits should be nearly clean, with no batter buildup.
  6. Cool in pans on rack for 15 minutes.  Gently remove from pans, using a sharp knife if necessary, and then cool for an hour or more before serving.

Freezing note: Make this zucchini bread now, when the zucchini is at its most flavorful, and freeze some for later. Wrap half loaves tightly in plastic, label and freeze in loaf bag. It's great months later when thawed for a feast!

For original blog, please go to www.wsoodfiredkitchen.com or search for 'Sortachef'

Copyright 2010 by Don Hogeland

Doris Light Zucchini Bread slices

sortachef's picture
sortachef

Pizza with quick-rise dough


A newly minted yeast showed up on my grocer's shelves last week. Made specifically for pizza crust by Fleischmann's, a venerable yeast company now owned by Associated British Foods, Pizza Crust Yeast promises a fully risen crust in just 30 minutes. Turbo-charged in other words. I just had to give it a spin.

Before I get too specific, let me tell you this: the yeast performed admirably. We made test runs with two different doughs using the specialized yeast, both in the conventional oven and in the woodfired oven, and every pizza came out beautifully. The crusts were puffy and mature despite the brief rise. My favorite was made with half caputo flour and had a longer rise time than the promised 30 minutes, while the meat-lovers in my family gave two thumbs up to the fast rising pepperoni pizza made with a crust recipe very similar to the one on the package. (The pizza in the photo above is in the oven after only 27 minutes!)

What's different about this yeast? Besides dry yeast granules, the package contains a cocktail of emulsifiers, antioxidants and enzymes that speed the growth of the yeast. You also add water that is 10 or 20 degrees warmer than normal - in the 125º range - that gets the process off to a very fast start. Turbo charged, indeed!

If you're familiar with yeast doughs, you will notice a difference as soon as the hot water is mixed with the dry ingredients. Because of the boosted heat and the emulsifiers involved, the gluten in the dough forms quickly, adding a spring to the dough that you wouldn't feel for 20 minutes or more if using conventional yeast. With the pizza crust yeast, the dough after a few minutes puts out an earthy smell, almost as if it is cooking. This smell alarmed me a little at first, but did not linger throughout the forming and baking processes, and was not apparent at all in the finished pizzas.


So here's the skinny:

  • If you want the fastest yeast crust pizza available, use the dough recipe in my 40 Minute Pepperoni Pizza. The 30-minute dough (plus about 10 minutes of baking) held together better than any quick dough I've ever made. For best results, bake the pizza directly on quarry tiles on the center rack of your preheated oven.
  • If you want a more mature crust that tastes like a high-quality pizzeria pizza, in the same recipe use caputo flour for half the flour and cut the amount of yeast in half. Knead well and let dough sit for an hour before forming your pizza. This 90-minute dough will rival an artisan crust, although it will lack the nutty flavor that comes with an overnight rise.


Meanwhile, before you rush to the store to get some of this whiz bang pizza crust yeast, you might want to know what the added ingredients are and what they do. As far as I can tell, these are well-accepted additives in the food world; you can google any one of them for more info.

Sorbitan Monostearate - a waxy derivative of sorbitol that aids yeast cells in their ability to absorb water. This one is found in active dry yeast as well.

Ascorbic acid - an antioxidant food additive group that contains as one of its members vitamin C. This is an accepted dough enhancer which I have used in small quantities to nourish and freshen the flavor of breads. Fruit Fresh is one brand, available as an additive to preserve color in canned fruits and vegetables.

L-cysteine - a nonessential amino acid that has antioxidant properties.

Enzymes - proteins that speed the rate of chemical reactions.


Conclusion: If you're in a hurry for a good homemade crust, this yeast will do the job of speeding things up. And since it does that in about the time it would take to bake a frozen pizza, I say the decision is a no-brainer. After all, the best pizza is the one you make yourself!

So go on. Give it your own test drive. I think you'll agree at the finish line that pizza crust yeast is a real winner!

For original post, see www.woodfiredkitchen.com

sortachef's picture
sortachef

Small fires over time make all the difference


Most woodfired oven owners only use their oven once a week or so to bake pizza or bread at fairly high temperatures. There's another level of cooking available, at lower and constant temperatures, which requires pulsing the oven with small fires. This is useful knowing about both to protect the oven from unnecessary cracking from cold firing and also to expand your cooking repertoire.

There was a time in the not-too-distant past when many home ovens were fueled with either wood or coal. These ovens were used every day, and never lost their warmth. My father remembers his mother stoking the fire at the crack of dawn to bake the daily bread. Even today, I hear through this website of people in Greek villages and Eastern European towns using wood or coal as their main source of cooking fuel.

In order to replicate this method of everyday cooking, you have to commit some time. In order to roast a chicken today, I had to find three different times yesterday - in amongst a busy schedule - to light and maintain fires. If you can find the time, however, the benefits are astounding. When I was ready to roast the chicken (see Woodfired Roast Chicken), my oven maintained a stable temperature in the 350º range for 2½ hours with no active flame throughout the cooking time. With this ability, all kinds of baked goods (including dinner rolls and pastries), casseroles, roasted meats and fish become possible.


Pulsing your oven: The trick is to 'pulse' your oven with small fires over time, in order to slowly heat all of the masonry components - the walls, the floor and the bed of sand beneath the floor. The operative word here is 'slowly'. After a cold spell in which your oven has lain dormant, this will prevent the components from cracking. For more normal cooking or baking operations, this will raise the temperature of your oven into the range of a conventional oven, with very little charring or direct smoke.

Here's what to do:

  • Use a piece of newspaper, a handful of kindling, 2 or 3 pieces of hardwood the thickness of your thumb and 2 thicker pieces of hardwood that weigh about 1 ½ pounds each (2 ½ inches thick) to build successive fires in the center of your oven. Maintain the fire for an hour, relighting and adding a bit more kindling if necessary.
  • After the hour of active fire, put the door in place as tightly as possible. You may have to put a wood wedge under the handle, as I do. Let the oven rest for 3 hours. This rest time can be variable in length.
  • Light another fire using the same amount of wood as above, and maintain for an hour. Let rest again.
  • With each subsequent fire, there will be more unburnt wood from the previous fire. Leave this in the oven and continue to add to it, building your fires on top.
  • Light a third fire in the early evening, maintain for an hour and let rest. During this rest period, you can move the coals to one side in order to cook beans or a casserole, if desired.
  • Close up the oven and let rest overnight.
  • On day 2, start a fire with the same amount of wood, maintain for an hour and let rest. By this time the parts of your oven are hot enough to maintain a temperature of about 350º. From here, you can safely and quickly take your oven much hotter (for pizza, say), or you can build another small fire to maintain low to moderate heat for roasting or baking.


Here are the temperatures I measured in my oven. As atmospheric conditions and your oven will likely be different, you will probably have different results, particularly during the first few fires.

Starting temperature: 52º, which was approximately the overnight low air temperature in Seattle (measured with an accurate thermometer).

After the first fire: 150º (measured with oven thermometer, as are all others)

After the second fire: 225º

After the third fire: 350º (I baked a pot of pinto beans for 2 ½ hours when fire was almost finished)

Starting temperature, 2nd day: 160º

After the fourth fire: 375º (I baked dinner rolls after this fire)

After the fifth fire: 425º (I let the oven cool to 350º and roasted a chicken. After 2 ½ hours, the oven temperature was 325º and the chicken was perfectly cooked.)


Final note: I just checked (10 a.m. on the third day) and, with no active fire since yesterday's noontime fire, the temperature of the oven is 160º. Hmm. I could just keep this whole thing going. Flame on!

sortachef's picture
sortachef

Cascade Cabin Cinnamon Rolls

 One of my favorite things to do when I'm up overnight at our little mountain cabin is to make cinnamon rolls, with a long slow rise. I get a batch of dough going, and let it sit for a long time in a cool corner, to rise all day. Before turning in for the night I roll the dough out and shape the rolls. Sometimes I make them all the same size, and sometimes I make them look like mountain peaks, the way I've done in this recipe. They're just perfect the next morning with freshly brewed cabin coffee.

Cascade Cabin Cinnamon Rolls

Makes 8 large rolls


For the dough:

½ cup water at 100º

2 teaspoons yeast

2/3 cup milk, scalded and cooled

4 Tablespoons butter

¾ cup sugar

1 teaspoons salt

4 cups all-purpose flour

¼ cup flour for benchwork


For the filling:

2 Tablespoons butter, lightly melted

¾ cups raisins (I use golden raisins)

3 teaspoons cinnamon

2 Tablespoons sugar


Make the dough: Mix the water and yeast in a 4-quart bowl and let sit for 10 minutes to foam. Scald the milk in a small saucepan and add the butter to the milk while it's cooling. Add the ¾ cup sugar, the salt and 2 cups of flour to the yeast mixture in the bowl and, when the milk has cooled to body heat add it as well. Stir with the handle of a wooden spoon for 200 beats to make a smooth batter.

Add the other 2 cups of flour and work it into the dough to incorporate. Make a ball with the dough, scraping the sides of the bowl as necessary. Turn the dough out onto a lightly floured counter and knead for 5 minutes. Clean and dry the bowl.

Long rise: Put the dough ball into the bowl, cover with a lid or a piece of plastic wrap, and let sit in a corner to rise. Optimal temperature for this rise is 55-60º. If you can't achieve this temperature you may have to improvise by putting the dough by a doorway or on a cellar step. Let sit for 8 to 10 hours, punching down if the dough is super active.

Shape the rolls: Roll the dough into a 10" x 18" rectangle. If your cabin has no rolling pin use a wine bottle, as I do. Spread 2 Tablespoons of barely melted butter over the flattened dough.

Cut the dough into equal quarters, and then cut each quarter in half lengthwise at a 20º angle so that one end of each finished piece is 3" wide and the other 2".

Mix the raisins, cinnamon and sugar in a coffee cup and spoon equal portions along the center of each dough piece. When all the raisin mixture is distributed, roll each piece up, starting with the widest end and keeping one side flat as you roll.

Overnight rise: Arrange the somewhat unwieldy rolls in a buttered 8" square metal or glass pan. They'll want to flop some, so let them. Cover loosely with plastic wrap and let rise for 7 hours at 55º.

Bake the rolls: In the morning, let the rolls sit near the morning fire for an hour to warm up some. Preheat the oven to 425º and, once hot, put in the rolls. Bake for 10 minutes, lower the oven temperature to 350º and bake for 25-30 minutes more. If the tops get too dark, drape a piece of foil over the rolls for the last 10 minutes.

When the rolls are baked, put down your snow shovel and grab some coffee. The rolls should probably cool for 30 minutes, but I really wouldn't know - I've never been able to wait that long!

Disclaimer: These results were obtained in a mountain cabin with thin insulation and a 40-year old electric stove. Rising and baking times will vary.

For complete text and a few more photos, see original content at www.woodfiredkitchen.com

sortachef's picture
sortachef

Sortachef's Greek Easter Bread

 Greek Easter Bread


Makes one 2 ½ pound loaf


4 Tablespoons butter

2 heaping dessertspoons of honey

2 eggs

2 teaspoons dry yeast

1½ teaspoons salt (2 if using unsalted butter)

1 teaspoon anise extract

20 ounces (about 4 cups) unbleached white flour

1 1/3 cup water at room temperature

¾ cup additional flour for bench work

A 14" pizza pan fitted with parchment paper


4 red hardboiled eggs (see Dyeing Red Eggs @ http://www.woodfiredkitchen.com/?p=742 )

1 eggyolk+1 teaspoon water for wash

4 teaspoons of raw hulled sesame seeds


Note: A flexible bowl scraper (or a Tupperware lid cut in half) comes in handy for working this dough.


Make the dough: In a mixer fitted with a flat beater, cream together the butter, honey, eggs, yeast, salt, anise extract and 1 cup of the flour. Beat well for 2 minutes. Add 1/3 cup water and ½ cup flour, beat for a minute; another 1/3 cup water and ½ cup and beat, etc., until you have used up all the water and all but a cup of the 20 ounces of flour. Beat for a further 2 minutes.

Scrape off the flat beater, scrape down the bowl, and put in the other cup of flour. Switch to the dough hook; run mixer 10 minutes on low (mark 2 for Kitchenaid). Scrape down bowl if necessary. The dough is not stiff enough for the hook to pick it up, but this mixing will improve its structure.

Knead the dough: Sprinkle half of the benchwork flour onto a counter or board, scrape the dough onto it and, using the scraper, quickly fold the edges in to the middle. Put a bit of flour onto the dough and let it rest for a few minutes while you clean out the bowl.

Knead for 5 minutes, adding flour as necessary until you have used up the ¾ cup of extra flour.

First rise: Put the dough into the bowl, cover and let rise at room temperature for 3½ hours.

Second rise: Use the bowl scraper to pull the dough in from the edges, releasing the air, and then let rise 1½ hours at room temperature.

Make the braid: Turn the dough out onto a barely floured counter. Cut a 5-ounce piece of dough off and put it to one side, covered. Now, make bulk of the dough into a snake about 2 feet long, rolling it on the counter under your hands to stretch it out. Let it rest for a few minutes. For the next step you will want a clean section of counter 3' wide, with no flour on it or the dough will slip instead of roll.

Roll the dough snake out to 3' long, and cut into three equal pieces of about 12 ounces by weight. Roll each of the three pieces out to nearly 3' long. Your dough ropes should be 5/8" in diameter and roughly uniform.

Put 3 ends together, cross two ropes and throw the third across the Y. Braid until the ropes are used up, keeping the dough slack to keep the braids loose and thick.

Make the loaf: Lift one end of the braid off the counter and slip the parchment lined pan under it, and then lift the other end around to form a circle. Overlap the two ends of the braid by an inch, and push your thumb down in at that point. The first egg will go into that depression.

Adjust the braided ring on the parchment to make it as round as you can, and push your thumb down to make depressions at the other 3 quadrants. Carefully put in the eggs.

Roll the leftover piece of dough into a snake the thickness of a pencil. Around the eggs, snip 4 places with scissors to receive the ends of the dough that crosses over them. Cut pieces of dough to make the crosses.

Final rise: Cover lightly with a cloth and let rise for 40 minutes.

Preheat oven to 400º. If you're using a pizza stone or quarry tiles (recommended), let them heat up for at least 30 minutes.

Glaze and bake: Mix the egg yolk and the water in a ramekin, and brush the egg wash over the dough, being careful not to cover the eggs. For best coverage, brush a second time. Sprinkle with sesame seeds.

Bake for 10 minutes at 400º. Turn oven down to 350º and bake for another 25 minutes, turning the bread around at halfway.

Let cool for at least an hour before sharing with your Greek friends.

See original content at www.woodfiredkitchen.com

Pages

Subscribe to RSS - sortachef's blog