The Fresh Loaf

A Community of Amateur Bakers and Artisan Bread Enthusiasts.

wayne on FLUKE's blog

wayne on FLUKE's picture
wayne on FLUKE


Made a batch of hoagies this morning. I have baked these many times. Recipe is from http://www.pizzamaniac.com/archives/2005/08/10/grinder-hoagie-roll-recipe/

I mix, rest 20 min, add salt and OO, knead in Bosch compact 10 min, mostly on 2. Rise about 90 min (room temp 66 F)

All four were 195-196 grams,  pre-shape to logs, rest 10 min, shape, rise about 45 min, slash, mist bread and oven, bake at 450 in Chicago Metallic pans.

Any ideas why the one didn't open up like the other three?

Since it was cooler than usual they may have been a little underproofed relative to what passes for normal.

wayne

wayne on FLUKE's picture
wayne on FLUKE

I have been wanting to try the Tangzhong method for a while when I want soft, fluffy bread. I also was very impressed with txfarmer's demonstrations of kneading technique to get soft and fluffy (and everything else she does!). I finally got around to it. I made up the Tangzhong yesterday and put in fridge overnight. There are good videos of this process on youtube, but it is easy. Just 5 parts water, 1 part flour (by weight) and medium heat, stirring till it thickens (149 degrees F).

This morning I mixed the dough from Karen's Kitchen in my Bosch compact. I kneaded (mostly on speed 2) for around 30 minutes total, trying to follow txfarmers instructions. I finally got something close. I shaped into 6 - 65 gram hot dog buns and 4 - 95 gram burger buns, two knotted, two not. ;-)

Soft and Fluffy.

Burger Buns close up.

Not sure how much of the texture is due to Tangzhong method vs extensive kneading.

Submitted to yeastspotting.

wayne

wayne on FLUKE's picture
wayne on FLUKE

I just made the Tartine Country Bread for a second time. I do not have a combo cooker and thought I would share my results with alternatives.

Both times I followed Chad's recipe and process carefully, but was afraid to add all the additional water the first attempt so used about half. The first attempt I did final proof in a colander lined with floured towel, pre-heated oven with Fibrament stone and baked in 8" cake pan with stainless "magic" bowl to hold in moisture. This worked OK, and had good oven spring and slashes (square pattern) opened nicely. Crumb was not as open as I hoped based on the oven spring.

For the second attempt, I decided to try my Romertopf #111 Clay Baker. I did add all the extra water and I proofed the first loaf in the clay baker and baked starting in cold oven. Since the dough is pretty slack it spread to take the shape of the clay baker in spite of my attempt to shape with good surface tension, but had nice spring and I removed the cover after 30 min (450) and baked another 25 min which gave pretty nice color.

The second loaf was retarded in floured towel in oval wicker basket (in refer inside plastic bag) for about 6 hours to fit my schedule. I let sit on the counter for about an hour before transfering to the clay baker and baking starting in cold oven. The transfer was not as smooth as I hoped as it landed a bit sideways, but I left it alone and slashed it, one long slash which again was not perfect, but I resisted the temptation to mess with it.

Again uncovered after 30 minutes. This loaf had great oven spring and since it didn't have time to settle down into the baker it was a much more attractive shape and the slash opened and created a fantastic ear. Almost as nice as some of David's (dmsnyder) :-). Really! Both loaves had nice blistered crust.

This loaf was taken to a neighbor's for dinner and served with seasoned olive oil dipping sauce. It was a big hit! Proudest moment for a home baker is to have others compliment the results.

To summarize, best results were from proofing in basket and baking in clay baker (cold oven). I will now try this technique with Teresa's Basic White Sourdough using 100%Hydration Starter

wayne

wayne on FLUKE's picture
wayne on FLUKE

My wife told me this morning that we were having Italian Sausage on pasta for dinner. I said "But I don't have any bread!" I decided to make Italian Feather Bread (which I have made quite a few times, but not lately) and try the steaming technique SylviaH described since I felt my previous steaming attempts were pretty weak. I am also using Better for Bread flour for the first time. (It is Buy One Get One Free at Albertson's this week.)

Beard on Bread - Italian Feather Bread original recipe here.

SylviaH steaming technique is described here.

Here they are in the oven, almost done.

Almost Done!

Here are the ingredients I used.

  • Better for Bread Flour  700 grams
  • Water (room temp) 414 grams (about 60%)
  • Sugar 15 grams (about 1 Tbs)
  • Instant Yeast 13 grams (about 3.5 tsp)
  • Salt 14 grams (about 2 tsp)
  • Olive Oil (EVOO) 66 grams (about 1/3 cup)

Process

  • Combine flour, water, sugar, yeast, autolyze 20 min
  • Add salt and EVOO, then knead (I did about 6 min in Bread Machine dough cycle)
  • Rise in oil coated bowl with 3 stretch and folds on the counter every 30 min.
  • Divide in half, pre-shape, rest 10 min, shape into something (see pics).
  • Place in couche, seam down. (Couche is Chicago Metalic Italian Bread Pan lined with flour coated microfiber kitchen towels.)
  • Proof for about 45 mins, preheat oven to 425 with quarry tiles in place.
  • Heat wet towels in baking dish in microwave.
  • Put dish with hot towels in oven 10 mins before bread. Add 1 cup hot water.
  • Roll loaves, one at a time onto peel, slash, mist with water and put on quarry tiles.
  • Bake at 425 for 10 mins, remove pan with towels, rotate bread, bake for another 20 min.
  • Turn off oven, leave bread in another 5-8 min.
  • Let cool on racks.

At least that is what I intended. The 2nd loaf to go in the oven stuck a little to the peel (rimless sheet pan) and was half on/half off of the tiles. I got a couple of metal spatulas and got it back on, but not very straight. Decided to leave well enough alone. Good call.

I was very happy to see the nice oven spring and opening of the slashes when I removed the towels. I am also very pleased with the look of the crust. Much better on all counts than previous attempts.

The main change I made to Sylvia's steaming method was to put all four towels in the baking dish in the microwave at once, and then tranfer the entire dish and towels into the bottom of the oven just before taking the loaves out of the couche. I added the 1 cup of steaming water when I put the bread in. I never saw much steam, but that may because it was warm and humid today in Florida.

Towels ready to go in oven

Ear and the required crumb close up, I would guess this is typical for 60% hydration?

Ear

Crumb

Sylvia, thanks for this technique, I will do it again for sure.

wayne

Submitted to YeastSpotting.

wayne on FLUKE's picture
wayne on FLUKE

My friend and former neighbor Big Al loves to cook. He gave us one of his Focaccia masterpieces a couple of years ago and it was so good I convinced him to show me how to make it. Big Al isn't into measuring much (never mind weighing to the gram like me!), but he got me started with ingredients and his process.

Yesterday was a dreary cool day in Florida so my wife decided we needed some bread to go with the soup she was going to make. If you didn't see the soup recipe for Mexican Salsa soup made with a rotisserie chicken in Parade magazine, check it out here.

Here's how it looked just out of the oven.

Focacci just out of the oven

I'll save a couple of crumb shots for later. Here is the ingredients I used.

  • Semolina Flour (Bob's Red Mill) 84 grams (1/2 cup)
  • Bread Flour 390 grams
  • Water (room temp) 360 grams
  • Sugar 15 grams (about 1 Tbs)
  • Instant Yeast 5 grams (about 1.5 tsp)
  • Salt 7 grams (about 1 tsp+)
  • Olive Oil (EVOO) 2 Tbs
  • Garlic, minced 1.5 tsp
  • Rosemary, dry 1.5 tsp
  • Kosher salt for topping

Process

  • Make a marinade from EVOO, garlic, rosemary and set aside
  • Make a sponge from Semolina, 190 gr Bread Flour, all the water, sugar, yeast and let sit covered for a couple of hours
  • Mix rest of BF into sponge, autolyze 20 min
  • Add salt and 1/2 of marinade then knead (I did about 12 min in Bread Machine dough cycle)
  • Rise in oil coated bowl with 3 stretch and folds in the bowl every 30 min.
  • At this point I refrigerated the dough for about 2.5 hrs because I wanted to time the completion to dinner being ready.
  • Removed dough from refer and bowl. Placed on oil coated 9x13 sheet pan. Started the dimpling/stretching process with fingers and covered with rest of the marinade.
  • Repeated the dimple/stretch 2 more times at 30 min intervals (See PR ABED) to get into the corners of the pan.
  • Proof for about 45 mins, preheat oven to 500.
  • Sprinkle a little Kosher salt on top
  • Bake at 450 for 10 mins, rotate, bake for another 15 min.
  • Let cool for only a few minutes, slice and EAT warm.

Here is how the crumb turned out. I was amazed at the oven spring. After all the dimpling/stretching it was not very thick when it went into the oven. Didn't use stone or steam.

It was the best looking of any higher hydration bread I have tried. I calculated the hydration to be 76%, but remember this is in the high humidity of Florida so you may need a little more water. I cut back on the flour by quite a bit from previous bakes and am glad I recorded the weights because there will definitely be a next time. Taste great, excellent mouth feel.

Focacci crumb shot

And the required crumb close up. Best holes yet.

Focacci crumb close up

A big thanks to everyone that shares on this site. I would never have been able to make this this good without all the great info from so many. Thanks

Hope you enjoy it as much as we did.

wayne

Submitted to YeastSpotting.

wayne on FLUKE's picture
wayne on FLUKE

I baked this bread for the second time and made a couple of changes. Here is the ingredient list as printed.

Buttermilk White Bread
Recipe By: James Beard in Beard on Bread

  • 2 packages active dry yeast
  • 1 tablespoon granulated sugar
  • 1/2 cup warm water (110 to 115, approximately)
  • 4 cups unbleached hard-wheat flour
  • 1 tablespoon salt
  • 3 tablespoon melted butter
  • 1 to 1 1/2 cup buttermilk

Changes I made were to use instant yeast and reduce the quantity to 1 tablespoon, next time I'll use even less.

I left out the 1/2 cup warm water and used 3/4 cup buttermilk (made from Saco "Cultured Buttermilk Blend" powder) plus 3/4 cup of non-fat milk. My 4 cups bread flour at 120 grams per cup with the 1.5 cups liquid was plenty wet enough without the water. I couldn't find anywhere that Beard defined what a cup of flour should weigh.

I also cut the salt in half and used canola oil for fat instead of butter.

I did a 20 min autolyze, then mixed in the oil and salt for a few minutes, then did a couple stretch and folds after 30 and 60 minutes and shaped after another 30. The dough more than doubled in the first 30 min. (I took out 75 gr of dough to make a small roll since last time the quantity (about 920 gr) seemed to much for my 9x5 pan.)

Dusted top with some sifted flour and proofed about 45 min which may have been a little too long as dough had not only domed above pan but was starting to hang over the edge. Fortunately that sprung up in the oven to make a nicely shaped loaf.

Baked at 375 for 40 min, removed from pan and left in the cooling oven for 8 min (on its side, as recommended by Beard).

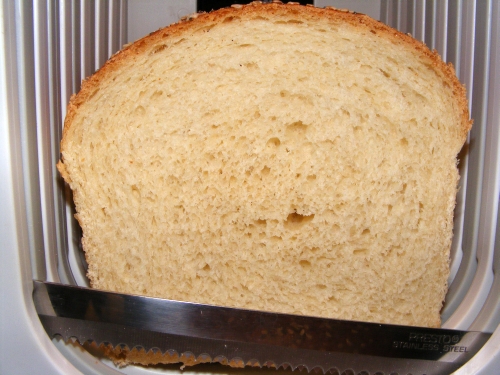
After cooling I sliced this and I can tell you it smells wonderful.

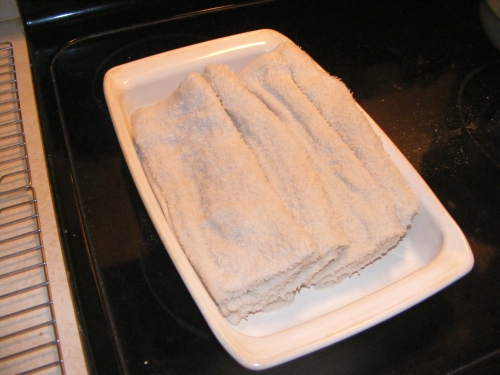
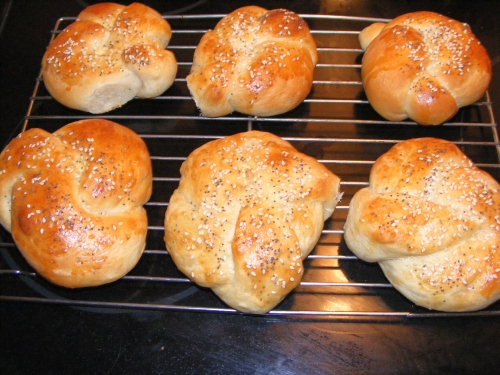
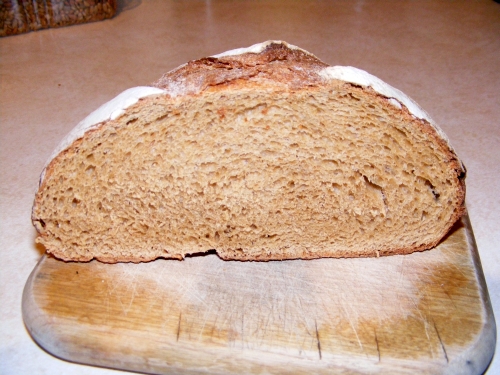
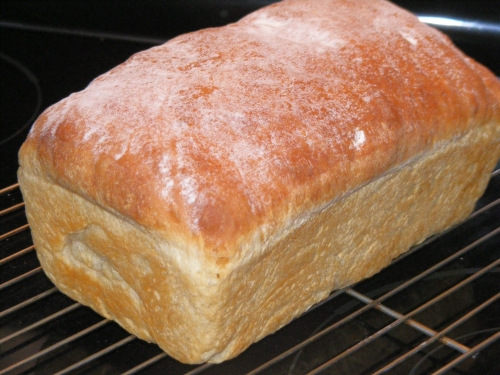
Here is the loaf cooling.

Beard Buttermilk cooling

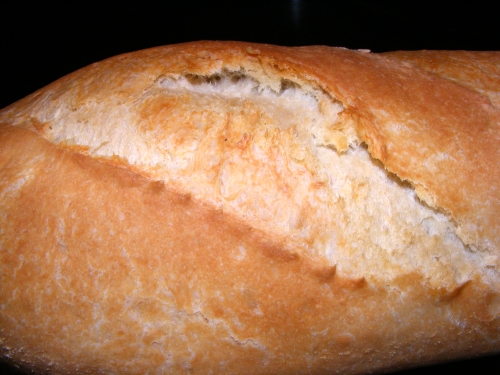
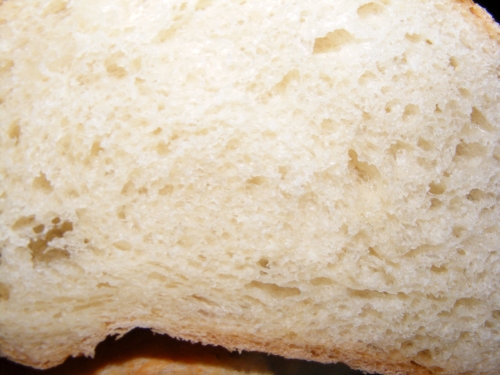
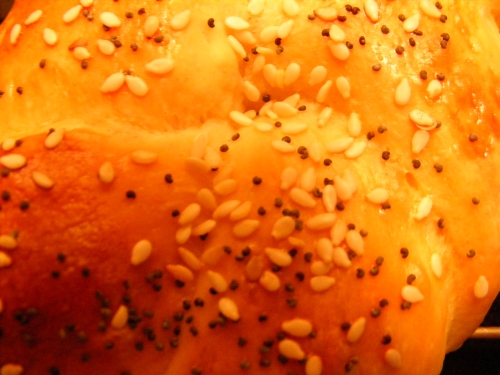
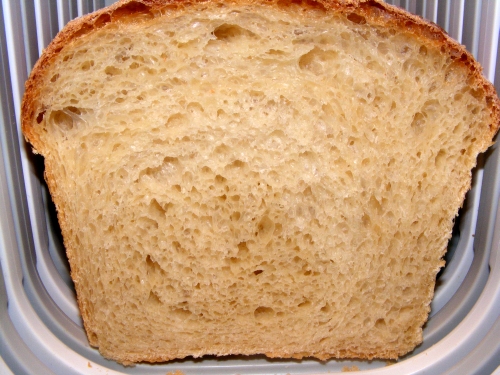
And here is the crumb close up shot. Looks good to me! Note the knife dragged some of the flour from the top down into the crumb. I didn't notice this until uploading the pic.

Beard Buttermilk crumb

I'll add a taste update after I have some for lunch.

UPDATE: Really enjoyed a sandwich at lunch. This was better with the half buttermilk half non-fat milk. I think I'll cut back the salt a little more to 1 tsp and reduce the yeast a little as well.

Submitted to YeastSpotting

wayne on FLUKE's picture
wayne on FLUKE

After having drooled over Floyd's Blueberry Cream Cheese Braid for a long time, I finally made it yesterday. I made half a batch and am glad I did. I would recommend at least 3 braids if you make a whole batch. The half batch was so big it was hanging of both ends of my 15" sheet pan. That being said, after breakfast this morning there is a big piece missing! It was great.

Changes and observations.

  1. The dough was too wet using my 120 gr/cup flour measuring, so I had to add quite a bit of flour (and I am no longer afraid of sticky dough, but this was thick batter).
  2. I mixed it in the bread machine using the dough cycle but didn't let it finish because the dough felt done.
  3. I used 1/2 of a 21 oz can of blueberry pile filling.
  4. Didn't do the overnight so I let the sponge ferment for a couple of hours and then mixed/kneaded the dough, let it more than double, then filled and shaped, rise again for about 45 min, then baked.
  5. Toppled with confectioners sugar (1 cup plus 1/4 t vanilla, 1 T milk) glaze after cooled.

This makes a beatiful presentation and has so many options for fillings. I cannot wait to try some others. This is so much better than anything I ever bought in a store.

Here is the braid after filling and shaping, ready to apply egg glaze.

Filled and Shaped

With egg glaze.

Egg Glaze

And here it is ready to bake.

Risen and ready to bake

Just out of the oven.

Just baked

Confectioners glaze.

Confectioners glazed

Crumb shot (makes me start drooling again.

Crumb shot

Crumb close up.

close up

Thank you Floyd and everyone that commented on that thread. I think I'll go have another piece. :-)

Submitted to YeastSpotting

10-01-10 update to add YeastSpotting link

wayne on FLUKE's picture
wayne on FLUKE

This is the 3rd recipe I have baked out of Peter Reinhart's Artisan Bread Every Day. I followed the recipe quite closely, choosing to go with 1 cup of buttermilk and the rest no-fat milk (from instant powdered milk). I used white sugar and canola oil for sweetener and fat. The only real change I made was to add 1 Tablespoon of Hodgson Mills Vital Wheat Gluten (first time I ever used this).

I refrigerated immediately after mixing as suggested and am glad I put it in a larger container cause it way more than doubled overnight. I made one loaf from about 900 grams of dough (9x5 pan) and 3 rolls at 75 gr and 3 rolls at 100 gr. Egg wash and seeds on everything.

Here are some pics.

Rolls

And here is a close-up.

Close Up

And an extreme close-up.

Extreme Close-Up

And now the crumb. Love my Presto slicer!

Close up.

Crumb close up

And one artistic shot (well, it is artistic for an old engineer!)

Soft Whilte artistic shot2

I will try to remember to update this with some comments on flavor and texture after we eat some. Hopefully it will be soft as decribed by Peter.

Comments always welcome, wayne

TASTE UPDATE (Sat 9/25): We had some of the rolls for lunch today for deli meat sandwiches. Very pleased with texture and taste. Will definately make these again.


wayne on FLUKE's picture
wayne on FLUKE

I recently purchased Peter Reinhart's artisan breads every day. I have been kneading by hand and wanted to try the minimal mixing, overnight cold ferment sytle recipes he provides to see what kind of rise/crumb structure I could get. We were having company for dinner last night whose diet required only whole wheat bread so I decided to make a half batch of each of the Lean Bread and 100% WW Hearth Bread. I had never made a 100% WW.

Since I can never seem to keep the variables to a minimum, here are some of the things I did different from my usual style in addition to the new recipes. We are not on the boat so I baked in a real oven that will preheat to 550 as recommended. I used quarry tiles and parchment paper and a metal baking pan for steam. I also used KA White Whole Wheat flour for the first time. I also decided to try some new shapes. I made a WW boule (inpired by David's shaping help) that I proofed in a towel lined 8" plastic bowl and decided to try some rolls for part of the Lean Bread. I made two 75 gram knotted rolls (fake Kaiser shape) and a couple of 100 gram Faux Braids (from Ciril Hitz, Baking Artisan Bread). The shaping of the Lean Bread rolls was tough because the dough was very sticky, but I stuck with it :-)

Here are the results:

Lean Bread (dusted with semolina flour)

Lean Bread

100% Whole Wheat Hearth Bread, I like the shape on the boule.

100% Whole Wheat Hearth Bread

Crumb Shot for Lean Bread. I was pretty happy with this, critiques welcome.

Lean Bread Crumb

100% Whole Wheat crumb. Is this what it should look like??

100% Whole Wheat Crumb Shot

The other big question is always taste. The lean bread was good after warming/crisping in oven before eating with pasta. The rolls were OK, a little chewy for tuna sandwhiches.

The whole wheat has a nice flavor. My wife even liked it and she doesn't like much WW. It is heavier than the white, but I assume that is to be expected. Maybe will try a variation with seeds and multigrain.

Any and all comments welcome, especially suggestions to improve.

wayne


wayne on FLUKE's picture
wayne on FLUKE

This has been a day of firsts.

  • Actually started last night by making the sponge for my "Wayne Thomas's English Muffins" and leaving it in the fridge overnight for first time.
  • Finished and cooked the muffins this morning, they look great.
  • Decided to try the #111 Romertopf clay baker (that my wife scored at a local thrift shop a couple of days ago for $6 !!) for the first time so I made a simple white bread from a recipe on http://www.fantes.com/romertopf.html called One Perfect Loaf.
  • This resulted in the first real "ear" I have managed to get (at least from one of the two slashes). I have started to slash with the double-edged razor on kabob stick thanks to this site. Some work still required.
  • I decided all these firsts were worth my first blog post.

I hope this tastes as good as it looks. It was far and away the most oven spring I have had. As soon as the bread cools I'll get a crumb shot and then post the pics. I imagine some would say this should be a little darker. I agree, but the wife likes it this way for sandwiches. Also, I am baking this in an anemic gas oven on our boat. I followed the recipe as far as soak bottom, proof in bottom, soak top, place in COLD oven. After removing the top for the last 5 mins, I realized it was never going to brown (always a problem in this oven) so I stuck it in the microwave/convection on broil for a few minutes. I think next time I'll remove the top sooner, as it was still moist inside after 45 mins (at an attempted 450+).

Comments and suggestions always welcome. Love this site.

wayne


Subscribe to RSS - wayne on FLUKE's blog