The Fresh Loaf

A Community of Amateur Bakers and Artisan Bread Enthusiasts.

Nickisafoodie's blog

Nickisafoodie's picture
Nickisafoodie

I found this 31-hour recipe on YouTube by Russ Brot, see links below.  I am very happy with the results, moist, loaded with deep rye flavor and relatively easy as long as you have the ability to regulate the various temperatures required at different stages.  The total dough weight is 2,400 grams (5.3 pounds) for two loaves.  I used one large 16” loaf pan.  Russ has many other great YouTube recipes, although many are in Russian.  The link below is for the English versions of his recipes via subtitles.  This recipe is the “Country Bread with Caraway”. 

 The recipe involves 1) a 16-hour starter build at 80 degrees, 2) a second stage build for 4 hours at 80 degrees, a scald portion for 5 hours at 150 degrees, which at the end is cooled down to 95 degrees.  Step 1 and 2 are then combined for an 8-hour fermentation at 86 degrees.  Finally, the remaining ingredients are combined for a 75-minute rise at 105 degrees.  Spray with water prior to going into the oven, and again at 20 minutes to keep the top moist.

The bake is 8 minutes at 550 degrees followed by 50 minutes at 375 degrees.  All steps are mixed by hand.  The consistency is like thick mashed potatoes.  When forming the final loaf, reserve one ounce of the mix, add water and mix well so it is like a thin paste.  This is spread on top of the loaf with a basting brush before the bake as it smooths out the surface and blends in any minor cracks or surface anomalies. I used a dough scraper to shape the final edged inward to a slight dome.  After the rise the bread had a nice subtle dome shape which is noted in the pictures.  After 90 minutes of cooling, I wrapped the loaf in several layers of plastic wrap, followed by placement in a large plastic bag.  Wait two days, then smile as you try the first bite!  The color is from the Milliard reaction, not the relatively little bit of molasses that I added.

I made the following changes, which overall are relatively subtle:

  1.          I used my 16x4x4 pan, which was a perfect size for one large loaf.  His recipe calls for two 2,400 gram loaves using an long oval shape. I used cooking spray even though my pan is non-stick.
  2.         Since I grind my own flour, I used 100% Rye (pumpernickel) as I prefer to use the whole grain rather than sifting.  The recipe calls for medium rye which has the bran sifted out.  As a result, I had to add a few ounces more water as expected, so my total weight was more like 2,450 gr each.  I went by eye for the last adjustment. Ending dough was like a very stiff mashed potato consistency.  Wearing gloves, I used the back of my fist with a dough scraper to incorporate the final dough.
  3.          I used a 100% rye sourdough starter, rather than the CLASS starter he discusses (and has a separate video on how to make what is essentially a faster way to build the starter version at 105 degrees)
  4.           I used 2 tablespoons molasses instead of the 24gr of sugar.

The recipe requires a special fermented malted rye which is only available in Germany or Russia, unless you make your own.  It is unique as the normal malting process is supplemented – and fermented by incorporating starter into the malting process. He has a fascinating video of how this is made per the second link below. I already had my own home made malted rye, not fermented as his process does.  I am very happy with the way this came out. I know it would be better using his malt technique. 

He states two requirements for this bread: 1) malted Red Rye per the link, and 2) the ability to control the various temperature ranges the various stages require.

The bread is delightful, perfect with cream cheese and with or with an added slice of smoked salmon.  My deviations were slight overall.  In the future, I will make the fermented rye malt as below and try that.  It will provide and even deeper rye nuance.  The 5 grams of Caraway added a nice back note, I may use a dash or two more in the next go around.

His YouTube videos also have Borodinsky bread, German Wheat breads and more.  All are dark and look amazing!  The recipes are shown in the YouTube section just above the comments section, all being centigrade temperatures.  Check it out. I am delighted to have come across his videos!

Recipe: https://www.youtube.com/playlist?reload=9&list=PLrSg5cYpPtU_NKto2xtoRpVtRsVs7kJq0

Rye Malt (fermented) https://www.youtube.com/watch?v=CTa19hYag4Q&list=PLrSg5cYpPtU_NKto2xtoRpVtRsVs7kJq0&index=48


Nickisafoodie's picture
Nickisafoodie

I am pleased with the way this came out (poor slashing and dull razor blade aside).  Chad Robertson's recipes require paying close attention as he spends a lot of time on each of the baking steps as part of his knowledge sharing.  The pictures provided fresh insight on steps I perhaps i missed in the past.  I hadn't made one of his recipes in a long time as the his 75% hydration can make it tricky and the loaves can come out rather flat without proper shaping techniques.

Over the past few months the recurring theme from web searches, YouTube and other recipes posted on TFL is the importance when shaping to tighten up the outer skin on both the pre-shape and final shaping cupping your hands and using a gentle sliding of the dough lightly across the countertop a few times into the ball shape. That was a critical component in getting a nice rise in the final loaves.

The recipe uses a four hour proofing period with stretch and folds every 30 minutes for two hours,with two more hours at 30 minute intervals of a more gentle S&F being mindful of not deflating.  This is followed by a  20- 40 minute bench rest which I never tried before but thought as another key step to be mindful of.  It is amazing how the dough comes together.  I used an overnight rest in the refrigerator after placing dough in the dusted banneton's, and placed in large plastic bags.  The next morning had the loaves outside of fridge for 20 minutes while heating two dutch ovens at 500 degrees then lowering to 450 once placed in oven.  The loaves did not stick as one step is to dust the bottom of the dough before flipping into the dutch oven. The loaves popped right out after cooking.  No need for parchment paper, this was a great tip as I had trouble in the past with loaves sticking.

In summary:

1) strong starter build 12 hours, refreshed twice and build to 20% of flour weight

2) gentle stretch and fold every 30 minutes for four hours, being gentle the last two hours

3) 30 or 40 minutes bench rest after pre-shaping loaves

4) Gentle tightening of final loaves with a dough scraper (like the pizza guys use to scrape the counter) achieving almost a skin like cover holding the dough into the underlying ball shape by cupping hands and pulling dough towards you.

5) My preference for overnight proofing in fridge, adds nice blisters and very slight and subtle tartness

6) Hot oven, I used 475 degree pre heat of oven and dutch oven/combo cookers - he states 500 degree preheat and bake at 450 degrees.  No steam required as sealed dutch ovens solve that.

7) Dust the bottom of the loaves so when you flip them into the dutch oven/combo cooker, the bottoms do not stick

8) Twenty minutes covered at 450 followed by 25-30 minutes uncovered.  I baked until internal was 210 degrees vs. the 215 he states in recipe.  Internal dough was moist, a nice almost gelatinous but cooked shine inside.

The basic recipe is also used on several other breads besides walnuts; herbs, olives, and more are in the book.  Will try his olive bread next  with herbs and some lemon zest.  Glad I pulled this one off of the shelf and wish I had done so sooner.

Nickisafoodie


Nickisafoodie's picture
Nickisafoodie

I have been experimenting with different ways to use my home oven for pizza.  Tonight's came out really good.  I used a baking steel about 6 inches below the top of the oven, close to the middle rack.  I used 550 F setting and also used the convection setting which often adds another 25 or so equivalent heat.  I preheated the oven for one hour.

I used my sourdough culture which I built up 3 times at 100% hydration followed by making the dough and a further two days in the refrigerator.  I used a food processor running and pulsing for 90 seconds.  King Arthur 12.7% Special Patent Flour (785gr or 96%)  I also used 33 grams or 4% of 100% whole wheat flour for the remaining).  Thus total flour of 816 gr, 3% salt, 100gr of starter, 500Gr spring water (62% hydration).  I added two tbs of extra virgin olive oil and 1 tbs of malt powder I made from sprouted wheat.  Basil on the whole pie with sausage on half.

I baked the pie for two minutes, then turned the pizza 180 degrees around and cooked for another three minutes.  The bottom crust was nice and crisp due to the baking steel, far better then I ever got with when using a stone (although stone works well overall).   I am very pleased with the result.  Next time I may cut the dough size back 10%. Each ball was 440 grams or .97 lbs each, 410gr may be better for this NY style pie.  And perhaps 10% whole wheat and 90% white.  Or as my sweetheart Liz said, it was fine the way it was!  The never ending quest for perfection!! :-)


Nickisafoodie's picture
Nickisafoodie

I recently came across a gadget that can be used to maintain starter temperatures in a rather easy way.  The LUX WIN100 is a programmable thermostat with built in sensor that also has an outlet.  It is designed for room air conditions or heaters where a constant temperature is desired.  The unit plugs in and when the desired temperature is reached, the power cuts off.  After cooling down a degree or two, it comes back on keeping a rather constant heat.

So can this be used for managing a starter at a constant temperature?  I took a large cardboard box, put the device, a 100 watt lamp, and the plastic wrapped bowl holding the starter on the room rug.  Lamp is plugged into device, and device is plugged into an extension cord coming out to wall outlet.  Simply place the box upside down on all of it with flaps open and spread out on the floor.  

The unit was on the floor next to the bowl. The sensor worked surprisingly well!  I periodically tested the culture with my laser thermometer and it was accurate to within 1-2 degrees.

Rather than caught up in trying to time multiple stages at multiple temperatures, it is far easier to use the “hold” function, and set to the desired temperature and it takes about 2 second to set to another temperature.

For my 55% Detmolder Rye Bread method, I built the starter as follows:

Freshen: 5 hours at 79°, followed by the basic sour at 76° for 18 hours, followed by full sour at 86° for 4 hours, with bulk fermentation and proofing at 82°.  This certainly will work for single stage.  So not as pretty as a commercial proofing chamber, it is cheap and easy. 

The unit costs about $35 online, but can be as high as $65 so shop around if you wish to find one…

Nickisafoodie's picture
Nickisafoodie

On Christmas eve I made 3 pounds of  dough for two large batard loaves intending to bake Christmas morning after overnight refrigerator proofing.  In the morning I went to preheat and the electric ignitor that starts my gas oven was broke and it didn't come on!  I wasn't sure if I could freeze the dough at this point.  I was targeting 72% hydration rather than a more typical 75% for a Tartine bake as I would be baking on a stone rather than in a dutch oven and looking to keep dough from spreading too much.  Plus the KAF patent flour I use seems to have a high moisture content with 72% coming working well in past recipes using this flour. 

Flour was 5.5% rye (100% hydration rye starter which made up 6.4% of the recipe), 10% semolina (ground the day prior) and 84.5% King Arthur patent flour (high protein, from a 50 lb bag - have never seen this in 5 pound bags).  Salt was 2%.  I originally intended to coat with sesame seeds and make two 1.5 lb batards. 

Plan B: pizza dough:  Given the 72% hydration is a level I have used for pizza dough and successfully kept in the refrigerator from 3 to 5 days, I thought this would be a good plan B.   Hoping for the best, I divided the dough into four pieces and place individually in lightly oiled containers.  For pizza dough, 3-5 days of refrigerated fermentation works well for optimal flavor and rising power, but have not ever gone longer. 

I ordered the new ignitor part and 5 days later my oven was up and running.   The $15 part ($22 with expedited shipping)  and an easy 15 minute fix was worth the wait compared to the repairman's $200 quote.  And by the way, three different web sites had the same part for for $75 so it pays to shop around...

So last night I made my 7 day old dough pizza.  You could see lots of holes in the dough while looking at it thru the plastic container.  I left the dough out for 90 minutes before starting.  This is a wet dough so I gently stretched to about 8'' size, let rest for 10 minutes and stretched to the final 14" size.  I made sure there was enough flour on the bottom to not stick, while preserving a rather moist dough otherwise.  I used semolina on the peel.  I used my thick soapstone stone which takes 90 minutes to preheat (to 600 degrees as outlined in a prior post).  The pie cooked in 3 1/2 minutes.  The tray above is where I let it rest after removing from the stone.

Surprise number one was how nice and fluffy the baked pizza was.  I thought the long fermentation may have broken down some of the rising ability/cell structure of the dough.  Surprise number two was very flavorful, but not sour or even tart (although I like sourdough more on the full flavor side).  Likely due to the starter being only 6.4% of the recipe compared to 20% or more in a sourdough bread recipe and a 39° refrigerator temperature.  But the flavor was excellent, slightly complex and the high hydration did allow the dough to become slightly gelatanized inside similar to some of the Tartine breads.  It was one of the best pizzas I have ever made.

So a very happy outcome all around and finding that a week in the refrigerator worked out surprisingly well.  And the holiday spiral ham?  Well while the oven didn't work, the broiler did as it uses a different element/burner at the top of the oven.  Wrapped the ham/pan in heavy foil, placed on low shelf, and removed foil after one hour.  Applied glazed and put under broiler for another 10 minutes.  The broiler flame carmelized the ham nicely and Christmas dinner was not only salvaged but came out very well.  Now I need to remake my original recipe and bake those batards!

Happy New Year to all...


Nickisafoodie's picture
Nickisafoodie

I came across the following link/article on Lactobacillus San Francisco posted in 2004 by Mark Preston on a site called “Danger! Men Cooking!”  http://dangermencooking.blogspot.com/2004/10/i-promised-to-write-about-fermented.html

The article describes how over several weeks one could replicate the SF Sourdough culture started by Isadore Boudin himself in 1849.  And be able to maintain it locally with minimal effort after the initial series of builds and at the recommended temperature for various steps.

This article is fascinating because many posts on TFL and the web in general say that any culture purchased or created will eventually assume the characteristics of the bacteria naturally present on the wheat, i.e. being local to where the wheat was grown.  Or that over time it assumes the characteristics of the wild bacteria present in the bakery/household in which the culture is maintained. Or a combination of both, which to me seems to be plausible- i.e. that once started from say a purchased culture, you cannot maintain it.  Is in fact that assumption correct?

The author says otherwise referencing a $192 technical book “HANDBOOK OF DOUGH FERMENTATIONS by Karel Kulp and Klaus Lorenz. (NY: Marcel Dekker, c.2003), some 328 pages long.  The book is listed on Amazon: http://www.amazon.com/Handbook-Dough-Fermentations-Science-Technology/dp/0824742648

To quote: “Well theories on that point differ radically. Some say the microorganisms are wild and floating around in the air. Others speculate that the quality of the flour has much to do with the fermentations. I have read a serious scientific paper on the quantity of lactobacillus microorganisms being greater on wheat near humanly populated areas than wheat in less populated areas. Another research paper says that there are about 400 types of microorganisms in a fermenting loaf. Other papers say that the sanfranciscensis microorganism is about 36% of that 400, that is to say, by quantity it predominates, naturally. So the question becomes how to nurture those San Francisco organisms along and not get anything bad going. That's what the Handbook of Dough Fermentations is all about. The piece of information lacking was to not make bread after two to three or four days, but that the starter needed about two to three weeks of refreshments. And it needed specific amounts of water and flour and at very specific intervals.”

Boudin is the oldest sourdough bakery in San Francisco. Mr. Boudin came from a village along the Swiss French border. The boat trip across the ocean allowed no baking so it likely took weeks of feeding to establish the culture. The Boudin Bakery still uses the same starter and the production method at the bakery also has to be taken into account.  I can honestly say it is the best sourdough that I have ever tasted and a must stop attraction for those visiting the Wharf in San Francisco.

My homemade culture using fresh ground rye has thrived for years.  Over time I have come to have a better understanding of some of the variables that we control to target a given bread style. These variables combined with the fermentation times and temperatures allows for an infinite range of bread styles – from a hardly noticeable and not desirable sour (baguettes) to the high levels typical in Northern/Eastern Europe as in Polish, Czech, German or Russian ryes. 

The essential elements are by controlling the buildup for a given bake in terms of:

1)       Intervals between feedings/buildup

2)       Percentage of starter used in the final recipe

3)       Temperature during the builds

4)       Hydration levels of the starter ranging from stiff to very loose (75% to 150%, each giving a different characteristic).

5)       Fermentation time and temperature of the dough

Yet as good as they are, the taste is not that of Lactobacillus Sanfranciscensis.  Should I be happy?  Yes.  Yet the pursuit of bread perfection is never achieved and continues!

The feeding cycle expansion from the initial start point is 312,500 times!  And the feeding cycles alternate between 8 and 16 hour cycles and follow specific temperature guidelines.  The author says after a few weeks you will have it.  Note: regarding the build table shown, there is a typo in the row that shows 12,500 water – the flour amount should be 10,000 not 1,000. 

In summary, a very interesting read that represents one approach that surely is not the final word on the subject.  There are many articles on the web regarding Lactobacillus sanfranciscensis and Candida milleri, likely counter to some of the points raised in the post.  This is leading me to do more research and explore other information on the web regarding this infamous grouping of complementary bacterias.  

I would also like to hear from people that may have purchased the SF cultures and whether or not they evolved over time to something other than when started?  That would seem an easy way to start if in fact one could maintain it so it doesn’t evolve away going forward.   Thanks to all…

Nickisafoodie's picture
Nickisafoodie

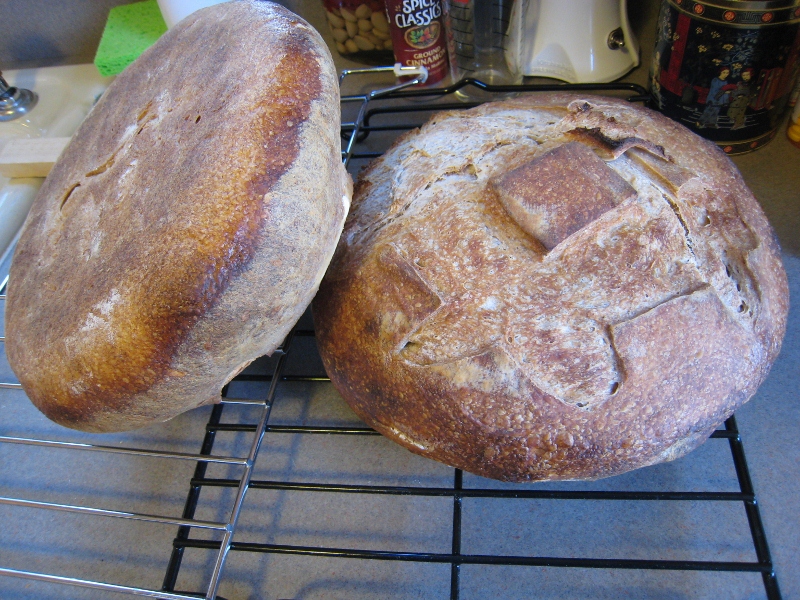
Sourdough Rye with Seeds – cast iron bake

First, thanks to Eric Hanner for this post providing inspiration to explore covered cast iron cooking recently:  http://www.thefreshloaf.com/node/21006/my-combo-cooker-experiment.  This is my second bake with cast iron and I like the results!  Flavor and texture were awesome!

I already owned a 5 qt Wagner Dutch oven with a glass lid that has been in the family as long as I can remember.  The diameter is the same as the 3 qt. Lodge combi cooker - the higher capacity of the Wagner being due to taller height.  So I had vessels that would allow two similar sized loaves to be baked at once- albeit with one having glass and one having cast iron cover.  Both loaves came out identical


Sourdough Rye Recipe for two loaves (2,066gr or 2.3 lbs prior to baking)

Overall Formula:

60% bread flour (697gr)

25% fresh ground whole wheat (293gr)

10% fresh ground whole rye (114gr)

5% Oat bran (I tend to add to all of my breads for health reasons - 58gr)

23 grams sea salt

20 gr molasses (approx 2 tbs)

10 gr malted wheat powder (approx 2 tbs) – sprouted, dried and ground into flour (malted barley would substitute)

40 gr mixed seeds: Flax, charnushka/black caraway, sesame, poppy seeds (approx 4 tbs)

72% hydration ratio: 834gr water including starter build up.


Build Stages:

1.      Stage 1 - build rye starter (100% hydration) to 228 grams (11% of recipe).  This uses all of the rye flour.

2.      Stage 2 – add 293gr of whole wheat, 58gr oat bran, 38 gr white bread flour, all of the seeds, 389gr water.  This approximates 39% of the total formula.  When combined with Stage 1 equates to 50% of the total recipe.  Let proof 8 hours at 78° (oven off light on gets works well).

3.      6pm: incorporate remaining ingredients other than salt.  40 minute autolyse.

4.      Add salt, mix 6 minutes on low speed.

5.      Stretch and fold 3 times at 45 minute intervals.  Keep at 78° between folds.

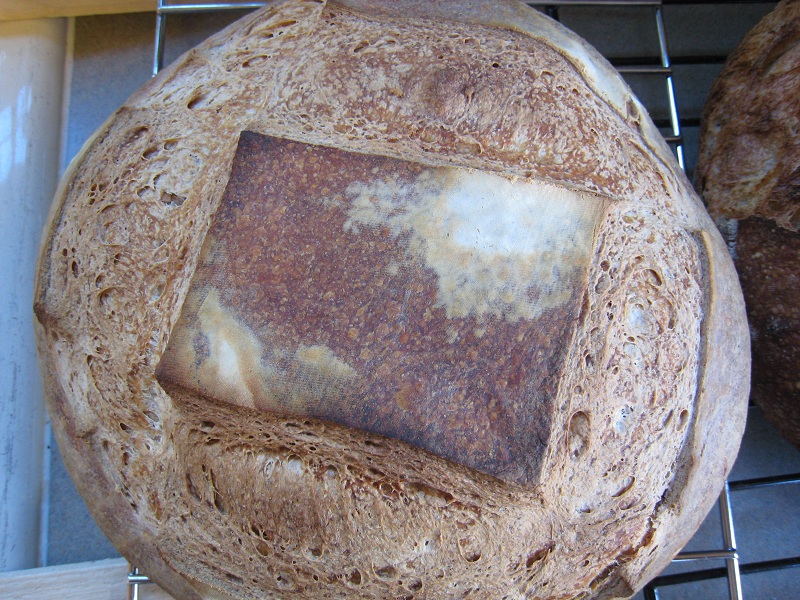
6.      10:00 pm: Preshape loaves, rest 25 minutes, shape into final loaf and place in floured banneton (actually: $1.50 colander from the dollar store lined with a microfiber dinner napkin and lightly dusted with flour- micro fiber wicks away moisture and releases fine with modest dusting)

7.      Place in plastic bag, leave overnight in refrigerator.

8.      Preheat oven 1 hour at 500° - include Dutch ovens and lids

9.      Plop dough into hot vessels, spray with water, score, and cover.  In they go.

10.  Reduce heat to 450° after 5 minutes

11.  Remove cover after 30 minutes

12.  Baked another 5 or so minutes until internal temp is 195°.  Shut oven until internal bread temp was 202°. 

Note: While the loaves came out nice, the crust is not rock hard as Eric was striving for and as was pointed out in his post/link above.   While my crusts were not rock hard after a 30 minute cover, I am still happy with the outcome.  

Perhaps next time I will leave the temp higher and in the oven longer to see what impact that has on the crust. And not spray dough after putting into Dutch ovens?  Or perhaps shut the oven sooner and leave until 210° or so internal?  Any suggestions on that elusive crust would be appreciated!

Nickisafoodie's picture
Nickisafoodie

Boule covereduncovered on left


I made one large 7 pound recipe for two loaves (Hamelman's "Vermont Sourdough with Increased Whole Wheat").  Given they were 3.5 lbs each I baked one at a time. Both were retarded 13 hours in the fridge (okay, one was 12 and one was 13 hours) then placed directly on the hot stone after slashing, steam used first 12 minutes.

The first loaf used a large stainless bowl covering for the first 15 minutes of baking.  When removing the bowl some of the dough stuck to the side and pulled away, but it finished nice and the tear is not too noticable.  Thus my decision to bake the second loaf without the bowl - a big mistake (on the left in the first picture and in the single shot picture). 

You can see how the bowl made the first loaf on the right better looking with tiny bubbles and a nice crust.  The "mistake loaf" on the left and bottom has a dull looking crust in addition to a demarcation line about one inch up the side and all over the bottom which essentially matches the look and sheen of the crust from the first covered loaf.  The better looking blisters and color must be from the heat of the stone which can be seen when looking at the side of the loaf.   The top part of the uncovered loaf in the second picture doesn't have the nice color and tiny bubbles on the skin that the covered one has. 

I expect them both to look and taste the same when they cut on Thanksgiving- but visually speaking (and poor slashing technique aside) the loaf on the right looks much better.  So my take away is to stay with a covered loaf going forward. 

One other thought that surprised me: the oven spring was better on these breads coming right out of the refigerator and into the oven than those of the past where I would take them out one hour to warm up at room temp while the oven was preheating.  The chilled dough seems to not spread out to lower height and wider loaf by keeping the pent up energy intact until released by the heat - resulting in a higher rising loaf than otherwise. 

Happy Thanksgiving all...

Nickisafoodie's picture
Nickisafoodie


Pizza baked home at 650 degrees


Ever since reading about Jeff Varasano and his obsession for the perfect pizza I find myself regularly revisiting his sight and learning more every time: http://www.varasanos.com/PizzaRecipe.htm  The sight is highly educational and a fun read and recommended by many other Fresh Loaf posts.  There is lots to learn from this sight including dough hydration (very wet), hot oven (how to modify yours at your own risk!), flour types, use of a starter and several days of cold fermentation, dough technique, aspects of creating a superior sauce, homemade mozzarella, toppings, and pizzeria ratings and technique, technique and more technique.

His holy grail is a 2-3 minute pie at 850-950 degrees - obtained in his home oven by rigging the cleaning cycle to stay on such ovens being designed to reach up to 1000 degrees to burn off any spills.  I have made very good pizzas at 550 degrees in my oven baking at 7 minutes or so.  I easily rigged my oven as Jeff did.  As others on this site have said proceed at your own risk and every kitchen should have a fire extinguisher near.  I am very happy with a 4 minute pie at 650-700 degrees rather than seeking 850-900 degrees (someday).  Preheating to 650-700 can take 80-90 minutes and longer to get to 800 plus temp.  Use of an inferred thermometer nails the temp.  After all is said and done I find the higher temp pie to be far superior to pies coming out of a standard 550 degree max oven, even though I have made some very good pies in a standard oven with stone.

If you get past the angst of the oven, then the trick is to use dough that is very wet as it can stand up to the heat and still be crisp on the outside and moist on the inside.  My experience has been that an 80-85% hydration works well.  And following Jeff’s method of storing in portion sized plastic containers in the refrigerator from 3-5 days to give the dough superior flavor.  After trying his technique for dough mixing many times I was not getting the proper dough development.  I found this YouTube video “That's Alotta Ciabatta! Start to Finish” http://www.youtube.com/watch?v=v24OBsYsR-A which shows how to make 90-95% hydration Ciabatta using the flat beater for most of the mixing and eventually to the dough hook.  Having used this technique several times, I can say it is the way to go on high hydration dough and achieving the window pane effect.
My recipe is simple: Build Starter: 120 grams total consisting of 60 grams of rye and 60 grams of water (note: you can use 100% white flour.  I prefer having up to 20% divided evenly among whole wheat and rye which adds a subtle flavor profile.  And my starter is 100% rye).  After five hours to build to peak activity add the following: 60 grams (10%) whole wheat 472 grams (80%) bread flour 410 grams water 15 grams of salt (2.5%, higher than the typical 1.75% for bread) 3 grams of yeast (.5% given the use of starter) Total 1,080 grams, enough for three 12”-14” pizza rounds at 360 grams each See links above for mixing technique (YouTube) and storage on Jeff’s site.  The sights are worth a look for any baker using high hydration dough, and pizza lovers.  Jeff has opened his own pizza place in Atlanta, Ga which seems to be getting great reviews.  His story of a passion that turned into his business calling is very interesting.  I found it inspiring to read and learn as we all do when sharing our experiences…


Nickisafoodie's picture
Nickisafoodie

As my baking evolves I am drawn more towards hearty rye sourdough breads in the northern European style.  I also like big and bold flavors that complement the rye and sour nuances of the bread. 

Thus my spur of the moment decision to also add the following to my 2.5lb loaf:

1 tbs fresh ground black pepper

2 tbs red pepper flakes (pizzeria type)

1 tbs fresh diced rosemary

1 tbs Greek Oregano

2 tbs sesame seeds

1 tbs nigella seeds (black caraway used in Russian Rye breads)

2 tbs flax seeds

1 tbs poppy seeds

The bread itself is 25% whole rye and 40% whole wheat (both fresh ground), bread flour for remainder.  My rye starter (100% hydration) was in full force by 5pm.  I added rye and whole wheat to make my basic sour which was approx 50% of the recipe plus all of the seeds. 

After 5 hours of fermenting I added the herbs and remaining ingredients targeting 68% hydration.  30 minute autolyse then mixed until gluten was developed.  There was only one stretch and fold given the high percentage of rye and my preference for developing the gluten early via the mixer in this style of bread. 

After kneading there was a 10 minute rest followed by pre-shaping and another 10 minute rest.  Shape into boule’, place in linen lined basket, cover top and place into a plastic bag.  Let rest overnight in refrigerator for an 8 hour fermentation.  The next morning I removed from refridgerator for the hour it takes to preheat oven and stone.  Baked at 470 degrees for 10 minutes with steam, then reduce oven to 430 degrees for another 50 minutes until internal temperature of 198 degrees. 

Note: Bread rose nicely in refrigerator.  However I didn’t flour my peel properly resulting in some deflation in getting the bread off of the peel.  And I butchered the slashing.  The crumb developed nicely and you can see the red pepper flakes and seeds if looking closely.

The bread is very complex due to the herbs, rye, seeds and sour, and additionally has a nice kick given the red pepper!  Simple can be best, but in this case the herbs and seeds compliment it well. The sour element was pleasantly noticeable and not lost.  Deep rich rye flavor which would go well sliced thin with cream cheese on smoked salmon.  Or with your favorite omelet... 


Subscribe to RSS - Nickisafoodie's blog