The Fresh Loaf

A Community of Amateur Bakers and Artisan Bread Enthusiasts.

Blogs

DanAyo's picture
DanAyo

The following are links to our Community Bakes

Below are tips & ideas that you may find useful. 
You can use THIS LINK to view all tips in a web browser.

For those in the US, the History of King Arthur Flour Company is very interesting and historic.

Although not listed as a tip, the links below may prove interesting for some.

Miscellaneous Blog Post

A compilation of my bakes during a Community Bake


I am trying to use a Table of Contents for my BLOG. Links to blogged bakes will be posted to this page. I plan to post a link to this page on all BLOG bakes, experiments, tips, Community Bakes, etc..

gabev50's picture
gabev50

thank you all for taking the time to read this lengthy post and any feedback is very much appreciated.

  • i have been baking a ton of bread the last 4-6 months and i have learned a lot, but am still struggling to execute really good fermentation. 
    • this last bake (naturally leavened) i pushed fermentation to the max (for me, at least): 40% inoculation, 10 hrs of total fermentation. the first 3 hours the dough temp was 85, then i let it coast for 6 more hours at room temp (RT 68). it was nearly tripled in volume so, thinking it was overproofed, i gently shaped it and only let it proof an hour before i baked it in a hot oven with steam.
    • the final crumb of this loaf was the same as all other previous loaves. open crumb near the very edge, but tight everywhere else. not great oven spring, a little heavy for its size, but great color. i feel like ill know overproofed when i see it. this still feels very characteristic of underproofed.


  • lastly, i’ve been working on some cinnamon raisin bread but still underproofing. bulk was great at 6hrs but the final proof was 3hrs (thinking it was ready!) at RT (68-69). bread came out lacking good oven spring, it felt heavy, and the crumb is very tight and weirdly dry on the inside. really showing how slow fermentation can be when the bread is enriched with egg, butter, sugar, and cinnamon.
  • sorry for no pictures, i dont know how to condense the photos from my phone so they can fit on the blog post.
  • my two questions after these two bakes are:
    • am i overlooking the affect of room temperature on fermentation time  (68 is pretty chilly)
    • is my starter just naturally sluggish and, is there a way to train it to work faster or, do i now need to develop the recipes/schedule based on how the starter performs 
ReneR's picture
ReneR

As I had posted in reply to cfraenkel, this Easter I tried  to make a Greek sweet Easter bread that has eluded me so far in terms of a successful bake. 

They haven't been a disaster, but also not what I had tried and liked so much. 

It has a very particular flavor thanks to a combination of ground cherry seed powder (mahleb) and ground up dry mastic resin. It also has a very characteristic texture/crumb, more stretchy, chewy, and moist rather than with big bubbles and airy. 

After substantial research online, even from Greek YouTube videos/sites, I decided to try a yeasted poolish recipe I cobbled together from a variety of different sources.  

Two key insights I tried to incorporate in the bake that were new and I felt might provide that missing something from the previous attempts:

  1. Build the dough up in successive stages going from more to less liquid, at each stage of the process
  2. Bake in a reducing temperature oven

The recipe for one loaf was as follows:

Poolish: 100g milk mixed with 100g strong white flour, 5g of sugar, and commercial yeast according to how long the poolish can be left to fully ferment. I had a timeframe of about 3h, so used 1g of active yeast powder. For fresh compressed yeast that would be 2g.   

Once the poolish has doubled in size and is very active (after about 3h), I combined it with the ingredients for the intermediate dough, which was as follows:

250g (of a final total of 300g) of strong white flour, 2eggs, 100g of sugar, a pea size piece of the dried mastic ground up with a mortar and pestle with a little of the sugar and mahleb powder, some orange zest (optional) and 40g of soft butter cut into small pieces.

I mixed the poolish, flour, sugar, eggs, and spices first, let it fully hydrate, and then mixed in the soft butter.

The resulting sticky and high hydration dough was then left to again at least double in size. (it took me about 4-5h). Some recipes also add a little more yeast at this stage to get it all moving faster, but I chose to take a slower less yeasted approach.

Once the intermediate dough is fermenting strongly and doubled in size, it is time to combine with the remaining flour in order to produce a much firmer dough that is easy to handle. I started mixing in a little at a time with dough whisk and once it was firm enough to kneed, I then proceeded by hand. As soon as it has reached this stage, I continued adding a little flour at a time, until I had a dough that was just firm enough to not stick too the kneading surface. I found that this was pretty much exactly at the 300g total without counting the flour in the poolish. 

With my first bake (picture bellow), I then left the resulting final dough to bulk ferment until I got a descent poke test, but what I found was that by then, it was too slack to be able to shape/braid easily and then also hold its shape, so I put the resulting loaf in a baking tin and let it ferment till almost double in size and then baked in a 'falling' oven. So heat to 200C with fan, change to 200C bottom only for 10min once the tin was in, then reduce to 180C bottom and top for 10min, and finish, at 160C for 10min, again bottom and top. The top of the loaf was brushed with eggwash before putting it in the oven and topped with almond slivers.

Tsoureki 1Tsoureki 1 crumb

The second bake (pictured at the top of the post), was pretty much the same, but what I did instead was not bulk ferment the final firm dough, but proceed to braiding straight after it had relaxed for about 30min from the kneading.

The shaping takes the following process: cut the final dough into 3 using the dough scraper. It's important to weigh and make sure they are as equal weight as possible. Flatten out, either by hand or using a rolling pin, and then roll up into a kind of sausage shape. Do the same with the other lumps of dough. Then, starting with the first one, roll it out by hand into a kind of long thin snake shape and then do the same with the other two, making sure they are as similar length and thickness.

With the 2nd bake, once I made the 3 dough lengths and braided them into a loaf, I left the resulting loaf on a baking tray lined with baking paper and covered with a wet towel for about 6h to rise ahead of the bake. 

Once the loaf seemed to be nice and plump, but not too soft (it is important not too let it ferment too much as it becomes like brioche/cake and not chewy/stringy) , it is time to bake. I found the poke test not really much use, just the plumpness of the braids.  I started the oven heating up to 200C with fan, and then did the first eggwash. I then did one more before putting it in, sprinkling, the 2nd time with sugar and the almond slivers. Put it in and switched to 200C bottom only for 10min, then 180C for 10min top and bottom, and finished with 160C top and bottom. 

The 1st bake was OK, the crumb was not bad, but it was too much like a brioche/cake rather than the more chewy tsoureki. The shaping/bradding was problematic, and making it in a tin, while a good emergency measure, took away the nice look of the stand-alone loaf.

The 2nd bake, was almost right. Going directly from final dough to shaping without bf really worked well. The baking is where the final tweak is needed. Warming the oven to 200C was OK, but probably should have then reduced to 180C for the 10min bottom only stage, and then moved a shelf up for the two top and bottom stages but at 160C and 140C respectively. 

I'll provide updates as to how these last tweaks worked out. 

The Roadside Pie King's picture
The Roadside Pi...

I pretty much have this one down pat. I am now working on an unfed l, overnight room temperature ferment style.

It's the early bird that catches the worm.

Bake off protocol initiated.

1. Preheat sequence - T Minus 30 minutes to completion.

2. Pre bake visual fermentation inspection ✅

95-100% of full fermentation achieved. 

3. The flip ✅

4. The Slash ✅

5. The Load ✅

6. Initiate steam injection ✅

Now we wait...


My goodness, how good fresh bread smells in the morning!

The crumb reveal


aly-hassabelnaby's picture
aly-hassabelnaby

Hey everyone,

I've posted another recipe on my website, this time for a pocket-style barley bread we have in Egypt. This one was slightly challenging to produce a full pocket with barley flour since it doesn't contribute any gluten. Pocket formation seems to depend on a strong gluten network and I managed to get enough strength in the dough by using 50% wheat and 50% barley while pushing my oven to its maximum temperature.

Check out the recipe here: Egyptian barley bread recipe

Let me know if you've tested it and how it turned out. Have you tried using barley flour before in baking? There seems to be little information here on The Fresh Loaf about barley flour.


Benito's picture
Benito

My second go at this bread that uses sweet rice flour (aka glutinous rice flour) in the tangzhong.  Read my previous blog post for details as to why this type of rice flour is especially good as a tangzhong and prolonging the freshness of bread.  You’ll recall that this rice flour is also used to make mochi, which I have made before and it also delicious so it is a good thing to have around if you like Asian treats.

For this bake I fixed the hydration error that I made last time that prevented me from shaping the dough as I had intended.  I’m much happier with this bake.  I haven’t sliced it yet so I’ll post those photos and flavour/texture comments later.

For one 9x4x4” Pullman pan loaf.


Instructions

Levain

Mix the levain ingredients in a jar or pyrex container with space for at least 300% growth. 

Press down with your knuckles or silicone spatula to create a uniform surface and to push out air.

At a temperature of 76-78ºF, it typically takes up to 10-12 hours for this sweet stiff levain to be at peak.  For my starter I typically see 3-3.5 times increase in size at peak.  The levain will smell sweet with only a mild tang.


Tangzhong 

In a sauce pan set on medium heat, stir the milk and glutinous rice flour until blended. Then cook for several minutes until well thickened, stirring regularly with a spoon or heat-resistant spatula. Let cool in the pan or, for faster results, in a new bowl.  Theoretically it should reach 65ºC (149ºF) but I don’t find I need to measure the temperature as the tangzhong gelatinizes at this temperature.  You can prepare this the night before and refrigerate it, ensure that it is covered to prevent it from drying out.


If you plan on using a stand mixer to mix this dough, set up a Bain Marie and use your stand mixer’s bowl to prepare the tangzhong.


Dough

In the bowl of a stand mixer, add the milk (consider holding back 10 g of milk and adding later if this is the first time you’re making this), egg, tangzhong, salt, sugar and levain.  Mix and then break up the levain into many smaller pieces.  Next add the flour.  I like to use my spatula to mix until there aren’t many dry areas.  Allow the flour to hydrate (fermentolyse) for 20-30 minutes.  Mix on low speed and then medium speed until moderate gluten development this may take 5-10 mins.  You may want to scrape the sides of the bowl during the first 5 minutes of mixing.  Next add room temperature butter one pat at a time.  The dough may come apart, be patient, continue to mix until it comes together before adding in more butter.  Again, knead until well incorporated.  You will want to check gluten development by windowpane during this time and stop mixing when you get a good windowpane.  You should be able to pull a good windowpane.


On the counter, shape the dough into a tight ball, cover in the bowl and ferment for 2 - 4 hours at 82ºF.  There should be some rise visible at this stage.


You can next place the dough into the fridge to chill the dough for about 1.5 hours, this makes rolling the dough easier to shape.  Remember, if you do so the final proof will take longer.  Alternatively, you can do a cold retard in the fridge overnight, however, you may find that this increases the tang in your bread.


Prepare your pans by greasing them with butter or line with parchment paper.  


Lightly oil the top of the dough. Scrape the dough out onto a clean counter top and divide it into four. I like to weigh them to have equal sized lobes. Shape each tightly into a boule, allow to rest 5 mins. Using an oiled rolling pin roll each ball out and then letterfold. Turn 90* and using a rolling pin roll each out to at least 8”. Letterfold again from the sides so you have a long narrow dough. Then using a rolling pin, roll flatter but keeping the dough relatively narrow.  The reason to do this extra letterfold is that the shorter fatter rolls when placed in the pan will not touch the sides of the pan.  This allows the swirled ends to rise during final proof, this is only done for appearance sake and is not necessary.  Next roll each into a tight roll with some tension. Arrange the rolls of dough inside your lined pan alternating the direction of the swirls. This should allow a greater rise during proof and in the oven.


Cover and let proof for  4-6 hours at a warm temperature.  I proof at 82°F.  You will need longer than 4-6 hours if you chilled your dough for shaping. I proof until the top of the dough comes to within 1 cm of the top edge of the pan.


Preheat the oven to 350F and brush the dough with the egg-milk wash.  Just prior to baking brush with the egg-milk wash again.


Bake the loaves for 50 minutes or until the internal temperature is at least 190ºF, rotating as needed to get even browning. Shield your loaf if it gets brown early in the baking process. After 50 mins remove the bread from the pan and bake a further 10 mins by placing the loaf directly in the oven on the rack with the oven turned down to 325ºF.

pmccool's picture
pmccool

Sometimes you get the bear.  Yes, really.  After a number of recent thoroughly edible but not very interesting bakes, I finally have one that gets me excited.

Sure, I could have let the final ferment go a bit longer but ... I'm getting ahead of myself.

We got home last Friday from a 3.5 week trip to Australia, New Zealand, and Fiji.  Which was absolutely wonderful, by the way.  We are happy to be back home and sleeping in our own bed after 15 flights and 11 different hotels. 

Before leaving, I had fed my starter twice.  The second feeding was extremely stiff, almost like a biga or bagel dough, since I wanted it to have enough food during our prolonged absence.  Upon returning, I gave it two more feedings just to ensure that it was at full strength.

Since we needed bread, I cast about for ideas and this bread was the one that caught my eye. 

The rye sour and the hot soaker were mixed Saturday evening.  Since I was out of sunflower seeds, I substituted chia seeds in the soaker. 

On Sunday morning, I mixed the dough.  What with the rye sour, the soaker, and the honey in the dough, I was happy to use my mixer to do the work instead of mixing and kneading by hand.  As Mr. Hamelman notes, the dough had ample gluten development in spite of all of the seeds and it was rather sticky.  I chose to cut the yeast in half, knowing that I would be away from the house for a couple of hours.  That worked well to keep the dough from over-fermenting while I was out. 

Once the dough was near doubled in volume, it was divided and shaped into three loaves; each slightly more than 1.5 pounds pre-bake weight.  These were placed on a baking sheet, dusted with rye flour, and covered with plastic wrap for final fermentation.  When they were about 75% of the way toward doubling, I preheated the oven.  Once the oven was up to temperature, I poured water in the steam tray, slashed the loaves, and popped them into the oven.  Per instructions, the oven was turned down from 460F to 450F after the first 10 minutes. 

The slashes opened beautifully, forming sharp ears as the loaves expanded.  The crust is a beautiful deep brown with russet notes and is rather thick and hard.  The interior is moist and cool and crunchy/chewy with all of the seeds from the soaker.

So, yeah, maybe a longer final ferment would have led to a more open crumb.  I'm still happy with the outcome, though.  And, it didn't drip any mayonnaise on my lap while I enjoyed a turkey sandwich for lunch today.

Paul

ReneR's picture
ReneR

It has been a massive source of frustration for me that, despite being able to produce pretty descent sourdough loaves, I have abjectly failed, so far, to make any remotely good pizzas and focaccias.

Even as a kid I remember trying to make pizzas and being so massively disappointed with the biscuity results. 

Every time I would come across some new technique or method that seemed to me to provide some kind of logical 'fix' for what I was thinking the underlying problem might be, I would try it, but still, that elusive soft and puffy but at the same time crunchy base would elude me.  

My Italian wife, eager to prevent my next disappointment, would tell me that it was not my fault and that without a proper pizza  oven no one can make descent pizza, that's why in Italy everyone buys them from the pizza shop!

But still, despite the recurring disappointments, my baker's curiosity (and pride) would never let me give up, much to my family's growing impatience with my, in their eyes, futile attempts. 

I was becoming more and more convinced that the problem was not in the dough or its shaping, but the oven and baking and finding a way to make the home oven mimic a proper pizza oven, even if it cannot reach the kind of temperatures a pizza oven can reach.

The latest 'hack' for how to do this, which rekindled my flagging but not entirely lost enthusiasm/curiosity, was a YouTube video by some Italian guys (Malati di pizza) who come up with and try all sorts of ways for making pizza at home.

The basic idea behind their most successful bake in a home oven was to create in the top of a home oven, a separate oven section in which a pizza oven could be simulated. They used two pizza stones (one thick ceramic, the other a thinner more stone like) on the top but one oven rack in the oven, to completely separate the upper chamber from the rest of the oven. The stones needed to reach to the very walls of the oven, both on the sides and from back to front, so as to create a high temperature section at the top with the temperature at the bottom part being much lower. They even disconnected the oven thermostat probe from the top of the oven and let it hang down into the lower chamber.

The idea was to use the grill-only function to heat the top artificial chamber to a much higher temperature than the normal range of the oven and then bake the pizza on the extremely hot stone and close to the grill, simulating the way pizza ovens work.

Defying the groans and rolling of eyes of my family when I told them that ' this time it would come out nice' I decided to give it a try. Made a 3h poolish with active yeast powder and then a 70% hydration final dough with all-purpose flour that was left to become super active and given many S&Fs and laminations in the process. I was not committed enough to move the temperature probe, but was able to create a mini sub-chamber in the top of the oven using some leftover tiles from some home decorating that were the right size to form a wall-to-wall ceramic base for the sub-chamber and cracked up the temperature of the oven to max on grill-only function and left it to warm for a long time, until it switched off (I assume at the top temperature of the oven). Meantime, I formed the base, brushed with EVO, chopped up some tomatoes from a tin, and mixed with some salt, pepper, and oregano and left the base to rise on some tin foil. Once the oven was at the highest temperature it would go to and switched off, I spread the tomato on to the base and put it into the, by now, very hot upper chamber. Put the timer for 5min and chopped up some mozzarella to sprinkle on top once the tomato had dried a little. 

I could see it all growing and puffing up almost as soon as I put it in and by the time I opened the oven to put the mozzarella on, the base and tomato looked really great. 3min later (8min in total), I took it out and let it cool on the chopping board before cutting it, bit into the slice I had just cut and ... there it was! An almost perfect home baked pizza that had so long eluded me! The picture shows what it looked like. 

Despite the good appearance, the family were still skeptical, to say the least, but as soon as they had bitten into the first slice, they all started to nod and smile and grudgingly admitted: 'this time you have finally got it'! My teenage son then proceeded to eat the entire remaining pizza himself! 

I have to say, it was a really nice feeling! These breakthroughs are what make me like baking so much I think. When, after all those experiments and disappointments one finally produces a successful result, it is a really good feeling. 

Of course, now the task of optimization begins! I think a slight tweaking of the temperature trajectory will yield an even better results. It was a little too pale underneath, so I think I will let the tiles warm up much longer at full temperature and then reduce the oven temperature a little (220C?) after I put the pizza in so it cooks slightly more underneath before the top is ready. But, apart from that, I am pretty sure that this will work from now on.


Benito's picture
Benito

For my first bake back home in Toronto I wanted to experiment with my sweet rice flour (glutinous rice flour which is gluten free of course).  I had read in Serious Eats the following which I found quite informative and interesting.

“ …the presence of a scald makes a bread far more resistant to staling than dough made without one. More accurately known as starch retrogradation, staling is the reversal of gelation, where the water in the starches gets pulled out of them, causing the starches to crystallize and harden. The more water in a bread, the longer it takes for the starches to retrograde. (Stale bread seems dry, but it isn’t necessarily, at least not initially. The starches have crystallized in a stale bread, but the water may still be hanging around nearby; this is the reason that toasting stale bread can restore some of its original tenderness.)

Which brings me to sweet rice flour. As I mentioned above, starch is made up of two types of molecules: amylose and amylopectin. Amylose molecules are long chains of glucose linked together, with only a few branches hanging off the central chain here and there. Crystals form most readily when the molecules in question can stack together neatly. Because amylose molecules are mostly straight chains, they are especially prone to crystallizing as food cools. (This is why long-grain rice, which contains around 20% amylose, becomes especially hard and brittle when refrigerated.) Meanwhile, amylopectin molecules are highlybranched, making them unable to stack together and crystallize as efficiently.


The starches in wheat flour are 28% amylose and 72% amylopectin, which makes it a less-than-perfect choice for a flour scald—one of the big benefits of using a flour scald is it slows staling, but wheat flour has a healthy dose of staling-prone amylose. Sweet rice flour, on the other hand, is nearly 100% amylopectin, making it ideal for using in a scald—especially if you want the bread to stay soft for as long as possible.

Another advantage to using sweet rice flour instead of wheat flour in a scald: It’s much easier to make. The standard tangzhong method has bakers combine flour and cold water (usually in a 1:4 ratio) until it is uniform. Bakers then cook the mixture on the stovetop until it gels. While this is an effective technique, it is—simply put—a pain in the ass, as it’s challenging to get the sticky paste out of the pan and into the dough completely.

I use a technique similar to the yudane method, where I pour boiling milk over glutinous rice flour and sugar and whisk the mixture until it thickens to a pudding-like consistency. Unlike the traditional yudane method, though, I use much more flour than is typical—20% of the total weight compared to the 5 to 10% most shokupan recipes contain—and instead of bread flour, I use sweet rice flour for all the reasons mentioned above. I also use a different ratio of 1 part flour to 3 parts liquid. This approach produces a smooth, thick gel easily and quickly, with no lumps in sight.”


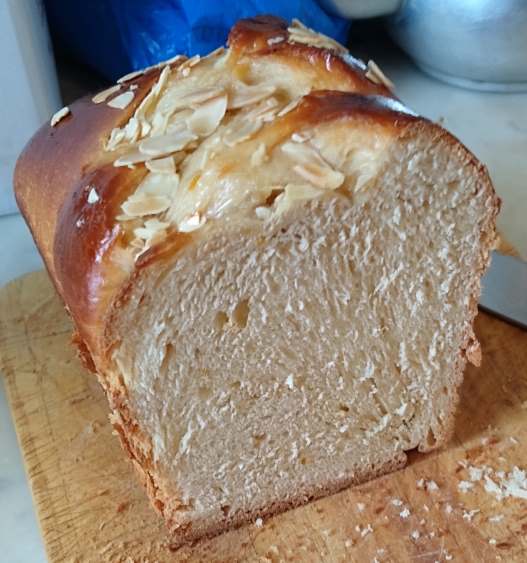
For my bake I wanted to try using the sweet rice flour in the tangzhong but prepared as I usually do with a 1:2 ratio to the milk.  Unfortunately I made an error with hydration and the resulting dough was much higher in hydration than I wanted and thus I couldn’t shape it with the four lobes.  Also, the rising bread had a blow out on one side above the rim of the pan.  This could have been avoided by doing a score which I seldom do when I bake enriched doughs that are egg washed.  

For one 9x4x4” Pullman pan loaf.


Instructions

Levain

Mix the levain ingredients in a jar or pyrex container with space for at least 300% growth. 

Press down with your knuckles or silicone spatula to create a uniform surface and to push out air.

At a temperature of 76-78ºF, it typically takes up to 10-12 hours for this sweet stiff levain to be at peak.  For my starter I typically see 3-3.5 times increase in size at peak.  The levain will smell sweet with only a mild tang.


Tangzhong 

In a sauce pan set on medium heat, stir the milk and glutinous rice flour until blended. Then cook for several minutes until well thickened, stirring regularly with a spoon or heat-resistant spatula. Let cool in the pan or, for faster results, in a new bowl.  Theoretically it should reach 65ºC (149ºF) but I don’t find I need to measure the temperature as the tangzhong gelatinizes at this temperature.  You can prepare this the night before and refrigerate it, ensure that it is covered to prevent it from drying out.


If you plan on using a stand mixer to mix this dough, set up a Bain Marie and use your stand mixer’s bowl to prepare the tangzhong.


Dough

In the bowl of a stand mixer, add the milk (consider holding back 10 g of milk and adding later if this is the first time you’re making this), egg, tangzhong, salt, sugar and levain.  Mix and then break up the levain into many smaller pieces.  Next add the flour.  I like to use my spatula to mix until there aren’t many dry areas.  Allow the flour to hydrate (fermentolyse) for 20-30 minutes.  Mix on low speed and then medium speed until moderate gluten development this may take 5-10 mins.  You may want to scrape the sides of the bowl during the first 5 minutes of mixing.  Next add room temperature butter one pat at a time.  The dough may come apart, be patient, continue to mix until it comes together before adding in more butter.  Again, knead until well incorporated.  You will want to check gluten development by windowpane during this time and stop mixing when you get a good windowpane.  You should be able to pull a good windowpane, not quite as good as a white flour because the bran will interrupt the windowpane somewhat.  Add the seeds, then mix again until they are well distributed.


On the counter, shape the dough into a tight ball, cover in the bowl and ferment for 2 - 4 hours at 82ºF.  There should be some rise visible at this stage.


You can next place the dough into the fridge to chill the dough for about 1.5 hours, this makes rolling the dough easier to shape.  Remember, if you do so the final proof will take longer.  Alternatively, you can do a cold retard in the fridge overnight, however, you may find that this increases the tang in your bread.


Prepare your pans by greasing them with butter or line with parchment paper.  


Lightly oil the top of the dough. Scrape the dough out onto a clean counter top and divide it into four. I like to weigh them to have equal sized lobes. Shape each tightly into a boule, allow to rest 5 mins. Using an oiled rolling pin roll each ball out and then letterfold. Turn 90* and using a rolling pin roll each out to at least 8”. Letterfold again from the sides so you have a long narrow dough. Then using a rolling pin, roll flatter but keeping the dough relatively narrow.  The reason to do this extra letterfold is that the shorter fatter rolls when placed in the pan will not touch the sides of the pan.  This allows the swirled ends to rise during final proof, this is only done for appearance sake and is not necessary.  Next roll each into a tight roll with some tension. Arrange the rolls of dough inside your lined pan alternating the direction of the swirls. This should allow a greater rise during proof and in the oven.


Cover and let proof for  4-6 hours at a warm temperature.  I proof at 82°F.  You will need longer than 4-6 hours if you chilled your dough for shaping. I proof until the top of the dough comes to within 1 cm of the top edge of the pan.


Preheat the oven to 350F and brush the dough with the egg-milk wash.  Just prior to baking brush with the egg-milk wash again.


Bake the loaves for 50 minutes or until the internal temperature is at least 190ºF, rotating as needed to get even browning. Shield your loaf if it gets brown early in the baking process. After 50 mins remove the bread from the pan and bake a further 10 mins by placing the loaf directly in the oven on the rack with the oven turned down to 325ºF


This bread is exceptionally soft and the next day after slicing it was still as fresh textured as the first.  Now whether this is completely related to the much higher hydration than I usually use or the sweet rice flour I don’t know as both are likely to have affected this.  I’ll have to do another bake with the hydration corrected.  However, the tangzhong was easy to incorporate and easy to make and it was a good use of the sweet rice flour that I already had in my cupboard.  I will definitely make the updated version of the bread.

JonJ's picture
JonJ

This bread ticks a whole bunch of health check-boxes for me and my ravenous teenager who is into healthy eating - whole grain, not wheat, and lots of fibre from seeds.

Foodgeek (Sune Trudslev) has a great description of this recipe with a matching video. He even has some fun suggestions of toppings you can use to make open sandwiches (smørrebrød) including, of course, smoked eel.

The high amount of seeds in this bread (90%) are what make it so special, bringing in some flavour, and a lot of chew and fibre. I prefer to use pumpkin seeds and rye kernels as per the original recipe, but practically it is not always possible to have enough seeds on hand and for this bake I'd run out so used a mix of seeds from the cupboard; this bread is still delicious with whatever is available.


There are variations of Danish rye, for example, this Stanley Ginsberg Danish rye recipe seems to only have about 20% in seeds, and possibly a more sour taste to it.
I take care when making this bread to keep the rye sponge fairly 'sweet' and I like to give it a final build 3-5 hours before using it in the final dough for this reason. The levain was made over 3 builds to achieve the 166% hydration sponge. Build 1 was 5g sweet stiff wheat starter:50g dark rye flour:50g water. Build 2 was the above:160g dark rye:160g water. Build 3 was the above:125g dark rye:344g water and 540g of this was used in the final dough when it was 3 hours old. Of course, there are lots of ways to make the levain and two alternatives are offered with the original recipe.

Sune's instructions for knowing when to bake is when the bread has risen 30-50% in the pan and there are 6-7 pinhead sized holes on top. I'd tend to agree with that, although for this bake the rye flour was super active and had reached the top of the pans after only 3 hours with many pinholes; consequently they were baked a little earlier than was usual and had some minor cracking on the top but otherwise I think the fermentation was spot on.

And, for this bake, inspired by Lance I tried painting on flour paste and starch washes to get some "glanz" on these breads, which sort of worked, they looked prettier than normal but I doubt you'd notice it unless you were looking carefully.

Besides the open sandwiches, this bread is great toasted and with a lot of butter. The Dane's have a special word for the tooth marks you leave behind when the butter is super thick, it is tandsmør ("tooth butter").
These breads are sweet and dense with a highly satisfying mouth feel, and I highly recommend this recipe if you love 100% rye or not.


Pages

Subscribe to RSS - blogs